The blog of dlaa.me

Posts tagged "WPF"

sudo localize & make me-a-sandwich [Free PseudoLocalizer class makes it easy for anyone to identify potential localization issues in .NET applications]

I've previously written about the benefits of localization and shown how to localize Windows Phone 7 applications. The techniques I describe in that post constitute a good workflow that's just as suitable for WPF and Silverlight desktop applications! But even with good processes in place, the way localization is done in the real world has some challenges...

You see, localization can be expensive: hiring people to translate an entire application, re-testing it in the newly supported locale, fixing resulting bugs, etc.. So teams often wait till near the end of the release cycle - after the UI has stabilized - to start localizing the application. This is a perfectly reasonable approach, but there are invariably a few surprises - usually some variation of "What do you mean that string is hard-coded in English and can't be translated??". It sure would be nice if teams could do some kind of low-cost localization in order to identify - and fix - oversights like this long before they turn into problems...

Yep - that process is known as pseudo-localization. What pseudo-localization does is create alternate versions of resource strings by using different characters that look similar enough to the original English characters that text is still readable - but obviously "localized". (This is one of those "a picture is worth a thousand words" moments, so please check out the Wikipedia article or bear with me for just a moment...) Additionally, because some languages tend to have longer phrases than English (German, I'm looking at you!), there's often an additional aspect of string lengthening to simulate that and help detect wrapping, clipping, and the like.

Aside: It's important to remember that the character "translations" are chosen exclusively on the basis of how similar they look to the original character and not on the basis of linguistic correctness, cultural influence, or anything like that!


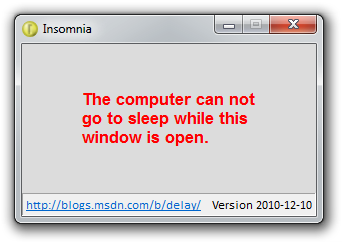
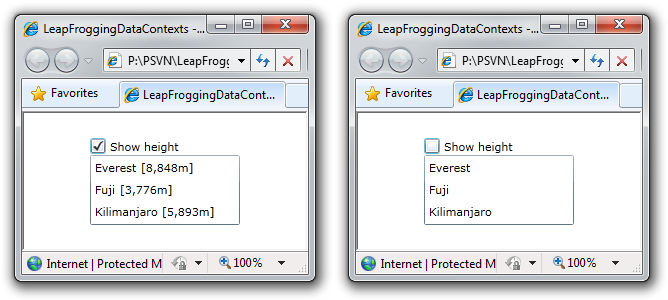
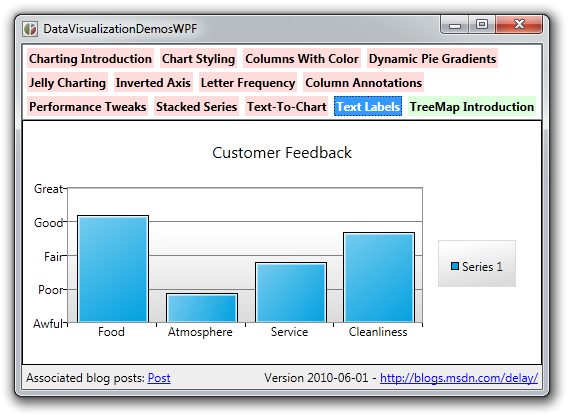
Here's the sample application I created for this post running in its normal English mode. (It's not very sophisticated, but it's good enough for our purposes.) Can you tell if all the strings are properly localizable? Are there any other localization concerns here?

Normal application


Pseudo-localization isn't a new concept and there are a variety of tools out there that do a fine job of it. However, none of the ones I found during a quick search appeared to be free, simple to use, and unencumbered by restrictions (i.e., licensing, distribution, etc.). So I thought it would be fun to write my own and share it with the community as open source under the very permissive Ms-PL license. :)

The class I've created is called PseudoLocalizer and it automatically pseudo-localizes standard .NET RESX-based resources. Using RESX-based resources is the recommend approach for building localizable Silverlight and Windows Phone 7 applications, the recommended approach for building localizable Windows Forms applications, and also a perfectly fine approach for building localizable WPF applications.

Aside: The recommended technique for localizing WPF applications is actually something else, but I have some issues with that approach and won't be discussing it here.


I've said it's easy to use PseudoLocalizer: all it takes are three special steps:

  1. Add the (self-contained) PseudoLocalizer.cs file from the sample download to your project.

  2. Add the following code somewhere it will be run once and run early (ex: the application's constructor):

    #if PSEUDOLOCALIZER_ENABLED
        Delay.PseudoLocalizer.Enable(typeof(ProjectName.Properties.Resources));
    #endif
  3. Add PSEUDOLOCALIZER_ENABLED to the list of conditional compilation symbols for your project (via the Project menu, Properties item, Build tab in Visual Studio).

Done! Not only will all localizable strings be automatically pseudo-localized, but images will, too! How does one pseudo-localize an image?? Well, I considered a variety of techniques, but settled on simply inverting the colors to create a negative image. This has the nice benefit of keeping the image dimensions the same (which is sometimes important) as well as preserving any directional aspects it might have (i.e., an image of an arrow pointing left has the same meaning after being "localized").

Aside: I've never seen image pseudo-localization before, but it seems like the obvious next step. Although many images don't need to be localized (ex: a gradient background), some images have text in them or make assumptions that aren't true in all locales (ex: thumbs up means "good"). So it seems pretty handy to know which images aren't localizable! :)


Okay, let's see how well you did on the localization quiz! Here's the sample application with PseudoLocalizer enabled:

Pseudo-localized application

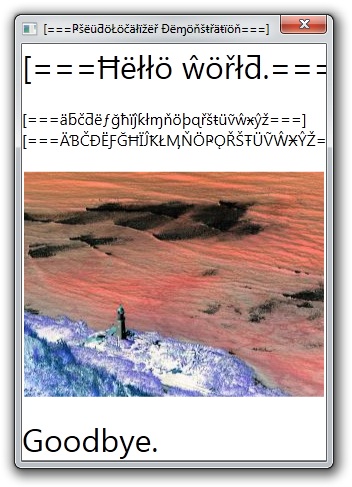
Hum... While it's clear most of the text was correctly localizable (and therefore automatically pseudo-localized), it appears the lazy developer (uh, wait, that's me...) forgot to put one of the strings in the RESX file: "Goodbye" is hardcoded to English in the XAML. :( Fortunately, the image is localizable, so it can be changed if necessary. Unfortunately, the fixed-width application window seems to be a little too narrow for longer translations (like German) and is clipping two of the pseudo-localized strings! Nuts, I'm afraid this application may need a bit more work before we can feel good about our ability to ship versions for other languages...


[Click here to download the complete source code the PseudoLocalizer and the WPF sample application shown above.]


Notes:

  • What I've described in this post works only on WPF; Silverlight has a couple of limitations that prevent what I've done from working exactly as-is. My next blog post will discuss how to overcome those limitations and use PseudoLocalizer on Silverlight, too!

  • The way PseudoLocalizer works so seamlessly is by examining the type of the generated resource class and using (private) reflection to swap in a custom ResourceManager class for the default one. This PseudoLocalizerResourceManager works the same as the default one for loading resources - then it post-processes strings and bitmaps to provide its pseudo-localization effects. Private reflection (i.e., examining and/or modifying the internal data of an object) is generally a bad practice - but I tend to believe it's acceptable here because the target class is simple, its (generated) code is part of the project, and PseudoLocalizer is only ever going to be used as a development tool (i.e., never in a released application).

  • For readers who want a brief overview of how to use RESX-resources in WPF, here you go:

    1. Set the Access Modifier to "Public" in the RESX designer so the auto-generated resource property accessors will be accessible to the WPF data-binding system.

    2. Create an instance of the auto-generated RESX class (typically named "Resources") as a WPF-accessible resource:

      <Window.Resources>
          <properties:Resources x:Key="Resources" xmlns:properties="clr-namespace:PseudoLocalizerWPF.Properties"/>
      </Window.Resources>
    3. Create a Binding that references the relevant properties of that resource wherever you want to use them:

      <TextBlock Text="{Binding Path=AlphabetLower, Source={StaticResource Resources}}"/>
  • Because RESX files expose images as instances of System.Drawing.Image and WPF deals with System.Windows.Media.ImageSource, I wrote a simple IValueConverter to convert from the former to the latter. (And it's part of the source code download.) Using BitmapToImageSourceConverter follows the usual pattern for value converters:

    1. Create an instance as a resource:

      <delay:BitmapToImageSourceConverter x:Key="BitmapToImageSourceConverter" xmlns:delay="clr-namespace:Delay"/>
    2. Use that resource in the relevant Binding:

      <Image Source="{Binding Path=Image, Source={StaticResource Resources}, Converter={StaticResource BitmapToImageSourceConverter}}"/>


Because the cost of fixing defects increases (dramatically) as a product gets closer to shipping, it's important to find and fix issues as early as possible. Localization can be a tricky thing to get all the kinks worked out of, so it's helpful to have good tools around to ensure a team is following good practices. With its low cost, simple implementation and friction-free usage model, I'm hopeful PseudoLocalizer will become another good tool to help people localize successfully!

No rest for the weary [Free tool and source code to temporarily prevent a computer from entering sleep mode - now available for .NET, 32-bit, and 64-bit!]

It was over a year ago that I wrote and shared the first version of my Insomnia utility. A few months later, I published a new version of Insomnia to satisfy the two most popular feature requests. Here's how I explained Insomnia's motivation at the time:

The default power settings for Windows are set up so a computer will go to sleep after 15 to 30 minutes of inactivity (i.e., no mouse or keyboard input). This is great because a computer that's not being used doesn't need to be running at full power. By letting an idle machine enter sleep mode, the user benefits from a significant reduction in electricity use, heat generation, component wear, etc.. And because sleep mode preserves the state of everything in memory, it's quick to enter, quick to exit, and doesn't affect the user's work-flow. All the same applications continue running, windows stay open and where they were, etc.. So sleep mode is a Good Thing and I'm a fan.

However, sometimes a computer is busy even though someone isn't actively using the mouse and keyboard; common examples include playing a movie, burning a DVD, streaming music, etc.. In these cases, you don't want the machine to go to sleep because you're using it - even though you're not actually using it! So most media players and disc burners tell Windows not to go to sleep while they're running. In fact, there's a dedicated API for exactly this purpose: the SetThreadExecutionState Win32 Function.

But what about those times when the computer is busy doing something and the relevant program doesn't suppress the default sleep behavior? For example, it might be downloading a large file, re-encoding a music collection, backing up the hard drive, or hashing the entire contents of the disk. You don't want the machine to go to sleep for now, but are otherwise happy with the default sleep behavior. Unfortunately, the easiest way I know of to temporarily suppress sleeping is to go to Control Panel, open the Power Options page, change the power plan settings, commit them - and then remember to undo everything once the task is finished. It's not hard; but it's kind of annoying...


I've gotten a bunch of positive feedback on Insomnia and heard from a lot of people who use it for exactly the kinds of things I expected. (Thanks, everyone!) But I've also heard from a number of people who use Insomnia for a slightly different purpose: as an override of their machine's current power settings. For one reason or another, these people don't have control over their power configuration (perhaps because their domain enforces the relevant group policy), but still want to prevent their computer from going to sleep. This is usually because they want to connect to their machine remotely (ex: via file sharing or Remote Desktop) and can't do that if the machine is forced to sleep...

Insomnia application

These people tend to put a shortcut to Insomnia in their Startup group (click Start Menu, All Programs, Startup) and set the "Minimize" flag to automatically run Insomnia as an icon in the notification area whenever they log in. Because they leave Insomnia running all the time, their computer stays awake and they're able to use it whenever they need to. I've always thought this is a cool scenario - and felt that maybe a lower-overhead version of Insomnia would be particularly compelling here.


I wrote the original Insomnia using the .NET Framework - which meant it was super-easy to write and took practically no time or effort on my part. That's the way (uh-huh, uh-huh!) I like it, because the thing I have the least of is spare time and so anything that makes me more productive is full of win. And in my experience, .NET isn't just more productive, it's dramatically more productive.

That said, everything has a cost, and one of the common downsides of .NET is longer startup time and higher memory use. All the stuff .NET does for you (comprehensive APIs, high-level abstractions, garbage collection, etc.) takes extra time to load and extra memory to keep around. That said, I'll confidently suggest these costs are negligible in the majority of cases and the benefits of .NET (developer productivity, rich feature set, security, etc.) are overwhelmingly in its favor. But Insomnia is a little different than most programs: the application exists only as a wrapper for a single API (SetThreadExecutionState), so the people who run it all the time aren't really benefitting from the power of .NET...

Insomnia minimized to the notification area

I thought it might be fun to re-implement Insomnia in native code (vs. managed code) since it was such a simple program. I've done exactly that - and the result is that Insomnia is now available in three versions: .NET, 32-bit native, and 64-bit native!


[Click here to download all three flavors of Insomnia along with the complete source code for managed and native.]


Of course, while it was neat to do some Windows API coding for a change, the experience served to reinforce my belief in the fundamental productivity benefits of .NET and the power of the WPF/Silverlight layout system. About half the code in native Insomnia exists for the purpose of layout - which the .NET version accomplishes much more succinctly with XAML. The other half of the code handles basic framework-y stuff like creating a window, configuring it, etc. - more things WPF handles for you or makes quite convenient. And the last half of the code [ ;) ] deals with a variety of little things that are quite simple in the managed world, but require non-trivial effort in native code (ex: copying strings, setting up a complicated function call, etc.).

Please don't get me wrong; I completely agree that native code has its place in life (and there's a certain feeling of power one gets from using it). But I've had enough of that for now and will be happy to return to .NET for my next project. :)


Notes:

  • The most common question I get about Insomnia is whether it also disables the screen saver - it does not. When Insomnia is running, the screen saver will continue to kick in and turn off the monitor on its usual schedule. The difference is that the computer itself will not be allowed to enter sleep mode. Once the Insomnia window is closed, the computer can sleep again and will do so on its usual schedule.

  • The second most common question I get is why the Insomnia window stays above other windows. As I explained in the introductory post, this is so Insomnia is always visible when running and people will be less likely to accidentally leave their computers sleep-less by forgetting they've started it. This seems like the right behavior for the original "temporarily prevent sleep mode" scenario; for the "always on" scenario, minimizing Insomnia to the notification area seems to work well for everyone I've talked to.

  • My goal for the native version of Insomnia was to duplicate the functionality of the .NET version as closely as possible - not because I think the .NET version is perfect, but because it works well and it's what people are already familiar with. So while I wasn't obsessive about matching the font face and size exactly, a side-by-side comparison of the two programs shows a very strong correlation. :)

  • The one thing I didn't port from the .NET version was the "/minimize" command-line switch. Originally intended to make it easy for users to start Insomnia minimized, commenter rbirkby reminded me that Windows shortcuts already made that easy enough. It didn't seem necessary to duplicate this somewhat unnecessary feature, so I've omitted it to keep the native version just a bit simpler.

  • To start Insomnia minimized, just create a shortcut to it (right-click+drag+drop its icon somewhere (like the Start Menu / All Programs / Startup folder) then edit the shortcut's settings (right-click it and choose Properties) and choose "Minimized":

    Shortcut to start Insomnia minimized

    Alternatively, the following syntax will do the same thing from a batch file:

    start /MIN Insomnia.exe
  • Because the whole point of this exercise was to reduce Insomnia's run-time footprint, it's interesting to see how things worked out. Here's a table of the Resource Monitor statistics for each flavor as measured by opening and minimizing them all on my 64-bit Windows 7 machine:

    Flavor Commit (KB) Private (KB)
    .NET 66,972 17,940
    64-bit 2,144 1,876
    32-bit 1,652 1,332

    (Note that the .NET version uses somewhat less memory on a 32-bit version of Windows 7.)

  • Not only do the native versions of Insomnia use less memory - they start faster, too! Because they have fewer dependencies, there's simply less stuff to load from disk - and because disk access is (relatively) slow, minimizing it can do a lot to improve startup speeds.

  • Something that made life a little more pleasant for the native version was the SysLink common control - specifically its LM_GETIDEALSIZE message. This message is used to "Retrieve[s] the preferred height of a link for the control's current width." and it enabled me to approximate something kind of like WPF's measure/arrange-based layout system without having to write a bunch of code myself. So while I'd originally thought to use SysLink only for the hyperlink (duh!), I ended up using it for the version text and message as well!

  • As you'd expect, the Visual Studio solution/project for the new, native version of Insomnia uses the Visual Studio 2010 format. However, the solution/project for the original, managed version is still in the 2008 format I originally released it in (of course, opening it in VS 2010 automatically "upgrades" it).

Hash for the holidays [Managed implementation of CRC32 and MD5 algorithms updated; new release of ComputeFileHashes for Silverlight, WPF, and the command-line!]

It feels like a long time since I last wrote about hash functions (though certain curmudgeonly coworkers would say not long enough!), and there were a few loose ends I've been meaning to deal with...

Aside: If my hashing efforts are new to you, more information can be found in my introduction to the ComputeFileHashes command-line tool and the subsequent release of ComputeFileHashes versions for the WPF and Silverlight platforms.


When I first needed a managed implementation of the CRC-32 algorithm a while back, I ended up creating one from the reference implementation. Thanks to the strong similarities between C and C#, the algorithm itself required only minimal tweaks and the majority of my effort was packaging it up as a .NET HashAlgorithm. Because HashAlgorithm is the base class of all .NET hash functions, the CRC32 class ends up being trivial to drop into any .NET application that already deals with hashing.

ComputeFileHashesWPF

The Silverlight platform doesn't include an implementation of the MD5 algorithm like "desktop" .NET does, and I soon ended up creating an MD5 implementation from the reference code so I could support that algorithm on Silverlight (and now Windows Phone, too). Again, the C algorithm translated to C# fairly easily - though there's quite a lot more code for MD5 than CRC32 - and the HashAlgorithm base class makes it easy to reuse. Over the next few days, I made a couple of minor revisions to the CRC32 and MD5Managed classes, but have otherwise left things alone. I've used ComputeFileHashes successfully ever since, and things seemed to be in a pretty good state.


Then one day kind reader Maurizio contacted me (from Italy!) to report a bug in my CRC32 wrapper: there was a missing variable in a loop that could lead to problems if someone passed a non-0 value as the inputOffset parameter of TransformBlock. Fortunately, this isn't a particularly common scenario - the "primary" overload of ComputeHash doesn't do it, none of my ComputeFileHashes code does it, and most typical scenarios probably won't do it, either. That said, a bug is a bug (is a bug), and I made a note to fix it when I got a chance... And I finally had that chance last week! :)

C:\T>ComputeFileHashesCL.exe ZeroByteFile.txt

C:\T\ZeroByteFile.txt
100.0%
CRC32: 00000000
MD5: D41D8CD98F00B204E9800998ECF8427E
SHA1: DA39A3EE5E6B4B0D3255BFEF95601890AFD80709
SHA256: E3B0C44298FC1C149AFBF4C8996FB92427AE41E4649B934CA495991B7852B855
SHA384: 38B060A751AC96384CD9327EB1B1E36A21FDB71114BE07434C0CC7BF63F6E1DA274EDEBFE76F65FBD51AD2F14898B95B
SHA512: CF83E1357EEFB8BDF1542850D66D8007D620E4050B5715DC83F4A921D36CE9CE47D0D13C5D85F2B0FF8318D2877EEC2F63B931BD47417A81A538327AF927DA3E
RIPEMD160: 9C1185A5C5E9FC54612808977EE8F548B2258D31


And as long as I was already messing with the ComputeFileHashes code (which meant recompiling for each platform, re-packaging, uploading, etc.), there were a few other things I decided to take care of at the same time. And it's just as well - in the process of doing so, I discovered (and fixed) a seemingly obscure bug in MD5Managed (which I suspect has never been hit in real life). Along the way, I added the complete suite of .NET HashAlgorithms to each tool so you'll automatically get the results of every supported algorithm when you hash a file!


ComputeFileHashes has been a fun project and a nice demonstration of how .NET lets you run the same code across a wide variety of environments and platforms. And the comprehensive automated test framework I added this time around makes me feel better about the correctness of these two HashAlgorithms. I deal with hashes regularly and have found all flavors of ComputeFileHashes to be handy tools to have around - especially the Silverlight version which brings simple, lightweight, install-free hashing to nearly every machine in the world. :)


[Click here to download the complete source code for the command-line, Silverlight, and WPF implementations of ComputeFileHashes along with the new test project.]

Click here or on the image below to run ComputeFileHashes in your browser with Silverlight 4:

ComputeFileHashesSL

Note: Bookmark the link above for easy access to hashing anytime, anywhere, on any machine!


Here are the major changes since last time:

  • CRC32 bug fix: HashCore was not adding the ibStart offset in its for loop. This is the issue Maurizio reported and would affect all scenarios where a non-0 value was passed for ibStart.

  • MD5Managed bug fix: MD5Update was not adding the inputIndex offset in its call to MD5Transform. This is the obscure issue found by the new test framework - in certain fairly specific circumstances (mostly around odd offsets and buffer sizes), the incorrect offset could result in an invalid hash result.

  • All supported algorithms are run on each file. Initially, only CRC32, MD5, and SHA1 were supported because they were the most common at the time and because I didn't want to waste CPU cycles on obscure algorithms that were hardly ever used. But since then, some of the "obscure" algorithms have become more common (ex: SHA256) and multi-core CPUs have become much more widespread. Because the ComputeFileHashes tools are already multi-processor friendly and because quad-processor CPUs are now commonplace, I've decided not to limit them due to CPU cycles. Most files hash instantaneously anyway, so the additional algorithms won't slow things down there; for longer files where CPU might start to dominate over disk access, the additional overhead shouldn't be that big of a deal. With this release, the bias is for convenience, and I'm optimistic that's the right tradeoff most of the time. :)

    Here's what each tool supports:

    • ComputeFileHashesCL, ComputeFileHashesWPF: CRC32, MD5, SHA1, SHA256, SHA384, SHA512, RIPEMD160
    • ComputeFileHashesSL: CRC32, MD5, SHA1, SHA256

    (Note: The Silverlight platform doesn't provide SHA384/SHA512/RIPEMD160. (And I haven't done my own implementation. (Yet...)))

  • There's a comprehensive set of automated tests for CRC32 and MD5Managed. I'd done some basic testing of this code in the past, but hadn't covered the edge cases - and a few bugs slipped by because of that. So I wanted to create a thorough automated test suite this time around and do what I could to cover all the bases.

    • The automated tests have a small library of different inputs and known-good hashes and process it in lots of different ways: all at once, in all different chunk sizes, with and without Initialize, etc.. If any of these techniques generates the wrong hash, the test suite reports the failure.
    • The new tests are thorough enough to yield 100% code coverage on both the CRC32 and MD5Managed implementations.
    • In addition to testing my CRC32 and MD5Managed classes, the automated tests also test the .NET MD5CryptoServiceProvider class - not because I expect to find errors in it, but so I can ensure both MD5 implementations behave the same in each scenario.
    • Consequently (and as a result of the more thorough coverage) CRC32 and MD5Managed now behave the same as the .NET implementations for invalid scenarios, too - all the way to exception-level compatibility for misuse of the API!
    • The only difference is for CryptographicUnexpectedOperationException which can't be constructed on Silverlight - its base class CryptographicException is thrown instead in cases where the hash value is retrieved before the process has been finalized.
  • The Visual Studio solution and project files have been upgraded to the Visual Studio 2010 format. This makes developing ComputeFileHashes in Visual Studio 2010 easy and enables the use of its new and improved feature set.

  • The CRC32/MD5Managed classes and the three ComputeFileHashes programs are now code analysis-clean for the complete Visual Studio 2010 rule set. Additional code analysis rules were introduced with VS 2010 and they reported some new violations in the code. These have all been fixed (or suppressed where appropriate).

  • The namespace of the CRC32 and MD5Managed classes has been changed to "Delay". This change brings these classes inline with the rest of the sample code I publish and makes their generality a bit clearer.

  • ComputeFileHashesCL remains a .NET 2.0 application for maximum versatility. By targeting .NET 2.0, ComputeFileHashesCL runs nearly everywhere .NET does.

  • ComputeFileHashesWPF is now a .NET 4 application for compactness and ease of distribution. ComputeFileHashesWPF used to have a dependency on the WPFToolkit for its DataGrid control. Because that control is part of the .NET 4 Framework, the new ComputeFileHashesWPF no longer depends on any non-Framework assemblies and can be distributed as a single file.

  • ComputeFileHashesSL is now a Silverlight 4 application to make use of new features in that platform. Most notably, ComputeFileHashesSL uses Silverlight's drag+drop support to enable the handy scenario of dragging a file directly from Windows Explorer and dropping it onto the ComputeFileHashesSL window to hash it (just like ComputeFileHashesWPF already supported). Additionally, I'm making use of my SetterValueBindingHelper class to use Bindings in a Setter and create the same ToolTip experience that ComputeFileHashesWPF already had: hovering over a hash failure shows the reason for the failure (typically because the file was locked by another process). Consequently, the "Details" column is no longer necessary in ComputeFileHashesSL and has been removed.

  • The ClickOnce flavor of ComputeFileHashesWPF is no longer supported. With ComputeFileHashesSL's functionality getting closer to that of ComputeFileHashesWPF and the elimination of the WPFToolkit.dll dependency from ComputeFileHashesWPF, the need for a ClickOnce install seems minimal and has been removed.

  • The version number has been updated to 2010-11-30.

Is that a BLOB in your pocket, or are you just happy to see me? [Silverlight REST-based Azure/S3 BLOB API updated to run on Windows Phone 7!]

It was about five months ago that I blogged about BlobStore, a simple Silverlight 4 REST-based cloud-oriented file management app for Azure and S3. I pitched it like this:

It's a small, lightweight Silverlight 4 application that acts as a basic front-end for the Windows Azure Simple Data Storage and the Amazon Simple Storage Service (S3)! Just run the BlobStore app, point it at a properly provisioned Azure or S3 account (see below for details on provisioning), and all of a sudden sharing files with yourself and others becomes as simple as dragging and dropping them!

...

Included with every code download is a free REST wrapper for basic Azure and S3 blob access that handles all the tricky Authorization header details for you. It's almost guaranteed to make your next Azure/S3 application a snap to develop and a wild success in the marketplace.

BlobStore with silly sample data

Disclaimer: None of the file names above is accurate. :)


I know people have incorporated my REST API wrapper code (BlobStoreApi.cs) into their Silverlight projects, so it wasn't too surprising when I heard that some of you want the same functionality for your Windows Phone 7 applications. While you might expect the existing code to work as-is, there's a catch: Windows Phone 7's version of the Silverlight framework doesn't support the HttpWebRequest.AllowWriteStreamBuffering or WebRequest.ContentLength properties - and both are used by the original BlobStoreApi.cs implementation...

Fortunately, the lack of AllowWriteStreamBuffering isn't a big deal because it's used in only one place and can be commented-out with no loss of functionality (assuming the default behavior of buffering the entire upload doesn't bother you). However, the lack of ContentLength is a little more problematic because its use is more tightly integrated with the rest of code. So it seemed worthwhile for me to update BlobStoreApi.cs for Windows Phone 7 - and it turned out to be fairly simple to remove ContentLength for Windows Phone 7 without changing the existing behavior for Silverlight 4 and desktop .NET.

Because the original file management sample application didn't translate very well to the phone, I dashed off a quick "note taking" sample instead:

BlobStoreOnWindowsPhone sample

The way the new sample works is that the user can type short notes in a text box and then hit the "add" button to upload them to their pre-configured Azure/S3 account as BLOBs with the blob name being the current DateTime.Now.Ticks value and its content being the text of the note. All available notes are listed by date of creation; their text contents are downloaded on demand and shown to the user when selected. Any note can be deleted by tapping it and hitting the "delete" button.

It's a simple application, but it shows off the list/get/put/delete functionality that BlobStoreApi implements for Azure, S3, and IsolatedStorage (the last existing mainly for test purposes). During calls to the BLOB service, the sample application shows a simple progress screen informing the user of the ongoing transaction. (Of course, IsolatedStorage is very fast, so the progress screen is little more than a flicker by default - it's more meaningful for Azure/S3 web access.)

The complete implementation can be found in BlobStore\BlobStoreApi.cs and compiles/runs on the .NET, Silverlight, and Windows Phone 7 platforms. I encourage readers to use this code to create way more compelling applications than my samples! :)


[Click here to download the complete BlobStore source code and sample applications for both Silverlight 4 and Windows Phone 7.]


Note: By default, the Windows Phone sample uses IsolatedStorage because I don't want to publish the keys to my Azure/S3 accounts. :) If you want to try it with your own account(s), just open MainPage.xaml.cs, uncomment the relevant line below, and add the missing information:
// TODO: Switch to AzureBlobStoreClient or S3BlobStoreClient after entering your connection information
private readonly BlobStoreClient _client = new IsolatedStorageBlobStoreClient();
//private readonly BlobStoreClient _client = new AzureBlobStoreClient("Account Name", "Access Key");
//private readonly BlobStoreClient _client = new S3BlobStoreClient("Access Key ID", "Secret Access Key", "Bucket Name");
Aside: Don't forget to provision your account first; see the notes here for more information!

My new home page, rejuvenated [Updated collection of great Silverlight/WPF/Windows Phone Data Visualization resources!]

It's been a few months since I posted my previous collection of Silverlight/WPF Charting links. In the meantime, the April 2010 release of the Silverlight Toolkit was published with support for stacked series and significant performance improvements! And Windows Phone 7 has been steadily building momentum - it's handy that the Data Visualization assembly also works on Windows Phone!

So there's lots of good stuff - here are all the links (FYI: previously published links are gray):

Overviews (100 level)

Scenarios (200 level)

Internals (300 level)

Team Member posts (Partner level)

My posts (Ego level)

Many thanks go out to everyone who has spent time helping people learn how to use Silverlight/WPF/Windows Phone Data Visualization!

PS - If I've missed something useful, please send me a link - I'm always happy to find more great content! :)

PPS - The most recent version of this collection will always be pointed to by http://cesso.org/r/DVLinks. If you're going to create a favorite or link to this post, please use that URL so your link will always be current.

Hopping outside the box [How to: Leapfrog Bindings (bridge DataContexts) in Silverlight and WPF]

The data binding infrastructure for Silverlight and WPF is extremely powerful and makes it easy to write powerful, dynamic applications without worrying about synchronizing the UI with every change to the underlying data. By leveraging this power, developers can think entirely in terms of the data model and be confident that any changes they make will be reflected by the interface automatically.

The way this works is that every element has a DataContext property, and the value of that property is inherited. DataContext can be assigned any object and acts as the default source for all Bindings applied to the element's properties. The object acting as DataContext can be as simple or complex as an application needs and is free to "shape" the data however is most convenient for the UI and Bindings. Collection-based controls like ItemsControl (and its subclasses ListBox, TreeView, etc.) automatically set the DataContext of their containers to the specific item they represent. This is what you'd expect and enables a great deal of flexibility when displaying collections. However, each element has a only one DataContext - so sometimes it's useful to "reach outside" that and bind to properties on some other object.

The good news is that there's an easy way to leapfrog the DataContext and "bridge" the two elements! The trick is to use an ElementName Binding to point to that other element - then to root the Binding's Path at that element's DataContext and "dot-down" to the property of interest. An example should make things clearer...


LeapFroggingDataContexts sample

The sample above has an application-wide DataContext model object ApplicationViewModel containing a bool property ShowHeight that's TwoWay-bound to the CheckBox control. For convenience, ShowHeight is also exposed as a Visibility value via HeightVisibility - which is much more convenient to bind the Visibility property to. There's also a Mountains property containing a collection of MountainViewModel model objects. Each mountain in the list is meant to show or hide its height according to the setting on ApplicationViewModel - but because the DataContext of the ListBoxItem containers is set to instances of MountainViewModel, they can't "see" the HeightVisibility property... The most direct option is probably to propagate this value "down" to the MountainViewModel instances by adding a property to the class for that purpose and keeping it in sync with the "real" property on ApplicationViewModel.

However, that feels like a bit of overkill for the current situation. Instead, if we just "leapfrog" the Binding in the item content, we can make use of the ApplicationViewModel directly and everything stays nice and simple!


[Click here to download the Silverlight 4 source code for the LeapFroggingDataContexts sample.]


Here's what it looks like in XAML:

<UserControl x:Class="LeapFroggingDataContexts.MainPage"
    xmlns="http://schemas.microsoft.com/winfx/2006/xaml/presentation"
    xmlns:x="http://schemas.microsoft.com/winfx/2006/xaml"
    xmlns:local="clr-namespace:LeapFroggingDataContexts">

    <UserControl.Resources>
        <local:ApplicationViewModel x:Key="ApplicationViewModel"/>
    </UserControl.Resources>

    <Grid
        x:Name="LayoutRoot"
        DataContext="{StaticResource ApplicationViewModel}"
        Width="150"
        HorizontalAlignment="Center"
        VerticalAlignment="Center">

        <Grid.RowDefinitions>
            <RowDefinition Height="Auto" />
            <RowDefinition/>
        </Grid.RowDefinitions>

        <CheckBox
            Grid.Row="0"
            Content="Show height"
            IsChecked="{Binding ShowHeight, Mode=TwoWay}"/>

        <ListBox
            Grid.Row="1"
            ItemsSource="{Binding Mountains}">
            <ListBox.ItemTemplate>
                <DataTemplate>
                    <StackPanel Orientation="Horizontal">
                        <TextBlock Text="{Binding Name}"/>
                        <TextBlock
                            Text="{Binding Height, StringFormat=' [{0:n0}m]'}"
                            Visibility="{Binding DataContext.HeightVisibility, ElementName=LayoutRoot}"/>
                    </StackPanel>
                </DataTemplate>
            </ListBox.ItemTemplate>
        </ListBox>
    </Grid>
</UserControl>

ElementName points the Binding at an element with the DataContext of interest, then the Path selects the DataContext as a starting point (an instance of the ApplicationViewModel class in this case), hooks up to that object's HeightVisibility property - and we're done!


While architectural purists might argue this technique is bad form, I've seen it come in handy for enough customer scenarios that it seems a worthwhile approach to keep in mind. Please don't abuse it - but feel free to use it! :)

Banana SplitButton [A WPF-specific fix for SplitButton and some code analysis improvements for the Silverlight version, too]

I've previously written that one of my ContextMenu test cases for the April '10 release of the Silverlight Toolkit was to implement a quick "split button" control for Silverlight using Button and ContextMenu. Though it wasn't my goal to build a general-purpose control for widespread use, there's been a lot of interest in SplitButton/MenuButton and I followed up with a few fixes for the Silverlight version and "official" support for WPF.


SplitButton and MenuButton


That might have been the end of the story - until Fabio Buscaroli contacted me to report an issue he was seeing with the WPF version (follow our exchange here). At first, I thought the problem was related to the DataContext not inheriting properly - and while that was true, it wasn't the whole story! When Fabio told me the tweak for DataContext I'd suggested didn't solve his RoutedCommand scenario, I had a look at a simple example he posted and realized the DataContext problem was a symptom of a larger issue: that the ContextMenu wasn't a logical child of the SplitButton. As soon as I solved that problem, it fixed Fabio's scenario and the related DataContext issue I'd discovered during my own investigation.

Aside: None of this applies to Silverlight because that platform doesn't expose the notion of a logical tree the way WPF does.


While I was working on this fix, I noticed full code analysis wasn't enabled for the SplitButton assemblies; I turned it on and addressed the handful of warnings it generated. Most of the changes won't matter to you, but one of them will: the namespace for SplitButton/MenuButton has changed. These classes now live in the Delay namespace - which is consistent with the rest of the sample code I post to my blog. Upgrading existing projects to the latest code will require a tweak of the XAML's "xmlns:" prefix and/or a tweak of the code's "using" statements. Otherwise, there have been no behavior changes to the functionality of SplitButton on Silverlight or WPF, so everything else should continue to work the same as before.


[Click here to download the complete Silverlight/WPF source code for SplitButton/MenuButton and the sample application shown above.]


It's been great to see the positive response SplitButton and MenuButton have generated. Thanks for everyone's help trying these controls out, finding issues, and reporting them!

Breaking up (lines) is (not) hard to do [Tip: Put XAML attributes and elements on multiple lines so the markup is easy to read and work with]

Tip

Put XAML attributes and elements on multiple lines so the markup is easy to read and work with

Explanation

The last few tips have dealt with DependencyProperty issues. Now it's time for something completely different: XAML. While it's nice to pretend XAML editing can all be done in a design tool like Visual Studio or Expression Blend, I've always felt that XAML should be pleasant for people to work with, too. Therefore, it's worthwhile to establish a common approach to XAML formatting. What I find works well is to put attributes and elements on separate lines with a single indent for continuations and nesting. (Aside: I make an exception for elements with a single attribute to keep simple things compact.) I also tend to order properties according to importance, starting with the most significant ones and ending with the least. I consider the x:Name of an element to be the most important, so it typically comes first. Attached properties also rank high in my book and are usually next. After that, I tend to list common properties (ex: ContentControl.Content and TextBlock.Text) first and formatting properties (FrameworkElement.HorizontalAlignment and .Margin) closer to the end. In addition to keeping lines short and easy to read, this approach is very revision control-friendly - by which I mean that edits, adds, and removes all show up unambiguously. Sometimes people forget that markup is code, too - please treat it with the same respect and discipline. :)

Good Example

<Button
    x:Name="TheButton"
    Grid.Row="0"
    Content="Click me"
    Click="TheButton_Click"
    HorizontalAlignment="Center"
    Margin="10">
    <Button.Background>
        <SolidColorBrush Color="Pink"/>
    </Button.Background>
</Button>

More information

SplitButtoning hairs [Two fixes for my Silverlight SplitButton/MenuButton implementation - and true WPF support]

One of my ContextMenu test cases for the April '10 release of the Silverlight Toolkit (click here for the full write-up) was to implement a quick "split button" control for Silverlight using Button and ContextMenu. In that post, I cautioned that my goal at the time was to do some scenario testing, not to build the best SplitButton control ever. However, what I came up with seemed to work pretty well in practice and I figured folks could probably use the code mostly as-is.

And it seems like they did - because I got two bug reports in that post's comments section! :)

SplitButton and MenuButton


Let me address them in reverse order:

The position of the ContextMenu was wrong when the browser is zoomed: True enough - though I'm going to ask for a bit of leniency here because the cause of the misalignment is actually a bug in Silverlight (which I've already reported). It seems the results of a call to element.TransformToVisual(Application.Current.RootVisual) or element.TransformToVisual(null) are not consistent for elements that are vs. are not inside a Popup control when the browser is zoomed (in or out). As a result, the SplitButton code to position the menu got inconsistent data and was unable to place the menu correctly. I've tweaked the code slightly to accommodate the underlying issue and now the menu is properly aligned at any zoom setting.

While I was at it, I figured it might be nice if the menu moved around with the SplitButton as the user resized the browser or changed the zoom while the menu was displayed. This is admittedly an edge case, but it's easy enough to handle by hooking the LayoutUpdated event while the menu is displayed (and only while it's displayed!), so I did that and now the menu sticks to the button and refuses to be shaken off. :)

The code didn't work on WPF: I had a footnote claiming my Silverlight implementation should work on WPF as well, though I hadn't tried it myself. It turns out that statement is mostly true - except for the positioning logic which bumps into an subtle API incompatibility with the TransformToVisual method. (Noticing a pattern here?) In the process of getting things working for WPF, I realized the code to position the menu could be simplified somewhat with the (WPF-only) TranslatePoint method. Therefore, the actual positioning logic is a tad different across the two platforms ("a tad" == 4 lines of code) while everything else stays the same. This time when I claim SplitButton and MenuButton work on WPF, it's because I've tried it. :)

In fact, I've added a new, WPF-specific assembly (SplitButtonWpf) and demo (SplitButtonWpfSample) to the sample code associated with this post. Which means there is a dedicated assembly containing SplitButton and MenuButton for both platforms as well as a separate sample application for each!


[Click here to download the complete Silverlight/WPF source code for SplitButton/MenuButton and the sample application shown above.]


With those changes in place (and an unrelated key handling tweak for WPF), I feel even better about the prospects of using SplitButton and MenuButton in a real application. Naturally, if something else comes up, please let me know. Otherwise, I hope you find it useful!

Please rate your dining experience [How to: Show text labels on a numeric axis with Silverlight/WPF Toolkit Charting]

A customer contacted me a few days ago asking how to display text labels on a NumericAxis. (Whereas CategoryAxis makes it easy to use text labels for the independent axis, this request was about text labels on the dependent axis.) It's a bit of an unusual request (I spent a minute just now and don't see how to accomplish this in Excel), but I knew it would be easy to do with the Charting controls in the Data Visualization assembly that's part of the Silverlight Toolkit and WPF Toolkit.

The underlying scenario is to provide labels for the results of one of those "How are we doing?" surveys restaurants and hotels like to give out. The chart should look like this:

Text labels on the dependent axis

Though I originally suggested a different approach, the act of coding it up myself suggested a trusty old IValueConverter would be most appropriate. (Aside: See more IValueConverter tricks here and here.) The basic approach is to explicitly specify the dependent axis and then use it to configure exactly the set of tick marks we want. Once that's done, a simple bit of IValueConverter magic converts the numeric values into their corresponding text labels - and the problem is solved! :)


I've added the sample shown here to my DataVisualizationDemos application which is collection of all the Data Visualization samples I've blogged. Like the core Data Visualization code itself, the demo app compiles for and runs on multiple platforms with the same code and XAML - it's an easy way to publish a sample and show it running on Silverlight 3, Silverlight 4, WPF 3.5, and WPF 4. Just for kicks, I've used the "Compatible" ColumnSeries for this example - but it works just as well with traditional ColumnSeries. Better yet, the basic idea can be generalized to solve a variety of similar problems as well!


[Click here to download the complete source code for the cross-platform DataVisualizationDemos sample application. ]


Here's the relevant XAML:

<!-- Chart of customer feedback -->
<charting:Chart Title="Customer Feedback">
    <compatible:ColumnSeries
        ItemsSource="{Binding}"
        IndependentValuePath="Topic"
        DependentValuePath="Rating">

        <!-- Custom Y axis for text labels -->
        <compatible:ColumnSeries.DependentRangeAxis>
            <charting:LinearAxis
                Orientation="Y"
                Minimum="0"
                Maximum="4"
                Interval="1"
                ShowGridLines="True">

                <!-- Custom style/template for text labels -->
                <charting:LinearAxis.AxisLabelStyle>
                    <Style TargetType="charting:AxisLabel">
                        <Setter Property="Template">
                            <Setter.Value>
                                <ControlTemplate TargetType="charting:AxisLabel">
                                    <TextBlock Text="{Binding Converter={StaticResource RatingToStringConverter}}"/>
                                </ControlTemplate>
                            </Setter.Value>
                        </Setter>
                    </Style>
                </charting:LinearAxis.AxisLabelStyle>
            </charting:LinearAxis>
        </compatible:ColumnSeries.DependentRangeAxis>

        <!-- Custom style for different background -->
        <compatible:ColumnSeries.DataPointStyle>
            <Style TargetType="charting:DataPoint">
                <Setter Property="Background" Value="#ff00a0e0"/>
            </Style>
        </compatible:ColumnSeries.DataPointStyle>
    </compatible:ColumnSeries>
</charting:Chart>

And code:

/// <summary>
/// Implements IValueConverter to convert from double rating values to friendly string names.
/// </summary>
public class RatingToStringConverter : IValueConverter
{
    public object Convert(object value, Type targetType, object parameter, CultureInfo culture)
    {
        // Validate parameters
        if (!(value is double))
        {
            throw new NotSupportedException("Unsupported value type in RatingToStringConverter.");
        }
        // Convert number to string
        double doubleValue = Math.Floor((double)value);
        if (0.0 == doubleValue)
        {
            return "Awful";
        }
        else if (1.0 == doubleValue)
        {
            return "Poor";
        }
        else if (2.0 == doubleValue)
        {
            return "Fair";
        }
        else if (3.0 == doubleValue)
        {
            return "Good";
        }
        else if (4.0 == doubleValue)
        {
            return "Great";
        }
        else
        {
            throw new ArgumentException("Unsupported value in RatingToStringConverter.");
        }
    }

    public object ConvertBack(object value, Type targetType, object parameter, CultureInfo culture)
    {
        throw new NotImplementedException();
    }
}