Yummier pies! [A technique for more flexible gradient styling of Silverlight Toolkit pie charts]
One of the goals of Charting for the Silverlight Toolkit is to enable rich, flexible styling by designers. (Background and overviews for Charting are available here and here.) And there are already some great resources for chart design: Designer’s Guide to Styling Silverlight Toolkit Charting Controls, Styling the Charts in the Silverlight Toolkit.
However, pie charts differ from the other common chart types in some significant ways and that makes the task of styling them a bit challenging. In particular, because styling happens at the DataPoint level (in the case of PieSeries, that's PieDataPoint: the visual representation of one of the slices of the pie), it initially seemed difficult to create a unified style for an entire pie because the sizes and positions of the individual slices can vary so dramatically for different data...
Working on something unrelated one day, I came across the GradientBrush.MappingMode property and realized the BrushMappingMode.Absolute enumeration was ideal for the pie styling problem. I created a simple demonstration and shared it with some folks on the Silverlight Toolkit team. That demo got passed around a bit and eventually made its way to Pete Brown; my sample shows up in his post about pie styling as what he calls the "Rainbow Brite" example.
Using Absolute mode is obviously a big win, but there's still a significant limitation: the coordinates it uses are expressed in pixels and therefore are closely tied to the size of the pie. What looks good for a pie at one size looks silly for that same pie when it is made a little bigger or smaller. I called this limitation out with my initial demo and Pete mentions it in his post as well...
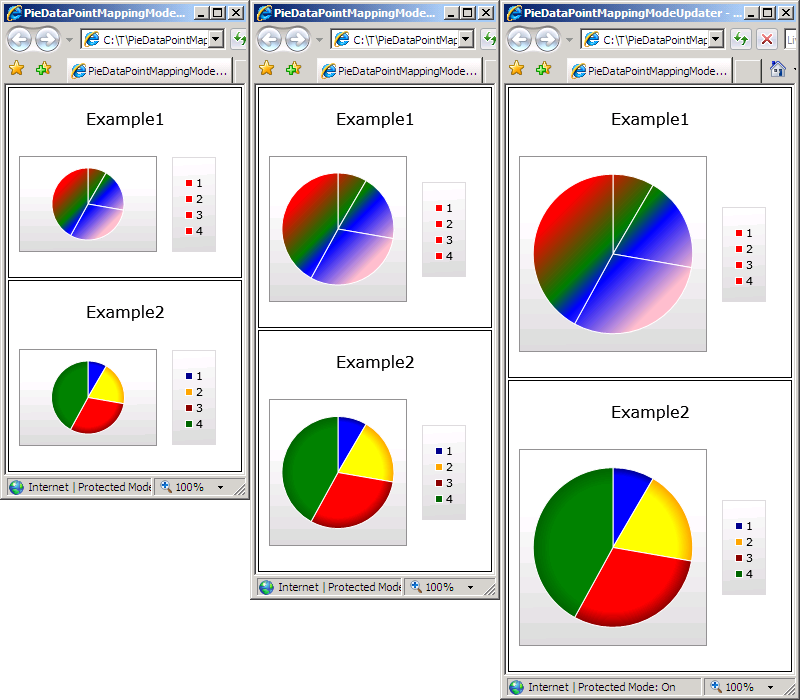
Knowing that Absolute mode works well to enable cohesive styling for fixed-size pies (just look at Pete's great second example!), it seemed to me that the sizing limitation could be overcome with some fairly simple code. So when I got a chance, I wrote that code and put together the following proof-of-concept demonstration using the existing examples from Pete's post (with only a few trivial tweaks to the XAML to adjust gradient offsets). What's great is that now both pies can both be resized dynamically and the styling looks good at any size!
[The complete sample code/project is available in PieDataPointMappingModeUpdater.zip as an attachment to this post.]
The principle here is simple: just update the relevant pixel coordinates of each gradient based on the current size of the PieSeries. What's more, a wrapper function abstracts out most of the complexity, so all that's necessary for the user is to pass in a simple helper method that's tailored to whatever specific pie design has been used. The helper is given the rectangular bounds of the pie and performs whatever gradient adjustments are necessary. It's that easy!
Here's what it looks like in code; the following is from the sample application's Page.xaml.cs:
/// <summary>
/// Initializes an instance of the Page class.
/// </summary>
public Page()
{
    InitializeComponent();

    // Hook up to Example1's PieSeries
    var pieSeries1 = Example1.Series[0] as PieSeries;
    PieDataPointMappingModeUpdater.UpdatePieSeries(pieSeries1, PieSeries1Updater, true);

    // Hook up to Example2's PieSeries
    var pieSeries2 = Example2.Series[0] as PieSeries;
    PieDataPointMappingModeUpdater.UpdatePieSeries(pieSeries2, PieSeries2Updater, true);
}

/// <summary>
/// Updates the gradients for Example1's PieSeries.
/// </summary>
private void PieSeries1Updater(PieDataPoint pieDataPoint, Rect pieBounds)
{
    var brush = pieDataPoint.Background as LinearGradientBrush;
    if (null != brush)
    {
        brush.StartPoint = new Point(pieBounds.Left, pieBounds.Top);
        brush.EndPoint = new Point(pieBounds.Right, pieBounds.Bottom);
    }
}

/// <summary>
/// Updates the gradients for Example2's PieSeries.
/// </summary>
private void PieSeries2Updater(PieDataPoint pieDataPoint, Rect pieBounds)
{
    var brush = pieDataPoint.Background as RadialGradientBrush;
    if (null != brush)
    {
        var center = new Point(
            pieBounds.Left + ((pieBounds.Right - pieBounds.Left) / 2),
            pieBounds.Top + ((pieBounds.Bottom - pieBounds.Top) / 2));
        brush.Center = center;
        brush.GradientOrigin = center;
        var radius = (pieBounds.Right - pieBounds.Left) / 2;
        brush.RadiusX = radius;
        brush.RadiusY = radius;
    }
}
Note that the constructor simply hooks things up and that each helper method is specific to the pie design it will be updating. All each updater does is nudge the pixel coordinates of its gradient to match up with the pie's size. So it seems reasonable to assume that other - potentially more complex - pie designs can be updated just as easily.
Here's the proof-of-concept wrapper method that does the bulk of the work:
/// <summary>
/// Updates the PieDataPoints of a PieSeries by applying the specified action to each.
/// </summary>
/// <param name="pieSeries">PieSeries instance to update.</param>
/// <param name="updater">Action to run for each PieDataPoint.</param>
/// <param name="keepUpdated">true to attach to the SizeChanged event of the PieSeries's PlotArea.</param>
public static void UpdatePieSeries(PieSeries pieSeries, Action<PieDataPoint, Rect> updater, bool keepUpdated)
{
    // Apply template to ensure visual tree containing PlotArea is created
    pieSeries.ApplyTemplate();
    // Find PieSeries's PlotArea element
    var children = Traverse<FrameworkElement>(
        pieSeries,
        e => VisualTreeChildren(e).OfType<FrameworkElement>(),
        element => null == element as Chart);
    var plotArea = children.OfType<Panel>().Where(e => "PlotArea" == e.Name).FirstOrDefault();
    // If able to find the PlotArea...
    if (null != plotArea)
    {
        // Calculate the diameter of the pie (0.95 multiplier is from PieSeries implementation)
        var diameter = Math.Min(plotArea.ActualWidth, plotArea.ActualHeight) * 0.95;
        // Calculate the bounding rectangle of the pie
        var leftTop = new Point((plotArea.ActualWidth - diameter) / 2, (plotArea.ActualHeight - diameter) / 2);
        var rightBottom = new Point(leftTop.X + diameter, leftTop.Y + diameter);
        var pieBounds = new Rect(leftTop, rightBottom);
        // Call the provided updater action for each PieDataPoint
        foreach (var pieDataPoint in plotArea.Children.OfType<PieDataPoint>())
        {
            updater(pieDataPoint, pieBounds);
        }
        // If asked to keep the gradients updated, hook up to PlotArea.SizeChanged as well
        if (keepUpdated)
        {
            plotArea.SizeChanged += delegate
            {
                UpdatePieSeries(pieSeries, updater, false);
            };
        }
    }
}
Attentive readers may have noticed that I'm using the same Traverse<T> implementation that ImplicitStyleManager uses - though I've got a custom getChildNodes implementation that works with the visual tree:
/// <summary>
/// Implementation of getChildNodes parameter to Traverse based on the visual tree.
/// </summary>
/// <param name="reference">Object in the visual tree.</param>
/// <returns>Stream of visual children of the object.</returns>
private static IEnumerable<DependencyObject> VisualTreeChildren(DependencyObject reference)
{
    var childrenCount = VisualTreeHelper.GetChildrenCount(reference);
    for (var i = 0; i < childrenCount; i++)
    {
        yield return VisualTreeHelper.GetChild(reference, i);
    }
}
And that's all there is to it! Now, not only do you know how to create appealing, holistic designs for fixed-size pie charts, you've got an easy way to keep those designs looking sharp for dynamically-sized pie charts as well. So go forth with that knowledge - and make even tastier pies! :)