The blog of dlaa.me

Posts from December 2009

Blogging code samples stays easy [Update to free ConvertClipboardRtfToHtmlText tool and source code for Visual Studio 2010!]

A big part of my blog is sharing code and so most of the posts I write include sample source. Therefore, it's pretty important to me that the code I share be easy for readers to understand and use. For me, that means I want it to be static, syntax-highlighted, and in text form so it's copy+paste-able and indexable by search engines.

I'm a big fan of keeping things simple and avoiding dependencies, so I ended up writing a very simple tool about two years ago called ConvertClipboardRtfToHtmlText. As you can see from the original ConvertClipboardRtfToHtmlText post and the subsequent follow-up, it's a very simple tool intended for a very specific scenario. That said, it works beautifully for my purposes and I've used it to blog every snippet of source code since then!

So I was surprised and a little disappointed when it stopped working recently... Why? Because I switched to Visual Studio 2010 (Beta 2) and they've changed the RTF clipboard format slightly with that release. Now, while I'm sure VS 2010's RTF is still 100% legal RTF, it's different enough from VS 2008's output that ConvertClipboardRtfToHtmlText chokes on it. Clearly, it was time to dust off the source code and make it work again! :)

Not surprisingly, the update process was quite painless - and by tweaking the code slightly, I've arrived at an implementation that works well for both versions of Visual Studio: 2008 and 2010! The source code download includes a VS 2010 solution and project, but takes advantage of the multi-targeting capabilities of Visual Studio to compile for the .NET 2.0 Framework, ensuring that the resulting executable runs pretty much everywhere.

As long as I was touching the code, I added the following simple banner text:

ConvertClipboardRtfToHtmlText
Version 2009-12-19 - http://blogs.msdn.com/delay/

Converts the Visual Studio 2008/2010 RTF clipboard format to HTML by replacing
the RTF clipboard contents with its HTML representation in text form.

Instructions for use:
1. Copy syntax-highlighted text to the clipboard in Visual Studio
2. Run ConvertClipboardRtfToHtmlText (which has no UI and exits immediately)
3. Paste HTML text into an editor, web page, blog post, etc.

So if you're in the market for a nice way to blog code and you're using Visual Studio 2008 or 2010, maybe ConvertClipboardRtfToHtmlText can help you out!


[Click here to download the ConvertClipboardRtfToHtmlText tool along with its complete source code.]


Here's the complete source code for ConvertClipboardRtfToHtmlText, provided by - you guessed it! - ConvertClipboardRtfToHtmlText:

using System;
using System.Collections.Generic;
using System.Drawing;
using System.Text;
using System.Windows.Forms;

// NOTE: This is NOT a general-purpose RTF-to-HTML converter! It works well
// enough on the input I've tried, but may break in other scenarios.
// TODO: Convert into a real application with a notify icon and hotkey.
namespace ConvertClipboardRtfToHtmlText
{
    static class ConvertClipboardRtfToHtmlText
    {
        private const string colorTbl = "\\colortbl;";
        private const string colorFieldTag = "cf";
        private const string tabExpansion = "    ";

        [STAThread]
        static void Main()
        {
            Console.WriteLine("ConvertClipboardRtfToHtmlText");
            Console.WriteLine("Version 2009-12-19 - http://blogs.msdn.com/delay/");
            Console.WriteLine();
            Console.WriteLine("Converts the Visual Studio 2008/2010 RTF clipboard format to HTML by replacing");
            Console.WriteLine("the RTF clipboard contents with its HTML representation in text form.");
            Console.WriteLine();
            Console.WriteLine("Instructions for use:");
            Console.WriteLine("1. Copy syntax-highlighted text to the clipboard in Visual Studio");
            Console.WriteLine("2. Run ConvertClipboardRtfToHtmlText (which has no UI and exits immediately)");
            Console.WriteLine("3. Paste HTML text into an editor, web page, blog post, etc.");
            if (Clipboard.ContainsText(TextDataFormat.Rtf))
            {
                // Create color table, populate with default color
                List<Color> colors = new List<Color>();
                Color defaultColor = Color.FromArgb(0, 0, 0);
                colors.Add(defaultColor);

                // Get RTF
                string rtf = Clipboard.GetText(TextDataFormat.Rtf);

                // Strip meaningless "\r\n" pairs (used by VS 2008)
                rtf = rtf.Replace("\r\n", "");

                // Parse color table
                int i = rtf.IndexOf(colorTbl);
                if (-1 != i)
                {
                    i += colorTbl.Length;
                    while ((i < rtf.Length) && ('}' != rtf[i]))
                    {
                        // Add color to color table
                        SkipExpectedText(rtf, ref i, "\\red");
                        byte red = (byte)ParseNumericField(rtf, ref i);
                        SkipExpectedText(rtf, ref i, "\\green");
                        byte green = (byte)ParseNumericField(rtf, ref i);
                        SkipExpectedText(rtf, ref i, "\\blue");
                        byte blue = (byte)ParseNumericField(rtf, ref i);
                        colors.Add(Color.FromArgb(red, green, blue));
                        SkipExpectedText(rtf, ref i, ";");
                    }
                }
                else
                {
                    throw new NotSupportedException("Missing/unknown colorTbl.");
                }

                // Find start of text and parse
                i = rtf.IndexOf("\\fs");
                if (-1 != i)
                {
                    // Skip font size tag
                    while ((i < rtf.Length) && (' ' != rtf[i]))
                    {
                        i++;
                    }
                    i++;

                    // Begin building HTML text
                    StringBuilder sb = new StringBuilder();
                    sb.AppendFormat("<pre><span style='color:#{0:x2}{1:x2}{2:x2}'>",
                        defaultColor.R, defaultColor.G, defaultColor.B);
                    while (i < rtf.Length)
                    {
                        if ('\\' == rtf[i])
                        {
                            // Parse escape code
                            i++;
                            if ((i < rtf.Length) &&
                                (('{' == rtf[i]) || ('}' == rtf[i]) || ('\\' == rtf[i])))
                            {
                                // Escaped '{' or '}' or '\'
                                sb.Append(rtf[i]);
                            }
                            else
                            {
                                // Parse tag
                                int tagEnd = rtf.IndexOf(' ', i);
                                if (-1 != tagEnd)
                                {
                                    if (rtf.Substring(i, tagEnd - i).StartsWith(colorFieldTag))
                                    {
                                        // Parse color field tag
                                        i += colorFieldTag.Length;
                                        int colorIndex = ParseNumericField(rtf, ref i);
                                        if ((colorIndex < 0) || (colors.Count <= colorIndex))
                                        {
                                            throw new NotSupportedException("Bad color index.");
                                        }

                                        // Change to new color
                                        sb.AppendFormat(
                                            "</span><span style='color:#{0:x2}{1:x2}{2:x2}'>",
                                            colors[colorIndex].R, colors[colorIndex].G,
                                            colors[colorIndex].B);
                                    }
                                    else if ("tab" == rtf.Substring(i, tagEnd - i))
                                    {
                                        sb.Append(tabExpansion);
                                    }
                                    else if ("par" == rtf.Substring(i, tagEnd - i))
                                    {
                                        sb.Append("\r\n");
                                    }

                                    // Skip tag
                                    i = tagEnd;
                                }
                                else
                                {
                                    throw new NotSupportedException("Malformed tag.");
                                }
                            }
                        }
                        else if ('}' == rtf[i])
                        {
                            // Terminal curly; done
                            break;
                        }
                        else
                        {
                            // Normal character; HTML-escape '<', '>', and '&'
                            switch (rtf[i])
                            {
                                case '<':
                                    sb.Append("&lt;");
                                    break;
                                case '>':
                                    sb.Append("&gt;");
                                    break;
                                case '&':
                                    sb.Append("&amp;");
                                    break;
                                default:
                                    sb.Append(rtf[i]);
                                    break;
                            }
                        }
                        i++;
                    }

                    // Trim any trailing empty lines
                    while ((2 <= sb.Length) && ('\r' == sb[sb.Length - 2]) && ('\n' == sb[sb.Length - 1]))
                    {
                        sb.Length -= 2;
                    }

                    // Finish building HTML text
                    sb.Append("</span></pre>");

                    // Update the clipboard text
                    Clipboard.SetText(sb.ToString());
                }
                else
                {
                    throw new NotSupportedException("Missing text section.");
                }
            }
        }

        // Skip the specified text
        private static void SkipExpectedText(string s, ref int i, string text)
        {
            foreach (char c in text)
            {
                if ((s.Length <= i) || (c != s[i]))
                {
                    throw new NotSupportedException("Expected text missing.");
                }
                i++;
            }
        }

        // Parse a numeric field
        private static int ParseNumericField(string s, ref int i)
        {
            int value = 0;
            while ((i < s.Length) && char.IsDigit(s[i]))
            {
                value *= 10;
                value += s[i] - '0';
                i++;
            }
            return value;
        }
    }
}
Wrap music [A more flexible balanced WrapPanel implementation for Silverlight and WPF!]

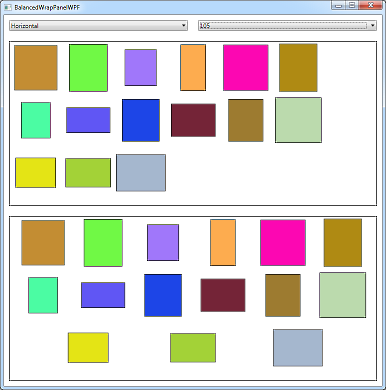
In my last post, I told the story of a customer who asked for an easy way to make the Silverlight/WPF WrapPanel use all available space to spread its children out evenly instead of bunching them up together. The following sample shows off the default WrapPanel behavior on top - and my alternate BalancedWrapPanel behavior on the bottom:

BalancedWrapPanel, Horizontal, ItemWidth and ItemHeight set

The default WrapPanel behavior fills each horizontal (or vertical) line as much as it can before moving on to the next line, but leaves any extra space at the end of each line. BalancedWrapPanel began as a copy of the WrapPanel code (available as part of the Silverlight Toolkit) and contains a modified copy of one of the helper methods that instead distributes the unsightly chunk of extra space evenly through the entire column (or row). That was what I set out to do with BalancedWrapPanel, so I was fairly happy with the results. Unfortunately, the customer wasn't 100% satisfied...

In particular, the desire was for those items in the last line to align with the items above instead of centering like they do in my initial implementation. It's a perfectly reasonable request - and something I thought about when I first started on BalancedWrapPanel! But things are a little tricky because those orderly columns only show up when the ItemWidth and/or ItemHeight properties are set. In fact, the WrapPanel code doesn't actually have any concept of columns at all! Rather, the columns you see are a natural consequence of the algorithm laying out lots of constant-width items within constant-width bounds. So the columns are very real, but the code doesn't really know anything about them. And they don't even exist when ItemWidth/ItemHeight aren't set; despite each column of this vertically-oriented BalancedWrapPanel being vertically balanced, there are no overall rows in the horizontal direction because all the elements are different sizes:

BalancedWrapPanel, Vertical, ItemWidth and ItemHeight not set

When I was first thinking about this scenario, it seemed to me that I'd need to add some code to track the columns and then do things differently for the last line in order to keep everything aligned properly. I was afraid this additional code would overly complicate the original sample, and decided not to implement it until and unless someone asked. Besides, it's called BalancedWrapPanel, so it seemed natural that everything should be balanced! :)

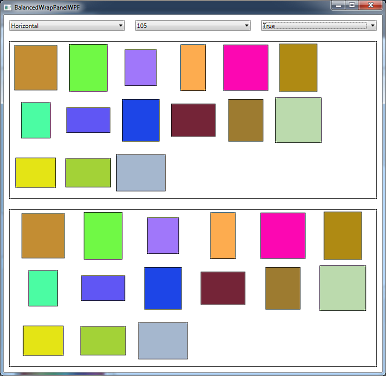
But now that I had a specific request, I thought more carefully and realized that not only was it easy to align the last items, but that it was also a tad more efficient to do so! I didn't want to change the current behavior of BalancedWrapPanel (because I think that's what people expect), but I wanted to enable the new aligning behavior, too. So I added a new property to align the last items, but it only works when ItemWidth/ItemHeight are set (otherwise it has no effect because items can be all different sizes and don't line up to begin with). I considered trying to explain this technicality in the name of the new property, but everything I came up with was long and cumbersome. So the new property is simply named AlignLastItems - setting it to True changes the first example to look like this instead:

BalancedWrapPanel, Horizontal, ItemWidth and ItemHeight set, AlignLastItems set

Notice how the basic WrapPanel behavior is maintained, but the items are spread out evenly and there are no gaping holes. And there you have it - a balanced WrapPanel implementation that should work for most common scenarios. What's more, the customer is satisfied and maybe other folks will start using BalancedWrapPanel in their projects, too!


Click here to download the source code for BalancedWrapPanel and the Silverlight/WPF demo application.


PS - Please refer to my previous BalancedWrapPanel post for information about why I coded it like I did along with some other details.

PPS - As I mention above, the changes from what I'd already written were surprisingly minimal. Other than adding the AlignLastItems DependencyProperty, the only differences are highlighted below:

private void ArrangeLine(int lineStart, int lineEnd, double? directDelta, double directMaximum, double indirectOffset, double indirectGrowth)
{
    Orientation o = Orientation;
    bool isHorizontal = o == Orientation.Horizontal;
    UIElementCollection children = Children;
    double directLength = 0.0;
    double itemCount = 0.0;
    double itemLength = isHorizontal ? ItemWidth : ItemHeight;

    if (AlignLastItems && !itemLength.IsNaN())
    {
        // Length is easy to calculate in this case
        itemCount = Math.Floor(directMaximum / itemLength);
        directLength = itemCount * itemLength;
    }
    else
    {
        // Make first pass to calculate the slack space
        itemCount = lineEnd - lineStart;
        for (int index = lineStart; index < lineEnd; index++)
        {
            // Get the size of the element
            UIElement element = children[index];
            OrientedSize elementSize = new OrientedSize(o, element.DesiredSize.Width, element.DesiredSize.Height);

            // Determine if we should use the element's desired size or the
            // fixed item width or height
            double directGrowth = directDelta != null ?
                directDelta.Value :
                elementSize.Direct;

            // Update total length
            directLength += directGrowth;
        }
    }

    // Determine slack
    double directSlack = directMaximum - directLength;
    double directSlackSlice = directSlack / (itemCount + 1.0);
    double directOffset = directSlackSlice;

    // Make second pass to arrange items
    for (int index = lineStart; index < lineEnd; index++)
    {
        // Get the size of the element
        UIElement element = children[index];
        OrientedSize elementSize = new OrientedSize(o, element.DesiredSize.Width, element.DesiredSize.Height);

        // Determine if we should use the element's desired size or the
        // fixed item width or height
        double directGrowth = directDelta != null ?
            directDelta.Value :
            elementSize.Direct;

        // Arrange the element
        Rect bounds = isHorizontal ?
            new Rect(directOffset, indirectOffset, directGrowth, indirectGrowth) :
            new Rect(indirectOffset, directOffset, indirectGrowth, directGrowth);
        element.Arrange(bounds);

        // Update offset for next time
        directOffset += directGrowth + directSlackSlice;
    }
}

That's a WrapPanel and I am outta here... [A balanced WrapPanel implementation for Silverlight and WPF!]

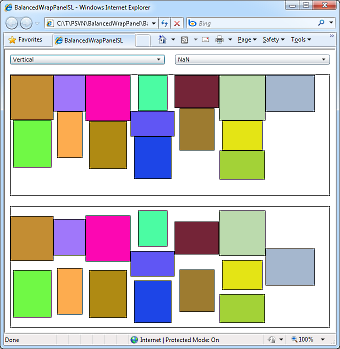
A customer contacted me a few days ago asking whether there was an easy way to make the Silverlight/WPF WrapPanel use all available space to spread its children out evenly instead of bunching them up against each other as it usually does. Instead of trying to explain what I mean by that, please have a look at the top half of the following screen shot:

BalancedWrapPanel, Horizontal, ItemWidth and ItemHeight set

The default WrapPanel behavior fills each horizontal (or vertical) line as much as it can before moving on to the next line - but it leaves all the extra space at the end of the line. That big, vertical gap of empty space at the right of the colored boxes is a bit unsightly, so what would be nice is if WrapPanel distributed the extra space across the entire line - kind of like you see in the bottom half of the window above!

My reply to the customer was that I didn't know of a way to do this with WrapPanel as-is, but that it should be pretty straightforward to modify the code and add the balancing logic. Well, I got curious on the bus yesterday, so I went ahead and implemented BalancedWrapPanel, the control I used in the second example above.


Click here to download the source code for BalancedWrapPanel and the Silverlight/WPF demo application.


To implement this alternate behavior, I started with the WrapPanel source code that comes with the Silverlight Toolkit. For WPF 3.5 (or Silverlight 4), I needed to copy WrapPanel.cs, OrientedSize.cs, and NumericExtensions.cs. For Silverlight 3 (which doesn't have LengthConverter) I also needed to copy LengthConverter.cs and TypeConverters.cs. I renamed "WrapPanel" to "BalancedWrapPanel" everywhere, linked the copied files into a new Visual Studio solution containing sample projects for Silverlight 3 and WPF 3.5, and compiled successfully. After that, it was just a matter of tweaking the code a bit, and I was done!

I've highlighted my additions to the existing helper method below:

private void ArrangeLine(int lineStart, int lineEnd, double? directDelta, double directMaximum, double indirectOffset, double indirectGrowth
{
    Orientation o = Orientation;
    bool isHorizontal = o == Orientation.Horizontal;
    UIElementCollection children = Children;

    // Make first pass to calculate the slack space
    double directLength = 0.0;
    for (int index = lineStart; index < lineEnd; index++)
    {
        // Get the size of the element
        UIElement element = children[index];
        OrientedSize elementSize = new OrientedSize(o, element.DesiredSize.Width, element.DesiredSize.Height);

        // Determine if we should use the element's desired size or the
        // fixed item width or height
        double directGrowth = directDelta != null ?
            directDelta.Value :
            elementSize.Direct;

        // Update total length
        directLength += directGrowth;
    }

    // Determine slack
    double directSlack = directMaximum - directLength;
    double directSlackSlice = directSlack / (lineEnd - lineStart + 1.0);
    double directOffset = directSlackSlice;

    // Make second pass to arrange items
    for (int index = lineStart; index < lineEnd; index++)
    {
        // Get the size of the element
        UIElement element = children[index];
        OrientedSize elementSize = new OrientedSize(o, element.DesiredSize.Width, element.DesiredSize.Height);

        // Determine if we should use the element's desired size or the
        // fixed item width or height
        double directGrowth = directDelta != null ?
            directDelta.Value :
            elementSize.Direct;

        // Arrange the element
        Rect bounds = isHorizontal ?
            new Rect(directOffset, indirectOffset, directGrowth, indirectGrowth) :
            new Rect(indirectOffset, directOffset, indirectGrowth, directGrowth);
        element.Arrange(bounds);

        // Update offset for next time
        directOffset += directGrowth + directSlackSlice;
    }
}

That's all there is to it: a few simple changes, a wave of the magic compiler wand, and POOF! a more pleasing layout for both platforms.

Woot! :)


Notes:

  • I could have refactored the method above for a slightly more efficient solution, but decided the code would be easier to understand if I changed as little as possible and kept the edits distinct.

  • Alternatively, I could have subclassed WrapPanel and implemented my changes in ArrangeOverride. This would have had the benefit of requiring fewer files from the Silverlight Toolkit, but would have required somewhat more code on my part. I didn't see a particularly compelling argument for either option, so I chose copy+edit because it demonstrates how really easy it is to reuse code from the Silverlight Toolkit, because it's more flexible in general, and because it makes it easy to add further enhancements in the future.

  • The example screen shot above uses WrapPanel's ItemWidth and ItemHeight properties to specify that all items should take up the same space. That seemed like the most likely case for someone who wants to use the new balancing behavior. However, the changes I've made work just as well when these properties are unset (i.e., NaN). They also work well when using a vertically-oriented BalancedWrapPanel - as the following screen shot shows:

    BalancedWrapPanel, Vertical, ItemWidth and ItemHeight not set
  • If you download the source code and build for Silverlight 4, you'll get the following warning because Silverlight 4 adds support for LengthConverter:

    warning CS0436: The type 'System.Windows.LengthConverter' in '...\LengthConverter.cs' conflicts with the imported type 'System.Windows.LengthConverter' in '...\System.Windows.Controls.Toolkit.dll'.

    You can either ignore the warning or remove the files LengthConverter.cs and TypeConverters.cs from the project.

Normal booting is old school [Windows 7 tricks detailed: USB key install, VHD creation, and native VHD boot/dual-boot!]

Windows 7 can boot and run in some ways that are a little surprising when you first learn about them. One example is that it can seamlessly install from any sufficiently large USB key; another is that it can natively boot VHD files. Neither of these is hard to configure and both have already been discussed by other web sites. However, it has been my experience that some of the relevant information on the web is confusing, misleading, or incomplete. So in the interest of saving others - and myself! - some trouble, I explain a few interesting scenarios below with exact steps and brief notes on what each step does. (That way, if anything goes wrong, troubleshooting is a lot easier.)

If you already do this kind of thing and have a process that's working for you, there's probably little here that's new. But if you've been thinking of getting your feet wet with any of this, maybe I can help make things a little easier! :)


Notes:

  • The tasks described here are potentially dangerous and can result in the complete loss of your data if done improperly. Always back up your data first, think about what you're doing, check your work, and otherwise take sensible precautions! While I've done my best to ensure the steps below work as intended, I can offer no guarantee they'll work the same under all conditions. Caveat emptor.
  • Things you type look like this - things you do look like [this] - things you need to replace when you type them (like drive letters that vary by machine) look like this.
  • Unless otherwise noted, all tasks should be carried out on a machine running Windows 7.
  • Each task is self-contained and can be done independently of the others.
  • Although I refer to Windows 7 everywhere, Windows Server 2008 R2 supports these same scenarios as well.
  • While it's possible to apply BitLocker drive encryption to a natively-booted VHD, the host drive (i.e., the drive containing the VHD) can not be encrypted. (And if you're going to use BitLocker, you should be aware that the default location for pagefile.sys of a natively-booted VHD is on the host disk outside the VHD.)
  • Here are some good resources for more information:


Installing Windows 7 (or Vista) from a USB Key

Besides making it possible to install Windows on machines without a DVD drive, installing from a USB key has a big advantage: it's fast. All you need is a blank USB key that's big enough to hold everything on the DVD (typically about 3GB of data). Then follow these easy steps and - BAM! - install runs faster than ever!

  1. [Open a Command Prompt as administrator]

    Open the Start Menu, expand "All Programs", "Accessories", right-click on "Command Prompt", then "Run as administrator".

  2. [Insert the USB key]

    Give the system a moment to identify it.

  3. diskpart

    Run the interactive disk partitioning tool.

  4. list disk

    Display the available disks.

  5. select disk #

    Select the USB key; identify it using the "Size" column. USB keys will usually be near the bottom of the list, especially if they've just been plugged-in (when they're likely to be last).

  6. list disk

    Look for the '*' identifying the selected disk and be sure you've selected the right one because the next step will delete all data on that disk.

  7. clean

    Remove all partition/formatting information from the selected disk.

  8. create partition primary

    Create a primary partition on the selected disk.

  9. format quick

    Format the new partition of the selected disk with the default file system.

  10. active

    Mark the new partition on the selected disk active and bootable.

  11. assign

    Assign a drive letter to the new volume of the selected disk.

  12. list volume

    Display the available volumes. Look for the '*' identifying the newly created volume.

  13. exit

    Exit the interactive disk partitioning tool.

  14. robocopy W:\ U:\ /e

    Copy the entire contents of the Windows 7 (or Vista) DVD in drive W to the USB key at drive U.

  15. [Safely remove/unplug the USB key]

    This key can now be inserted in any machine that supports booting from USB (nearly all of them do these days). The experience will be just the same as if the original DVD were used - but it runs considerably faster!

    Note: You may need to hit a special key as the machine starts to tell it to boot from the USB key instead of the internal hard drive - it's usually one of F2/F12/DEL/ESC, but check the manual if you're not sure.


Create a VHD containing an up-to-date Windows 7 image

Installing from USB may be fast, but what's even faster is not having to install at all! If you'll be running Windows 7 in Windows Virtual PC, Hyper-V, or natively from a VHD, it's convenient to start out with an image that already has the bits in the right places and the latest security patches applied. What's cool is that there's a script to make creating one of these VHDs easy: WIM2VHD by Mike Kolitz. Start by going to that web site and following the directions to download WIM2VHD and its dependencies before carrying out the steps below.

  1. [Open a Command Prompt as administrator]

    Open the Start Menu, expand "All Programs", "Accessories", right-click on "Command Prompt", then "Run as administrator".

  2. [Change to the directory containing WIM2VHD.wsf]

    For convenience, this directory should also contain all the QFE patches that will be applied.

  3. cscript WIM2VHD.wsf
      /wim:W:\sources\install.wim
      /sku:ULTIMATE
      /disktype:fixed
      /size:10000
      /vhd:Windows7Ultimate.vhd
      /qfe:Windows6.1-KB973525-x86.msu,Windows6.1-KB974332-x86.msu,Windows6.1-KB974431-x86.msu,Windows6.1-KB974455-x86.msu,Windows6.1-KB974571-x86.msu,Windows6.1-KB975364-x86.msu,Windows6.1-KB975467-x86.msu,Windows6.1-KB976749-x86.msu
    

    Create a VHD named Windows7Ultimate.vhd from the original Windows 7 DVD in drive W using the Ultimate SKU, a fixed size disk of 10GB, and with the listed QFEs pre-applied.

    Note: I'm using the x86 DVD here, so I'm providing the x86 versions of the relevant security patches. This should all work the same for 64-bit, but I prefer 32-bit because it's smaller and works pretty much everywhere.

    Note: You can create a dynamic disk (which starts small and grows as necessary) by omitting the italic /disktype and /size options above. That's going to be faster and easier to deal with for Virtual PC and Hyper-V - but for native VHD boot a fixed size is easier and performs better. That's what I'm going to do in the next task, so I've specified a small, fixed disk above. (Please refer to the FAQ for more detail.)

    Note: Per the FAQ, "Native boot from VHD is only available with Windows 7 Enterprise, Windows 7 Ultimate and all versions of Windows Server 2008 R2."


Configure a clean machine for native VHD booting

Is it possible to boot a machine without a "real" operating system? Yes!

The steps below will clean a machine and configure it to boot into a VHD image from a nearly-empty hard drive. While there are some sensible reasons to do this (e.g., implementing poor-man's undo disks or making it easy to transfer a pre-configured Windows 7 install around), this is mainly just a cool way to show off. :) Rumor has it that these steps can even be used to create a USB key that hosts and boots a running copy of Windows 7, though I don't have a USB key large enough to try myself. (And besides, that would probably wear out the USB key's flash memory quite quickly.)

Note: If you already have Windows 7 installed on a machine, and want to add an additional boot option for VHD, please scroll down to the next task instead.

  1. [Boot the machine from the Windows 7 DVD or a Windows 7 USB key created by the steps above]

    Load a simple shell that can be used to make low-level changes to the disk.

  2. [Wait for the "Install Windows" dialog to display]

    Allow the system to boot completely.

  3. [Optional: Plug in an external USB drive containing the VHD image]

    If you're booting from the DVD or using a USB key that's too small to hold the 10GB VHD image, you can store the VHD file on a separate USB hard disk. Plug that disk in now, and give the system a moment to find it and assign it a drive letter.

  4. [Press Shift+F10]

    Open an interactive command prompt with administrator permissions

  5. diskpart

    Run the interactive disk partitioning tool.

  6. list disk

    Display the available disks.

  7. select disk #

    Select the primary hard disk; it will usually be at index 0.

  8. list disk

    Look for the '*' identifying the selected disk and be sure you've selected the right one because the next step will delete all data on that disk.

  9. clean

    Remove all partition/formatting information from the selected disk.

  10. create partition primary

    Create a primary partition on the selected disk.

  11. format quick

    Format the new partition of the selected disk with the default file system.

  12. active

    Mark the new partition on the selected disk active and bootable.

  13. assign

    Assign a drive letter to the new volume of the selected disk.

  14. list volume

    Display the available volumes. Look for the '*' identifying the newly created volume.

  15. exit

    Exit the interactive disk partitioning tool.

  16. copy E:\Windows7Ultimate.vhd C:\

    Copy the VHD file Windows7Ultimate.vhd from (external) drive E to the now-empty primary hard drive C. This may take a little while...

  17. diskpart

    Run the interactive disk partitioning tool.

  18. select vdisk file=C:\Windows7Ultimate.vhd

    Select the VHD file Windows7Ultimate.vhd just copied to the primary hard drive C. Make sure not to reference the VHD file on the removable disk because that disk won't be available in the future.

  19. attach vdisk

    Attach the selected virtual disk to the system.

  20. list volume

    Display the available volumes. Look for the new virtual disk volume; identify it using the "Size" column (it will probably be the last one listed).

  21. exit

    Exit the interactive disk partitioning tool.

  22. bcdboot V:\Windows /s C:

    Configure primary hard disk drive C to boot into the copy of Windows installed on virtual drive V (the newly attached virtual disk volume).

  23. exit

    Close the Command Prompt window.

  24. [Close the "Install Windows" dialog by clicking the 'X' in the upper-right corner]

    Cancel the install process.

  25. [Confirm you want to cancel the install process]

    Yes, really cancel the install process.

  26. [Wait while the machine automatically reboots]

    Allow the machine to boot into the new VHD image. (Note: This may require unplugging the USB key and/or external USB drive.) After booting into the VHD image, Windows will run through the last stages of setup (e.g., user name, time zone, etc.) and finalize the install.

    Enjoy your new VHD-based Windows!


Add native VHD booting to a machine with Windows 7

If you already have a machine with Windows 7 installed (perhaps via the previous set of steps), you can modify it to boot a separate instance of Windows 7 from VHD.

  1. [Open a Command Prompt as administrator]

    Open the Start Menu, expand "All Programs", "Accessories", right-click on "Command Prompt", then "Run as administrator".

  2. copy E:\Windows7Ultimate.vhd C:\

    Copy the VHD file Windows7Ultimate2.vhd from (any) drive E to drive C which should be the machine's primary hard disk. (It will already contain a VHD file if you're continuing along from the previous task.) Make sure drive C does not correspond to a VHD-based disk.

  3. bcdedit /copy {default} /d "Windows 7 VHD"

    Creates a copy of the default boot configuration with the name Windows 7 VHD. Note the GUID that is returned by this command; use it in place of GUID in the following commands.

  4. bcdedit /set GUID device vhd=[C:]\Windows7Ultimate2.vhd

    Set the device for the new boot configuration to the Windows7Ultimate2.vhd file on drive C. (Note: Use the "[C:]\..." syntax exactly as shown above with the square brackets.)

  5. bcdedit /set GUID osdevice vhd=[C:]\Windows7Ultimate2.vhd

    Set the OS device for the new configuration to the Windows7Ultimate2.vhd file on drive C. (Note: Use the "[C:]\..." syntax exactly as shown above with the square brackets.)

  6. [Reboot and choose the new ""Windows 7 VHD" option]

    Boot into the new VHD.

    Note: If that doesn't work, please have a look at the end of this document and try the "detecthal on" step. I haven't found this to be necessary, so I haven't listed it - but if others find that it's helpful, I'll call that out.

Tags: Technical