That's a WrapPanel and I am outta here... [A balanced WrapPanel implementation for Silverlight and WPF!]
A customer contacted me a few days ago asking whether there was an easy way to make the Silverlight/WPF WrapPanel use all available space to spread its children out evenly instead of bunching them up against each other as it usually does. Instead of trying to explain what I mean by that, please have a look at the top half of the following screen shot:
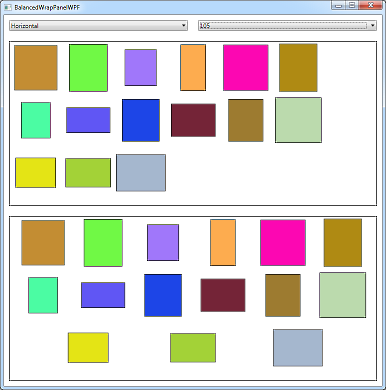
The default WrapPanel behavior fills each horizontal (or vertical) line as much as it can before moving on to the next line - but it leaves all the extra space at the end of the line. That big, vertical gap of empty space at the right of the colored boxes is a bit unsightly, so what would be nice is if WrapPanel distributed the extra space across the entire line - kind of like you see in the bottom half of the window above!
My reply to the customer was that I didn't know of a way to do this with WrapPanel as-is, but that it should be pretty straightforward to modify the code and add the balancing logic. Well, I got curious on the bus yesterday, so I went ahead and implemented BalancedWrapPanel, the control I used in the second example above.
To implement this alternate behavior, I started with the WrapPanel source code that comes with the Silverlight Toolkit. For WPF 3.5 (or Silverlight 4), I needed to copy WrapPanel.cs, OrientedSize.cs, and NumericExtensions.cs. For Silverlight 3 (which doesn't have LengthConverter) I also needed to copy LengthConverter.cs and TypeConverters.cs. I renamed "WrapPanel" to "BalancedWrapPanel" everywhere, linked the copied files into a new Visual Studio solution containing sample projects for Silverlight 3 and WPF 3.5, and compiled successfully. After that, it was just a matter of tweaking the code a bit, and I was done!
I've highlighted my additions to the existing helper method below:
private void ArrangeLine(int lineStart, int lineEnd, double? directDelta, double directMaximum, double indirectOffset, double indirectGrowth
{
    Orientation o = Orientation;
    bool isHorizontal = o == Orientation.Horizontal;
    UIElementCollection children = Children;

    // Make first pass to calculate the slack space
    double directLength = 0.0;
    for (int index = lineStart; index < lineEnd; index++)
    {
        // Get the size of the element
        UIElement element = children[index];
        OrientedSize elementSize = new OrientedSize(o, element.DesiredSize.Width, element.DesiredSize.Height);

        // Determine if we should use the element's desired size or the
        // fixed item width or height
        double directGrowth = directDelta != null ?
            directDelta.Value :
            elementSize.Direct;

        // Update total length
        directLength += directGrowth;
    }

    // Determine slack
    double directSlack = directMaximum - directLength;
    double directSlackSlice = directSlack / (lineEnd - lineStart + 1.0);
    double directOffset = directSlackSlice;

    // Make second pass to arrange items
    for (int index = lineStart; index < lineEnd; index++)
    {
        // Get the size of the element
        UIElement element = children[index];
        OrientedSize elementSize = new OrientedSize(o, element.DesiredSize.Width, element.DesiredSize.Height);

        // Determine if we should use the element's desired size or the
        // fixed item width or height
        double directGrowth = directDelta != null ?
            directDelta.Value :
            elementSize.Direct;

        // Arrange the element
        Rect bounds = isHorizontal ?
            new Rect(directOffset, indirectOffset, directGrowth, indirectGrowth) :
            new Rect(indirectOffset, directOffset, indirectGrowth, directGrowth);
        element.Arrange(bounds);

        // Update offset for next time
        directOffset += directGrowth + directSlackSlice;
    }
}
That's all there is to it: a few simple changes, a wave of the magic compiler wand, and POOF! a more pleasing layout for both platforms.
Woot!
Notes:
-
I could have refactored the method above for a slightly more efficient solution, but decided the code would be easier to understand if I changed as little as possible and kept the edits distinct.
-
Alternatively, I could have subclassed
WrapPaneland implemented my changes in ArrangeOverride. This would have had the benefit of requiring fewer files from the Silverlight Toolkit, but would have required somewhat more code on my part. I didn't see a particularly compelling argument for either option, so I chose copy+edit because it demonstrates how really easy it is to reuse code from the Silverlight Toolkit, because it's more flexible in general, and because it makes it easy to add further enhancements in the future. -
The example screen shot above uses
WrapPanel's ItemWidth and ItemHeight properties to specify that all items should take up the same space. That seemed like the most likely case for someone who wants to use the new balancing behavior. However, the changes I've made work just as well when these properties are unset (i.e.,NaN). They also work well when using a vertically-orientedBalancedWrapPanel- as the following screen shot shows: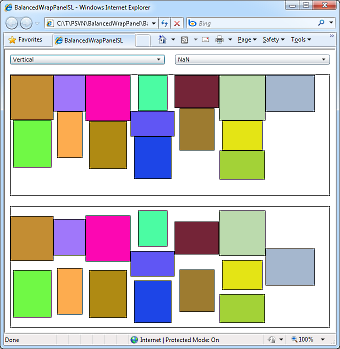
-
If you download the source code and build for Silverlight 4, you'll get the following warning because Silverlight 4 adds support for
LengthConverter:warning CS0436: The type 'System.Windows.LengthConverter' in '...\LengthConverter.cs' conflicts with the imported type 'System.Windows.LengthConverter' in '...\System.Windows.Controls.Toolkit.dll'.
You can either ignore the warning or remove the files
LengthConverter.csandTypeConverters.csfrom the project.