Lying to the layout system for a good cause [Bringing LayoutTransform to Silverlight 2!]
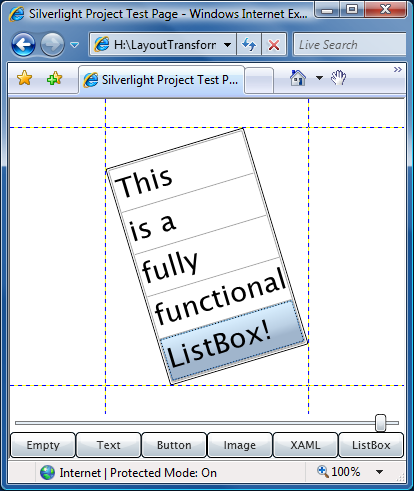
People who want to rotate visual elements in Silverlight 2 are likely to use RotateTransform within RenderTransform - but they may not always get the results they expect! For example, using RenderTransform to achieve the following effect:
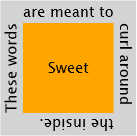
Actually renders like this:
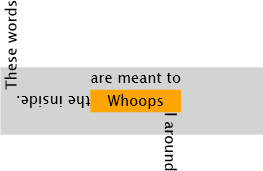
But the problem isn't with RenderTransform - it's with using the wrong tool for the job! By design, RenderTransform applies its transformations (a rotation in this case) after the layout system has performed its measure/arrange pass. So when the elements in the example are being measured and arranged, the text is still horizontal. It's only after everything has been positioned that the text is finally rotated - and ends up in the "wrong" place. While it's possible to correct for this discrepancy by hard-coding all the relevant offsets in the XAML (very brittle and error-prone) or by adjusting all the offsets in code (only slightly more flexible - and a lot more work), these aren't great alternatives.
The right tool for the job is LayoutTransform which applies its transformations before the layout pass. With LayoutTransform, the text in the example is already rotated by the time the elements are measured and arranged, and the desired effect can be achieved quite simply.
But there's a catch: LayoutTransform doesn't exist in Silverlight 2 (Beta 1)...
However, there's no reason to let that stop us. Rotation is rotation whenever it happens, so maybe there's a way to get the already-optimized RenderTransform implementation to do the real work earlier in the layout pass. Unfortunately, we can't change when RenderTransform is applied.
But it turns out that we can tell a very carefully crafted set of lies to the layout system during the measure/arrange pass in order to convince it to lay things out as if it supported LayoutTransform - then we let RenderTransform do the work of actually rotating the content. The result is that we've got something that looks like LayoutTransform and behaves like LayoutTransform - so it might as well be LayoutTransform! :)
I've done just this and the result is something I've called LayoutTransformControl. The complete implementation can be found in LayoutTransformControl.cs in the attached ZIP. The XAML for LayoutTransformControl is quite simple and follows the well-known WPF Decorator model (ex: Border, Viewbox):
<local:LayoutTransformControl Angle="15">
    <TextBlock Text="I am rotated 15 degrees!"/>
</local:LayoutTransformControl>
Note: This assumes the "local" namespace prefix has been mapped to an assembly containing the LayoutTransformControl implementation:
xmlns:local="clr-namespace:LayoutTransformControlSample;assembly=YourAssemblyName"
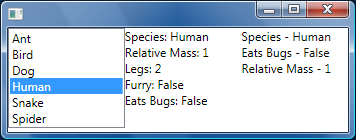
In fact, the first picture of this post (the one that looked right!) was done with LayoutTransformControl. But it's easy to get simple scenarios right... So I also wrote a sample application that lets you interactively change the rotation angle and swap in different content:
Attribution: The XAML example came from a post on designerslove.net; the image is from the set of stock Windows Vista wallpapers.
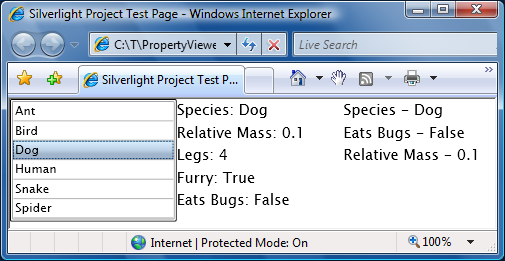
But it's easy to get a sample right... So I also wrote a test harness to exercise a handful of interesting elements in most of the interesting constraint scenarios and show RenderTransform along with LayoutTransformControl:
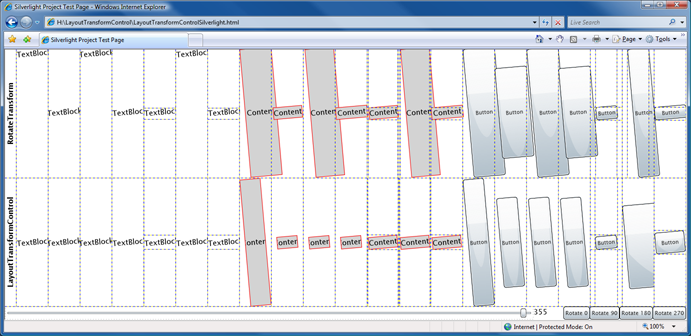
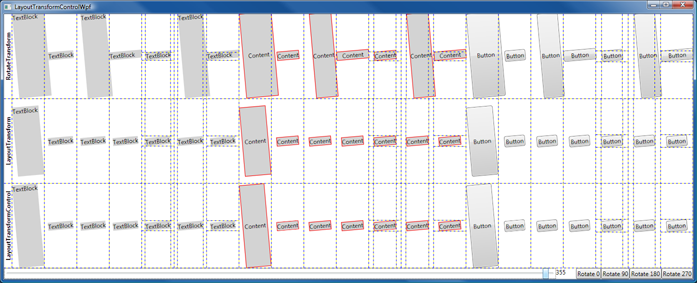
But the rules of layout are sufficiently complex and subtle that it's hard to tell if LayoutTransformControl is behaving properly without knowing how it's supposed to behave... So the test harness (and LayoutTransformControl!) also runs under WPF where LayoutTransform is supported and can be used to visually verify that LayoutTransformControl is doing what it should by comparing the bottom two rows:
Whew! :)
So - after all that posturing and seemingly comprehensive test coverage, you might expect me to be confident that LayoutTransformControl behaves correctly under all circumstances. Well... no. LayoutTransform is conceptually simple, but exhibits all kinds of weird and unexpected behaviors in practice. I've lost count of the number of times I had to stare at a bit of LayoutTransform output and figure out why it's correct - sometimes more than once for the same output! Add to that the fact that LayoutTransformControl is doing everything outside the core layout system, and I'm kind of surprised any of this works... :)
I do believe that LayoutTransformControl behaves correctly in all scenarios I've subjected it to, but I would not be surprised at all to hear about other scenarios where it breaks down. If you think you've found such a scenario, please let me know and I'll try to figure out what might be going on. (But before you do, please check the behavior on WPF - that's the first thing I'll do anyway!)
Notes:
- This release of LayoutTransformControl supports only rotation because that's by far the most common scenario. However, I'm prepared to add support for scale, skew, and matrix if folks find this useful. (Party trivia: Translation has no effect during LayoutTransform.)
- For the most part, using LayoutTransformControl is simply a matter of wrapping the desired content and setting the angle. But it's important to note that some properties will need to be moved from the child control to LayoutTransformControl. For example, when positioning things within a Grid, the Grid.Column and Grid.Row attached properties need to be set on LayoutTransformControl in order to be recognized by the parent Grid.
- Examination of the test matrices above reveals two things that deserve more explanation:
- Thing 1: The sizing of the Buttons in the Silverlight test matrix is different than in the WPF matrix. At first glance, the sizing seems to be wrong, but that's not actually the case. The default Button style in Silverlight Beta 1 has a bug that interferes with proper layout (and is completely unrelated to LayoutTransformControl). This can be seen with a simple example; adding the following to a new project should show a small, centered Button just like it does on WPF:
<Button Content="Button" HorizontalAlignment="Center" VerticalAlignment="Center"/>
However, on Silverlight Beta 1 the result is a very large Button instead. The problem is that the template in the default style includes the following:<Path Stretch="Fill" .../>
The Stretch on that Path element causes the Button to measure much larger than it should (and a similar issue with the Line element affects the default ListBoxItem style). It's because the Button behaves as it does that sizing with LayoutTransformControl looks like it does. It's comforting to note that applying the Silverlight Button style to a WPF Button and using the real LayoutTransform gives the same wrong-looking behavior. - Thing 2: The rotated rectangle used by LayoutTransformControl for its child content is slightly different than that used by LayoutTransform under certain circumstances. This causes the child control to layout in a slightly longer, narrower rectangle and can be seen in the first column of the WPF test matrix. Perhaps surprisingly, this difference is deliberate. When determining the parameters of the rotated rectangle, the WPF algorithm finds the largest rectangle possible (as measured by area). It just so happens that the algorithm I came up with manages to find an even larger rectangle in certain cases. :) As far as I've seen, the algorithm in LayoutTransformControl is never worse - and sometimes better - so I decided it's a winner.
- Thing 1: The sizing of the Buttons in the Silverlight test matrix is different than in the WPF matrix. At first glance, the sizing seems to be wrong, but that's not actually the case. The default Button style in Silverlight Beta 1 has a bug that interferes with proper layout (and is completely unrelated to LayoutTransformControl). This can be seen with a simple example; adding the following to a new project should show a small, centered Button just like it does on WPF:
- The example elements in the test matrix were chosen as follows:
- Button - Represents the classic layout-friendly control which has a preferred size, but is willing to go smaller or larger as space permits
- ContentControl - Containing a Border and a TextBlock, this simple Button-like layout acts like a Button should on Silverlight
- TextBlock - Interesting for layout because it refuses to render smaller than the size it asked for
- I've omitted any technical discussion of how LayoutTransformControl works from this blog post. For now, curious readers can refer to the commented source code. If there's interest, I'll write a follow-up post explaining what's really going on under the covers.
LayoutTransformControl was an interesting project that demonstrates once again the power and versatility of the WPF/Silverlight layout system. LayoutTransform and RenderTransform are like peanut butter and jelly - and I'm glad to help reunite them on Silverlight. If you've got a layout problem and RenderTransform isn't doing what you need, maybe LayoutTransformControl is the solution!