The blog of dlaa.me

Posts from January 2010

The Code Not Taken [Comparing two ways of creating a full-size Popup in Silverlight - then picking the best]

Update on 2010-06-17: Silverlight 4's behavior is different than Silverlight 3's (which is described below); I examine the difference in this follow-up post.


When it comes time to display a Popup that overlays the entire Silverlight plug-in, most people do it the same way. Unfortunately, although the typical approach appears correct at first glance (and may even survive a test pass!), there are some problems that are just about guaranteed to surface once the application is released. The purpose of this post is to educate people about those issues - and suggest an alternative approach that is easier to get right.


[Click here to download the complete source code for the sample (a Visual Studio 2010 (Beta 2) project targeting Silverlight 3)]


Let's start with a pretty typical first attempt at creating a full-plug-in Popup. This code uses Application.Current.Host.Content to get the size of the plug-in, creates a Popup with some simple content, sizes the content to match the plug-in's dimensions, and opens the Popup:

var root = Application.Current.Host.Content;
var popup = new Popup();
var child = CreateChildElement();
child.Width = root.ActualWidth;
child.Height = root.ActualHeight;
popup.Child = child;
popup.IsOpen = true;
Aside: I'm following Raymond Chen's convention that code in italics is wrong. So please don't start copy/pasting quite yet... :)

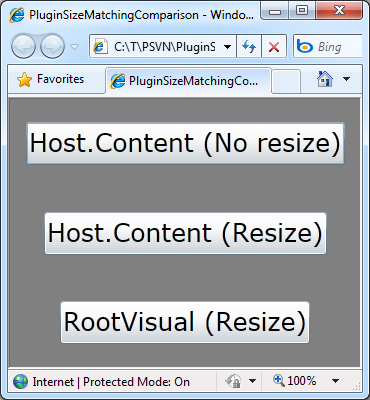
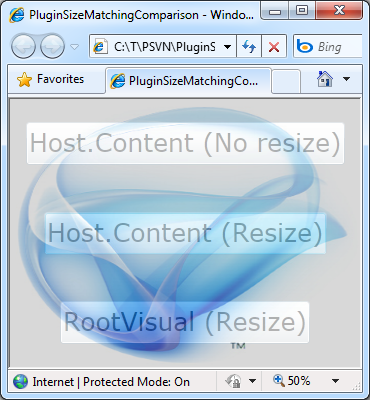
Here's how the sample application looks when we run it:

Initial state

When you press the top button to run the snippet above, the CreateChildElement method creates an Image element (showing the Silverlight logo) set to stretch horizontally and vertically. Everything looks fine immediately after pressing the button, but here's what happens if you make the browser a little bigger while the Popup is still on screen:

Resize not handled

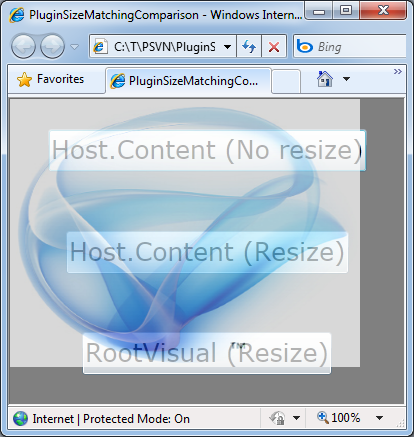
Oops, we forgot to handle the resize event. No big deal - except that it's actually worse than that... Here's what things look like if you instead press the top button when the browser's zoom setting is set to 50% (as indicated by the magnifying glass at the bottom right of the browser window):

Zoom not respected

Ouch! As it turns out, this browser zoom problem is what seems to trip people up the most. When the browser is zoomed, some of the coordinates Silverlight exposes are affected - and Host.Content is one of them. Unless the browser zoom is at exactly 100%, basing anything on Host.Content's ActualWidth/ActualHeight without manually compensating for the zoom results in sizes that are too small (like we see here) or too large.


Okaaay, let's correct the resize thing first because it's easy and then we'll worry about zoom. Here's a simple modification of the code above to handle the Host.Content's Resized event:

var root = Application.Current.Host.Content;
var popup = new Popup();
var child = CreateChildElement();
EventHandler rootResized = delegate
{
    child.Width = root.ActualWidth;
    child.Height = root.ActualHeight;
};
root.Resized += rootResized;
rootResized(null, null);
popup.Child = child;
popup.IsOpen = true;
Aside: You may be wondering why I didn't use a Binding to synchronize the Width and Height properties instead of futzing around with an event handler like this. Well, I would have liked to, but there's the small issue that Silverlight doesn't provide property change notifications for ActualWidth/ActualHeight changes. So while I do recommend using Binding whenever you can, that's not really an option here.

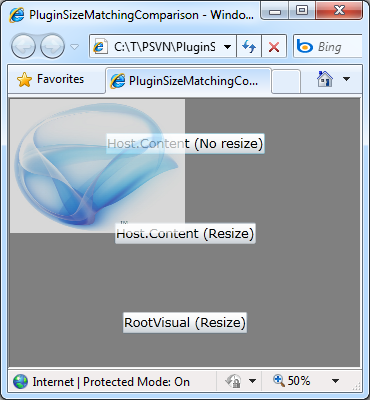
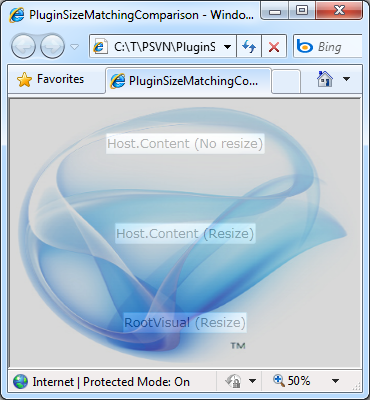
So let's run the sample application and press the middle button to see how those changes worked out:

Zoom undone

Well, things look right at first. Though I don't demonstrate it here, we've successfully fixed the browser resize issue and that's good. But something is still wrong in the image above... If you look carefully, you can see that the browser zoom is set at 50% - yet somehow the image is sized correctly despite us not doing any work to handle the browser's zoom setting yet. How can that be? Hold on, Sherlock, there's another clue in the image: look at the size of the buttons. Yeah, those buttons are not the size they should be for the 50% zoom setting that's active (refer back to the previous image if you don't believe me). Those buttons are at the 100% size - wha??

Aside: Hey, don't feel bad, it weirded me out, too. :)

It turns out that when you attach an event handler to the Resized event, Silverlight disables its support for browser zoom. The reason being that Silverlight assumes the application has chosen to handle that event because it wants full control over the zoom experience (via ZoomFactor and Zoomed, perhaps). Now that's really kind of thoughtful of it and everything - but in this case it's not what we want. In fact, that behavior introduces a somewhat jarring experience because the graphics visibly snap between 50% and 100% as the Resized event handler is attached and detached. Our sample application is perfectly happy to respect the browser's zoom settings; it just wants to know when it has been resized so it can update the Popup's dimensions. Irresistible force, meet immovable object...


Like I said at the beginning, most people seem to gravitate to the approach above. But there's another option - one which I'll suggest is better because it doesn't suffer from either of these problems: use Application.Current.RootVisual instead!

var root = Application.Current.RootVisual as FrameworkElement;
var popup = new Popup();
var child = CreateChildElement();
SizeChangedEventHandler rootSizeChanged = delegate
{
    child.Width = root.ActualWidth;
    child.Height = root.ActualHeight;
};
root.SizeChanged += rootSizeChanged;
rootSizeChanged(null, null);
popup.Child = child;
popup.IsOpen = true;

As you can see, the code looks nearly identical to what we had before (except it's not in italics!). But by keeping all the math inside the domain of the plug-in, the need to account for browser zoom or hook the troublesome Resized event goes away completely! Instead, this code responds to the RootVisual's SizeChanged event and behaves correctly at first, when the browser is resized, for different zoom settings, and even when the zoom setting is changed while the Popup is visible!

Success!

What more could you ask for?


There are just two things worth calling out:

  1. The RootVisual must be an instance of a FrameworkElement-based class (which it is by default and 99.9% of the rest of the time; MainPage is a UserControl and that derives from FrameworkElement).
  2. If the size of the RootVisual is explicitly set for some reason, the Popup will match that size and not the size of the plug-in itself (though I can't imagine why you'd do this).

Those small caveats aside, it's been my experience that the RootVisual approach is more naturally correct - by which I mean that it tends to be right by virtue of its simplicity and the fact that it hooks up to the right thing. I don't promise that it's the best choice for all scenarios, but I'll suggest that it's worth considering first for most scenarios. There are probably ways to make either approach do what you want - but I prefer to start with the one that's less troublesome! :)

Flattery will get you everywhere [Html5Canvas source code now available on CodePlex!]

A few months ago, I described a proof-of-concept project and learning exercise I'd worked on to implement some of the basics of the HTML 5 <canvas> specification using Silverlight as the underlying platform: HTML 5 <canvas> announcement, fix for other cultures. As I explain in the introductory post, I didn't set out to come up with the most efficient, most complete implementation - just to get some familiarity with the <canvas> specification and see what it would be like to implement it with Silverlight. Html5Canvas was a lot of fun and even generated a small amount of buzz when I posted it...

Sample application in Firefox

Earlier today, fellow programmer Jon Davis emailed me to ask if he could put that sample up on CodePlex to share with others in the community. I replied that he was welcome to do so (all the code I post is under the OSI-approved Ms-PL license) - and soon got a reply from Jon pointing me to:

http://slcanvas.codeplex.com/

Jon has written about his motivations here - I encourage interested parties to have a read. [And I swear I didn't bribe him to say nice things! :) ] This was not the first time I'd been asked about putting the source code for HTML 5 <canvas> on CodePlex, so if you've been waiting for an opportunity like this, please follow up with Jon to see how you might be able to help contribute to the effort!

Looks the same - with half the overhead! [Update to free ConvertClipboardRtfToHtmlText tool and source code gives more compact output; Can you do better?]

I recently updated my ConvertClipboardRtfToHtmlText tool to work with Visual Studio 2010 (Beta 2). This utility takes the RTF clipboard format Visual Studio puts on the clipboard, converts it into HTML, and substitutes the converted text for pasting into web pages, blog posts, etc.. It works great and I use it all the time for my blog.

In the comments to that post, kind reader Sameer pointed out that the converted HTML was more verbose than it needed to be - and I quickly replied that it wasn't my fault. :) Here's the example Sameer gave (which is particularly inefficient):

public partial class

And here's the corresponding HTML (on multiple lines because it's so long):

<pre>
<span style='color:#000000'></span>
<span style='color:#0000ff'>public</span>
<span style='color:#000000'> </span>
<span style='color:#0000ff'>partial</span>
<span style='color:#000000'> </span>
<span style='color:#0000ff'>class</span>
</pre>

Yup, that's almost obnoxiously inefficient: there's a useless black span at the beginning and a bunch of pointless color swapping for both of the space characters. Something more along the lines of the following would be much better:

<pre style='color:#0000ff'>public partial class</pre>

The HTML for both examples ends up looking exactly the same in a web browser, so wouldn't it be nice if the tool produced the second, more compact form?

I thought so, too!


[Click here to download the ConvertClipboardRtfToHtmlText tool along with its complete source code.]


I had a bit of spare time the other night and decided to make a quick attempt at optimizing the output of ConvertClipboardRtfToHtmlText according to some ideas I'd been playing around with. Specifically, instead of outputting the converted text as it gets parsed, the new code builds an in-memory representation of the entire clipboard contents and associated color changes. After everything has been loaded, it performs some basic optimization steps to remove unnecessary color changes by ignoring whitespace and collapsing text runs. Once that's been done, the optimized HTML is placed on the clipboard just like before.

Here's what the relevant code looks like (recall that this tool compiles for .NET 2.0, so it's can't use Linq):

int j = runs.Count - 1;
while (0 <= j)
{
    Run run = runs[j];

    // Remove color changes for whitespace runs
    if (0 == run.Text.Trim().Length)
    {
        runs.RemoveAt(j);
        if (j < runs.Count)
        {
            runs[j].Text = run.Text + runs[j].Text;
        }
        else
        {
            j--;
        }
        continue;
    }

    // Remove redundant color changes
    if ((j + 1 < runs.Count) && (run.Color == runs[j + 1].Color))
    {
        runs.RemoveAt(j);
        runs[j].Text = run.Text + runs[j].Text;
    }

    j--;
}

// Find most common color
Dictionary<Color, int> colorCounts = new Dictionary<Color, int>();
foreach (Run run in runs)
{
    if (!colorCounts.ContainsKey(run.Color))
    {
        colorCounts[run.Color] = 0;
    }
    colorCounts[run.Color]++;
}
Color mostCommonColor = Color.Empty;
int mostCommonColorCount = 0;
foreach (Color color in colorCounts.Keys)
{
    if (mostCommonColorCount < colorCounts[color])
    {
        mostCommonColor = color;
        mostCommonColorCount = colorCounts[color];
    }
}

...

// Build HTML for run stream
sb.Length = 0;
sb.AppendFormat("<pre style='color:#{0:x2}{1:x2}{2:x2}'>", mostCommonColor.R, mostCommonColor.G, mostCommonColor.B);
foreach (Run run in runs)
{
    if (run.Color != mostCommonColor)
    {
        sb.AppendFormat("<span style='color:#{0:x2}{1:x2}{2:x2}'>", run.Color.R, run.Color.G, run.Color.B);
    }
    sb.Append(run.Text);
    if (run.Color != mostCommonColor)
    {
        sb.Append("</span>");
    }
}
sb.Append("</pre>");


The code comments explain what's going on and it's all pretty straightforward. The one sneaky thing is the part that finds the most commonly used color and makes that the default color of the entire block. By doing so, the number of span elements can be reduced significantly: switching to that common color becomes as simple as exiting the current span (which needed to happen anyway).

So was this coding exercise worth the effort? Is the resulting HTML noticeably smaller, or was this all just superficial messing around? To answer that, let's look at some statistics for converting the entire ConvertClipboardRtfToHtmlText.cs file:

Normal Optimized Change
Character count of .CS file 11,996 11,996 N/A
Character count converted HTML 32,091 21,158 -34%
Extra characters for HTML representation 20,095 9,162 -54%

Hey, those are pretty good results for just an hour's effort! And not only is the new representation significantly smaller, it's also less cluttered and easier to read - so it's easier to deal with, too. I'm happy with the improvement and switched to the new version of ConvertClipboardRtfToHtmlText a couple of posts ago. So if you notice my blog posts loading slightly faster than before, this could be why... :)


A challenge just for fun: I haven't thought about it too much (which could be my downfall), but I'll suggest that the output of the new approach is just about optimal for what it's doing. Every color change is now necessary, and they're about as terse as they can be. Unless I decide to throw away some information (ex: by using the 3-character HTML color syntax) or change the design (ex: by creating a bunch of 1-character CSS classes), I don't think things can get much better than this and still accurately reproduce the appearance of the original content in Visual Studio. Therefore, if you can reduce the overhead for this version of ConvertClipboardRtfToHtmlText.cs by an additional 5% (without resorting to invalid HTML), I will credit you and your technique in a future blog post! :)

Sometimes it takes a village to solve a problem [Workaround for a Visual Studio 2008 design-time issue with the WPF Toolkit when Blend 3 is installed]

Back in June, the "WPF" half of Silverlight/WPF Charting made its first official appearance with the release of the June 2009 WPF Toolkit. Having Charting be part of both the Silverlight Toolkit and the WPF Toolkit was always a goal of mine and I've heard from lots of customers who are using Charting with great success on WPF. By and large, everyone's feedback has been positive and the community enthusiasm has been fantastic to see!

Unfortunately there's one problem that's come up a few times which nobody really had enough context to solve. A user with Visual Studio 2008 and the June 2009 WPF Toolkit installed would be happily using the Data Visualization assembly (Charting) in their projects and everything would be working fine for weeks on end. Then one day they'd install Blend 3 and all of a sudden Visual Studio 2008 would fail trying to open the Charting project with a confusing "Problem Loading" error from the design surface:

'/Microsoft.Windows.Design.Developer;component/themes/GridAdorners.xaml' value cannot be assigned to property 'Source' of object 'System.Windows.ResourceDictionary'. Cannot create instance of 'GenericTheme' defined in assembly 'Microsoft.Windows.Design.Interaction, Version=3.5.0.0, Culture=neutral, PublicKeyToken=b03f5f7f11d50a3a'. Exception has been thrown by the target of an invocation.

The first thing most people would try is uninstalling Blend 3 - which fortunately "fixes" the problem - but makes for a crummy long-term solution...

Fortunately, we managed to get the right people from the Silverlight Toolkit, Blend 3, and Visual Studio 2008 teams in a room a few days ago to hash this out. The first bit of good news is that we did sort out enough of what's going on to come up with an easy workaround. The second bit of good news is that I've already made a change to the WPF Toolkit source code so the next official release won't trigger this problem. And the third bit of good news is that they're going to make sure the underlying issue is addressed in Visual Studio 2010 so this doesn't come up again!

Here's the official synopsis of the problem and the steps to implement the simple workaround:

Known Issue with WPF Toolkit June 2009, Visual Studio 2008, and Blend 3

If a customer has Visual Studio 2008, WPF Toolkit June 2009, and Blend 3 installed, and the WPF project in Visual Studio 2008 has a reference to System.Windows.Controls.DataVisualization.Toolkit.dll, you may see the following error message when opening the project or loading the designer:

Error 1 '/Microsoft.Windows.Design.Developer;component/themes/GridAdorners.xaml' value cannot be assigned to property 'Source' of object 'System.Windows.ResourceDictionary'. Cannot create instance of 'GenericTheme' defined in assembly 'Microsoft.Windows.Design.Interaction, Version=3.5.0.0, Culture=neutral, PublicKeyToken=b03f5f7f11d50a3a'. Exception has been thrown by the target of an invocation. Error at object 'ResourceDictionary_4'.

The problem can be triggered by dragging the Chart control from WPF Toolkit June 2009 from the Toolbox onto the WPF designer in Visual Studio.

To resolve this issue, use the following workaround:

From an account with elevated/administrative permissions, in the WPF Toolkit June 2009 install directory on the machine (typically "C:\Program Files\WPF Toolkit\v3.5.40619.1"):

  1. Rename System.Windows.Controls.DataVisualization.Toolkit.Design.dll to System.Windows.Controls.DataVisualization.Toolkit.Design.4.0.dll
  2. Rename System.Windows.Controls.DataVisualization.Toolkit.Design.pdb to System.Windows.Controls.DataVisualization.Toolkit.Design.4.0.pdb

Thank you for everyone's patience as we sorted this out. I wish we could have done so sooner, but I'm really glad we seem to have gotten to the bottom of it at last!


PS - If you still have problems after applying the fix, please let us know!

"I feel the need... the need for SPEED!" [Seven simple, performance-boosting tweaks for common Silverlight/WPF Charting scenarios]

No matter how fast things are, they never seem to be fast enough. Even if we had the world's most optimized code in the Silverlight/WPF Data Visualization assembly, I bet there would still be a couple of people who wanted better performance. :) Unfortunately, we have don't have the world's most optimized code, and performance concerns represent one of the most common customer issues with Charting. While I wish we had the resources to commit to a few weeks of focused performance work, things just haven't panned out like that so far.

Instead, I've got the next best thing: a collection of simple changes anyone can make to noticeably improve the performance of common scenarios with today's bits! To demonstrate the impact of each of these tips, I've created a new "Performance Tweaks" tab in my DataVisualizationDemos sample application. The controls on this new page let you pick-and-choose which optimizations you'd like to see - then allow you to run simple scenarios to get a feel for how effective those tweaks are. And because DataVisualizationDemos compiles for and runs on Silverlight 3, Silverlight 4, WPF 3.5, and WPF 4, it's easy to get a feel for how much benefit you can expect to see on any supported platform.

For each of the seven tips below, I list simple steps that show the performance benefit of the tip using the new sample page. Performance improvements are best experienced in person, so I encourage interested readers to download the demo and follow along at home! :)


[Click here to download the complete source code for the cross-platform DataVisualizationDemos sample application.]


Performance Tweaks Demo


Tip: Use fewer data points

Okay, this first tip is really obvious - but it's still valid! Fewer data points means less to process, less to manage, and less to render - all of which mean that scenarios with few points to tend to be faster and smoother than those with many points. You can often reduce the number of points in a scenario by plotting fewer values, aggregating similar values together, or by showing subsets of the whole data. This approach isn't always practical, but when it is, it's usually a big win - and has the added benefit that the resulting chart is less cluttered and can even be easier to understand!

Aside: Typical performance guidance for Silverlight and WPF recommends capping the total number of UI elements in the low- to mid-hundreds. Given that each of Charting's DataPoint instances instantiates around 5 UI elements, it's easy to see why rendering a chart with 1000 data points can start to bog the system down.

Slow: Reset, check only Simplified Template, Create Chart, Add Series, 1000 points, Populate

Fast: Reset, check only Simplified Template, Create Chart, Add Series, 50 points, Populate


Tip: Turn off the fade in/out VSM animations

By default, data points fade in and fade out over the period of a half second. This fade is controlled by a Visual State Manager state transition in the usual manner and therefore each DataPoint instance runs its own private animation. When there are lots of data points coming and going, the overhead of all these parallel animations can start to slow things down. Fortunately, the DataPoint classes are already written to handle missing states, so getting rid of these animations is a simple matter of modifying the default Template to remove the "RevealStates"/"Shown" and/or "RevealStates"/"Hidden" states.

Slow: Reset, uncheck everything, Create Chart, Add Series, 100 points, Populate

Fast: Reset, check only No VSM Transition, Create Chart, Add Series, 100 points, Populate


Tip: Change to a simpler DataPoint Template

I mentioned above that overwhelming the framework with lots of UI elements can slow things down. So in cases where it's not possible to display fewer points, it's still possible to display fewer elements by creating a custom Template that's simpler than the default. There is a lot of room here to creatively balance simplicity (speed) and visual appeal (attractiveness) here, but for the purposes of my demonstration, I've gone with something that's about as simple as it gets:

<Style x:Key="SimplifiedTemplate" TargetType="charting:ScatterDataPoint">
    <Setter Property="Template">
        <Setter.Value>
            <ControlTemplate TargetType="charting:ScatterDataPoint">
                <Grid
                    Width="5"
                    Height="5"
                    Background="{TemplateBinding Background}"/>
            </ControlTemplate>
        </Setter.Value>
    </Setter>
</Style>
Aside: This tip and the previous one are the only two tips that are mutually exclusive (because they both involve providing a custom DataPointStyle for the series). Otherwise, you have complete freedom to mix-and-match whatever tweaks work well for your scenario!

Slow: Reset, uncheck everything, Create Chart, Add Series, 100 points, Populate

Fast: Reset, check only Simplified Template, Create Chart, Add Series, 100 points, Populate


Tip: Specify fixed ranges for the axes

For convenience and ease-of-use, Charting's axes automatically analyze the data that's present in order to provide reasonable default values for their minimum, maximum, and interval. This works quite well in practice and you should hardly ever have to override the automatic range. However, the code that determines the automatic axis ranges isn't free. This cost isn't significant for static data, but if the underlying values are changing a lot, the small cost can accumulate and become noticeable. If you're fortunate enough to know the ranges over which your data will vary, explicitly specifying the axes and giving them fixed ranges will completely eliminate this overhead.

Slow: Silverlight 3, Reset, uncheck everything, Create Chart, Add Series, 100 points, Populate, Change Values

Fast: Silverlight 3, Reset, check only Set Axis Ranges, Create Chart, Add Series, 100 points, Populate, Change Values


Tip: Add the points more efficiently

Silverlight/WPF Charting is built around a model where any changes to the data are automatically shown on the screen. This is accomplished by detecting classes that implement the INotifyPropertyChanged interface and collections that implement the INotifyCollectionChanged interface and registering to find out about changes as they occur. This approach is incredibly easy for developers because it means all they have to touch is their own data classes - and Charting handles everything else! However, this system can be counterproductive in one scenario: starting with an empty collection and adding a bunch of data points all at once. By default, each new data point generates a change notification which prompts Charting to re-analyze the data, re-compute the axis properties, re-layout the visuals, etc.. It would be more efficient to add all the points at once and then send a single notification to Charting that its data has changed. Unfortunately, the otherwise handy ObservableCollection class doesn't offer a good way of doing this. Fortunately, it's pretty easy to add:

// Custom class adds an efficient AddRange method for adding many items at once
// without causing a CollectionChanged event for every item
public class AddRangeObservableCollection<T> : ObservableCollection<T>
{
    private bool _suppressOnCollectionChanged;

    public void AddRange(IEnumerable<T> items)
    {
        if (null == items)
        {
            throw new ArgumentNullException("items");
        }
        if (items.Any())
        {
            try
            {
                _suppressOnCollectionChanged = true;
                foreach (var item in items)
                {
                    Add(item);
                }
            }
            finally
            {
                _suppressOnCollectionChanged = false;
                OnCollectionChanged(new NotifyCollectionChangedEventArgs(NotifyCollectionChangedAction.Reset));
            }
        }
    }

    protected override void OnCollectionChanged(NotifyCollectionChangedEventArgs e)
    {
        if (!_suppressOnCollectionChanged)
        {
            base.OnCollectionChanged(e);
        }
    }
}

Slow: Reset, uncheck everything, Create Chart, Add Series, 500 points, Populate

Fast: Reset, check only Efficient Collection, Create Chart, Add Series, 500 points, Populate


Tip: Disable the data change animations

Because people perceive changes better when they're able to see the change happening, Charting animates all value changes to the underlying data points. So instead of a bar in a bar chart suddenly getting longer when its bound data value changes, the bar smoothly animates from its old value to its new value. This approach has another benefit: it calls attention to the value that's changed in a way that an instantaneous jump wouldn't. However, animating value changes can take a toll when there are lots of changes happening at the same time or when there are a continuous stream of changes over a long time. In cases like these, it can be helpful to lessen the default duration of the animation (a half second) by lowering the value of the series's TransitionDuration property - all the way down to 0 if that's what it takes.

Slow: Silverlight 3, Reset, uncheck everything, Create Chart, Add Series, 100 points, Populate, Change Values

Fast: Silverlight 3, Reset, check only Zero Transition Duration, Create Chart, Add Series, 100 points, Populate, Change Values


Tip: Use a different platform or version

Though they offer basically identical APIs, Silverlight and WPF are implemented very differently under the covers - and what performs poorly on one platform may run quite well on the other. Even staying with the same platform, Silverlight 4 contains a number of improvements relative to Silverlight 3 (as does WPF 4 vs. WPF 3.5). Therefore, if you have the freedom to choose your target platform, a bit of prototyping early on may help to identify the best choice for your scenario.

Slow: Silverlight 3, Reset, uncheck everything, Create Chart, Add Series, 100 points, Populate, Change Values

Fast: WPF 3.5, Reset, uncheck everything, Create Chart, Add Series, 100 points, Populate, Change Values

The source code IS (still) the executable [Updated CSI, a C# interpreter (with source and tests) for .NET 4]

I published CSI, a simple C# interpreter, exactly one year ago. In that introductory post, I explained how CSI offers a nice alternative to typical CMD-based batch files by enabling the use of the full .NET framework and stand-alone C# source code files for automating simple, repetitive tasks. CSI accomplishes this by compiling source code "on the fly" and executing the resulting assembly seamlessly. What this means for users is that it's easy to represent tasks with a simple, self-documenting code file and never need to worry about compiling a binary, trying to keep it in sync with changes to the code, or even tracking project files and remembering how to build it in the first place!

Aside: The difference may not seem like much at first, but once you start thinking in terms of running .CS files instead of running .EXE files, things just seem to get simpler and more transparent! :)

And I'm happy to say that today, on the first birthday of CSI's public introduction, I'm releasing a new version!


[Click here to download CSI for .NET 4.0, 3.5, 3.0, 2.0, and 1.1 - along with the complete source code and test suite.]


Notes:

  • Today's release of CSI includes CSI40.exe, a version of CSI that uses the .NET 4 Beta 2 Framework to enable the execution of programs that take full advantage of the latest .NET Framework! Correspondingly, the -R "include common references" switch now includes the new Microsoft.CSharp.dll and System.Xaml.dll assemblies that are part of .NET 4. This new version of CSI makes it easy to take advantage of the late-binding dynamic type, the push-based IObservable interface, the handy Tuple class, or any of the other neat, new features of .NET 4.
  • CSI previously required a program's entry point be of the Main(string[] args) kind and would fail if asked to run a program using the (also valid) Main() form. This restriction has been lifted and all new flavors of CSI will successfully call into a parameter-less entry point.
  • CSI could formerly fail to execute programs requiring the single-threaded apartment model. While this probably wasn't an issue for most people because apartment models don't matter much in general, if you were working in an area where it did matter (like WPF), things were unnecessarily difficult. No longer - CSI's entry point has been decorated with the STAThread attribute, and it now runs STA programs smoothly.
  • Please note that I have not updated the .NET 1.1 version of CSI, CSI11.exe, for this release. There don't seem to be enough people running .NET 1.1 (and expecting updates!) for it to be worth creating a virtual machine and installing .NET 1.1 just to compile a new version of CSI for that platform. Therefore, the version of CSI11.exe that comes with this release is the previous version and doesn't include the changes described above.
  • The CSI.exe in the root of the release folder corresponds to the .NET 3.5 version of CSI; this is the "official" version just as it was with the previous release. The file CSI40.exe in the same folder is the .NET 4 Beta 2 version of CSI (the obvious heir apparent, but not king quite yet...). Previous versions (CSI30.exe, CSI20.exe, and CSI11.exe) can be found in the "Previous Versions" folder.
  • The -R "include common references" switch of the .NET 3.5 version of CSI no longer includes a reference to System.Data.DataSetExtensions.dll because that assembly is unlikely to be used in common CSI scenarios. If needed, a reference can be added via -r System.Data.DataSetExtensions.dll in the usual manner. (The .NET 4 version of CSI's -R doesn't reference this assembly, either, but because this is the first release of CSI40.exe, it's not a breaking change.)


For fun, here's an example of the new Main() support:

C:\T>type Main.cs
public class Test
{
  public static void Main()
  {
    System.Console.WriteLine("Hello world");
  }
}

C:\T>CSI Main.cs
Hello world


And here's an example of the new ability to run WPF code. Note that I've used the RegisterCSI.cmd script (included with the release; see here for details) to register the .CSI file type with Windows to make it even easier to run CSI-based programs. (And by the way, check out how easy it is to output the default style of a WPF control!)

C:\T>type WpfDefaultStyleBrowser.csi
using System;
using System.Windows;
using System.Windows.Controls;
using System.Windows.Markup;
using System.Xml;

class WpfDefaultStyleBrowser
{
    [STAThread]
    public static void Main()
    {
        Style style = (new FrameworkElement()).FindResource(typeof(ContentControl)) as Style;
        XmlWriterSettings settings = new XmlWriterSettings();
        settings.Indent = true;
        settings.NewLineOnAttributes = true;
        settings.OmitXmlDeclaration = true;
        XamlWriter.Save(style, XmlWriter.Create(Console.Out, settings));
    }
}

C:\T>WpfDefaultStyleBrowser.csi
<Style
  TargetType="ContentControl" xmlns="http://schemas.microsoft.com/winfx/2006/xaml/presentation">
  <Style.Resources>
    <ResourceDictionary />
  </Style.Resources>
  <Setter
    Property="Control.Template">
    <Setter.Value>
      <ControlTemplate
        TargetType="ContentControl">
        <ContentPresenter
          Content="{TemplateBinding ContentControl.Content}"
          ContentTemplate="{TemplateBinding ContentControl.ContentTemplate}"
          ContentStringFormat="{TemplateBinding ContentControl.ContentStringFormat}" />
      </ControlTemplate>
    </Setter.Value>
  </Setter>
</Style>


Finally, here's the contents of the "read me" file, with the CSI syntax, release notes, and version history:

==================================================
==  CSI: C# Interpreter                         ==
==  David Anson (http://blogs.msdn.com/delay/)  ==
==================================================


Summary
=======
CSI: C# Interpreter
     Version 2010-01-04 for .NET 3.5
     http://blogs.msdn.com/delay/

Enables the use of C# as a scripting language by executing source code files
directly. The source code IS the executable, so it is easy to make changes and
there is no need to maintain a separate EXE file.

CSI (CodeFile)+ (-d DEFINE)* (-r Reference)* (-R)? (-q)? (-c)? (-a Arguments)?
   (CodeFile)+      One or more C# source code files to execute (*.cs)
   (-d DEFINE)*     Zero or more symbols to #define
   (-r Reference)*  Zero or more assembly files to reference (*.dll)
   (-R)?            Optional 'references' switch to include common references
   (-q)?            Optional 'quiet' switch to suppress unnecessary output
   (-c)?            Optional 'colorless' switch to suppress output coloring
   (-a Arguments)?  Zero or more optional arguments for the executing program

The list of common references included by the -R switch is:
   System.dll
   System.Data.dll
   System.Drawing.dll
   System.Windows.Forms.dll
   System.Xml.dll
   PresentationCore.dll
   PresentationFramework.dll
   WindowsBase.dll
   System.Core.dll
   System.Xml.Linq.dll

CSI's return code is 2147483647 if it failed to execute the program or 0 (or
whatever value the executed program returned) if it executed successfully.

Examples:
   CSI Example.cs
   CSI Example.cs -r System.Xml.dll -a ArgA ArgB -Switch
   CSI ExampleA.cs ExampleB.cs -d DEBUG -d TESTING -R


Notes
=====
CSI was inspired by net2bat, an internal .NET 1.1 tool whose author had left
Microsoft. CSI initially added support for .NET 2.0 and has now been extended
to support .NET 3.0, 3.5, and 4.0. Separate executables are provided to
accommodate environments where the latest version of .NET is not available.


Version History
===============

Version 2010-01-04
Add .NET 4 (Beta 2) version
Minor updates

Version 2009-01-06
Initial public release

Version 2005-12-15
Initial internal release