An example of watermark-friendly popping [How to: Integrate the PopupControl and TextBoxWatermark]
One of the questions that comes up every now and then on the "Atlas" Control Toolkit support forums is how to point both the PopupControl and the TextBoxWatermark at the same TextBox. The straightforward implementation doesn't work quite right because both controls assume they have complete control over the TextBox. What happens is that the PopupControl's result gets written directly into the TextBox where it partially overwrites the watermark that's already there. But the TextBoxWatermark doesn't realize anything has happened and assumes the TextBox is still empty. Nuts...
The solution to this problem is not immediately obvious, so I thought I'd post a simple example to help show how it's done using the 60731 release of the Toolkit.
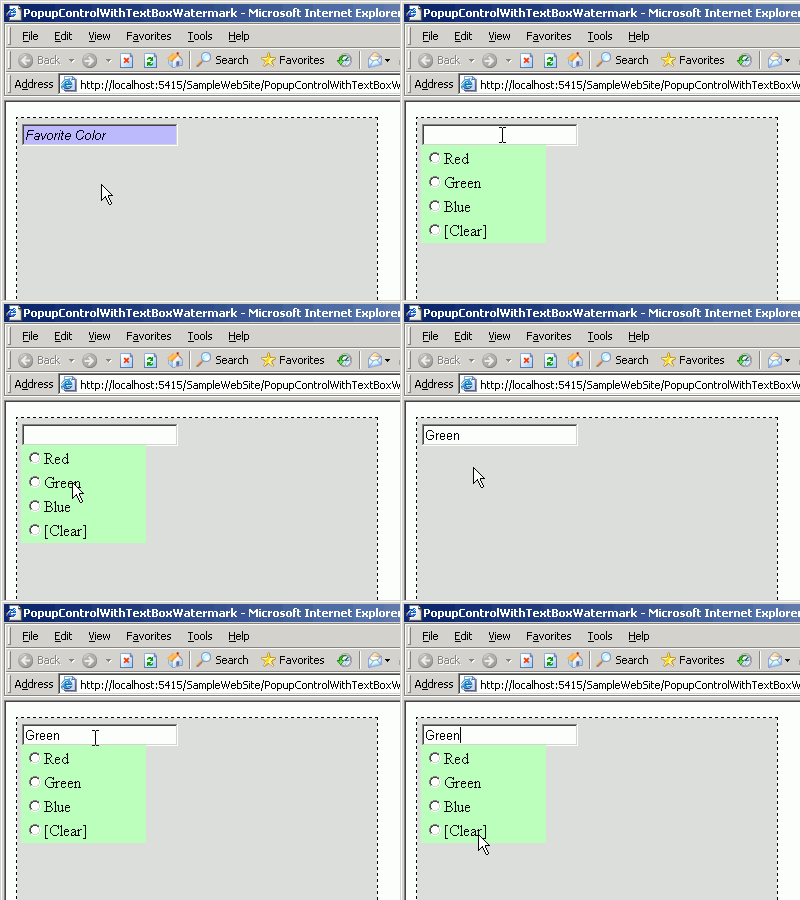
First, here's what the sample code below looks like when it's running:

The complete code for the sample follows - most of what's there is just to get the necessary elements on the page hooked up properly. There are a few things worth noting, though:
- The unique "ID" attributes on the PopupControlProperties and TextBoxWatermarkProperties elements prevent the automatically assigned IDs (which are based only on the TargetControlID (that's common to both elements)) from clashing.
- The CommitProperty on the PopupControlProperties defines a custom expando property of the TargetControlID (TextBox1) into which the result of the popup will be placed. This keeps the PopupControl from blindly stomping on the text/watermark in the TextBox.
- The CommitScript on the PopupControlProperties points to a script that gets run when the popup returns (after the CommitProperty has been populated). In this case, the script simply gets the popup result from the CommitProperty and uses the TextBoxWatermark behavior's set_Text method to safely set the text into the TextBox without breaking the watermark behavior.
That's all there is to it!
Just save the following code to an .ASPX file in the SampleWebSite directory of a Toolkit installation if you want to try it out for yourself:
<%@ Register Assembly="AtlasControlToolkit" Namespace="AtlasControlToolkit" TagPrefix="atlasToolkit" %>
<!DOCTYPE html PUBLIC "-//W3C//DTD XHTML 1.0 Transitional//EN" "http://www.w3.org/TR/xhtml1/DTD/xhtml1-transitional.dtd">
<script runat="server">
protected void RadioButtonList1_SelectedIndexChanged(object sender, EventArgs e)
{
PopupControlExtender.GetCurrent(Page).Commit(RadioButtonList1.SelectedValue);
RadioButtonList1.ClearSelection();
}
</script>
<html xmlns="http://www.w3.org/1999/xhtml">
<head runat="server">
<title>PopupControlWithTextBoxWatermark</title>
<style type="text/css">
.watermark { background-color:#bbbbff; font-style:italic; }
.panel { background-color:#bbffbb; visibility:hidden; }
</style>
</head>
<body>
<form id="form1" runat="server" style="background-color: #dddddd; width: 350px; height: 250px;
border-style: dashed; border-width: 1px; padding: 5px;">
<atlas:ScriptManager ID="ScriptManager1" runat="server" EnablePartialRendering="true" />
<asp:TextBox ID="TextBox1" runat="server" Width="150"></asp:TextBox>
<asp:Panel ID="Panel1" runat="server" Width="125px" CssClass="panel">
<atlas:UpdatePanel ID="UpdatePanel1" runat="server">
<ContentTemplate>
<asp:RadioButtonList ID="RadioButtonList1" runat="server"
OnSelectedIndexChanged="RadioButtonList1_SelectedIndexChanged" AutoPostBack="true">
<asp:ListItem Text="Red" />
<asp:ListItem Text="Green" />
<asp:ListItem Text="Blue" />
<asp:ListItem Text="[Clear]" />
</asp:RadioButtonList>
</ContentTemplate>
</atlas:UpdatePanel>
</asp:Panel>
<atlasToolkit:TextBoxWatermarkExtender ID="TextBoxWatermarkExtender1" runat="server">
<atlasToolkit:TextBoxWatermarkProperties TargetControlID="TextBox1" WatermarkCssClass="watermark"
WatermarkText="Favorite Color" ID="TextBoxWatermarkBehavior" />
</atlasToolkit:TextBoxWatermarkExtender>
<atlasToolkit:PopupControlExtender ID="PopupControlExtender1" runat="server">
<atlasToolkit:PopupControlProperties TargetControlID="TextBox1" PopupControlID="Panel1"
Position="Bottom" ID="PopupControlBehavior" CommitProperty="favoriteColor"
CommitScript="commitScript()" />
</atlasToolkit:PopupControlExtender>
<script type="text/javascript">
// Called when PopupControl has been dismissed (registerd via CommitScript property on
// PopupControlProperties)
function commitScript() {
// Get the comitted property from the specified expando property on the TargetControlID
// (CommitProperty above)
var favoriteColor = $("TextBox1").favoriteColor;
// If it's the magic value "[Clear]", then set empty text into the textbox (which
// restores the watermark)
if("[Clear]" == favoriteColor) {
favoriteColor = "";
}
// Call into the TextBoxWatermark behavior to set the desired text
$object("TextBoxWatermarkBehavior_TextBox1").set_Text(favoriteColor);
}
</script>
</form>
</body>
</html>
If you found this simple "How to" helpful or if you have any suggestions for ways in which future "How to"s could be improved, please let me know. Thank you!!