The blog of dlaa.me

Posts tagged "Silverlight"

Alive and kickin' [New Silverlight 4 Toolkit released with today's Silverlight 4 RTW!]

The Silverlight team released Silverlight 4 today and it includes a variety of compelling new features and great improvements for all kinds of scenarios. You can learn more about the new platform hotness in the Silverlight 4 Technical Feature Overview.

Congratulations to the team on another great release!

To help celebrate the event, we have just published the April '10 release of the Silverlight Toolkit! If you're new to Silverlight 4 or the Silverlight Toolkit, you might start by reviewing my November 09 Toolkit announcement to see what was in the Silverlight 4 Beta Toolkit. Once you've done that, you're ready for my take on the...


Silverlight 4 Toolkit April '10 Release Notes


ContextMenu (New!)
ContextMenu

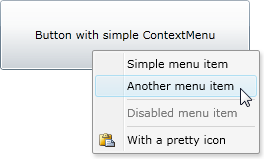
Silverlight 4 allows applications to handle the right mouse button (via the UIElement.MouseRightButtonDown event), and the showcase control for that is ContextMenu! (If you're not familiar with ContextMenu, here's an overview of the WPF version.). While I considered starting from an existing implementation, the handful I saw didn't match the WPF class hierarchy. Because compatibility is a big priority for us, I wrote the Toolkit's ContextMenu from scratch - and this is a 100% WPF-compatible subset implementation. Which means that existing properties/methods/events should behave the same on Silverlight as they do on WPF - something that makes porting existing code from WPF to Silverlight very straightforward.

That said, please pay attention to the word "subset"; the Toolkit's ContextMenu doesn't have all the features of WPF's quite yet. Notably, it doesn't support multi-level menu item nesting. However, none of the customers I asked felt that nesting was necessary right now, so I don't expect its absence to be a big limitation.

Okay, enough about what's not there; here's what is there:

XAML for the example above:

<Button
    x:Name="MyButton"
    Content="Button with simple ContextMenu">
    <toolkit:ContextMenuService.ContextMenu>
        <toolkit:ContextMenu>
            <toolkit:MenuItem
                Header="Simple menu item"
                Click="MenuItem_Click"/>
            <toolkit:MenuItem
                Header="Another menu item"
                Click="MenuItem_Click"/>
            <toolkit:Separator/>
            <toolkit:MenuItem
                Header="Disabled menu item"
                IsEnabled="False"/>
            <toolkit:Separator/>
            <toolkit:MenuItem
                Header="With a pretty icon"
                Click="MenuItem_Click">
                <toolkit:MenuItem.Icon>
                    <Image Source="Paste.png"/>
                </toolkit:MenuItem.Icon>
            </toolkit:MenuItem>
        </toolkit:ContextMenu>
    </toolkit:ContextMenuService.ContextMenu>
</Button>

If you're looking for more examples of how to use ContextMenu, just about any WPF sample you find should be useful. The one thing to keep in mind is that Silverlight 4 doesn't have the FrameworkElement.ContextMenu property that's often used to attach a ContextMenu to an element. Instead, it is always necessary to use the (functionally equivalent and more flexible) ContextMenuService.ContextMenu attached property like I show above.

ContextMenu is useful in a variety of scenarios - some of them are obvious (like the example above) and some a little less so. For an example, please...

[Click here for my follow-up post about ContextMenu.]

[Or click here to download the sample application for this post containing all the examples.]


Stacked series support (New!)

StackedSeries

One common feature request for the Data Visualization assembly in the Silverlight Toolkit (and WPF Toolkit) has been support for stacked series (like you see in the example above). This release of the Silverlight Toolkit includes full stacking support, which means all of Excel's top-level series types are supported in both normal and stacked modes! The following eight series classes are now available in the Data Visualization assembly:

  • StackedBarSeries
  • StackedColumnSeries
  • StackedLineSeries
  • StackedAreaSeries
  • Stacked100BarSeries
  • Stacked100ColumnSeries
  • Stacked100LineSeries
  • Stacked100AreaSeries

Another common request has been better performance - and that's something else this release includes. While existing applications aren't likely to see a big difference by default, there's a trivial change that can be made to many scenarios to enable significant performance gains for BarSeries, ColumnSeries, LineSeries, AreaSeries, and ScatterSeries.

And because customer scenarios involving selection (including "drill down") come up a lot more often than you'd think, the new stacked series types also offer full ListBox-style selection support, including multi-select and all the associated events/properties.

Based on the fact that a stacked series showing a single set of data is morally equivalent to the corresponding non-stacked series, it's clear that you can get these benefits for existing scenarios, too. In fact, I've added five additional wrapper classes to make it even easier to do so!

XAML for the example above:

<toolkit:Chart
    Title="Student Test Scores"
    LegendTitle="Subject">
    <toolkit:Chart.Resources>
        <Style TargetType="toolkit:LinearAxis">
            <Setter Property="Minimum" Value="0"/>
        </Style>
    </toolkit:Chart.Resources>
    <toolkit:StackedColumnSeries>
        <toolkit:SeriesDefinition
            Title="Math"
            ItemsSource="{Binding}"
            DependentValuePath="MathScore"
            IndependentValuePath="StudentName"/>
        <toolkit:SeriesDefinition
            Title="Language"
            ItemsSource="{Binding}"
            DependentValuePath="LanguageScore"
            IndependentValuePath="StudentName"/>
        <toolkit:SeriesDefinition
            Title="Science"
            ItemsSource="{Binding}"
            DependentValuePath="ScienceScore"
            IndependentValuePath="StudentName"/>
    </toolkit:StackedColumnSeries>
</toolkit:Chart>

There's a lot that went on under the hood to add this new support, and some of the details are pretty interesting - but it's necessary to understand a bit about how stacked series came about in the first place. Because I want to keep these release notes brief, please...

[Click here for my follow-up post about stacked series support.]

[Or click here to download the sample application for this post containing all the examples.]


SystemColors theme (New!)
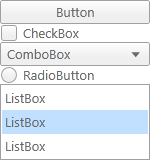
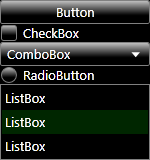
SystemColors theme SystemColors theme (high contrast)

Some customers have asked for an easy way to get a Silverlight application to honor the color settings of the host operating system. This typically comes up in the context of high contrast mode (shown above on the right) and improved accessibility support, but it's also generally applicable. So the UX team created a custom theme for this, and I've incorporated their work into this release of the Silverlight Toolkit as the new SystemColors theme. Just like the 11 themes already in the Toolkit, using it is as easy as wrapping some content in an instance of the SystemColors theme container - everything inside automatically gets the new styles!

XAML for the example above:

<toolkit:SystemColorsTheme>
    <StackPanel>
        <Button Content="Button"/>
        <CheckBox Content="CheckBox"/>
        ...
    </StackPanel>
</toolkit:SystemColorsTheme>

Actually, it can be even easier than that! :) But to understand how, you need to know about the...


Theme base class improvements

Theme base class

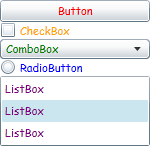
Because Silverlight 4's support for implicit styling makes theming so much easier, the Theme base class has been enhanced and is now more useful than ever. For starters, there's a ThemeUri property which can point to an external file to use as the theme. This reference can be a URL for a web resource like /MySiteWideTheme.xaml which gives sites the freedom to change a theme after an application has been deployed. Or it can point to an assembly resource via the /AssemblyShortName;component/ResourceLocation syntax discussed here. In this second case, the theme is loaded immediately; otherwise it is downloaded asynchronously and applied as soon as the download completes. Even better, ThemeUri can be changed dynamically by applications that allow users to change their themes "on the fly".

The format of a theme file is exactly what you'd expect: a generic.xaml-like ResourceDictionary containing one or more implicit styles. This is how the Toolkit classes store their theme resources, so those themes are accessible in the same manner. This makes it easy to dynamically switch among any of the Toolkit themes, too!

Okay, that's pretty cool and all, but sometimes you want to theme an entire application and you don't want to have to wrap every page in its own theme container. No sweat, that's what the new ApplicationThemeUri attached property is all about! Just open your project's App.xaml and set the ApplicationThemeUri property on the Application object (just as you would for ThemeUri on the Theme class). When ApplicationThemeUri is used, the corresponding implicit styles are added at the application level and automatically apply to every page.

Can it get any easier? Yes! :) Every theme that comes with the Toolkit also exposes an IsApplicationTheme attached property. Much like ApplicationThemeUri, you set this property in App.xaml on the Application object. But because IsApplicationTheme is a simple bool value, you don't have to mess with ugly, confusing URI formats or even know what a URI is! Just set it (to True), and forget it!

XAML for the example above:

<toolkit:Theme ThemeUri="/ToolkitSamplesApril10;component/CustomTheme.xaml">
    <StackPanel>
        <Button Content="Button"/>
        <CheckBox Content="CheckBox"/>
        ...
    </StackPanel>
</toolkit:Theme>
<ResourceDictionary
    xmlns="http://schemas.microsoft.com/winfx/2006/xaml/presentation">

    <Style TargetType="Button">
        <Setter Property="FontFamily" Value="Comic Sans MS"/>
        <Setter Property="Foreground" Value="Red"/>
    </Style>

    <Style TargetType="CheckBox">
        <Setter Property="FontFamily" Value="Comic Sans MS"/>
        <Setter Property="Foreground" Value="Orange"/>
    </Style>

    ...
    
</ResourceDictionary>

Alternatively:

<Application xmlns="http://schemas.microsoft.com/winfx/2006/xaml/presentation"
             xmlns:x="http://schemas.microsoft.com/winfx/2006/xaml" 
             x:Class="ToolkitSamplesApril10.App"
             xmlns:toolkit="http://schemas.microsoft.com/winfx/2006/xaml/presentation/toolkit"
             toolkit:Theme.ApplicationThemeUri="/ToolkitSamplesApril10;component/CustomTheme.xaml">
    <Application.Resources>
    </Application.Resources>
</Application>

Or:

<Application xmlns="http://schemas.microsoft.com/winfx/2006/xaml/presentation"
             xmlns:x="http://schemas.microsoft.com/winfx/2006/xaml" 
             x:Class="ToolkitSamplesApril10.App"
             xmlns:toolkit="http://schemas.microsoft.com/winfx/2006/xaml/presentation/toolkit"
             toolkit:SystemColorsTheme.IsApplicationTheme="True">
    <Application.Resources>
    </Application.Resources>
</Application>

[Click here to download the sample application for this post containing all the examples.]


Test Framework improvements and new UI

Unit Test Framework

The Silverlight Unit Test Framework that comes with the Toolkit has been updated to include:

  • Out-of-browser support for Silverlight applications
  • Support for testing Windows Phone 7 applications
  • A new, more functional user interface
Note: The two Unit Test Framework assemblies (Microsoft.Silverlight.Testing and Microsoft.VisualStudio.QualityTools.UnitTesting.Silverlight) are no longer located in the Bin directory of the Toolkit install - they have been moved to a new Testing directory instead. This was done to prevent many of the classes used by the new UI from showing up in the Visual Studio and Blend designers and confusing people. However, this location change could cause existing applications that reference the test assemblies to fail to compile due to the "missing" references. If that happens, please delete the two broken references and create references to these assemblies in their new location. Everything else should continue to work as expected.

For more information about changes to the Silverlight Unit Test Framework, please have a look at Jeff Wilcox's blog.


PanelDragDropTarget (New!)
PanelDragDropTarget

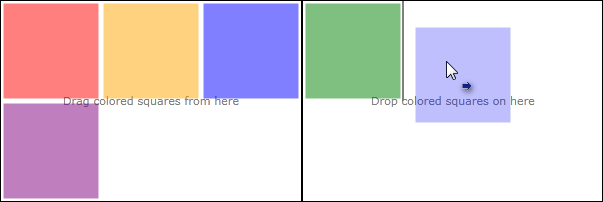
A new DragDropTarget has been added to make it easy to support drag/drop scenarios with Panel subclasses like Grid and WrapPanel. Simply wrap the relevant Panel in an instance of PanelDragDropTarget (like you see below), and the Toolkit's drag/drop framework automatically allows users to drag items out of that container with full visual feedback about what's being dragged and what the drop action will be. To allow dropping items into the container, just set its AllowDrop property to True and the details are handled seamlessly.

XAML for the example above:

<Border Grid.Column="0">
    <Grid>
        <TextBlock Text="Drag colored squares from here"/>
        <toolkit:PanelDragDropTarget>
            <toolkit:WrapPanel>
                <Rectangle Fill="Red"/>
                <Rectangle Fill="Orange"/>
                <Rectangle Fill="Green"/>
                <Rectangle Fill="Blue"/>
                <Rectangle Fill="Purple"/>
            </toolkit:WrapPanel>
        </toolkit:PanelDragDropTarget>
    </Grid>
</Border>

<Border Grid.Column="1">
    <Grid>
        <TextBlock Text="Drop colored squares on here"/>
        <toolkit:PanelDragDropTarget>
            <toolkit:WrapPanel
                AllowDrop="True"
                Background="Transparent"/>
        </toolkit:PanelDragDropTarget>
    </Grid>
</Border>

For more about other DragDropTargets and how they work, please have a look at Jafar Husain's series of posts on the topic.

[Click here to download the sample application for this post containing all the examples.]


TreeView Scenario Examples (New!)
TreeView connecting lines

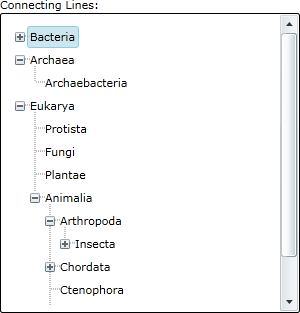
There are some fairly common TreeView scenarios that tend to stymie people who try to implement them in WPF or Silverlight. So this release of the Toolkit includes complete, run-able examples of some of these scenarios in the Toolkit sample application. None of the scenarios requires changing TreeView code - but there are a couple of fancy XAML tricks in there. :) The complete source code for the sample application is installed with the Toolkit and also available within the sample application (just expand the tabs at the bottom of each sample page for the syntax-highlighted code). Please feel free to make use of the same techniques in your own applications.

For a look at the new samples, please visit the live Toolkit samples application, navigate to the TreeView node, and switch to the "Templating" tab.


Improved XmlnsDefinition support

Now that Silverlight 4 honors the URI form of XmlnsDefinitionAttribute, we use that to simplify the list of namespace mappings needed by typical applications. Specifically, the primary namespaces of all Toolkit assemblies share the URI http://schemas.microsoft.com/winfx/2006/xaml/presentation/toolkit which maps to the prefix "toolkit" by default.

So instead of wrestling with this big glob of XAML goo:

xmlns:controls="clr-namespace:System.Windows.Controls;assembly=System.Windows.Controls.Toolkit"
xmlns:layout="clr-namespace:System.Windows.Controls;assembly=System.Windows.Controls.Layout.Toolkit"
xmlns:input="clr-namespace:System.Windows.Controls;assembly=System.Windows.Controls.Input.Toolkit" 
xmlns:datavis="clr-namespace:System.Windows.Controls.DataVisualization;assembly=System.Windows.Controls.DataVisualization.Toolkit" 
xmlns:charting="clr-namespace:System.Windows.Controls.DataVisualization.Charting;assembly=System.Windows.Controls.DataVisualization.Toolkit"
xmlns:theming="clr-namespace:System.Windows.Controls.Theming;assembly=System.Windows.Controls.Theming.Toolkit"

The following is now all you need (and will be automatically used by both Visual Studio and Blend):

xmlns:toolkit="http://schemas.microsoft.com/winfx/2006/xaml/presentation/toolkit"
Aside: If you're someone like me who writes your XAML by hand, there's no need to memorize the URI above - just copy the default xmlns from the top of any XAML file and add "/toolkit" to the end!

You can read more about this feature in the Silverlight SDK article about a similar change for the SDK assemblies.


Changed AssemblyFileVersion for all assemblies

AssemblyFileVersion

Based on feedback from the Visual Studio and Blend teams regarding design-time issues when the Silverlight 3 and Silverlight 4 Toolkits were both installed, we've changed the AssemblyFileVersion of all Silverlight 4 Toolkit assemblies. Where it used to be 2.0.5.0 (which is what's used by versions of Silverlight so far), Toolkit assemblies now specify 4.0.5.0. This change resolves the confusion for both design tools by uniquely distinguishing the Silverlight 3 and Silverlight 4 Toolkit assemblies.


Removed the Reactive Extensions dependency

In previous releases, limited parts of the Silverlight Toolkit made use of the Reactive Extensions for .NET (Rx) library internally. Those Toolkit assemblies therefore had a direct dependency on the version of the Rx assemblies we referenced when we compiled the Toolkit. However, Rx binaries released by the Rx team in the time since we published the last Toolkit have included some breaking changes. This has caused frustration for customers wanting to use more recent Rx bits in their own applications because of the fact that a XAP can contain only one instance of a particular assembly. Those customers were often unable to upgrade successfully as a result of mismatched Rx assembly versions. Because of the feedback we've received here, Toolkit assemblies no longer have a dependency on the Rx assemblies and applications are again free to reference whatever version of Rx they wish!

Note: Most applications should be completely unaffected by this change. However, if your project has specific references to any of the Rx assemblies that were previously located in the Bin directory of the Toolkit install (System.CoreEx.dll, System.Interactive.dll, or System.Reactive.dll), those references are no longer valid and should be removed. In rare cases, it may be necessary to add an explicit reference to their replacement assembly, System.Windows.Controls.Toolkit.Internals.dll, which is now present in the Bin directory instead.


Removed System.ComponentModel.Composition.Packaging.Toolkit

MEF's PackageCatalog class was renamed to DeploymentCatalog and moved to the System.ComponentModel.Composition.Initialization assembly that is part of the Silverlight 4 SDK. The System.ComponentModel.Composition.Packaging.Toolkit assembly was left with nothing in it and therefore removed from the Silverlight Toolkit.


Various bug fixes

This release also includes bug fixes for a variety of problems customers have reported or that were identified internally.


As you can see, the Toolkit has a lot of new stuff for Silverlight 4! Of course, the first thing to do is install Silverlight 4! Once you've done that, please check out the live Toolkit samples application, download the Toolkit installer, and start writing great applications!


We hope you enjoy the new release!! :)
"I would prefer even to fail with honor than to win by cheating" [Tip: For a truly read-only custom DependencyProperty in Silverlight, use a read-only CLR property instead]

Tip

For a truly read-only custom DependencyProperty in Silverlight, use a read-only CLR property instead

Explanation

My last tip outlined the best way I knew to approximate a WPF-like read-only DependencyProperty on Silverlight. (Aside: It's also a good way to implement coercion.) However, it suffers from the unavoidable problem that the actual DependencyProperty is still writable and can "twitch" if written to. The comments for that post proved to be very interesting - with two suggestions for alternate techniques. I looked into them both (and stumbled across a third myself) to understand their merits. Unfortunately, the technique I stumbled across and the one Morten Nielsen (SharpGIS) suggested both suffer from this same issue: the DependencyProperty is still writable and there are ways to sneak around the protections and write to it anyway. (Aside: Morten's solution is fiendishly clever and well worth having a look at.) However, the technique suggested by Dr. WPF doesn't have that limitation - it produces a guaranteed read-only property. The catch is that it's not actually a DependencyProperty! However, Dr. WPF points out that a read-only DependencyProperty doesn't actually need to be a DependencyProperty as long as the class implements INotifyPropertyChanged. What's great is that there's no loss of functionality with the implementation shown below, and no need to try to subvert the platform! The thing to remember is that you can't use TemplateBinding to get at it - you'll need to use Binding + RelativeSource instead. Overall, this is a very nice solution - even if it does bend the rules just a bit... :)

Good Example

public class MyControl : Control, INotifyPropertyChanged
{
    public int MyReadOnly
    {
        get { return _myReadOnly; }
        protected set
        {
            if (value != _myReadOnly)
            {
                int oldValue = _myReadOnly;
                _myReadOnly = value;
                OnMyReadOnlyChanged(oldValue, _myReadOnly);
                PropertyChangedEventHandler handler = PropertyChanged;
                if (null != handler)
                {
                    handler.Invoke(this, new PropertyChangedEventArgs("MyReadOnly"));
                }
            }
        }
    }
    private int _myReadOnly;
    protected virtual void OnMyReadOnlyChanged(int oldValue, int newValue)
    {
        // TODO: Handle property change
    }
    public event PropertyChangedEventHandler PropertyChanged;
}
<ControlTemplate TargetType="local:MyControl">
    <ContentControl Content="{Binding MyReadOnly, RelativeSource={RelativeSource TemplatedParent}}"/>
</ControlTemplate>

More information

Sometimes you just gotta do the best you can [Tip: Read-only custom DependencyProperties don't exist in Silverlight, but can be closely approximated]

Tip

Read-only custom DependencyProperties don't exist in Silverlight, but can be closely approximated

Explanation

My last tip discussed a special case of creating a Silverlight/WPF DependencyProperty where it's necessary to create a read-only property. (Aside: Read-only DependencyProperties are read-only outside the owning class, but can be changed by the class itself at any time.) This task is quite simple on WPF where a single call to RegisterReadOnly does it all. However, Silverlight (as of version 4) does not support the RegisterReadOnly method, so if you want a read-only DependencyProperty on that platform, you'll need to do some extra work. Unfortunately, I don't think it's possible to do a perfect job - but you can get fairly close with something like the code below. The basic principle is to catch illegal attempts to change the property's value (i.e., those coming from outside the owning class) and undo those changes as quickly and silently as possible. For convenience, the CLR wrapper's setter hides the details from users of the class (in a notable exception to one of the earlier tips). The code looks a little more complicated than it really is because it tries to be resilient to exceptions and because it uses two state variables to avoid calling the class's virtual OnPropertyChanged method when recovering from a bogus change. For consistency, the exception that's thrown after an invalid attempt to change the property's value is similar to the corresponding exception on WPF. And while this approach can't prevent bound values from seeing the property "twitch" briefly, I also don't know of a way to avoid that (recall that the DependencyProperty itself must be public so other code can create Bindings to it). Like I said above, this isn't perfect - but it's pretty close. :)

Good Example

public int MyReadOnly
{
    get { return (int)GetValue(MyReadOnlyProperty); }
    protected set
    {
        try
        {
            _changingMyReadOnly = true;
            SetValue(MyReadOnlyProperty, value);
        }
        finally
        {
            _changingMyReadOnly = false;
        }
    }
}
private bool _changingMyReadOnly;
private bool _restoringMyReadOnly;
public static readonly DependencyProperty MyReadOnlyProperty = DependencyProperty.Register(
    "MyReadOnly", typeof(int), typeof(MyControl), new PropertyMetadata(0, OnMyReadOnlyChanged));
private static void OnMyReadOnlyChanged(DependencyObject d, DependencyPropertyChangedEventArgs e)
{
    MyControl myControl = (MyControl)d;
    if (myControl._changingMyReadOnly)
    {
        if (!myControl._restoringMyReadOnly)
        {
            myControl.OnMyReadOnlyChanged((int)e.OldValue, (int)e.NewValue);
        }
    }
    else
    {
        try
        {
            myControl._restoringMyReadOnly = true;
            myControl.MyReadOnly = (int)e.OldValue;
        }
        finally
        {
            myControl._restoringMyReadOnly = false;
        }
        throw new InvalidOperationException("'MyReadOnly' property is read-only and cannot be modified.");
    }
}
protected virtual void OnMyReadOnlyChanged(int oldValue, int newValue)
{
    // TODO: Handle property change
}

More information

That's why it's called the default *value* instead of default *values* [Tip: The default value of a DependencyProperty is shared by all instances of the class that registers it]

Tip

The default value of a DependencyProperty is shared by all instances of the class that registers it

Explanation

The last two tips explained how to set the default value of a Silverlight/WPF DependencyProperty. But there's something you need to be aware of when you're using either technique: the default value of a DependencyProperty is shared by all instances of a class. This doesn't tend to matter for value types, immutable reference types, and sharable types (like brushes), but it affects mutable reference types and can lead to unexpected behavior. The most common scenario is creating a collection-type DependencyProperty (for something like Collection(T)) - the intent is for each instance to have its own unique collection, but because the default value is shared, all instances end up sharing the same list! In such cases, there are two things to change: make the DependencyProperty read-only (with RegisterReadOnly) and initialize the property in the class constructor. [Didn't a previous tip say that was bad? Yes, but this scenario is special. :) ] When a class exposes a collection-type DependencyProperty, the intent is typically to use the same collection instance for the life of the object. And that's what makes it okay to set the property in the constructor: it doesn't matter that nobody can override the default value with a Style because they're not supposed to anyway. Next time: Why this can't be done on Silverlight.

Good Example

public Collection<string> MyStringCollection
{
    get { return (Collection<string>)GetValue(MyStringCollectionProperty); }
}
protected static readonly DependencyPropertyKey MyStringCollectionPropertyKey =
    DependencyProperty.RegisterReadOnly(
        "MyStringCollection",
        typeof(Collection<string>),
        typeof(MyControl),
        new PropertyMetadata(null));
public static readonly DependencyProperty MyStringCollectionProperty =
    MyStringCollectionPropertyKey.DependencyProperty;

public MyControl()
{
    SetValue(MyStringCollectionPropertyKey, new Collection<string>());
}

More information

When you have two good options, go with the easier one [Tip: Set DependencyProperty default values in a class's default style if it's more convenient]

Tip

Set DependencyProperty default values in a class's default style if it's more convenient

Explanation

In the previous tip, I explained why it's usually wrong to assign a value to a Silverlight/WPF DependencyProperty in the constructor for a class. The preferred way is to pass the default value in the call to Register, but there's another good option: set the property's starting value in the default Style for the control by putting it in generic.xaml. A control's default style is applied when it is first created and the corresponding changes to its DependencyProperty values have very low precedence (though not as low as the default value passed to Register). Therefore, this is a safe place to set default values without the risk of overriding application-level customizations. A nice benefit of this approach is that it allows the value to be specified in XAML - which offers a designer-friendly syntax and can sometimes be easier to understand. In the example below, a rather complicated Brush is constructed in XAML; the matching code to create that same brush would not be as clear. Next time: Something to watch out for when setting default values.

Good Example

<ResourceDictionary
    xmlns="http://schemas.microsoft.com/winfx/2006/xaml/presentation"
    xmlns:local="clr-namespace:DevelopmentTips">
    <Style TargetType="local:MyControl">
        <Setter Property="MyBrush">
            <Setter.Value>
                <LinearGradientBrush>
                    <GradientStop Color="Red" Offset="0"/>
                    <GradientStop Color="Green" Offset="0.5"/>
                    <GradientStop Color="Blue" Offset="1"/>
                </LinearGradientBrush>
            </Setter.Value>
        </Setter>
    </Style>
</ResourceDictionary>

More information

The platform giveth power, don't taketh it away [Tip: Do not assign DependencyProperty values in a constructor; it prevents users from overriding them]

Tip

Do not assign DependencyProperty values in a constructor; it prevents users from overriding them

Explanation

Initializing variables in an object's constructor is considered a Good Thing. Traditionally, initialization is done with a simple assignment that sets the variable to its initial value: MyProperty = 10;. However, doing that with a Silverlight/WPF DependencyProperty uses the CLR wrapper (more background here and here) and results in a call to SetValue that sets the local value of that property. The precedence order for DependencyProperty values is such that the local value overrides almost any other value the application may have provided with a Style (normal or implicit) Setter or Trigger. But if a property can't be styled, then much of the goodness of being a DependencyProperty goes out the window... Fortunately, there are two good alternatives; the most direct is to pass the default value in the call to Register. Setting the default value that way is nice because it's easy, it's obvious, and it "just works". And since DependencyProperty default values have the lowest precedence of anything, you don't need to worry about overriding any customizations users may have made. Next time: The other option.

Good Example

public static readonly DependencyProperty MyPropertyProperty = DependencyProperty.Register(
    "MyProperty", typeof(int), typeof(MyControl), new PropertyMetadata(123, OnMyPropertyChanged));

More information

Freedom isn't free [Tip: When creating a DependencyProperty, follow the handy convention of "wrapper+register+static+virtual"]

Tip

When creating a DependencyProperty, follow the handy convention of "wrapper+register+static+virtual"

Explanation

The fundamental steps for defining a Silverlight/WPF DependencyProperty are fairly rigid and not open to a great deal of flexibility (as I discuss in this earlier tip about the CLR wrapper). However, there's a bit more freedom once you add a default value or a PropertyChangedCallback delegate to the mix - but don't let it go to your head! :) For convenience and flexibility, I recommend the pattern shown below; the same one used by most of the core Silverlight and WPF controls. Observe that while the PropertyMetadata constructor requires a static delegate for property change notifications, doing instance-specific work in a static method is inconvenient. Therefore, the static method below does the bare minimum before handing execution off to a more appropriate instance method. (Aside: Explicit casts are safe because the DependencyProperty infrastructure is responsible for honoring the contract of the Register call.) The extra level of indirection also provides an opportunity to pass more meaningful parameters to the change handler: the property's old value and its new value. And because the instance method is virtual, subclasses can override it to receive their own notification of property changes easily and efficiently. Working with DependencyProperty can be tricky enough; do yourself a favor and start with a solid foundation.

Good Example

public int MyProperty
{
    get { return (int)GetValue(MyPropertyProperty); }
    set { SetValue(MyPropertyProperty, value); }
}
public static readonly DependencyProperty MyPropertyProperty = DependencyProperty.Register(
    "MyProperty", typeof(int), typeof(MyControl), new PropertyMetadata(0, OnMyPropertyChanged));
private static void OnMyPropertyChanged(DependencyObject d, DependencyPropertyChangedEventArgs e)
{
    ((MyControl)d).OnMyPropertyChanged((int)e.OldValue, (int)e.NewValue);
}
protected virtual void OnMyPropertyChanged(int oldValue, int newValue)
{
    // TODO: Handle property change
}

More information

Do one thing, and do it well [Tip: The CLR wrapper for a DependencyProperty should do its job and nothing more]

Tip

The CLR wrapper for a DependencyProperty should do its job and nothing more

Explanation

The CLR wrapper for a Silverlight/WPF DependencyProperty exists purely as a convenience to the developer. The "real" value of a DependencyProperty is stored by the system and accessed by the GetValue and SetValue methods. In fact, parts of the system will only access the value in that manner (possible examples: XAML parser, storyboard animations, etc.). And even if that weren't the case, the fact that the DependencyProperty field is public means that other parts of an application might do so as well (and there is no way of knowing when or stopping them). Therefore, it's not possible to ensure that any custom logic added to the CLR property's set or get wrapper implementation will run every time the DependencyProperty is accessed. Unless you're a fan of inconsistent state, hard to find bugs, or the like, it is typically unwise to violate this convention.

Good Example

public int MyProperty
{
    get { return (int)GetValue(MyPropertyProperty); }
    set { SetValue(MyPropertyProperty, value); }
}

More information

Confessions of a ListBox groupie [Using IValueConverter to create a grouped list of items simply and flexibly]

A customer recently asked how to implement a simple "grouped ListBox" experience in Silverlight (now available in desktop, mobile, and extra crispy flavor!), so I dashed off this sample to show one way that's pretty easy to work with.

Well, actually, the first thing I did was ask if DataGrid (which supports grouping natively) was an option - but the customer felt strongly about using a ListBox, so here we are...

The core of my solution is a custom IValueConverter implementation. If you've read my blog much, you were probably expecting that because I tend to be a pretty big fan. As usual, IValueConverter is convenient because it allows us to easily transform the source data into something that looks how we want without needing to modify the actual data source or values. In fact, the rest of the application doesn't really need to know what's going on - this is a (mostly) UI-only solution.

Okay, not needing to modify the original data is a nice advantage. What else would we like to see in a good solution? Well, it would be nice if it were easy to customize the appearance of items and their group headers without writing any code. And it would be nice if the grouping logic were flexible enough to allow grouping on any criteria (ex: value of a property, value ranges, first letter of name, etc.). And of course we want the designer to have the flexibility to hook everything up in XAML.


That seems like a pretty reasonable list of requirements - and we can handle them all without a problem. But first, let's see it in action:

GroupingItemsControlConverter sample

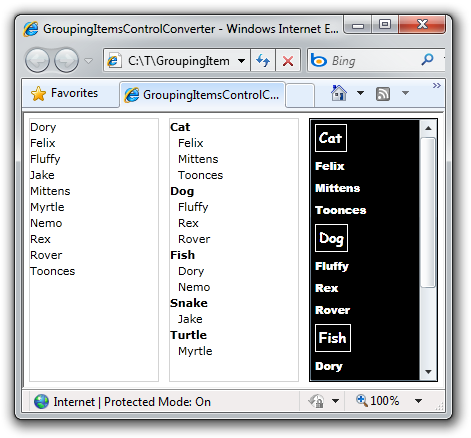
On the left is the original data in a simple ItemsControl, in the center is a grouped version of that same data (just like we wanted!), and on the right is the same grouping of that data - this time a little more fancy and in a ListBox so the items are selectable! The XAML for the middle example looks like this:

<Grid.Resources>
    <delay:GroupingItemsControlConverter x:Key="GroupingItemsControlConverter"/>

    <delay:GroupingItemsControlConverterParameters x:Key="SimpleGroupingItemsControlConverterParameter">
        <delay:GroupingItemsControlConverterParameters.GroupSelector>
            <local:AnimalSpeciesGroupSelector/>
        </delay:GroupingItemsControlConverterParameters.GroupSelector>

        <delay:GroupingItemsControlConverterParameters.GroupHeaderTemplate>
            <DataTemplate>
                <ContentControl Content="{Binding}" FontWeight="Bold"/>
            </DataTemplate>
        </delay:GroupingItemsControlConverterParameters.GroupHeaderTemplate>

        <delay:GroupingItemsControlConverterParameters.ItemTemplate>
            <DataTemplate>
                <ContentControl Content="{Binding Name}" Padding="8 0 0 0"/>
            </DataTemplate>
        </delay:GroupingItemsControlConverterParameters.ItemTemplate>
    </delay:GroupingItemsControlConverterParameters>

</Grid.Resources>

<!-- ... -->

<ItemsControl
    ItemsSource="{Binding Converter={StaticResource GroupingItemsControlConverter},
        ConverterParameter={StaticResource SimpleGroupingItemsControlConverterParameter}}"/>


[Click here to download the complete source code for the GroupingItemsControlConverter sample as a Silverlight 4 Visual Studio 2010 solution.]


How does it work? Fairly simply, actually! Once parameters have been validated, the GroupingItemsControlConverter class makes a call to Linq's GroupBy extension method using the custom grouping method specified and follows with a call to the OrderBy extension method. The results are then output as a sequence of ContentControl instances with a custom DataTemplate applied according to whether each thing is a group header or an item. This pattern should seem pretty familiar; it's the standard ItemsControl model mixed together with something kind of like implicit DataTemplates. The GroupingItemsControlConverterParameters class lets you specify the GroupHeaderTemplate, the ItemTemplate, and an class implementing the IGroupingItemsControlConverterSelector interface. And don't worry, the custom implementation of that interface is quite trivial - here's what the sample application uses:

// Simple IGroupingItemsControlConverterSelector implementation for grouping by an Animal's species
public class AnimalSpeciesGroupSelector : IGroupingItemsControlConverterSelector
{
    public Func<object, IComparable> GetGroupSelector()
    {
        return (o) => ((Animal)o).Species;
    }
}


As you can see, the simple example really is pretty simple. :) The fancier example on the right is very similar, except that it uses a bit more XAML to get that "black is the new white" effect that's becoming so popular lately. And it makes use of my SetterValueBindingHelper implementation which adds support for specifying a Binding in the Value of a Setter on Silverlight to bind the ListBoxItem's IsEnabled property to another simple IValueConverter to disable the headers so they can't be clicked on or selected.

Aside: Yes, I know that the very top group header is selectable when using the keyboard on current Silverlight bits. No, it's not my bug. Yes, I already reported it to the relevant people. :)


Those of you familiar with my blog may be wondering why I haven't mentioned that everything here works on WPF, too... Okay, fine, I fully expect that what I've done here will work exactly the same on WPF as it does on Silverlight. :) However, WPF's support of additional features like implicit DataTemplates means that I'd probably implement this solution a little differently on WPF. If you're itching to use this code as-is on WPF, go right ahead; I don't anticipate any problems with that. But if you do, maybe spend just a bit of time thinking about how you would do things differently on WPF...


Here's the complete implementation of GroupingItemsControlConverter and its helper classes for those who are interested:

/// <summary>
/// Class that implements simple grouping for ItemsControl and its subclasses (ex: ListBox)
/// </summary>
public class GroupingItemsControlConverter : IValueConverter
{
    /// <summary>
    /// Modifies the source data before passing it to the target for display in the UI.
    /// </summary>
    /// <param name="value">The source data being passed to the target.</param>
    /// <param name="targetType">The Type of data expected by the target dependency property.</param>
    /// <param name="parameter">An optional parameter to be used in the converter logic.</param>
    /// <param name="culture">The culture of the conversion.</param>
    /// <returns>The value to be passed to the target dependency property.</returns>
    public object Convert(object value, Type targetType, object parameter, CultureInfo culture)
    {
        // Validate parameters
        var valueAsIEnumerable = value as IEnumerable;
        if(null == valueAsIEnumerable)
        {
            throw new ArgumentException("GroupingItemsControlConverter works for only IEnumerable inputs.", "value");
        }
        var parameterAsGroupingItemsControlConverterParameter = parameter as GroupingItemsControlConverterParameters;
        if (null == parameterAsGroupingItemsControlConverterParameter)
        {
            throw new ArgumentException("Missing required GroupingItemsControlConverterParameter.", "parameter");
        }
        var groupSelectorAsIGroupingItemsControlConverterSelector =
            parameterAsGroupingItemsControlConverterParameter.GroupSelector as IGroupingItemsControlConverterSelector;
        if (null == groupSelectorAsIGroupingItemsControlConverterSelector)
        {
            throw new ArgumentException(
                "GroupingItemsControlConverterParameter.GroupSelector must be non-null and implement IGroupingItemsControlConverterSelector.",
                "parameter");
        }

        // Return the grouped results
        return ConvertAndGroupSequence(valueAsIEnumerable.Cast<object>(), parameterAsGroupingItemsControlConverterParameter);
    }

    /// <summary>
    /// Converts and groups the values of the specified sequence according to the settings of the specified parameters.
    /// </summary>
    /// <param name="sequence">Sequence of items.</param>
    /// <param name="parameters">Parameters for the grouping operation.</param>
    /// <returns>Converted and grouped sequence.</returns>
    private IEnumerable<object> ConvertAndGroupSequence(IEnumerable<object> sequence, GroupingItemsControlConverterParameters parameters)
    {
        // Validate parameters
        var groupSelector = ((IGroupingItemsControlConverterSelector)(parameters.GroupSelector)).GetGroupSelector();
        if (null == groupSelector)
        {
            throw new NotSupportedException("IGroupingItemsControlConverterSelector.GetGroupSelector must return a non-null value.");
        }

        // Do the grouping and ordering
        var groupedOrderedSequence = sequence.GroupBy(groupSelector).OrderBy(g => g.Key);

        // Return the wrapped results
        foreach (var group in groupedOrderedSequence)
        {
            yield return new ContentControl { Content = group.Key, ContentTemplate = parameters.GroupHeaderTemplate };
            foreach (var item in group)
            {
                yield return new ContentControl { Content = item, ContentTemplate = parameters.ItemTemplate };
            }
        }
    }

    /// <summary>
    /// Modifies the target data before passing it to the source object. This method is called only in TwoWay bindings.
    /// </summary>
    /// <param name="value">The target data being passed to the source.</param>
    /// <param name="targetType">The Type of data expected by the source object.</param>
    /// <param name="parameter">An optional parameter to be used in the converter logic.</param>
    /// <param name="culture">The culture of the conversion.</param>
    /// <returns>The value to be passed to the source object.</returns>
    public object ConvertBack(object value, Type targetType, object parameter, CultureInfo culture)
    {
        throw new NotImplementedException("GroupingItemsControlConverter does not support ConvertBack.");
    }
}

/// <summary>
/// Class that represents the input parameters to the GroupingItemsControlConverter class.
/// </summary>
public class GroupingItemsControlConverterParameters
{
    /// <summary>
    /// Template to use for the header for a group.
    /// </summary>
    public DataTemplate GroupHeaderTemplate { get; set; }

    /// <summary>
    /// Template to use for the items of a group.
    /// </summary>
    public DataTemplate ItemTemplate { get; set; }

    /// <summary>
    /// Selector to use for determining the grouping of the sequence.
    /// </summary>
    public IGroupingItemsControlConverterSelector GroupSelector { get; set; }
}

/// <summary>
/// Interface for classes to be used as a selector for the GroupingItemsControlConverterParameters class.
/// </summary>
public interface IGroupingItemsControlConverterSelector
{
    /// <summary>
    /// Function that returns the group selector.
    /// </summary>
    /// <returns>Key to use for grouping.</returns>
    Func<object, IComparable> GetGroupSelector();
}

My new home page, refreshed [Updated collection of great Silverlight/WPF Data Visualization resources!]

Some great content has been published since I posted my previous collection of Silverlight/WPF Charting links. What's more, the November 2009 release of the Silverlight Toolkit and the February 2010 release of the WPF Toolkit have both been released, so please have a look at them if you haven't already!

Now, without further ado, here are all links that are fit to print (FYI: previously published links are gray):

Overviews (100 level)

Scenarios (200 level)

Internals (300 level)

Team Member posts (Partner level)

My posts (Ego level)

My many thanks go out to everyone who has spent time helping people learn how to use Silverlight/WPF Data Visualization!

PS - If I've missed any good resources, please leave a comment with a link - I'm always happy to find more great content! :)

PPS - The most recent version of this collection will always be pointed to by http://cesso.org/r/DVLinks. If you're going to create a favorite or link to this post, please use that URL so you'll always be up to date.