The blog of dlaa.me

There's a blob on your web page - but don't wipe it off [New Delay.Web.Helpers assembly brings easy Amazon S3 blob access to ASP.NET web sites!]

Microsoft released a bunch of new functionality for its web platform earlier today - and all of them are free! The goodies include new tools like WebMatrix, ASP.NET MVC3 and the Razor syntax, and IIS Express - as well updates to existing tools like the Web Platform Installer and Web Deploy. These updates work together to enable a variety of new scenarios for the web development community while simultaneously making development simpler and more powerful. I encourage everyone to check it out!


Web Helpers...

One of the things I find particularly appealing is the idea of "web helpers": chunks of code that can be easily added to a project to make common tasks easier - or enable new ones! Helpers can do all kinds of things, including integrating with bit.ly, Facebook, PayPal, Twitter, and so-on. For an example of cool they are, here's how easy it is to add an interactive Twitter profile section to any ASP.NET web page [and it's even easier if you don't customize the colors :) ]:

@Twitter.Profile(
    "DavidAns",
    height:150,
    numberOfTweets:20,
    scrollBar:true,
    backgroundShellColor:"#8ec1da",
    tweetsBackgroundColor:"#ffffff",
    tweetsColor:"#444444",
    tweetsLinksColor:"#1985b5")

Which renders as:
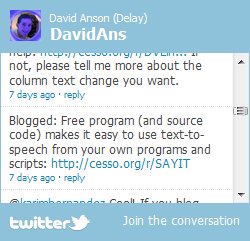
Twitter profile search

You can see other examples of useful web helpers (including charting, cryptography, Xbox gamer cards, ReCaptcha, and more) in the ASP.NET social networking tutorial.


Aside: While web helper assemblies like System.Web.Helpers and Microsoft.Web.Helpers are obviously easy to use from ASP.NET Razor and ASP.NET MVC, what's neat (and not immediately obvious) is that they don't need to be tied to those technologies. At the end of the day, helper assemblies are normal .NET assemblies and some of their functionality can be used equally well in non-web scenarios!


The inspiration...

One of the web helpers that caught my eye when I was looking around is the Windows Azure Storage Helper which makes it easy to incorporate Windows Azure blob and table access into ASP.NET applications. If you happened to be reading this blog a few months ago, you might remember that I already have some experience working with Windows Azure and Amazon S3 blobs in the form of my BlobStore Silverlight application and BlobStoreOnWindowsPhone Windows Phone 7 sample.

When I wrote BlobStore for Silverlight, I didn't see any pre-existing libraries I could make use of (the Windows Azure Managed Library didn't (and maybe still doesn't?) work on Silverlight and there were some licensing concerns with the S3 libraries I came across), so I implemented my own support for what I needed: list/get/set/delete support for blobs on Windows Azure and Amazon Simple Storage Service (S3). But now that we're talking about ASP.NET, web helpers run on the server and the Windows Azure Storage Helper is able to leverage the Windows Azure Managed Library for all the heavy lifting so it can expose things in a clean, web helper-suitable way (via the WindowsAzureStorage static class and its associated methods).

That's good stuff and the WindowsAzureStorage helper seems quite comprehensive - but what about customers who are already using Amazon S3 and can't (or won't) switch to Windows Azure? Well, that's where I come in. :) I'd thought it would be neat to create my own web helper assembly, and this seemed like the perfect opportunity - so I've created the Delay.Web.Helpers web helper assembly by leveraging the work I'd already done for BlobStore. This enables basic list/get/set/delete functionality for S3 blobs without a much additional effort and seems like a great way to help out more customers!


The API...

Most people don't like having many different ways to do the same thing, so I decided early on that the fundamental API for AmazonS3Storage would be the same as that already exposed by WindowsAzureStorage. That led directly to the following API (the two "secret key" properties have been renamed to match Amazon's terminology, but they're used exactly the same):

namespace Delay.Web.Helpers
{
    public static class AmazonS3Storage
    {
        public static string AccessKeyId { get; set; }
        public static string SecretAccessKey { get; set; }

        public static IList<string> ListBlobs(string bucketName);
        public static void UploadBinaryToBlob(string blobAddress, byte[] content);
        public static void UploadBinaryToBlob(string blobAddress, Stream stream);
        public static void UploadBinaryToBlob(string blobAddress, string fileName);
        public static void UploadTextToBlob(string blobAddress, string content);
        public static byte[] DownloadBlobAsByteArray(string blobAddress);
        public static void DownloadBlobAsStream(string blobAddress, Stream stream);
        public static void DownloadBlobToFile(string blobAddress, string fileName);
        public static string DownloadBlobAsText(string blobAddress);
        public static void DeleteBlob(string blobAddress);
    }
}

And because I wanted to be sure AmazonS3Storage could really be dropped into an application that already used WindowsAzureStorage, I did exactly that: I downloaded the WindowsAzureStorage sample application, performed a find-and-replace on the class name, updated the names of the two "secret key" properties, removed some unsupported functionality, and then verified that the sample ran and worked correctly. (It did!)


The enhancements...

While I think the WindowsAzureStorage APIs works well for listing and reading existing blobs, it's not immediately clear what a blobAddress string is made up of or how to create one, so I might get a little confused in scenarios that create blobs from scratch... It so happens that the blobAddress structure is ContainerName/BlobName (which I preserve in AmazonS3Storage), but that feels like an implementation detail developers focusing on the upload scenario shouldn't need to know. Therefore, I've also exposed the following set of methods with separate bucketName and blobName parameters (and otherwise the same signatures):

public static void UploadBinaryToBlob(string bucketName, string blobName, byte[] content);
public static void UploadBinaryToBlob(string bucketName, string blobName, Stream stream);
public static void UploadBinaryToBlob(string bucketName, string blobName, string fileName);
public static void UploadTextToBlob(string bucketName, string blobName, string content);
public static byte[] DownloadBlobAsByteArray(string bucketName, string blobName);
public static void DownloadBlobAsStream(string bucketName, string blobName, Stream stream);
public static void DownloadBlobToFile(string bucketName, string blobName, string fileName);
public static string DownloadBlobAsText(string bucketName, string blobName);
public static void DeleteBlob(string bucketName, string blobName);

I'm optimistic this provides a somewhat easier model for developers to work with, but I encourage folks to use whatever they think is best! :)

Aside: I hadn't previously needed create/list/delete functionality for buckets, so the corresponding methods are not part of today's release. However, I expect them to be rather easy to add and will likely do so at a future date.


The testing...

To try to ensure I hadn't made any really dumb mistakes, I wrote a complete automated test suite for the new AmazonS3Storage class. With the exception of verifying each ArgumentNullException for null parameters, the test suite achieves complete coverage of the new code and runs as a standard Visual Studio test project (i.e., here's an example of using web helpers "off the web").


The sample...

As much fun as testing is, a sample is often the best way to demonstrate how an API is used in practice - so I also put together a (very) quick Razor-based web site to provide simple list/get/set/delete access to an arbitrary Amazon S3 account/bucket:
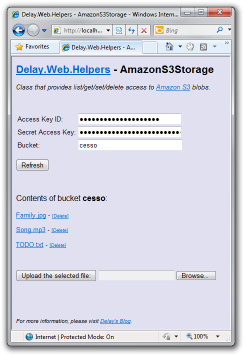
Delay.Web.Helpers AmazonS3Storage sample


The example...

Using the Delay.Web.Helpers web helper is as easy as you'd expect; here's the piece of code that lists the bucket's contents (which is only as long as it is because it handles invalid credentials and empty buckets):

@if (configured) {
    <p class="Emphasized">
        Contents of bucket <strong>@bucket</strong>:
    </p>
    var blobs = AmazonS3Storage.ListBlobs(@bucket);
    if (blobs.Any()) {
        foreach (var blobAddress in blobs) {
            <p>
                <a href="@Href("DownloadBlob", new { BlobAddress = blobAddress})">@blobAddress.Split('/').Last()</a>
                -
                <a href="@Href("DeleteBlob", new { BlobAddress = blobAddress})" class="Subdued">[Delete]</a>
            </p>
        }
    } else {
        <em>[Empty]</em>
    }
} else {
    <p>
        <strong>[Please provide valid Amazon S3 account credentials in order to use this sample.]</strong>
    </p>
}

The one "gotcha" that's easy to forget (and that causes compile errors when you do!) is the using statement that goes at the top of the .cshtml file and tells Razor where to find the implementation of the AmazonS3Storage class:

@using Delay.Web.Helpers


The download...

[Click here to download the Delay.Web.Helpers assembly, its complete source code, all automated tests, and the sample web site.]

To use the Delay.Web.Helpers assembly in your own projects, simply download the ZIP file above, unblock it (click here for directions on "unblocking" a file), extract its contents to disk, and reference Delay.Web.Helpers.dll - or copy the Delay.Web.Helpers.dll and Delay.Web.Helpers.xml files to wherever they're needed (typically the Bin directory of a web site).

Aside: Technically, the Delay.Web.Helpers.xml file is optional - its sole purpose is to provide enhanced IntelliSense (specifically: method and parameter descriptions) in tools like Visual Studio. If you don't care about that, feel free to omit this file!

To play around with the included sample web site, just open the folder Delay.Web.Helpers\SourceCode\SampleWebSite in WebMatrix or Visual Studio (as a web site) and run it.

To have a look at the source code for the Delay.Web.Helpers assembly, tweak it, run the automated tests, or open the sample web site (a slightly different way), just open Delay.Web.Helpers\SourceCode\Delay.Web.Helpers.sln in Visual Studio.


The summary...

Being able to repurpose code is a great thing! In this case, all it took to convert my existing BlobStoreApi into an ASP.NET Razor/MVC-friendly web helper was writing a few thin wrapper methods. With a foundation like that, all it takes is some testing to catch mistakes, a quick sample to show it all off, and all of a sudden you've got yourself the makings of a snazzy blog post - and a new web helper! :)
SayIt, don't spray it! [Free program (and source code) makes it easy to use text-to-speech from your own programs and scripts]

Over the holiday break, I was asked to create a program to "speak" (via text-to-speech) simple sentences that were provided on the command-line. None of the available offerings were "just right" for the customer's scenario, so I was asked if I knew of any other options... Although I hadn't used it before, I figured the .NET System.Speech assembly/classes would make solving this task pretty easy, so I decided to give it a quick try.

And about three minutes later, I was done [ :) ]:

using System.Speech.Synthesis;

class Program
{
    static void Main(string[] args)
    {
        (new SpeechSynthesizer()).Speak(string.Join(" ", args));
    }
}


Because that was so easy, it felt like cheating; I decided to add support for a few more features to round out the offering and turn the whole thing into a free tool and blog post. The program I've written is called SayIt and is a window-less .NET 4 application to speak arbitrary text from the command line (or from a file) while allowing the user to make simple customizations (such as gender and volume).

Here's the "documentation" that shows up when SayIt is run without any parameters:

Use the command line to tell SayIt what to say and how to say it.

SayIt.exe
    [--Gender Male|Female|Neutral]
    [--Volume Silent|ExtraSoft|Soft|Medium|Loud|ExtraLoud|Default]
    [--Rate ExtraSlow|Slow|Medium|Fast|ExtraFast]
    [--Text <Text.txt>]
    [--SSML <SSML.xml>]
    [<Text to say>]

Examples:
    SayIt.exe Hello world
    SayIt.exe --Gender Female --Text C:\My\File.txt

Version 2011-01-04
http://blogs.msdn.com/b/delay/


For fun, I created the following icon (if you don't recognize it, here's a hint):

SayIt icon


When you run SayIt with the proper parameters (combine them in any order!), SayIt uses the Windows text-to-speech engine to speak the text using the default output device. It does this without creating or showing a window, so other programs can make use of SayIt without distracting the user. Alternatively, SayIt can be called from batch files to provide status updates for custom scripts and the like. Simple text can be passed directly on the command line, while more complicated (or lengthy) text can be passed in a file (via the --Text option).

Here are a few ideas to get you started:

SayIt Build completed
SayIt Processing file 12 of 25
SayIt You've got mail!
SayIt I'm sorry, Dave. I'm afraid I can't do that.
SayIt Barbra Streisand


Aside from the simple gender, volume, and rate customizations that can be done on the command-line, the most likely tweak is fine-tuning the pronunciation of a particular word or words. (Though most sentences are quite understandable by default, some words come out a little garbled!) Fortunately, there's a W3C standard for customizing pronunciation and SayIt supports that standard (via the --SSML parameter): Speech Synthesis Markup Language.

SSML is a simple, XML-based syntax for controlling the behavior of text-to-speech applications like SayIt. I won't go into the gory details here (the SSML specification has everything you need), but I will highlight the phoneme element in the form of a simple sample that's part of the small SayIt test suite:

<!-- IPA pronunciations based on http://en.wiktionary.org/wiki/tomato -->
<speak version='1.0' xmlns='http://www.w3.org/2001/10/synthesis' xml:lang='en-US'>
  You say <phoneme alphabet="ipa" ph="təˈmaɪto">tomato</phoneme>.
  I say <phoneme alphabet="ipa" ph="təˈmeɪto">tomato</phoneme>.
</speak>


Although technology hasn't come quite as far as Arthur C. Clarke envisioned in 2001: A Space Odyssey, it's still pretty amazing what the common household computer is capable of. Speech - and other forms of "natural input" - can be a great way to personalize the computing experience and the ease with which SayIt can be incorporated into existing programs and scripts should make it a natural fit for many scenarios. Instead of using an inefficient polling approach to find out when your tasks finish, let the computer tell you - literally! :)


[Click here to download the .NET 4 SayIt application, complete source code, and simple tests.]


Notes:

  • The default English install of Windows 7 comes with only one "voice", Microsoft Anna, which is female. Therefore, even if you specifically request a male voice (via --Gender Male or SSML), you'll probably still hear Anna. This is not a bug in SayIt. :)
  • SayIt exposes the same volume settings that the System.Speech assembly does (via the PromptVolume enumeration), but you probably won't be able to increase the speech volume because the default setting is "ExtraLoud". This is not a bug in SayIt, either.
  • The speech engine is pretty good about spelling out acronyms like you'd want, but if you ever need to force the issue, just prefix the relevant word/acronym with the '-' character:
    SayIt Register your car at the -DOT.

"And she'd say, 'Can you see ... what I'm saying?'" [How to: Localize a Windows Phone 7 application that uses the Windows Phone Toolkit into different languages]

While it might be convenient if everybody spoke the same language (or communicated via telepathy), that's not the world we live in. :) Therefore, building applications that can be easily translated to other languages is an important consideration. Fortunately, it's easy - and it's covered in the MSDN article How to: Build a Localized Application for Windows Phone. But what's not covered is how to localize the controls in the Silverlight for Windows Phone Toolkit. As you might expect, it's fairly similar, but I've had a few people ask about this explicitly and I decided to do a quick post on the topic. As long as I was at it, I figured I'd show the entire process from start to finish just to make things a little easier...


Prepare the emulator/phone

In order to monitor our progress as the sample application gets localized, it's helpful to work in a non-default language which makes it easy to identify the un-localized parts. I run an English operating system, so I'll use Spanish for this example:

  1. Open the Settings application

  2. Choose region & language

  3. Open the Display language picker

  4. Change to "Español"

  5. Tap the link to restart the emulator/phone:

    Settings


Create a new application

We'll start with a brand new application using the default template provided by the Visual Studio 2010 development tools:

  1. From the File menu, choose New, then Project...

  2. Go to the "Silverlight for Windows Phone" section and create a "Windows Phone Application" with the name of your choice

  3. From the Project menu, choose Add New Item...

  4. Select "Resources File" and name it AppResources.resx

  5. Add an entry for Name="Title" and Value="welcome"

  6. Open MainPage.xaml.cs and add the following to the end of the constructor to set the text of the existing PageTitle element:

    PageTitle.Text = AppResources.Title;
  7. Run the application to see the custom title in English:

    New application


Localize the application

Now let's localize the sample application so it uses the proper language for the user's settings. In the steps below, we'll add support for Spanish (via the "es" language code), but adding other languages is a simple matter of repeating these steps using the other language's code and translations. It's a little bit of effort, but it's all quite simple:

  1. In the Solution Explorer window, select AppResources.resx by clicking on it

  2. Press Ctrl+C, then Ctrl+V to create a copy of AppResources.resx

  3. Select Copy of AppResources.resx and press F2 to rename it to AppResources.es.resx

  4. Staying in the Solution Explorer window, right-click the project root node and choose Unload Project

  5. Right-click the project node again and choose Edit [ProjectName].csproj

  6. Change the existing SupportedCultures element to be:

    <SupportedCultures>es</SupportedCultures>
  7. Back in the Solution Explorer window, right-click the project node and choose Reload Project

  8. Open AppResources.es.resx and change "welcome" to "bienvenido"

  9. Run the application and verify the custom title now shows up in Spanish (no code changes necessary!):

    Localized application


Add the Windows Phone Toolkit project

Now we'll modify the sample application to reference the Windows Phone Toolkit. (You can read more about the Windows Phone Toolkit in my introductory post.) Rather than adding a binary reference to the Toolkit, we'll add a project reference and build the Toolkit code as part of the sample application (for reasons that will become clear soon):

  1. Go to http://silverlight.codeplex.com/ and download the "Silverlight for Windows Phone Toolkit Source & Sample" ZIP file

  2. Unblock the ZIP file (see the notes at the end of this post for instructions)

  3. Right-click the ZIP file and choose Extract All... to extract all files to the directory of your choice

  4. From the File menu in Visual Studio, choose Add, then Existing Project...

  5. Choose the Microsoft.Phone.Controls.Toolkit.csproj file found in the same-named directory of the extracted content

  6. Click on the application project node in Solution Explorer to make it active again

  7. From the Project menu, choose Add Reference...

  8. Switch to the Projects tab and pick the Microsoft.Phone.Controls.Toolkit project

  9. Press F6 and verify the solution builds both projects successfully:

    ------ Build started: Project: Microsoft.Phone.Controls.Toolkit, Configuration: Debug Any CPU ------
    ...
    ------ Build started: Project: LocalizedPhoneApplicationWithToolkit, Configuration: Debug Any CPU ------
    ...
    ========== Build: 2 succeeded or up-to-date, 0 failed, 0 skipped ==========


Add some Windows Phone Toolkit controls

Now it's time to add two of those handy-dandy Windows Phone Toolkit controls (both covered in the aforementioned blog post): DatePicker and ToggleSwitch. We'll follow the usual steps for referencing third-party controls which should be pretty familiar to everyone:

  1. Open MainPage.xaml and switch to XAML view

  2. Add the following to the top of the file along with the other xmlns definitions:

    xmlns:toolkit="clr-namespace:Microsoft.Phone.Controls;assembly=Microsoft.Phone.Controls.Toolkit"
  3. Paste the following inside the empty "ContentPanel" Grid:

    <StackPanel>
        <toolkit:DatePicker/>
        <toolkit:ToggleSwitch/>
    </StackPanel>
  4. Optional: Follow the steps in the notes of my Windows Phone Toolkit introduction to add the DatePicker Application Bar icons to the project

  5. Run the application to see the text of the Toolkit controls in English:

    Toolkit ToggleSwitch Toolkit DatePicker

    Note: The day and month names are already in Spanish because they come from the operating system which knows to use the current language for dates. The Spanish-correct day/month/year formatting (vs. the United States default of month/day/year) is automatically provided by the DatePicker control.


Localize the Windows Phone Toolkit controls

Finally, we'll localize the Toolkit controls using the same process we did for the sample application itself:

  1. In Solution Explorer, expand the "Properties" folder for the Toolkit and click Resources.resx

  2. Press Ctrl+C, then Ctrl+V to create a copy of Resources.resx

  3. Select Copy of Resources.resx and press F2 to rename it to Resources.es.resx

  4. Open Resources.es.resx and change "CHOOSE DATE" to "ELIGE UNA FECHA", "cancel" to "cancelar", "done" to "listo", "Off" to "Desactivado", and "On" to "Activado"

  5. Run the application and verify the Toolkit control text is also in Spanish now:

    Localized Toolkit ToggleSwitch Localized Toolkit DatePicker

    Note: If you get the error Unable to copy file "obj\Debug\Microsoft.Phone.Controls.Toolkit.dll" to "..\Bin\Debug\Microsoft.Phone.Controls.Toolkit.dll". The process cannot access the file '..\Bin\Debug\Microsoft.Phone.Controls.Toolkit.dll' because it is being used by another process. when compiling, close all documents in Visual Studio via Window/Close All Documents, then restart Visual Studio itself.


At the end of the day, translating an application isn't just a nice thing to do, it's good business! We operate in a global marketplace and that means localized products can have a big advantage over their single-language-only competitors. While good localization can't save a bad application from itself, it can make a good application stand out. So please think about localization in your next marketplace application - your customers will appreciate it!

Gracias. :)


Notes:

  • People sometimes ask why the Windows Phone Toolkit (or the Silverlight Toolkit, for that matter) isn't already localized to the same set of languages the host platform supports. While I personally think it should be, doing so would take time and money and those two things can be in rather short supply at times. :) While I hope to see Toolkit localization become official some day, the good news for now is that things have been implemented such that they're easily localizable.

  • I've taken the quick/easy route of assigning the localized text resource directly to PageTitle.Text in the application's constructor, but that is not the recommended technique. Instead, what's generally preferred is what's described in the second half of the "Replacing hard-coded strings with strings in a resource file" section of the MSDN documentation: use a property Binding in XAML to reference the localized resources via a custom object as a StaticResource. It's a little unintuitive at first, but a very reasonable solution in practice. :)

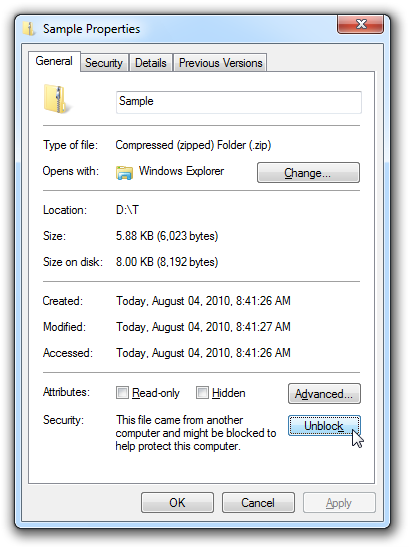
  • After downloading the ZIP file for the Windows Phone Toolkit source code, you should "unblock" it before extracting its contents to avoid warnings from Visual Studio like Security Warning, You should only open projects from a trustworthy source. and The "ValidateXaml" task failed unexpectedly. System.IO.FileLoadException: Could not load file or assembly .... Unblocking is a simple matter of right-clicking on the ZIP file, choosing Properties from the context menu, clicking the Unblock button in the lower, right-hand corner of the resulting dialog, and hitting OK or Apply:

    Unblock button in Properties dialog

No rest for the weary [Free tool and source code to temporarily prevent a computer from entering sleep mode - now available for .NET, 32-bit, and 64-bit!]

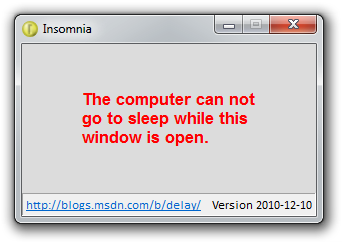
It was over a year ago that I wrote and shared the first version of my Insomnia utility. A few months later, I published a new version of Insomnia to satisfy the two most popular feature requests. Here's how I explained Insomnia's motivation at the time:

The default power settings for Windows are set up so a computer will go to sleep after 15 to 30 minutes of inactivity (i.e., no mouse or keyboard input). This is great because a computer that's not being used doesn't need to be running at full power. By letting an idle machine enter sleep mode, the user benefits from a significant reduction in electricity use, heat generation, component wear, etc.. And because sleep mode preserves the state of everything in memory, it's quick to enter, quick to exit, and doesn't affect the user's work-flow. All the same applications continue running, windows stay open and where they were, etc.. So sleep mode is a Good Thing and I'm a fan.

However, sometimes a computer is busy even though someone isn't actively using the mouse and keyboard; common examples include playing a movie, burning a DVD, streaming music, etc.. In these cases, you don't want the machine to go to sleep because you're using it - even though you're not actually using it! So most media players and disc burners tell Windows not to go to sleep while they're running. In fact, there's a dedicated API for exactly this purpose: the SetThreadExecutionState Win32 Function.

But what about those times when the computer is busy doing something and the relevant program doesn't suppress the default sleep behavior? For example, it might be downloading a large file, re-encoding a music collection, backing up the hard drive, or hashing the entire contents of the disk. You don't want the machine to go to sleep for now, but are otherwise happy with the default sleep behavior. Unfortunately, the easiest way I know of to temporarily suppress sleeping is to go to Control Panel, open the Power Options page, change the power plan settings, commit them - and then remember to undo everything once the task is finished. It's not hard; but it's kind of annoying...


I've gotten a bunch of positive feedback on Insomnia and heard from a lot of people who use it for exactly the kinds of things I expected. (Thanks, everyone!) But I've also heard from a number of people who use Insomnia for a slightly different purpose: as an override of their machine's current power settings. For one reason or another, these people don't have control over their power configuration (perhaps because their domain enforces the relevant group policy), but still want to prevent their computer from going to sleep. This is usually because they want to connect to their machine remotely (ex: via file sharing or Remote Desktop) and can't do that if the machine is forced to sleep...

Insomnia application

These people tend to put a shortcut to Insomnia in their Startup group (click Start Menu, All Programs, Startup) and set the "Minimize" flag to automatically run Insomnia as an icon in the notification area whenever they log in. Because they leave Insomnia running all the time, their computer stays awake and they're able to use it whenever they need to. I've always thought this is a cool scenario - and felt that maybe a lower-overhead version of Insomnia would be particularly compelling here.


I wrote the original Insomnia using the .NET Framework - which meant it was super-easy to write and took practically no time or effort on my part. That's the way (uh-huh, uh-huh!) I like it, because the thing I have the least of is spare time and so anything that makes me more productive is full of win. And in my experience, .NET isn't just more productive, it's dramatically more productive.

That said, everything has a cost, and one of the common downsides of .NET is longer startup time and higher memory use. All the stuff .NET does for you (comprehensive APIs, high-level abstractions, garbage collection, etc.) takes extra time to load and extra memory to keep around. That said, I'll confidently suggest these costs are negligible in the majority of cases and the benefits of .NET (developer productivity, rich feature set, security, etc.) are overwhelmingly in its favor. But Insomnia is a little different than most programs: the application exists only as a wrapper for a single API (SetThreadExecutionState), so the people who run it all the time aren't really benefitting from the power of .NET...

Insomnia minimized to the notification area

I thought it might be fun to re-implement Insomnia in native code (vs. managed code) since it was such a simple program. I've done exactly that - and the result is that Insomnia is now available in three versions: .NET, 32-bit native, and 64-bit native!


[Click here to download all three flavors of Insomnia along with the complete source code for managed and native.]


Of course, while it was neat to do some Windows API coding for a change, the experience served to reinforce my belief in the fundamental productivity benefits of .NET and the power of the WPF/Silverlight layout system. About half the code in native Insomnia exists for the purpose of layout - which the .NET version accomplishes much more succinctly with XAML. The other half of the code handles basic framework-y stuff like creating a window, configuring it, etc. - more things WPF handles for you or makes quite convenient. And the last half of the code [ ;) ] deals with a variety of little things that are quite simple in the managed world, but require non-trivial effort in native code (ex: copying strings, setting up a complicated function call, etc.).

Please don't get me wrong; I completely agree that native code has its place in life (and there's a certain feeling of power one gets from using it). But I've had enough of that for now and will be happy to return to .NET for my next project. :)


Notes:

  • The most common question I get about Insomnia is whether it also disables the screen saver - it does not. When Insomnia is running, the screen saver will continue to kick in and turn off the monitor on its usual schedule. The difference is that the computer itself will not be allowed to enter sleep mode. Once the Insomnia window is closed, the computer can sleep again and will do so on its usual schedule.

  • The second most common question I get is why the Insomnia window stays above other windows. As I explained in the introductory post, this is so Insomnia is always visible when running and people will be less likely to accidentally leave their computers sleep-less by forgetting they've started it. This seems like the right behavior for the original "temporarily prevent sleep mode" scenario; for the "always on" scenario, minimizing Insomnia to the notification area seems to work well for everyone I've talked to.

  • My goal for the native version of Insomnia was to duplicate the functionality of the .NET version as closely as possible - not because I think the .NET version is perfect, but because it works well and it's what people are already familiar with. So while I wasn't obsessive about matching the font face and size exactly, a side-by-side comparison of the two programs shows a very strong correlation. :)

  • The one thing I didn't port from the .NET version was the "/minimize" command-line switch. Originally intended to make it easy for users to start Insomnia minimized, commenter rbirkby reminded me that Windows shortcuts already made that easy enough. It didn't seem necessary to duplicate this somewhat unnecessary feature, so I've omitted it to keep the native version just a bit simpler.

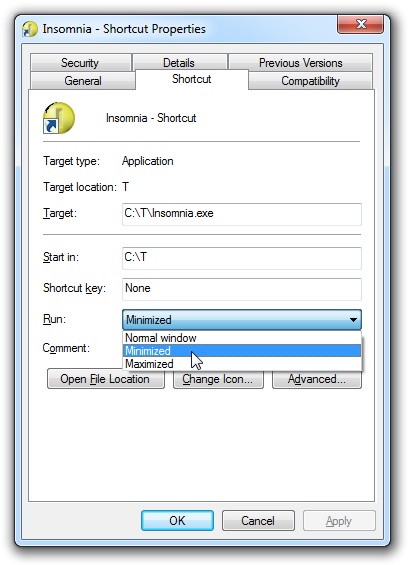
  • To start Insomnia minimized, just create a shortcut to it (right-click+drag+drop its icon somewhere (like the Start Menu / All Programs / Startup folder) then edit the shortcut's settings (right-click it and choose Properties) and choose "Minimized":

    Shortcut to start Insomnia minimized

    Alternatively, the following syntax will do the same thing from a batch file:

    start /MIN Insomnia.exe
  • Because the whole point of this exercise was to reduce Insomnia's run-time footprint, it's interesting to see how things worked out. Here's a table of the Resource Monitor statistics for each flavor as measured by opening and minimizing them all on my 64-bit Windows 7 machine:

    Flavor Commit (KB) Private (KB)
    .NET 66,972 17,940
    64-bit 2,144 1,876
    32-bit 1,652 1,332

    (Note that the .NET version uses somewhat less memory on a 32-bit version of Windows 7.)

  • Not only do the native versions of Insomnia use less memory - they start faster, too! Because they have fewer dependencies, there's simply less stuff to load from disk - and because disk access is (relatively) slow, minimizing it can do a lot to improve startup speeds.

  • Something that made life a little more pleasant for the native version was the SysLink common control - specifically its LM_GETIDEALSIZE message. This message is used to "Retrieve[s] the preferred height of a link for the control's current width." and it enabled me to approximate something kind of like WPF's measure/arrange-based layout system without having to write a bunch of code myself. So while I'd originally thought to use SysLink only for the hyperlink (duh!), I ended up using it for the version text and message as well!

  • As you'd expect, the Visual Studio solution/project for the new, native version of Insomnia uses the Visual Studio 2010 format. However, the solution/project for the original, managed version is still in the 2008 format I originally released it in (of course, opening it in VS 2010 automatically "upgrades" it).

Hash for the holidays [Managed implementation of CRC32 and MD5 algorithms updated; new release of ComputeFileHashes for Silverlight, WPF, and the command-line!]

It feels like a long time since I last wrote about hash functions (though certain curmudgeonly coworkers would say not long enough!), and there were a few loose ends I've been meaning to deal with...

Aside: If my hashing efforts are new to you, more information can be found in my introduction to the ComputeFileHashes command-line tool and the subsequent release of ComputeFileHashes versions for the WPF and Silverlight platforms.


When I first needed a managed implementation of the CRC-32 algorithm a while back, I ended up creating one from the reference implementation. Thanks to the strong similarities between C and C#, the algorithm itself required only minimal tweaks and the majority of my effort was packaging it up as a .NET HashAlgorithm. Because HashAlgorithm is the base class of all .NET hash functions, the CRC32 class ends up being trivial to drop into any .NET application that already deals with hashing.

ComputeFileHashesWPF

The Silverlight platform doesn't include an implementation of the MD5 algorithm like "desktop" .NET does, and I soon ended up creating an MD5 implementation from the reference code so I could support that algorithm on Silverlight (and now Windows Phone, too). Again, the C algorithm translated to C# fairly easily - though there's quite a lot more code for MD5 than CRC32 - and the HashAlgorithm base class makes it easy to reuse. Over the next few days, I made a couple of minor revisions to the CRC32 and MD5Managed classes, but have otherwise left things alone. I've used ComputeFileHashes successfully ever since, and things seemed to be in a pretty good state.


Then one day kind reader Maurizio contacted me (from Italy!) to report a bug in my CRC32 wrapper: there was a missing variable in a loop that could lead to problems if someone passed a non-0 value as the inputOffset parameter of TransformBlock. Fortunately, this isn't a particularly common scenario - the "primary" overload of ComputeHash doesn't do it, none of my ComputeFileHashes code does it, and most typical scenarios probably won't do it, either. That said, a bug is a bug (is a bug), and I made a note to fix it when I got a chance... And I finally had that chance last week! :)

C:\T>ComputeFileHashesCL.exe ZeroByteFile.txt

C:\T\ZeroByteFile.txt
100.0%
CRC32: 00000000
MD5: D41D8CD98F00B204E9800998ECF8427E
SHA1: DA39A3EE5E6B4B0D3255BFEF95601890AFD80709
SHA256: E3B0C44298FC1C149AFBF4C8996FB92427AE41E4649B934CA495991B7852B855
SHA384: 38B060A751AC96384CD9327EB1B1E36A21FDB71114BE07434C0CC7BF63F6E1DA274EDEBFE76F65FBD51AD2F14898B95B
SHA512: CF83E1357EEFB8BDF1542850D66D8007D620E4050B5715DC83F4A921D36CE9CE47D0D13C5D85F2B0FF8318D2877EEC2F63B931BD47417A81A538327AF927DA3E
RIPEMD160: 9C1185A5C5E9FC54612808977EE8F548B2258D31


And as long as I was already messing with the ComputeFileHashes code (which meant recompiling for each platform, re-packaging, uploading, etc.), there were a few other things I decided to take care of at the same time. And it's just as well - in the process of doing so, I discovered (and fixed) a seemingly obscure bug in MD5Managed (which I suspect has never been hit in real life). Along the way, I added the complete suite of .NET HashAlgorithms to each tool so you'll automatically get the results of every supported algorithm when you hash a file!


ComputeFileHashes has been a fun project and a nice demonstration of how .NET lets you run the same code across a wide variety of environments and platforms. And the comprehensive automated test framework I added this time around makes me feel better about the correctness of these two HashAlgorithms. I deal with hashes regularly and have found all flavors of ComputeFileHashes to be handy tools to have around - especially the Silverlight version which brings simple, lightweight, install-free hashing to nearly every machine in the world. :)


[Click here to download the complete source code for the command-line, Silverlight, and WPF implementations of ComputeFileHashes along with the new test project.]

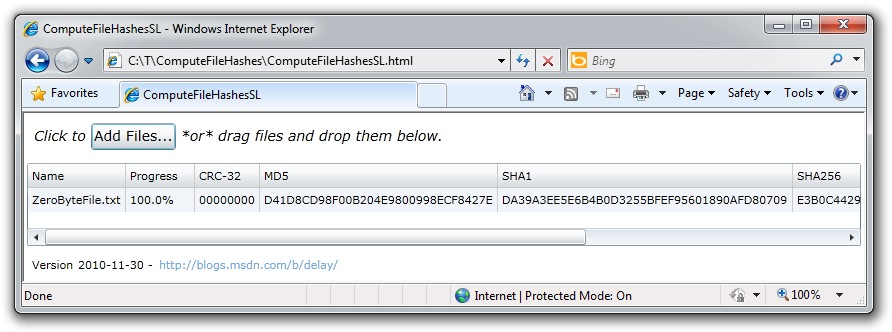
Click here or on the image below to run ComputeFileHashes in your browser with Silverlight 4:

ComputeFileHashesSL

Note: Bookmark the link above for easy access to hashing anytime, anywhere, on any machine!


Here are the major changes since last time:

  • CRC32 bug fix: HashCore was not adding the ibStart offset in its for loop. This is the issue Maurizio reported and would affect all scenarios where a non-0 value was passed for ibStart.

  • MD5Managed bug fix: MD5Update was not adding the inputIndex offset in its call to MD5Transform. This is the obscure issue found by the new test framework - in certain fairly specific circumstances (mostly around odd offsets and buffer sizes), the incorrect offset could result in an invalid hash result.

  • All supported algorithms are run on each file. Initially, only CRC32, MD5, and SHA1 were supported because they were the most common at the time and because I didn't want to waste CPU cycles on obscure algorithms that were hardly ever used. But since then, some of the "obscure" algorithms have become more common (ex: SHA256) and multi-core CPUs have become much more widespread. Because the ComputeFileHashes tools are already multi-processor friendly and because quad-processor CPUs are now commonplace, I've decided not to limit them due to CPU cycles. Most files hash instantaneously anyway, so the additional algorithms won't slow things down there; for longer files where CPU might start to dominate over disk access, the additional overhead shouldn't be that big of a deal. With this release, the bias is for convenience, and I'm optimistic that's the right tradeoff most of the time. :)

    Here's what each tool supports:

    • ComputeFileHashesCL, ComputeFileHashesWPF: CRC32, MD5, SHA1, SHA256, SHA384, SHA512, RIPEMD160
    • ComputeFileHashesSL: CRC32, MD5, SHA1, SHA256

    (Note: The Silverlight platform doesn't provide SHA384/SHA512/RIPEMD160. (And I haven't done my own implementation. (Yet...)))

  • There's a comprehensive set of automated tests for CRC32 and MD5Managed. I'd done some basic testing of this code in the past, but hadn't covered the edge cases - and a few bugs slipped by because of that. So I wanted to create a thorough automated test suite this time around and do what I could to cover all the bases.

    • The automated tests have a small library of different inputs and known-good hashes and process it in lots of different ways: all at once, in all different chunk sizes, with and without Initialize, etc.. If any of these techniques generates the wrong hash, the test suite reports the failure.
    • The new tests are thorough enough to yield 100% code coverage on both the CRC32 and MD5Managed implementations.
    • In addition to testing my CRC32 and MD5Managed classes, the automated tests also test the .NET MD5CryptoServiceProvider class - not because I expect to find errors in it, but so I can ensure both MD5 implementations behave the same in each scenario.
    • Consequently (and as a result of the more thorough coverage) CRC32 and MD5Managed now behave the same as the .NET implementations for invalid scenarios, too - all the way to exception-level compatibility for misuse of the API!
    • The only difference is for CryptographicUnexpectedOperationException which can't be constructed on Silverlight - its base class CryptographicException is thrown instead in cases where the hash value is retrieved before the process has been finalized.
  • The Visual Studio solution and project files have been upgraded to the Visual Studio 2010 format. This makes developing ComputeFileHashes in Visual Studio 2010 easy and enables the use of its new and improved feature set.

  • The CRC32/MD5Managed classes and the three ComputeFileHashes programs are now code analysis-clean for the complete Visual Studio 2010 rule set. Additional code analysis rules were introduced with VS 2010 and they reported some new violations in the code. These have all been fixed (or suppressed where appropriate).

  • The namespace of the CRC32 and MD5Managed classes has been changed to "Delay". This change brings these classes inline with the rest of the sample code I publish and makes their generality a bit clearer.

  • ComputeFileHashesCL remains a .NET 2.0 application for maximum versatility. By targeting .NET 2.0, ComputeFileHashesCL runs nearly everywhere .NET does.

  • ComputeFileHashesWPF is now a .NET 4 application for compactness and ease of distribution. ComputeFileHashesWPF used to have a dependency on the WPFToolkit for its DataGrid control. Because that control is part of the .NET 4 Framework, the new ComputeFileHashesWPF no longer depends on any non-Framework assemblies and can be distributed as a single file.

  • ComputeFileHashesSL is now a Silverlight 4 application to make use of new features in that platform. Most notably, ComputeFileHashesSL uses Silverlight's drag+drop support to enable the handy scenario of dragging a file directly from Windows Explorer and dropping it onto the ComputeFileHashesSL window to hash it (just like ComputeFileHashesWPF already supported). Additionally, I'm making use of my SetterValueBindingHelper class to use Bindings in a Setter and create the same ToolTip experience that ComputeFileHashesWPF already had: hovering over a hash failure shows the reason for the failure (typically because the file was locked by another process). Consequently, the "Details" column is no longer necessary in ComputeFileHashesSL and has been removed.

  • The ClickOnce flavor of ComputeFileHashesWPF is no longer supported. With ComputeFileHashesSL's functionality getting closer to that of ComputeFileHashesWPF and the elimination of the WPFToolkit.dll dependency from ComputeFileHashesWPF, the need for a ClickOnce install seems minimal and has been removed.

  • The version number has been updated to 2010-11-30.

Better together [DynamicOrientationChanges and TransitionFrame create a comprehensive transition experience for Windows Phone 7]

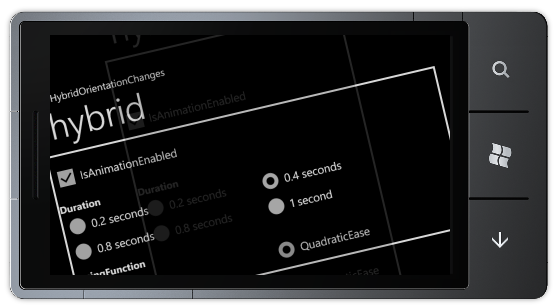
I've previously blogged about my implementation of AnimateOrientationChangesFrame, FadeOrientationChangesFrame, and HybridOrientationChangesFrame. As part of my DynamicOrientationChanges sample, these classes smoothly animate an application's layout transition as the phone orientation changes from portrait to landscape (and vice-versa).

HybridOrientationChanges sample


More recently, I blogged about the Windows Phone Toolkit's support for animated page transitions. The TransitionFrame class (and its helpers) work with the platform's navigation framework to animate the transitions among different pages within an application.

TransitionFrame sample


Though they address different scenarios, both transition helpers make it easy for developers' Silverlight applications to match the behavior of the core Windows Phone 7 applications. The obvious question is whether it's possible to use them together...

At first glance, the fact that both approaches work by directly subclassing PhoneApplicationFrame means they can't be combined as-is.

Aside: This is one of the drawbacks of subclassing as a method of adding or extending functionality in a library: you only get one chance to subclass the base class. (But because you can create as many subclasses as you want, subclassing a subclass can be an excellent alternative!)

So it has always been my hope that these two approaches could be easily combined to create an application that animates both kinds of transitions. Because the Windows Phone Toolkit's TransitionFrame class is more official, it seems appropriate to leave that one alone and try subclassing the DynamicOrientationChanges classes from TransitionFrame. Based on what I knew about both implementations, I assumed this would work, but I didn't get around to trying it before Andy Wigley contacted me with the same question! Well, Andy was brave enough to give this a go and reports that it works well - he wrote a nice summary here:

Best of breed Page rotation animations

If you're interested in combining these two scenarios, I highly recommend checking out Andy's post - he's made the change easy to understand and the steps are easy to follow!

Thanks, Andy! :)


PS - If others have success merging the two transition animation implementations, I'll go ahead and make this an official part of the DynamicOrientationChanges project in a future release. Please don't be shy - give it a try and let me know how it goes!

You've got questions; I've got dumb looks [PDC10's Channel 9 Live Windows Phone 7 Q&A session available online and offline]

A few weeks ago, Microsoft held its annual Professional Developer's Conference (PDC10) and I had the privilege of being a (small!) part of it. This year's content spanned a variety of topics, including Windows Azure, HTML 5, Windows Phone 7, and more! The Channel 9 folks were there in force with two full days of live interviews - including a session on Windows Phone 7 Questions & Answers. Under the expert direction of Dan Fernandez, team members Jeff Wilcox, Peter Torr, and myself spent about 30 minutes talking about building Windows Phone 7 applications and answering questions from the (virtual) audience. It was a lot of fun, and I'd like to think it might even be educational! :)


Channel 9 Windows Phone 7 Question and Answer session


Here are the viewing options:


While you're at it, please check out some of the other PDC10 content online - there's a ton of good stuff and it's all free to enjoy!

The taming of the phone [New SetterValueBindingHelper sample demonstrates its usefulness on Windows Phone 7 (and Silverlight 4)]

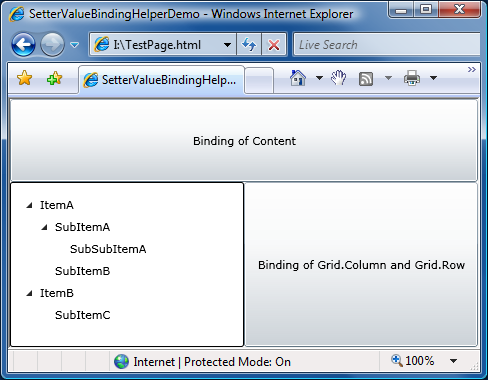
If you've done much work with Bindings in Silverlight, you're probably aware that Silverlight doesn't support applying Bindings using a Style's Setter the same way its big brother WPF does. This limitation isn't a big deal at first because people don't tend to need that until they're more familiar with the platform and have started using MVVM and taking advantage of the ItemContainerStyle property. But once you're working with scenarios where it's relevant, being able to specify Bindings in a Setter can be extremely useful because it replaces a bunch of code/subclassing with a single line of XAML!

SetterValueBindingHelperDemo sample on Silverlight


Fortunately, it's possible to implement this feature outside the Silverlight framework! (Or at least to implement enough of it to cover nearly all the relevant scenarios.) I originally wrote SetterValueBindingHelper for Silverlight 3 as part of an application building exercise. Later on, I updated SetterValueBindingHelper to accommodate implementation changes in the Silverlight 4 platform - and was able to do so in a way that continued to work on Silverlight 3. So because Windows Phone 7 is based on Silverlight 3, I had a strong suspicion SetterValueBindingHelper would work there, too. But it wasn't until a couple of days ago that I had a chance to validate my theory - and now that I have, here's an updated version of the Silverlight sample for Windows Phone:

SetterValueBindingHelperDemo sample on Windows Phone 7


Other than converting the Silverlight sample's TreeView to a ListBox (because the former doesn't exist for Windows Phone), the sample works just the same on Windows Phone as on Silverlight. The code for SetterValueBindingHelper is nearly identical as well - the only difference being that the code to walk an application's assemblies for resolving attached property types can't be used because Windows Phone doesn't support the AssemblyPart.Load method. (But because this particular feature isn't used very often, its absence probably won't even be noticed.)

As a quick reminder, here's what a typical use looks like:

<ListBox.ItemContainerStyle>
    <Style TargetType="ListBoxItem">
        <!-- WPF syntax:
            <Setter Property="Foreground" Value="{Binding Color}"/> -->
        <Setter Property="delay:SetterValueBindingHelper.PropertyBinding">
            <Setter.Value>
                <delay:SetterValueBindingHelper
                    Property="Foreground"
                    Binding="{Binding Color}"/>
            </Setter.Value>
        </Setter>
    </Style>
</ListBox.ItemContainerStyle>
Aside: SetterValueBindingHelper supports more advanced scenarios, too - please refer to the previous post (or the original post) for information and examples.


[Click here to download the code for SetterValueBindingHelper along with sample applications for Silverlight 4 and Windows Phone 7.]


I've gotten a lot of great feedback from developers who have made use of SetterValueBindingHelper in their applications. I've found it quite helpful in my own projects, and I'm glad many of you have, too! With today's announcement, I hope another "generation" is able to use SetterValueBindingHelper to benefit from the many advantages of the Silverlight platform's rich data-binding support. :)

ListPicker? I hardly even know 'er! [A detailed overview of the Windows Phone Toolkit's ListPicker control]

In yesterday's post, I announced the second release of the Silverlight for Windows Phone Toolkit and gave an overview of the four new controls it includes. (For a discussion of the controls in the original Windows Phone Toolkit, please see my announcement for that release.) In today's post, I want to focus on one of the new controls, ListPicker, and discuss it in detail.


The sample application associated with the official Windows Phone Toolkit download offers a great overview of the Windows Phone Toolkit controls, but (deliberately) doesn't get into specific detail on any of them. This post is all about details, so I've written a dedicated sample application which is the source of all the XAML snippets and screenshots below:

[Click here to download the complete source code for the ListPickerSamples application.]


Background

From my previous post:

ListPicker is the Windows Phone 7 equivalent of the ComboBox control: give it a list of items and it will show the selected one and also allowing the user to pick from a list if they want to change it. The core applications on Windows Phone 7 implement two kinds of list selection: an in-place expander for picking among five or fewer items, and a full-screen popup for picking among more. The Toolkit's ListPicker control combines both experiences into one handy package by automatically selecting the right UX based on the number of items in its list! It is a standard ItemsControl subclass with all the common elements of a Selector, so the API will be familiar to just about everyone. In fact, you can take most existing ListBoxes and convert them to ListPickers just by changing the control name in XAML!

That's the gist: ListPicker is the control of choice for selecting values in Windows Phone 7 applications. To be more explicit, it is most appropriate in "Settings"-like scenarios where the user is offered a variety of different options and it makes sense to display only the current value (with an option to show everything once the user decides to make a change). Conversely, ListPicker is not appropriate for displaying long lists of data that the user is going to scan and scroll; scenarios like the "People" or "Marketplace" applications are better served by a ListBox or the Windows Phone Toolkit's new LongListSelector.


Typical Use

The most common scenario for ListPicker looks something like this:

<StackPanel>
    <toolkit:ListPicker
        Header="Rating"
        ItemsSource="{Binding Ratings}"
        SelectedIndex="1"
        SelectionChanged="RatingSelectionChanged"/>
    <TextBlock
        x:Name="RatingSelection"
        CacheMode="BitmapCache"/>
    ...
</StackPanel>

Which gets displayed like this (in normal and expanded forms):

Typical example (normal) Typical example (expanded)

As you'd expect for an ItemsControl subclass, the ItemsSource property is used to provide the list of items (see also: the Items property). And as you'd expect for a Selector-like control, the SelectionChanged event is used to signal changes and the SelectedIndex property is used to get or set the selection (see also: SelectedItem). Everything so far looks just like ListBox - the only difference is the Header property which can optionally be used to provide a simple, platform-consistent label for the ListPicker that offers additional context about the control's purpose (see also: HeaderTemplate).

Aside: The built-in ListBox control will throw an exception if you set SelectedIndex as in the example above because it tries to apply the selection before the Binding has provided the list of items. ListPicker specifically handles this common scenario so you don't have to jump through hoops to make it work. :)


Custom Templates

Displaying strings is all well and good, but sometimes it's nice to display richer content:

Custom template (normal) Custom template (expanded)

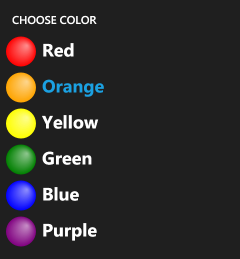
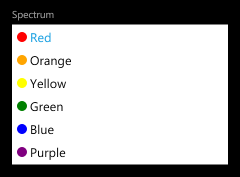
The first thing to do is set the ItemTemplate property as you would for ItemsControl or ListBox - that applies the specified DataTemplate to each item and formats it attractively in the usual manner. That works great, but what about ListPicker's Full mode that's used when the list has too many items? By default, the same ItemTemplate automatically applies there, too, so you may not need to do anything more! However, the Full mode UI uses the entire screen, so it's pretty common to want to specifically customize the appearance of the items for that mode. Therefore, the FullModeItemTemplate property lets you provide a different DataTemplate to be used in the Full mode scenario. Another relevant property for such cases is FullModeHeader which sets the content that's shown at the top of the full-screen "popup".

<toolkit:ListPicker
    Header="Spectrum"
    FullModeHeader="CHOOSE COLOR"
    ItemsSource="{Binding Rainbow}"
    ItemTemplate="{StaticResource RainbowTemplate}"
    FullModeItemTemplate="{StaticResource LargeRainbowTemplate}"/>


Threshold Overrides

By default, lists with five or fewer items expand in-place while lists with more items switch to a full-screen selection interface. This behavior matches the platform guidelines, but sometimes it might make sense to nudge the threshold one way or another (for very large or very small items, perhaps). You might even want to force a ListPicker to always use Expanded or Full mode...

Threshold (full) Threshold (expanded)

For these scenarios, there's the ItemCountThreshold property: it specifies the maximum number of items that will be displayed in Expanded mode. In addition to nudging it up or down a bit for custom scenarios, it can also be set to 0 to "always use Full mode" or a very large number to "always use Expanded mode". Granted, an application that forces Expanded mode for a list of 1000 items probably won't be easy to use - but the freedom is there to allow developers and designers to dial-in exactly the kind of experience they want.

<toolkit:ListPicker
    Header="Rating"
    FullModeHeader="CHOOSE RATING"
    ItemsSource="{Binding Ratings}"
    ItemCountThreshold="0"/>
<toolkit:ListPicker
    Header="Spectrum"
    ItemsSource="{Binding Rainbow}"
    ItemTemplate="{StaticResource RainbowTemplate}"
    ItemCountThreshold="100"/>


Two-Way Binding

Two-way binding

As you'd expect, ListPicker can be used with TwoWay Bindings as well. This is particularly convenient for the SelectedIndex/SelectedItem properties where it's common to want to set the initial value based on a data model (see also: MVVM) and/or when you want the model to update directly when selection changes. The corresponding XAML looks just how you'd expect:

<toolkit:ListPicker
    Header="Network"
    ItemsSource="{Binding Networks}"
    SelectedItem="{Binding CurrentNetwork, Mode=TwoWay}"/>
<StackPanel
    Orientation="Horizontal"
    Margin="{StaticResource PhoneMargin}"
    CacheMode="BitmapCache">
    <TextBlock Text="Current Network: "/>
    <TextBlock Text="{Binding CurrentNetwork}"/>
</StackPanel>


Tips and Tricks

At this point, I hope everyone knows how ListPicker works and has a good feel for when/where/why/how to use it. That being the case, there are a few additional things I'd like to draw attention to:

  1. The ListPicker philosophy is that "there is always an active selection", so it makes sure to select an item when it initializes or when the list changes. This automatic selection (of the first item in most cases) causes the SelectionChanged event to fire - and that causes the application's associated event handler to run (assuming one has been registered). In practice, this "initialization-time" event catches some people by surprise - but it's the intended behavior (and folks tend to agree it's correct once they understand why it happens). Now that you know about it, maybe your development experience will be a bit easier. :)

    Aside: If you want to ignore this event in code, it should be easy to detect because its SelectionChangedEventArgs.RemovedItems collection will be empty (have 0 items). And the only time that happens is when ListPicker is transitioning from an empty list to a non-empty one (e.g., on startup).
  2. ListPicker's transitions between Normal and Expanded mode are effectively animations of the control's Height. Because Height changes cause a layout pass, they don't take place on the composition thread and therefore are more susceptible to performance issues. An easy way to mitigate this in the typical "list of items in a StackPanel" scenario is to add CacheMode=BitmapCache to the elements that appear below the ListPicker (i.e., those that are pushed down by the animation). Please refer back to the first XAML snippet for an example - this tweak allows the Silverlight layout system to animate such controls as bitmaps and that helps the animation run a bit more smoothly.

    Aside: If you don't want to apply BitmapCache to every control individually, an alternate approach is to wrap the affected controls in another StackPanel and set the CacheMode property on the StackPanel instead. Please see the last XAML snippet above for an example of this.
  3. If you have a long list of controls in a StackPanel inside a ScrollViewer and there's a ListPicker near the bottom using Expanded mode, that expansion does not automatically scroll the screen to keep the ListPicker completely in view. On WPF, the fix would be a simple matter of calling FrameworkElement.BringIntoView. However, Silverlight doesn't have that API and there doesn't seem to be a good general purpose way for ListPicker to find the right parent to scroll. (Although walking up the visual tree to find the first ScrollViewer is probably right in most cases, it's not a sure thing; ListPicker errs on the side of caution and doesn't try to make guesses.) In practice, the underlying issue doesn't come up very often - when it has, my suggestion has been to use the ItemCountThreshold property to force the relevant ListPicker to use Full mode (which doesn't expand, so it doesn't alter the parent's layout, so it doesn't have this problem).


Summary

ListPicker is a relatively straightforward control that should be familiar to anyone who's used the standard ListBox. But while its API may be unremarkable, its user experience is all Windows Phone 7 goodness! :)

I hope you enjoy it!

Mo controls, mo controls, mo controls... [Announcing the second release of the Silverlight for Windows Phone Toolkit!]

I'm happy to report that we've just published the Silverlight for Windows Phone Toolkit November 2010 release! This is the second iteration of the Windows Phone Toolkit and effectively doubles the number of controls we've created to help developers and designers build more compelling, more platform-consistent user experiences with ease. The first Windows Phone Toolkit release has been a big hit and we've seen a lot of developers using it (in both binary and source forms) to build their Windows Phone 7 applications. But while we tried to address the most pressing needs with that release, there were still a couple of prominent controls missing...

With today's update, we've tried to provide more of the fundamental controls customers have been asking for - as well as API documentation and fixes for some of the bugs people reported with the first release. Recall that the Windows Phone Toolkit is published on CodePlex under the Ms-PL open-source license so anyone who wants can look at the source code to learn how we've done things - or customize any control to suit their specific scenario. As always, if you have suggestions for things we should add or change, please search the CodePlex issue tracker and vote for the issue (or create a new one if the idea is unique). We use your input to help prioritize our efforts and ensure we're delivering the right things for the community!


What's New?


ListPicker

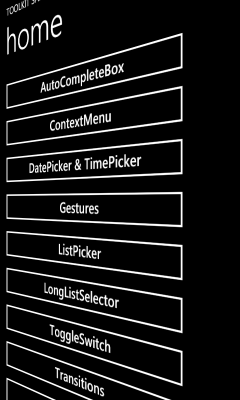
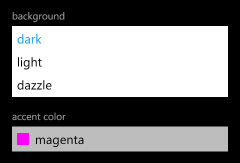
ListPicker sample ListPicker popup sample
<toolkit:ListPicker Header="background">
    <sys:String>dark</sys:String>
    <sys:String>light</sys:String>
    <sys:String>dazzle</sys:String>
</toolkit:ListPicker>

ListPicker is the Windows Phone 7 equivalent of the ComboBox control: give it a list of items and it will show the selected one and also allow the user to pick from a list if they want to change it. The core applications on Windows Phone 7 implement two kinds of list selection: an in-place expander for picking among five or fewer items, and a full-screen popup for picking among more. The Toolkit's ListPicker control combines both experiences into one handy package by automatically selecting the right UX based on the number of items in its list! It is a standard ItemsControl subclass with all the common elements of a Selector, so the API will be familiar to just about everyone. In fact, you can take most existing ListBoxes and convert them to ListPickers just by changing the control name in XAML!


LongListSelector

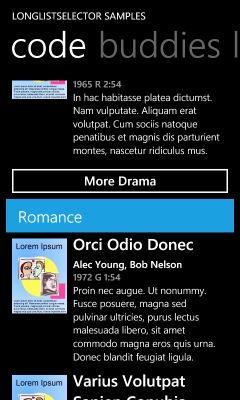
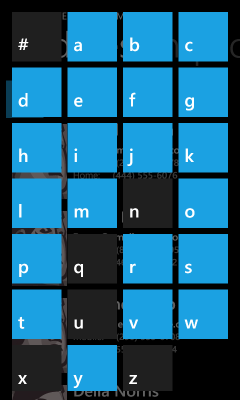
LongListSelector movies sample LongListSelector people sample LongListSelector jump-list sample
<toolkit:LongListSelector
    ItemsSource="{StaticResource movies}"
    ListHeaderTemplate="{StaticResource movieListHeader}"
    GroupHeaderTemplate="{StaticResource movieGroupHeader}"
    GroupFooterTemplate="{StaticResource movieGroupFooter}"
    GroupItemTemplate="{StaticResource groupItemHeader}"
    ItemTemplate="{StaticResource movieItemTemplate}">
</toolkit:LongListSelector>

While ListPicker is about simple selection scenarios, LongListSelector is about advanced ones! Think of it as ListBox++--, it has everything you expect from ListBox plus a bunch of advanced capabilities and great on-device performance minus the levels of abstraction and generality that tend to slow ListBox down. LongListSelector supports full data and UI virtualization, flat lists, grouped lists (with headers!), and also implements the "jump list" header navigation UI that makes the "People" app so efficient! The theory behind LongListSelector is that it should be easy to fix a poorly-performing ListBox scenario by swapping in a LongListSelector instead: it handles all the tricky parts for you, so there's less to worry about and it "just works". Unless you've spent a lot of time fine-tuning your application's list behavior, you should see improved performance by switching to LongListSelector!


TransitionFrame (and Transitions)

TransitionFrame sample
RootFrame = new TransitionFrame();
<toolkit:TransitionService.NavigationInTransition>
    <toolkit:NavigationInTransition>
        <toolkit:NavigationInTransition.Backward>
            <toolkit:TurnstileTransition Mode="BackwardIn"/>
        </toolkit:NavigationInTransition.Backward>
        <toolkit:NavigationInTransition.Forward>
            <toolkit:TurnstileTransition Mode="ForwardIn"/>
        </toolkit:NavigationInTransition.Forward>
    </toolkit:NavigationInTransition>
</toolkit:TransitionService.NavigationInTransition>
<toolkit:TransitionService.NavigationOutTransition>
    <toolkit:NavigationOutTransition>
        <toolkit:NavigationOutTransition.Backward>
            <toolkit:TurnstileTransition Mode="BackwardOut"/>
        </toolkit:NavigationOutTransition.Backward>
        <toolkit:NavigationOutTransition.Forward>
            <toolkit:TurnstileTransition Mode="ForwardOut"/>
        </toolkit:NavigationOutTransition.Forward>
    </toolkit:NavigationOutTransition>
</toolkit:TransitionService.NavigationOutTransition>

The Windows Phone UI Guidelines encourage smooth, attractive page-to-page animations like the core applications show, but there has been little platform support for creating similar experiences in your own applications - until now! :) The new transition classes in the Windows Phone Toolkit aims to make it easy for application developers to add attractive, platform-consistent transitions to their applications. All that's necessary to enable transitions for an application's pages is tweak App.xaml.cs (shown above) and add a bit of XAML to each page to specify its transitions (also shown above). Everything else is done for you!

Aside: This release includes support for multiple flavors of the following transitions: turnstile, slide, rotate, swivel, and roll. It's also possible to implement custom transitions using the same framework!


AutoCompleteBox

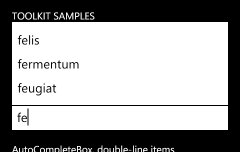
AutoCompleteBox sample
<toolkit:AutoCompleteBox
    ItemsSource="{StaticResource words}"/>

AutoCompleteBox first appeared in the Silverlight 2 Toolkit, then later graduated to the Silverlight 3 SDK. Now it's back in the Toolkit - this time for Windows Phone 7! Because phones are about being small and quick to use, simplifying tedious tasks like text input is an important goal. Toward that end, a number of the core applications (like Bing search) make use of auto-completion to predict what the user is typing and save time by allowing them to click on the completed word instead. AutoCompleteBox makes it easy to bring the same convenience to your own applications by taking advantage of a phone-friendly implementation of this popular Silverlight control. By providing a suitable completion list (in any of a variety of ways), users are automatically prompted with the relevant matches as they start typing!


API Documentation

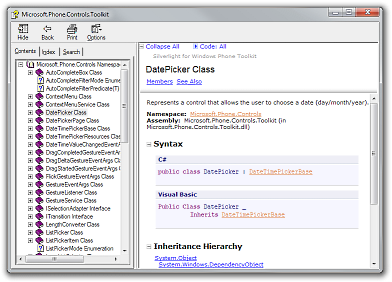
CHM file example

The source code for the Windows Phone Toolkit has included full XML Documentation Comments from the beginning, but now we've begun generating a separate CHM file with all the property/method/event comments in a single, easy-to-browse location. The documentation file is automatically installed by the Windows Phone Toolkit installer and a handy link is added to the "Silverlight for Windows Phone Toolkit" folder in the Start Menu. Because we don't have dedicated documentation writers on the Toolkit team, our documentation is a bit on the terse side - but the CHM file is still a great way to survey the Toolkit classes and get a feel for what's available. And because the sample syntax is available in both C# and VB, everyone should be comfortable with the examples!


Bug fixes for existing controls

The previous Toolkit release wasn't all that long ago and we've been quite busy since then, but we've still managed to squeeze in fixes for some of the more annoying bugs customers reported. That's not to say that we fixed them all or that we had a chance to squash your favorite bug, but we were fortunate to be able to fix a good number of customer-impacting issues and I hope everyone finds the new controls even more pleasant to use! :)


[Click here to download the Silverlight for Windows Phone Toolkit November 2010 release.]


The screen shots and XAML shown above are all from the sample application you can download along with the Toolkit. I encourage people to play around with the sample if they want to experiment with any of these controls (in the emulator or on the device) or if they want to learn more about how these controls work. I anticipate more in-depth coverage will show up in the coming weeks (I will be posting a detailed ListPicker overview tomorrow!), but for now the sample application is a great springboard to get folks started!


In closing, I'm really glad we've been able to get this second round of controls out to the community in such a short time! While there are probably still some "nice to have" controls that could be added to further round-out the Windows Phone 7 control offering, I think that what we've included in the Windows Phone Toolkit represents nearly all the critical ones needed to unblock important scenarios. I hope people continue to enjoy their Windows Phone development experience and that the new Windows Phone Toolkit makes application development even easier! :)