The blog of dlaa.me

Posts tagged "Silverlight"

Supporting the unsupported [Two fixes for the unofficial WPF Charting assembly!]

In my last post I described a few updates I made to my ChartBuilder sample/application/learning tool for the March 09 release of the Silverlight Toolkit. As usual, I posted the complete source code to ChartBuilder for interested parties to download and play around with. But this time around I also took the opportunity to showcase a WPF version of ChartBuilder that shows off an unofficial version of Silverlight Charting for WPF. Along with a WPF-based project file for ChartBuilder, I included a private build of the WPF Charting assembly that it compiles against.

I cautioned readers that WPF Charting was completely untested, but it was my not-so-secret hope that some of you would take the opportunity to play around with WPF Charting and give us some early feedback. And you did! :)

In addition to a known issue I describe in the previous post where dynamically added or removed DataPoints don't always complete their show/hide animations, kind reader abrien reported an additional problem causing a KeyNotFoundException during certain updates to a PieSeries's ItemsSource property. Then he/she went even further to create a CodePlex work item with a simple sample project demonstrating the problem! (Which is fantastic bug reporting, by the way!)

Now, before I go further, let me take this opportunity to reemphasize that neither of these problems is present in Silverlight Charting; they exist only in WPF Charting and are there because we've done absolutely no testing of WPF Charting due to a profound lack of time or resources. In fact, this is probably a good time to remind everyone of the warning I gave last time:

Warning: We have done absolutely no testing of the WPF Charting bits and if you decide to pull them out of the source code download and play around with them, then you do so at your own risk!

Okay, enough scare-mongering! :) The truth is that we'd love for people to be able to start experimenting with WPF Charting. So while the known show/hide problem was already bothering me, finding out about an exceptional condition arising from a fairly simple ChartBuilder scenario was downright unpleasant...

I spent some time over the weekend looking into both of these issues to see if I could identify the problem and perhaps fix it without too much fuss. And the good news is that I believe they're both fixed now! [After no small amount of frustration along the way... :) ] As it happens, both problems result from fairly subtle Storyboard behavior differences between Silverlight and WPF - though I'm happy to note the fixes I made are not platform specific. In other words, it's possible to write the exact same code on both platforms and have it work correctly on both platforms. It's just the code we started with wasn't that code... :(

I'm optimistic that both of these problems are behind us. And what's more, the fixes are already checked into our source control system for inclusion in the next release of Charting. But I don't want early adopters of WPF Charting to have to wait that long, so I've gone ahead and updated the WPF Charting assembly in the ChartBuilder download to include both of these fixes! If you're already playing around with WPF Charting, please take a moment to upgrade to the new version of System.Windows.Controls.DataVisualization.Toolkit.dll (file version 3.0.30324.1808) from the ChartBuilder download link below. And if you don't care about WPF Charting, then please don't worry about any of this - there are no other changes to the files in the download archive.

Our thanks go out to everyone who has given Silverlight Charting a try - and special thanks to our WPF Charting pioneers for their passion, feedback, and patience!


Please click here to download the complete ChartBuilder source code.


ChartBuilder on WPF

Silverlight Charting remains just a click away - and runs on WPF, too!! [ChartBuilder sample and source code updated for Charting's March 09 release]

In yesterday's announcement of the March 09 release of the Silverlight Toolkit and Silverlight Charting, I gave an overview of some new Charting features. One of the things I always do right after we release a new version of Charting is update my ChartBuilder sample/application/learning tool. If you're not already familiar with ChartBuilder, here's some background reading: Introduction/user's guide for November 08 release, Fix for non-US cultures, Update for December 08 release.

This time around is no different and I've just updated the live ChartBuilder application! It's a typical Silverlight 2 application, so you can run it with Silverlight 2 OR the newly released Silverlight 3 Beta.


Please click this text or the image below to run the latest ChartBuilder in your browser.

ChartBuilder on Silverlight

You can click here to download the complete ChartBuilder source code.


Release notes:

  • Added support for new series type AreaSeries.
  • Slightly better round-tripping behavior for doubles and DateTimes from the helper class Pair.
  • Various other minor improvements.
  • Updated the version to 2009-03-20.


Although we have - literally - thousands of automated test cases for Charting, ChartBuilder remains our de facto testing tool and has helped us to prevent or debug countless issues during the months we've been developing the Charting framework. I use it regularly to investigate strange behavior or to provide the scaffolding for one-off test cases that would otherwise require quite a bit of time and effort to create.

ChartBuilder won't win any awards for great user interface design, but it has been worth its weight in gold to us. I hope it helps you, too!


Oh, and one more thing... :)

It's always been our goal with Charting to support both Silverlight and WPF - and we've been compiling Charting for the WPF platform as part of our daily builds for the past few months. I thought it would be neat to show off a sneak preview of WPF Charting here, so I created a WPF build of ChartBuilder and hooked it up to the WPF build of Charting and - yup - it just worked. Well, mostly... :)

Warning: We have done absolutely no testing of the WPF Charting bits and if you decide to pull them out of the source code download and play around with them, then you do so at your own risk!

The great thing about what's going on here is that Silverlight Charting and WPF Charting are both compiled from exactly the same source code and XAML and allow you to use exactly the same source code and XAML in your projects. So you'll be able to create a chart on one platform and share it seamlessly with the other platform and you won't have to do any extra work! To help prove my point, ChartBuilder itself is built from exactly the same source code and XAML for both Silverlight and WPF!


ChartBuilder on WPF


The most obvious problem I've seen from playing around with WPF ChartBuilder for a little is that sometimes dynamically added/removed DataPoints don't play their reveal/show/hide transition properly. Some of the points coming in are obviously present in the chart because there's space reserved for them and their tooltips work properly - but they're not visible. And some of the points going out just don't go away like they're supposed to. My primary suspect here is VSM (the Visual State Manager; a Silverlight concept that's been ported to WPF); WPF Charting uses the WPF Toolkit's preview implementation of VSM and there may be some incompatibilities between that implementation and the one in Silverlight. Charting on WPF also has a few fit-and-finish issues; these are probably easy to fix, but like I said we haven't spent any time working on Charting for WPF.

Important: If you do decide to try WPF Charting, please note that it's necessary to add references to both the DataVisualization assembly and the WPFToolkit assembly or else you'll get a weird error from WPF when we attempt to use VSM and its implementation isn't present.


Okay, that's all I've got for now. :) I hope you have fun with Charting - on whatever platform you choose!

Silverlight Charting is faster and better than ever [Silverlight Toolkit March 09 release now available!]

We've just published the March 09 release of the Silverlight Toolkit and I bet there's something in there to make just about everyone happy! There are bug fixes for some of your favorite controls, a variety of cool new features sprinkled all around, and some completely new controls that will add a little more excitement to your next Silverlight application. The Toolkit continues to support everyone's ongoing Silverlight 2 development efforts and now also supports the newly released Silverlight 3 Beta. What's more, you get all of this goodness for the same low, low price of: free! :)

I encourage everyone to have a look at the live samples for Silverlight 2 or Silverlight 3, download the Toolkit installer(s), and enjoy the new stuff!

Aside: As a public service, I'll also direct your attention to the new LayoutTransformer control which didn't get its own sample page this time around, but remains near and dear to my heart. And if you look closely enough, you just might be able to spot LayoutTransformer being used by Accordion and Charting...


But enough about the rest of the Toolkit; you're probably here because you want to learn more about Silverlight Charting. Well, you've come to the right place! If you haven't already done so, this might be a good time to read or review my previous two introductory posts for Charting: this one for the initial November release and this one for the follow-up release in December. The March 09 release of Charting builds on the foundation Jafar and I previously established to add some new features, improve some usability scenarios, fix some bugs, and address what was easily our most common request: better performance!

Let's start with the full version of the Charting release notes (a simplified version of these notes is available on the "What's New" page for the Toolkit - but it omits all the juicy details):

Notable Changes

Significant performance improvements have been made to many parts of the Charting framework which yield noticeable speed-ups for scenarios dealing with large data sets. Because performance is one of those areas where it's easy to make improvements against benchmarks and yet achieve very little benefit that's relevant to the user, I won't cite the benchmark-based improvements our testing shows for this release. Instead, I'll share the anecdotal story of a Charting customer who got a chance to try an early version of the code and found that a scenario which was starting to bog down with around 500 points under the previous release could now manage over 5000 points with no difficulty! Your mileage may vary, of course, but we definitely think the new Charting core feels snappier!

Added new Series type AreaSeries which works just like LineSeries except that it fills in the area underneath the line. With the addition of AreaSeries in this release, Silverlight Charting now supports all of the major chart types offered by the top level of Excel's ribbon! We've still got some work to do before we can think about trying to replace Excel (like supporting stacked series!), but it's nice to be moving in the right direction and to have achieved this "mini milestone". :)

Any Series can use a CategoryAxis as its independent value axis. Specifically, it is now possible to create a LineSeries with values on the vertical axis and categories (ex: Dogs, Cats, Fish) on the horizontal axis. The purists among you might argue that it's inappropriate to use a LineSeries in this manner because the presence of a line connecting each value suggests a cross-value correlation that's typically not present with categorized data. So the purists are welcome to ignore this feature entirely - but those of you who have requested this feature should please go ahead and make use of it however you feel best fits your particular scenario. :)

Added DependentValuePath and IndependentValuePath string-typed properties to the Series classes (and a corresponding SizeValuePath property to BubbleSeries) to significantly simplify the experience of binding to properties of the underlying data objects being visualized. Instead of having to type something like DependentValueBinding="{Binding Value}", it's now also possible to use the simpler, easier to read DependentValuePath="Value". In fact, we like the simplicity of the new form so much that we've made the new *Path properties the default user-visible properties at design time! The *Binding properties are still present, of course, and can be used for more advanced scenarios such as those where it's necessary to use the Converter parameter of the Binding. The continued support of the *Binding properties also means that any existing code using the Charting core will continue to work just fine as-is and won't need to be changed.

Numerous design-time enhancements for Silverlight 3 and Blend 3. The most obvious improvement here is that dragging a new Chart onto the design surface automatically creates some simple sample data as well as a ColumnSeries that's properly hooked up to that data. This means that not only does the new chart look like a chart (instead of being mostly blank), but it also demonstrates how to correctly hook a Series up to a data source. It's like getting a mini Charting tutorial for free! :) Another big improvement in this area is better exception handling during design-time so the code is less likely to throw exceptions during the intermediate configuration steps that are common to interactive design. This makes it easier to build a chart interactively without having it complain about missing values along the way. Other design-time improvements include improved metadata and a slightly improved workflow.

Added support for Silverlight 3's new easing feature for better control over how data change animations behave. Available only with Silverlight 3 Charting, the new TransitionEasingFunction property of Series makes it easy to select any of Silverlight 3's easing functions to be used when animating the value change of the data points in a Chart. The default value, QuadraticEase, provides a smoother, more pleasing animation that helps keep the viewer focused on the data itself. And while we haven't explicitly changed the DataPoint default fade in/fade out show/hide transition behavior to use an easing function, it's easy for anyone else to do so by providing a custom DataPoint Template in the usual manner.

Added ExtendRangeToOrigin and Origin properties to LinearAxis to enable more scenarios when this axis is used for dependent values. The ExtendRangeToOrigin property is handy when you know you want to display the origin (0) on the dependent axis, but you don't want to have to set Minimum or Maximum because your data could have positive or negative values - or both! Setting ExtendRangeToOrigin is an easy way to ensure that a ColumnSeries or BarSeries always displays the full extent of its columns/bars which makes it easy for the viewer to draw conclusions based on the relative sizes of the elements. Similarly, the Origin property allows you to override the default origin for scenarios where 0 just isn't good enough.

Changed the underlying types of the Chart's Series and Axis properties to improve the code- and design-time experience when using them. As a result, Blend now automatically filters its class list and offers only valid types when adding a new item to either of these collections.

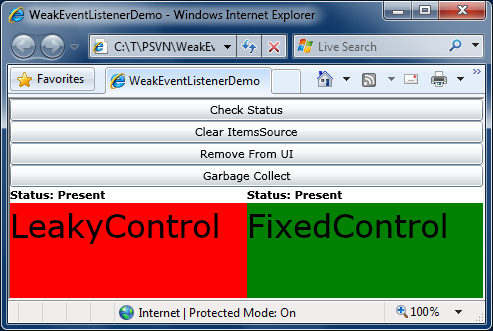
Fixed a memory leak that could occur when a Chart was removed from the visual tree and had one or more Series with their ItemsSource properties set to an ObservableCollection(T) owned by the application. The specifics of the leak scenario are a bit technical, so I'll refer interested readers to this post of mine which contains a fairly detailed description of the problem and its solution.

Changed the default Template of ScatterDataPoint to improve performance and provide more consistent behavior. The previous ScatterDataPoint Template employed a RotateTransform to create its diamond shape - in this release we've switched to a Path which enables us to simplify the Template reduce the ScatterDataPoint's overhead just a bit.

Various architectural changes to improve the current and future programmability story for Charting. Most of these changes aren't the kinds of things that you'll notice as a user, but they're part of our ongoing effort to open up the Charting platform and provide a solid foundation for others to build upon.

Breaking Changes

Assembly name changed to System.Windows.Controls.DataVisualization.Toolkit.dll as part of a Toolkit-wide assembly renaming task. Because this change wasn't specific to Charting, I won't discuss it here. Please refer to the Toolkit release notes for more information about the renaming and how to easily migrate your applications.

Root namespace changed to System.Windows.Controls.DataVisualization as part of a Toolkit-wide namespace renaming task. As above, this change had wasn't specific to Charting and will not be discussed here.

Switched AxisOrientation enumeration values from Horizontal/Vertical to X/Y for clarity, succinctness, and future-proofing. As part of the architectural work that went on, we realized that we'd eventually be switching to X/Y as we introduced certain other features and decided to make the change now to help ease the transition later.

Some of the *Axis properties on the Series classes have been renamed to be more general as a consequence of adding more flexible axis support to the Series classes. For example, what used to be named IndependentRangeAxis is now simply IndependentAxis.

Data values represented by strings are no longer automatically converted to numbers or dates. This is another consequence of the more flexible axis support: when a chart is taking advantage of automatic axis creation, we can't be sure what the desired behavior is if the values "2007", "2008", "2009" are provided as the independent values. Specifically, it's unclear whether the intent is to create a CategoryAxis with three string categories or to create a LinearAxis spanning those numeric values. So we've resolved the ambiguity by requiring stronger typing of dependent and independent values: numeric values must be a numeric type (int, double, etc.) and chronological values must be a DateTime. Otherwise, category values will be used where possible. It's unfortunate that this change may break some existing scenarios, but we believe the ambiguity it removes is worthwhile and the overall behavior is now more consistent and predictable. Charting has always encouraged you to be in charge of your data and this change simply reinforces that - if you want to visualize numbers, then you need to provide numbers. :)

The default Template of Chart has been reworked slightly to make things a bit easier for designers to customize. The most obvious change is the introduction of a new EdgePanel primitive for sizing/positioning the plot area and axes. Using EdgePanel makes this axis placement process more transparent to the designer and should be a little more resilient than the previous Grid-based approach.

Legend is now a TemplatePart of Chart; its LegendItems property has been removed. Certain architectural changes made it necessary for the Chart to be able to identify its Legend and that meant that we needed to formalize things a bit and make Legend a TemplatePart. There's a slight loss of generality here because it is no longer possible to put two or more Legends in the same Template, but as far as we know, nobody was doing this anyway. Note that it is still perfectly acceptable to omit the Legend entirely; TemplateParts are always optional in a Template.

Removed the MarkerWidth/MarkerHeight properties for LineSeries and ScatterSeries. We use the term "convenience properties" for properties that exist to make things easier for the user but that aren't actually necessary because there are other ways of doing the same thing. During development we're always trying to balance the benefits of convenience properties against the API bloat and possible confusion they can cause. In this case, we decided the MarkerWidth and MarkerHeight properties added very little value over re-Templating LineDataPoint or ScatterDataPoint (which is the default approach for changing the appearance of something in WPF and Silverlight). So the default width and height for these DataPoints are now set by their default Templates - and can be customized by re-Templating in the usual manner.

The DataPointSeries and DataPoint classes have been changed to internal visibility to indicate that we are not yet ready for people to be deriving from them when writing their own Series. That's not to say we don't love to see people opening up the hierarchy and writing their own DataPointSeries subclasses - just that we want to be sure people realize that doing so isn't supported quite yet. (But if you do this anyway, please share your feedback with us - we'd like to ensure that when we do open things up they'll work as smoothly as possible!)

Other Changes

Various UI improvements and bug fixes for issues reported by customers or found internally.

There's lots of good stuff here - we hope you'll enjoy using it as much as we enjoyed developing it!


Please click here to download the complete Silverlight 2 and Silverlight 3 source code for a project demonstrating all of the sample charts shown below (and by my two previous introductory blog posts on Charting).


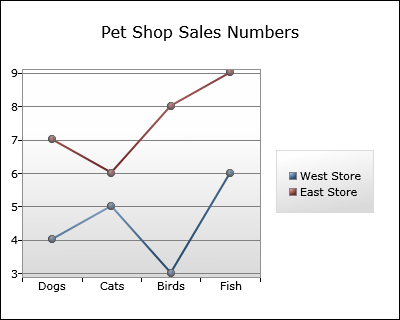
Let's begin by looking at an example of the new support for using a CategoryAxis somewhere that it previously wouldn't have been allowed. For this example, we'll look at a fictitious pet shop chain's sales numbers for four types of animals across two different stores. We could go the traditional route and use ColumnSeries for this, but in this case we're looking to visually draw attention to the fact that one store is outselling the other in every category. With the latest Charting bits, it's easy to do this with LineSeries:

LineSeries on a CategoryAxis

Here's the XAML for this chart:

<!-- Chart with shared DataContext -->
<chartingToolkit:Chart
    Title="Pet Shop Sales Numbers"
    DataContext="{StaticResource SalesDataCollection}">
    <!-- West Store data -->
    <chartingToolkit:LineSeries
        Title="West Store"
        ItemsSource="{Binding}"
        IndependentValuePath="Animal"
        DependentValuePath="WestStoreQuantity"/>
    <!-- East Store data -->
    <chartingToolkit:LineSeries
        Title="East Store"
        ItemsSource="{Binding}"
        IndependentValuePath="Animal"
        DependentValuePath="EastStoreQuantity"/>
</chartingToolkit:Chart>

Because the "Animal" property of our data objects is of type string, the LineSeries automatically does what we want and uses a CategoryAxis for the horizontal axis! Note that we're also using the new *Path properties to specify the independent/dependent values instead of the *Binding properties. The new syntax is short, sweet, and to the point - and allows us to focus on visualizing our data instead of creating Bindings.

One other thing worth calling attention to here is the way the data source is associated with both Series. In this case (as in many real-world scenarios), a single data source provides data objects for multiple series. While we could certainly recreate the same Binding to that data source in the ItemsSource property of each Series, there's a slightly easier way! What we do instead is specify the data source as the DataContext of the Chart object and then simply point both ItemsSource properties to it via a simple "{Binding}". The savings in this particular example are relatively minor, but for scenarios with more series, the convenience of being able to perform the actual binding to the data source in just one place becomes quite nice.


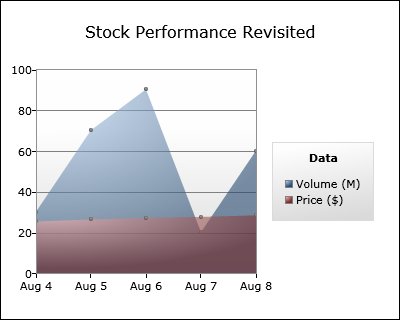
For the next example, let's revisit one of the charts from last time that used BubbleSeries to visualize the performance of a made-up stock ticker by displaying its price and volume by date. But this time around we'll use two instances of the new AreaSeries class to display the same data. Here's how it looks:

AreaSeries

The XAML is very similar to last time:

<chartingToolkit:Chart
    Title="Stock Performance Revisited"
    LegendTitle="Data">
    <!-- Volume -->
    <chartingToolkit:AreaSeries
        Title="Volume (M)"
        ItemsSource="{StaticResource StockDataCollection}"
        IndependentValuePath="Date"
        DependentValuePath="Volume"/>
    <!-- Price -->
    <chartingToolkit:AreaSeries
        Title="Price ($)"
        ItemsSource="{StaticResource StockDataCollection}"
        IndependentValuePath="Date"
        DependentValuePath="Price"/>
    <chartingToolkit:Chart.Axes>
        <!-- Axis for custom range -->
        <chartingToolkit:LinearAxis
            Orientation="Y"
            Minimum="0"
            Maximum="100"
            ShowGridLines="True"/>
        <!-- Axis for custom labels -->
        <chartingToolkit:DateTimeAxis
            Orientation="X">
            <chartingToolkit:DateTimeAxis.AxisLabelStyle>
                <Style TargetType="chartingToolkit:DateTimeAxisLabel">
                    <Setter Property="StringFormat" Value="{}{0:MMM d}"/>
                </Style>
            </chartingToolkit:DateTimeAxis.AxisLabelStyle>
        </chartingToolkit:DateTimeAxis>
    </chartingToolkit:Chart.Axes>
</chartingToolkit:Chart>

Notice how the semi-transparency of the fill used by AreaSeries makes it easy to plot both sets of data on the same chart. We've also gone ahead and added a title for the Legend via the LegendTitle property on Chart and customized the names of each series via the Title property on Series. We're using the simplified *Path syntax again to keep things easy to understand and we've preserve the previous sample's axis customization to provide a nicely readable representation of the dates being displayed (instead of the longer MM/DD/YYYY form that's used by default).


For the last example, we'll need to use the Silverlight 3 version of Charting because we're going to take advantage of the new support for easing functions that's available there. The effort needed to customize the easing function used by a Series is practically nothing - all you need to do is add the highlighted portion below to an existing chart and you're done! It really is this easy:

<chartingToolkit:Chart
    x:Name="EasingDemonstration"
    Title="Easing Demonstration">
    <chartingToolkit:ColumnSeries
        Title="Gelatin Sales">
        <!-- Custom easing function -->
        <chartingToolkit:ColumnSeries.TransitionEasingFunction>
            <ElasticEase EasingMode="EaseOut"/>
        </chartingToolkit:ColumnSeries.TransitionEasingFunction>
        <!-- Specify an appropriate color -->
        <chartingToolkit:ColumnSeries.DataPointStyle>
            <Style TargetType="Control">
                <Setter Property="Background" Value="#ff33ff33"/>
            </Style>
        </chartingToolkit:ColumnSeries.DataPointStyle>
    </chartingToolkit:ColumnSeries>
    <!-- Custom Y axis for range -->
    <chartingToolkit:Chart.Axes>
        <chartingToolkit:LinearAxis
            Orientation="Y"
            Minimum="0"
            Maximum="10"
            ShowGridLines="True"/>
    </chartingToolkit:Chart.Axes>
</chartingToolkit:Chart>

Here's what the corresponding chart looks like:

EasingFunction

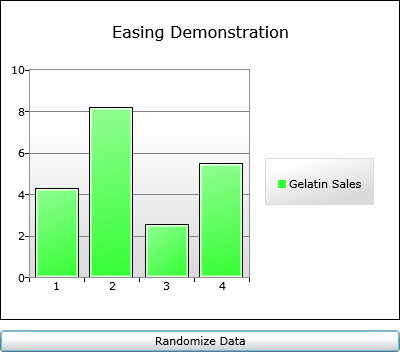
Okay, I admit: this is just a static picture and the effect of the easing function can't be appreciated here... However, if you download and build the Silverlight 3 version of the sample code linked to above, you'll find that clicking the "Randomize Data" button changes the data values every time it's pressed. And every time it does, the ElasticEase function specified above causes each of the bars to zoom quickly to their new values and then bounce around for a bit - just as if the bars were made out of gelatin! I'll grant that ElasticEase is probably not the most practical easing function for data visualization purposes, but we found that the default QuadraticEase behavior makes a very noticeable - yet subtle - impact on the viewer. It obviously won't turn a bad chart into a good chart, but it adds just a bit of extra polish that can help a good chart really shine! :)


Finally, let's have a look at one of the many Blend improvements we've made in this release. One of the things we wanted to do was help newcomers to Charting get up and running as quickly as possible without having to learn a lot of obscure concepts. To that end, when you drop a new Silverlight 3 Chart onto the design surface with the new Blend 3 Preview, you'll automatically get not just XAML for the chart, but also a bit of sample data and a properly configured ColumnSeries that uses it to display a very simple chart!

Blend 3 Charting User Experience

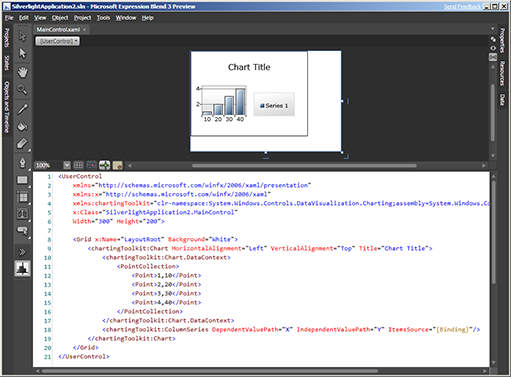
Of course, we don't expect this to be the same data you intended to visualize, but the automatic creation and configuration of the complete end-to-end scenario should help people understand just what it takes to create a chart. Furthermore, it's easy to begin experimenting with the objects and data that are automatically created in order to learn more and develop an understanding about how the different properties work together. To make that experimentation even more rewarding (translation: less frustrating) we've done some work internally to suppress many of the exceptions that result from the invalid configurations that are so easy to accidentally trigger when interactively manipulating a chart in the designer. There's still a lot more that can be done to improve the design-time experience for Charting - but I hope you'll agree that changes like this move us strongly in the right direction!


We've had a great time working on the March 09 release of Charting and hope you're as excited by the new functionality as we are! You can always browse the live Charting sample page for Silverlight 2 or Silverlight 3 to find out more - then please download the March 09 Toolkit release - for Silverlight 2 or Silverlight 3 - and start playing around with the new stuff! And as always, if you have questions about Charting, please ask them in the Silverlight Controls forum where there are plenty of folks who are happy to help out (including us!). If you run into problems and think you've found a bug, please report it with the Issue Tracker on the Toolkit's CodePlex site so that we'll know about it and others can tell us if they're seeing the same behavior.

Thank you very much for taking an interest in Charting - I hope you have fun with the new bits!! :)


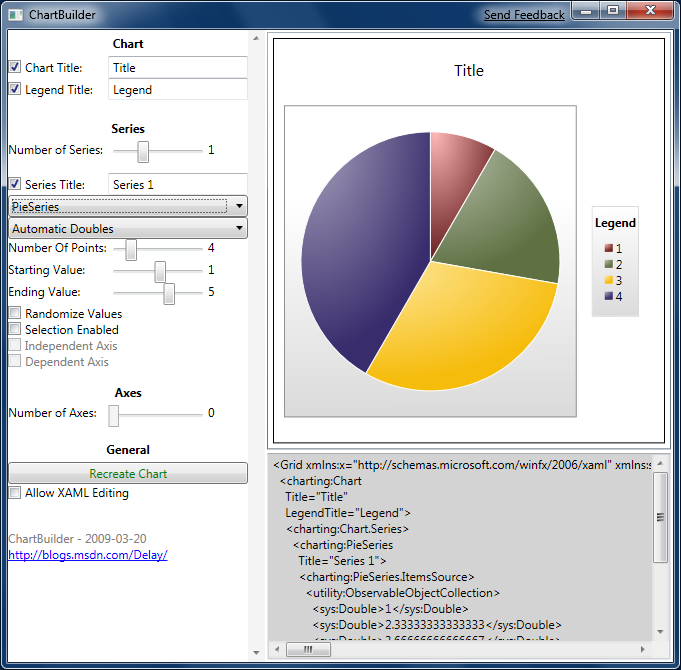
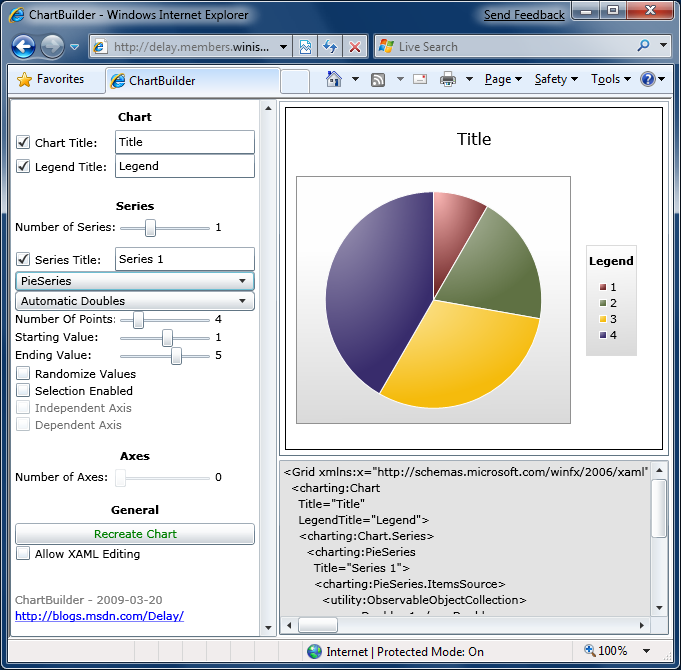
PS - I'll be posting an update to my ChartBuilder application/tutorial (Background reading: Introduction, Update, New Release) in the next day or so. ChartBuilder itself hasn't changed much since last time, but there's going to be something special about it this time that think you'll agree is pretty exciting! :)

Where's your leak at? [Using WinDbg, SOS, and GCRoot to diagnose a .NET memory leak]

In my last post, I explained how it was possible for "hidden" event handlers to introduce memory leaks and showed an easy way to prevent such leaks. I used a sample application to contrast a leaky implementation with one that uses the WeakEventListener class (included as part of the post) to avoid leaking on Silverlight. The changes required to patch the leak were fairly minimal and the entire process was pretty straightforward. But I glossed over one important point...

What if you don't know the source of the memory leak in the first place? Knowing how something is leaking is the first step to fixing it, and the web has some great resources for learning more about tracking down managed memory leaks in WPF and Silverlight applications. I am not going to try to duplicate that information here. :) Instead, I'll refer interested readers to these excellent resources and recommend a bit of web searching if additional background is needed:

As luck would have it, there are also a number of fine tools available to help find managed memory leaks. Being a rather frugal individual myself, I nearly always prefer to use free stuff and it just so happens that two of the best tools available are free from Microsoft! They are:

Again, this post is not a tutorial for either tool. :) Instead, it will demonstrate how to use these tools together to answer a specific question: What part of the sample application's LeakyControl code is causing a leak? The basic technique I'll use is described in the following two posts which do a great job covering the topic:

Now that we're ready to go, let's remind ourselves what the demo application looked like:

WeakEventListener Sample Application

To reproduce the leak, build the sample application and run it outside the Visual Studio debugger (because we'll be using WinDbg instead). You can do this by hitting Ctrl+F5 ("Start Without Debugging") or by double-clicking the TestPage.html file in the Bin\Debug folder. As before, click "Remove From UI" to discard both controls, then click "Garbage Collect" to perform a collection, then click "Check Status". You'll see that FixedControl is gone, but LeakyControl is still present despite our attempt to get rid of it.

Now start WinDbg from the Start Menu, hit F6 to "Attach to a Process", and pick the iexplore.exe instance corresponding to the test application. (If there are multiple instances of iexplore.exe, you can determine the proper PID via Task Manager or you can just guess - it's nearly always the one at the bottom of the list!) If all went well, you'll see a bunch of modules get loaded and a couple of them should have "Silverlight" in their path. (If not, try again and attach to a different instance of iexplore.exe.) Great, now we're ready to go!

First, we'll load the SOS debugging extension:

0:012> .loadby sos coreclr

In this case, we know we're leaking an instance of the LeakyControl class, so what we'll do is find all of the instances of LeakyControl in the managed heap. We expect there to be zero at this point, so if one is present, then it has been leaked. DumpHeap tells us this easily:

0:012> !DumpHeap -type LeakyControl
 Address       MT     Size
03ff6df4 02f43c80       56
total 1 objects
Statistics:
      MT    Count    TotalSize Class Name
02f43c80        1           56 WeakEventListenerDemo.LeakyControl
Total 1 objects

Yep, we're leaking an instance of LeakyControl... Let's find out what reference is keeping this instance alive:

0:012> !GCRoot 03ff6df4
Note: Roots found on stacks may be false positives. Run "!help gcroot" for
more info.
Scan Thread 10 OSTHread 7ec
Scan Thread 11 OSTHread e44
Scan Thread 12 OSTHread e04
DOMAIN(003CB450):HANDLE(Pinned):2f512f8:Root:  04fe78e0(System.Object[])->
  03fef5bc(WeakEventListenerDemo.App)->
  03ff0710(WeakEventListenerDemo.Page)->
  03ff77b0(System.Collections.ObjectModel.ObservableCollection`1[[System.Int32, mscorlib]])->
  03ff7a20(System.Collections.Specialized.NotifyCollectionChangedEventHandler)->
  03ff7a08(System.Object[])->
  03ff7920(System.Collections.Specialized.NotifyCollectionChangedEventHandler)->
  03ff6df4(WeakEventListenerDemo.LeakyControl)->

I find it's usually easiest to start from the bottom of GCRoot output: in this case we see the LeakyControl instance is referenced by an instance of NotifyCollectionChangedEventHandler. Now, in the trivial sample application that's all we need to identify the source of the leak and we could stop here. But in a larger, more realistic application there might be many places where a NotifyCollectionChangedEventHandler is created - let's see if we can narrow this down even further:

0:012> !DumpObj 03ff7920
Name:        System.Collections.Specialized.NotifyCollectionChangedEventHandler
MethodTable: 02e9dcc0
EEClass:     02ea0760
Size:        32(0x20) bytes
File:        c:\Program Files\Microsoft Silverlight\2.0.40115.0\System.Windows.dll
Fields:
      MT    Field   Offset                 Type VT     Attr    Value Name
02a444e8  40001e0        4        System.Object  0 instance 03ff6df4 _target
02c13c58  40001e1        8 ...ection.MethodBase  0 instance 00000000 _methodBase
02b00a90  40001e2        c        System.IntPtr  1 instance  2f4c14c _methodPtr
02b00a90  40001e3       10        System.IntPtr  1 instance        0 _methodPtrAux
02a444e8  40001e4       14        System.Object  0 instance 00000000 _invocationList
02b00a90  40001e5       18        System.IntPtr  1 instance        0 _invocationCount

What would be nice is if we could figure out which method in LeakyControl corresponds to that _methodPtr because doing so would tell us which particular event hook-up was involved. Let's try the easy way first:

0:012> !IP2MD 2f4c14c
Failed to request MethodData, not in JIT code range

Okay, so much for the easy way; the method hasn't been JITted yet. Let's look at the code corresponding to _methodPtr next:

0:012> !U 2f4c14c
Unmanaged code
02f4c14c b84c3cf402      mov     eax,2F43C4Ch
02f4c151 89ed            mov     ebp,ebp
02f4c153 e9bc46ceff      jmp     02c30814
02f4c158 00b000eb18b0    add     byte ptr [eax-4FE71500h],dh
02f4c15e 02eb            add     ch,bl
02f4c160 14b0            adc     al,0B0h
02f4c162 04eb            add     al,0EBh
02f4c164 10b006eb0cb0    adc     byte ptr [eax-4FF314FAh],dh
02f4c16a 08eb            or      bl,ch
02f4c16c 08b00aeb04b0    or      byte ptr [eax-4FFB14F6h],dh

Because the method hasn't been JITted, it's a pretty safe bet that we're looking at a thunk here. Let's take the value it's using and try to examine that as a MethodDesc:

0:012> !DumpMD 2F43C4C
Method Name: WeakEventListenerDemo.LeakyControl.OnCollectionChanged(System.Object, System.Collections.Specialized.NotifyCollectionChangedEventArgs)
Class:       02f41b18
MethodTable: 02f43c80
mdToken:     06000013
Module:      02f433bc
IsJitted:    no
CodeAddr:    ffffffff

Success! We see this event handler is for the LeakyControl.OnCollectionChanged method - so now we know exactly which event handler hook-up is responsible for the leak. And, armed with the knowledge from my last post, we've got everything we need to fix this code and patch the leak!

Once we do, our code will be a little better behaved, our developers won't have to track down leaks in our code, and our users will see more solid, more predictable behavior with lower memory use. Nice work - it's donut time! :)

Controls are like diapers: you don't want a leaky one [Implementing the WeakEvent pattern on Silverlight with the WeakEventListener class]

One of the nice things about developing on a platform that uses a garbage collecting memory manager (like Silverlight and WPF) is that the traditional concerns about memory leaks pretty much go away; most common types of memory leaks are impossible in a garbage collected environment. I say "most" and not "all" because there are still a few ways to leak memory - typically by creating a reference to an object and then "forgetting" about that reference. Sometimes this forgetfulness is simply an oversight on the part of the developer, but sometimes it is due to the reference being created in such a way that it's not obvious it even exists...

One of the easiest ways to create a "hidden" reference is by creating an event handler. Greg Schechter blogged in detail about the event handler situation back in 2004, and interested readers would do well to refer to his post for more details and some pretty diagrams. To summarize the issue briefly: when component A attaches an event handler to an event on component B, what happens behind the scenes is that component B creates a reference to component A - which it needs in order to provide a notification to A when the event is fired. This "backwards" reference is a bit subtle, but if you know what you're looking for, it's usually not too hard to spot.

What's more challenging is when a component you're using creates one of these backwards references in response to an action that's (superficially) completely unrelated to the event handling. As an exercise, see if you can spot the event handler here:

control.ItemsSource = collection;

Not so obvious, huh? :) The context needed to understand what's going on here is that an the control variable is some type that derives from ItemsControl (such as ListBox) and the collection variable is some type that derives from ObservableCollection<T>. It so happens that when an ItemsControl sees an assignment to its ItemsSource property of an object that implements INotifyCollectionChanged, it automatically adds a handler for that object's CollectionChanged event. And there's the potentially troublesome backward reference...

All it takes to start leaking memory at this point is an application with a long-lived reference to an ObservableCollection that gets passed to a short-lived ItemsControl that gets discarded. What can end up happening is that all of the references to the ItemsControl go away when it is discarded except for the one the ItemsControl itself created to listen to CollectionChanged events. Unless something is done to avoid this problem, the long-lived reference to the ObservableCollection will inadvertently keep the ItemsControl and all of its references alive considerably longer than the application developer expects. Furthermore, if the application is creating and discarding these ItemsControls on a fairly regular basis, it will quickly build up a sizable memory leak due to the accumulation of all the "discarded" ItemsControls.

As luck would have it, this situation was well understood and by the WPF team and that platform exposes APIs to implement what they call the WeakEvent pattern. WPF makes use of the WeakEvent pattern for its own ItemsControl, so the scenario described above isn't a problem in practice.

However, the WeakEvent pattern APIs don't exist in Silverlight 2 and the scenario above actually is a problem for ItemsControl and its subclasses as well as the DataGrid, and Charting's Series classes (each of which has a non-ItemsControl-based ItemsSource property). The good news is that Silverlight intends to fix this problem for ItemsControl-derived classes as part of a future release. Unfortunately, that doesn't help Charting - and besides I'd like to help customers avoid this problem on the current release...

So I got in touch with Silverlight developer Ivan Naranjo to see if his team had anything we could make use of and he kindly responded with something very much like the WeakEventListener class you see below. (For my part, I just tweaked things to address a few code- and source-analysis warnings and made a small change to avoid a possible area of confusion Ivan and I independently agreed on.) If you read Greg Schechter's post, the technique and implementation should look pretty familiar - WeakEventListener is a small, intermediary class that can be attached to an event so the resulting backwards reference affects only the extremely lightweight WeakEventListener and not the heavyweight class that created it. This avoids the costly "hidden" reference and allows the owning class to be garbage collected as soon as it is no longer in use. It was easy to add a WeakEventListener in Charting's Series.ItemsSource handler - and now our users don't have to worry about inadvertently leaking Chart instances!

To show just how easy it is to use WeakEventListener, I created a sample project that you can download and experiment with as you read the rest of this post. Here's what it looks like:

WeakEventListener Sample Application

The sample application includes two custom controls: LeakyControl (which has a typical ItemsSource implementation) and FixedControl (which uses WeakEventListener). To see the problem and solution in action, start the application, click the "Check Status" button to verify both controls are present, then click "Remove From UI" to discard both controls. If you click "Check Status" again at this point, you'll see that both controls are still present - and that's expected because the garbage collector hasn't needed to run and so nothing has been done to clean up. Now click "Garbage Collect" and then "Check Status" again. You'll see that LeakyControl is still present, but FixedControl is gone. Yay, WeakEventListener works! :)

Now, take things just a bit further and click "Clear ItemsSource", then "Garbage Collect", then "Check Status". We see that LeakyControl is gone as well! Why? Because by setting ItemsSource property of LeakyControl to null, we've explicitly told it we were done with the old collection and it knew enough to remove its event handler from that collection - thereby breaking the backwards reference and making itself eligible for clean-up during the next garbage collection. And, in fact, this is the workaround for controls that don't implement some form of the WeakEvent pattern and suffer from leaky behavior because of it: null-out the relevant property and hope they're kind enough to detach their event handlers in response. Depending on your application scenario, implementing this work around may be quite simple - or it may be almost impossible if your application has no way of knowing when some subcomponent has gotten into this situation - or no explicit knowledge of when affected controls are removed from the user interface. That's why it's nice when controls behave properly on their own - they work no matter what you do! :)

For an idea of how an easy it is to make use of WeakEventListener in a control, here is the relevant (leaky) code from LeakyControl:

// Change handler for the ItemsControl.ItemsSource-like DependencyProperty
private void OnItemsSourceChanged(IEnumerable oldValue, IEnumerable newValue)
{
    // See if the old value implements INotifyCollectionChanged
    var oldNotifyCollectionChanged = oldValue as INotifyCollectionChanged;
    if (null != oldNotifyCollectionChanged)
    {
        // It does; detach from the CollectionChanged event
        oldNotifyCollectionChanged.CollectionChanged -= OnCollectionChanged;
    }
    // See if the new value implements INotifyCollectionChanged
    var newNotifyCollectionChanged = newValue as INotifyCollectionChanged;
    if (null != newNotifyCollectionChanged)
    {
        // It does; attach to the CollectionChanged event
        newNotifyCollectionChanged.CollectionChanged += OnCollectionChanged;
    }
}

And here's what that same code looks like in FixedControl where WeakEventListener is used to avoid the backward reference problem:

// Change handler for the ItemsControl.ItemsSource-like DependencyProperty
private void OnItemsSourceChanged(IEnumerable oldValue, IEnumerable newValue)
{
    // See if the old value implements INotifyCollectionChanged
    var oldNotifyCollectionChanged = oldValue as INotifyCollectionChanged;
    if (null != oldNotifyCollectionChanged)
    {
        // It does; detach our WeakEventListener and clear our reference
        _weakEventListener.Detach();
        _weakEventListener = null;
    }
    // See if the new value implements INotifyCollectionChanged
    var newNotifyCollectionChanged = newValue as INotifyCollectionChanged;
    if (null != newNotifyCollectionChanged)
    {
        // It does; create a WeakEventListener, attach us to it, and add it to the event
        _weakEventListener = new WeakEventListener<FixedControl, object, NotifyCollectionChangedEventArgs>(this);
        _weakEventListener.OnEventAction = (instance, source, eventArgs) =>
            instance.OnCollectionChanged(source, eventArgs);
        _weakEventListener.OnDetachAction = (weakEventListener) =>
            newNotifyCollectionChanged.CollectionChanged -= weakEventListener.OnEvent;
        newNotifyCollectionChanged.CollectionChanged += _weakEventListener.OnEvent;
    }
}

Note that the basic structure of the code is unchanged - there's just a bit more bookkeeping involved in creating and hooking up the WeakEventListener. The first thing to look at is the bottom half of the method where a new collection is handled - a WeakEventListener instance is created and a couple of properties are set. The OnEventAction property specifies a strongly-typed (thanks to WeakEventListener being generic!) function that gets called when the event is fired - this maps to whatever method would otherwise be used to handle the event. The OnDetachAction property specifies a strongly-typed function that gets called when the WeakEventListener is detached from the event it's listening to - it simply removes the WeakEventListener's handler for the event. (Note that this function takes a WeakEventListener parameter which should be used to unhook the event so as to prevent creating a closure that itself contains a hidden reference that could cause a leak. And if that last sentence makes no sense, don't worry about it - just follow the pattern shown here and you'll be fine.) Now that everything's in place, the WeakEventListener is attached to event of interest. Going back to the top half of the function, all that needs to be done is to manually detach the WeakEventListener from the event. The example also sets the WeakEventListener reference to null - but this is done for clarity and debugging convenience and not because it's necessary.

That's all there is to it - WeakEventListener adds only a couple of lines of code and saves gobs of aggravation!

Aside: People who prefer not to use anonymous methods like I've done here are welcome to write explicit methods to do the same thing. It's a few more lines of code and a tiny bit more work, but if you go that route, you can create static methods which almost guarantee you won't inadvertently create a leaky closure. Either way you do it, WeakEventListener works the same.

Finally, here's the complete implementation of WeakEventListener for anyone who's curious how it works:

/// <summary>
/// Implements a weak event listener that allows the owner to be garbage
/// collected if its only remaining link is an event handler.
/// </summary>
/// <typeparam name="TInstance">Type of instance listening for the event.</typeparam>
/// <typeparam name="TSource">Type of source for the event.</typeparam>
/// <typeparam name="TEventArgs">Type of event arguments for the event.</typeparam>
internal class WeakEventListener<TInstance, TSource, TEventArgs> where TInstance : class
{
    /// <summary>
    /// WeakReference to the instance listening for the event.
    /// </summary>
    private WeakReference _weakInstance;

    /// <summary>
    /// Gets or sets the method to call when the event fires.
    /// </summary>
    public Action<TInstance, TSource, TEventArgs> OnEventAction { get; set; }

    /// <summary>
    /// Gets or sets the method to call when detaching from the event.
    /// </summary>
    public Action<WeakEventListener<TInstance, TSource, TEventArgs>> OnDetachAction { get; set; }

    /// <summary>
    /// Initializes a new instances of the WeakEventListener class.
    /// </summary>
    /// <param name="instance">Instance subscribing to the event.</param>
    public WeakEventListener(TInstance instance)
    {
        if (null == instance)
        {
            throw new ArgumentNullException("instance");
        }
        _weakInstance = new WeakReference(instance);
    }

    /// <summary>
    /// Handler for the subscribed event calls OnEventAction to handle it.
    /// </summary>
    /// <param name="source">Event source.</param>
    /// <param name="eventArgs">Event arguments.</param>
    public void OnEvent(TSource source, TEventArgs eventArgs)
    {
        TInstance target = (TInstance)_weakInstance.Target;
        if (null != target)
        {
            // Call registered action
            if (null != OnEventAction)
            {
                OnEventAction(target, source, eventArgs);
            }
        }
        else
        {
            // Detach from event
            Detach();
        }
    }

    /// <summary>
    /// Detaches from the subscribed event.
    /// </summary>
    public void Detach()
    {
        if (null != OnDetachAction)
        {
            OnDetachAction(this);
            OnDetachAction = null;
        }
    }
}

A rose by any other name... [LayoutTransformControl on track to ship in the Silverlight Toolkit under the name LayoutTransformer!]

I'm a believer in the power of LayoutTransform - so much so that I wrote a control to graft this capability onto Silverlight 2 (which natively supports only the slightly less practical RenderTransform). I've posted extensively about what my LayoutTransformControl project is and how it works - you can read more via the following links: Motivation and introduction for Beta 1, Significant enhancements and update for Beta 2, Update for RTW, Fixes for two edge case bugs, Usefulness on WPF. I've been happy with how this project has gone and have gotten lots of good feedback from customers who are successfully making use of LayoutTransformControl in their own applications. So, yeah, I'm a fan... :)

LayoutTransformer Sample Application

That said, I haven't pushed to include this control in the Silverlight Toolkit - I figured things would sort themselves out if and when the need for LayoutTransform functionality became sufficiently compelling. As it happens, we saw this need arise for Silverlight Charting a few months ago, and the December 08 release of Charting includes a private (internal) copy of this control (we weren't prepared to officially expose it at the time). More recently, the issue came up again in the context of a different Toolkit control and in this case using a private implementation isn't practical.

Nobody really had time on the schedule to "productize" LayoutTransformControl, but it was becoming clear that our inability to take advantage of LayoutTransform functionality was limiting our ability to develop flexible controls. So I dedicated some time to making LayoutTransform an official part of the Toolkit and am happy to say that we're tentatively planning to include it in the next release of the Silverlight Toolkit under the name LayoutTransformer.

For a variety of reasons, I did this work in a private area of our source control tree. At some point I realized that by starting from the same Visual Studio solution/projects I'd already shared on my blog, I'd made it easy to give everyone a sneak peak of LayoutTransformer and benefit from some pre-release feedback. :) That said, if LayoutTransformer were simply a renamed LayoutTransformControl, I probably wouldn't bother - but there's an internal change of some significance that I would love to get early feedback on from folks who are already making use of LayoutTransformControl. To the extent that I've tested things, LayoutTransformer behaves the same as LayoutTransformControl - but if anyone finds otherwise, I'd definitely like to understand why!

LayoutTransformer Silverlight Test Cases

And as long as I'm publishing new bits, I thought it would be nice to include two new projects in the solution: a Silverlight-based testing project and a WPF-based one. These two test projects share the same source code, run cross-platform (just like LayoutTransformer), and get nearly complete code coverage from various flavors of 26 test cases. Even better, when the tests are run on WPF, they validate all scenarios against WPF's built-in LayoutTransform, too - thereby ensuring that LayoutTransformer matches the real LayoutTransform (for all the test scenarios, at least)!

I hope you like the new bits and would love to hear from anyone who tries LayoutTransformer out in their own project(s). Good or bad, your feedback is very much appreciated!


[Click here to download the LayoutTransformer source code, samples, and test projects.]


Notes:

  • The most obvious difference with the new bits is the name change from LayoutTransformControl to LayoutTransformer. Along with this renaming of the control itself, we've gone ahead and renamed a couple of other things for increased clarity. So migrating to LayoutTransformer involves a bit of manual effort, but it's important to emphasize that the changes are just to the names of things - the core behavior remains the same as it was before.
    Aside: I'll be the first to admit that "LayoutTransformer" isn't exactly my favorite name in the whole world - mostly because it always makes me think of other things. But all the other proposed names were rejected for valid reasons (ex: inconsistency with the platform, potential confusion, etc.). LayoutTransformer simply outlasted its competition and got the most votes when I put the issue to the team. Fortunately, it happens to be the shortest of the proposed names - and that helps me feel a little better! :)
  • The difference that concerns me just a bit is that LayoutTransformer derives from ContentControl whereas LayoutTransformControl has always derived from Control. We made this base class change because LayoutTransformer seemed to make more sense as a ContentControl given that it follows the same "put your content in me" model as the rest of the ContentControl subclasses (like Button). Furthermore, by being a ContentControl, it's now possible to put non-UI business objects inside a LayoutTransformer, set its ContentTemplate to a suitable DataTemplate, and have the transform automatically apply to the resulting UI elements. Additionally, it's nice that this switch simplifies the code ever so slightly. As I note above, my testing suggests there should be no negative impact - but if you run into any difficulty, please let me know!
  • Here's the relevant portion of my check-in notes for a list of the other changes we decided to make:
    Base class Control -> ContentControl
    Removed Child property and handlers; supplanted by Content property
    Transform property -> LayoutTransform
    TransformUpdated method -> ApplyLayoutTransform
    Create MatrixTransform in code instead of Template
    Added TemplatePartAttributes ("TransformRoot"/Grid, "Presenter"/ContentPresenter)
    Moved template to generic.xaml
    Sealed class
    Removed unnecessary #if for template definition
    
  • The WPF test project may fail to load if you don't have the unit testing feature of Visual Studio installed (which isn't supported by the Express editions as far as I know). If so, don't worry because that project's absence doesn't affect anything else. The good news is that the Silverlight test project is self-contained and should work for everyone!


DesignerProperties.GetIsInDesignMode_ForRealz [How to: Reliably detect Silverlight design mode in Blend and Visual Studio]

Catching up on Dave Campbell's fantastic WynApse feed earlier today, I came across this post by Bryant Likes about detecting design mode in Silverlight. One of the things mentioned in that post was the challenge of finding a design mode check that works correctly in both Expression Blend and Visual Studio's XAML designer. Unfortunately, the official mechanism for this, DesignerProperties.GetIsInDesignMode, doesn't always return the correct value under Visual Studio. :(

Well, I needed something reliable for the Charting assembly in the Silverlight Toolkit, so I checked with the experts (i.e., members of both teams) and came up with the following code that returns the correct value under both Blend and Visual studio (from DesignerProperties.cs in the Silverlight Toolkit source).

I present it here in the hope that others might also benefit:

/// <summary>
/// Provides a custom implementation of DesignerProperties.GetIsInDesignMode
/// to work around an issue.
/// </summary>
internal static class DesignerProperties
{
    /// <summary>
    /// Returns whether the control is in design mode (running under Blend
    /// or Visual Studio).
    /// </summary>
    /// <param name="element">The element from which the property value is
    /// read.</param>
    /// <returns>True if in design mode.</returns>
    [SuppressMessage("Microsoft.Usage", "CA1801:ReviewUnusedParameters", MessageId = "element", Justification =
        "Matching declaration of System.ComponentModel.DesignerProperties.GetIsInDesignMode (which has a bug and is not reliable).")]
    public static bool GetIsInDesignMode(DependencyObject element)
    {
        if (!_isInDesignMode.HasValue)
        {
            _isInDesignMode =
                (null == Application.Current) ||
                Application.Current.GetType() == typeof(Application);
        }
        return _isInDesignMode.Value;
    }

    /// <summary>
    /// Stores the computed InDesignMode value.
    /// </summary>
    private static bool? _isInDesignMode;
}

Ambiguous contract is ambiguous [Minor bug fix for CRC32 and MD5Managed HashAlgorithm implementations]

Kind reader Gregor Zurowski contacted me over the weekend to let me know that he was using my free CRC-32 HashAlgorithm implementation in his project and he'd found that omitting the call to the Initialize method lead to incorrect hash values being returned. My first thought was, "Well, sure, calling the Initialize method before using the class is a necessary part of the HashAlgorithm contract - if you don't satisfy the contract then problems like this are entirely possible.". But Gregor went on to say that he got perfectly good results from the .NET Framework's MD5/SHA1 implementations without needing to call the Initialize method. I wondered if maybe the Framework classes had anticipated this scenario and allowed callers to skip the initialize call, but I was beginning to suspect that my understanding of the contract was wrong and that my implementation had a bug...

Sure enough, when I consulted the documentation for the Initialize method there was no mention of a contractual need to call it prior to doing anything else: "Initializes an implementation of the HashAlgorithm class.". I poked around a bit more trying to find some kind of justification for my beliefs, but I couldn't and was soon forced to conclude that I'd simply been mistaken by assuming that the .NET Framework followed the same pattern as COM or Win32. What's worse, I'd made the mistake twice: once for my CRC32 class and again with my MD5Managed class. :(

Well, as long as I was taking some time to validate my assumptions, I decided to check up on my assumption that a final call to TransformFinalBlock was required prior to fetching the hash value. Fortunately, I was right about this one and the TransformFinalBlock documentation notes that "You must call the TransformFinalBlock method after calling the TransformBlock method but before you retrieve the final hash value.". So while I'd clearly started out on the wrong foot, at least I didn't botch the landing, too. :)

The good news here is that this mistake is trivial to detect during application development (failing to call the Initialize method always yields the wrong hash value) and it's also trivial to work around: simply call the Initialize method after constructing a new instance of one of these HashAlgorithm subclasses. In fact, if your application already does this (as my ComputeFileHashes suite does), then you are completely unaffected by this issue.

Of course, I didn't want to perpetuate this error any further than I already had, so I corrected the code for the CRC32 and MD5Managed classes by performing the initialization as part of the object construction process. I then updated the following resources:

As I note above, there was no need to update the ComputeFileHashes application binaries because they were written under the assumption that a call to Initialize was required - and therefore are correct whether or not a call to Initialize actually is required.

Again, my thanks go out to Gregor for bringing this issue to my attention - I sincerely hope that no one else was affected by this mistake. While I do try to strive for perfection, I obviously need all the help I can get along the way! :)

My new home page, expanded [Updated collection of great Silverlight Charting resources!]

It's been a couple of months since I shared my semi-comprehensive page of Charting resources on the web. During that time, the Silverlight Toolkit's December release came out with some great new Charting features (Woot!) and there have been a number of fantastic Charting posts that I'd like people to be aware of. So I've updated my previous list of links (FYI: old links are grayed-out) with all the new content that caught my eye:

Overviews (100 level)

Scenarios (200 level)

Internals (300 level)

My own Charting posts (Ego level)

Many, many thanks to everyone who has spent time helping others learn how to use Silverlight Charting!

PS - If I've missed any good resources, please leave a comment with a link - I'm always happy to find more quality Charting content! :)

Columns of a different color [Customizing the appearance of Silverlight charts with re-templating and MVVM]

When we created Silverlight Charting (background reading here and here), we tried to make things as designer-friendly as possible. So friendly, in fact, that it would be possible for someone to take the default look-and-feel of what we'd released and significantly enhance it without changing the Charting framework at all. :) That said, it's worth noting that Charting controls are a little different than typical WPF/Silverlight controls: while it might make sense to completely change how a ListBox looks, there are certain aspects of a chart that can't be changed without rendering the visualization meaningless. And so there are certain assumptions behind our Charting implementation around things we didn't expect users to want to change. But that's the great thing about users: they want to change these things anyway! :)

One of the fundamentals of column/bar charts is that the columns/bars of a single series are all drawn the same; that's what ties them together and makes it clear they represent a single series. If you create a column chart in Excel, the default color for the columns is blue. It's easy to change that color to orange or green or plaid, but by default all of the columns of the series change together because they're all part of the same series. (Incidentally, it is possible to change the colors of an individual column in Excel, but it's not entirely obvious how to do so and it's clearly not a mainline scenario.) With that in mind, it's no surprise that our charts behave similarly: you can provide whatever look you want for the columns and bars (via the ColumnSeries.DataPointStyle property, perhaps), but the columns and bars of a particular series always look the same.

But what if your scenario is such that you want to do things a little differently and you want more control over the colors of individual columns and bars? Well, you take advantage of re-templating and Model-View-ViewModel (MVVM), that's what! :) You're reading this blog, so I'll assume you already know what re-templating is - if not, here's a good place to start. Model-View-ViewModel (MVVM) is probably less well known to date - it's an approach to application development commonly used with WPF and Silverlight where simple wrapper classes are used to expose aspects of the underlying data types in a manner that's easy for the UI layer to deal with. You can read lots more about MVVM on John Gossman's blog or this recent MSDN article by Josh Smith. But I'm not here to teach you what re-templating or MVVM are - I'm here to show you how to use them with Charting to implement the multi-colored column scenario!


[Click here to download the complete Silverlight 2 source code for the sample application shown/discussed below.]


Imagine that you're a teacher and you want to chart the grades of your students. You've already got a basic Student class that exposes some basic properties and you can create instances from a database or a file or something. The Student class probably looks like this:

// Standard data object representing a Student
public class Student : INotifyPropertyChanged
{
    // Student's name
    public string Name { get; private set; }

    // Student's favorite color
    public Brush FavoriteColor { get; private set; }

    // Student's grade
    public double Grade
    {
        get { return _grade; }
        set
        {
            _grade = value;
            Helpers.InvokePropertyChanged(PropertyChanged, this, "Grade");
        }
    }
    private double _grade;

    // Student constructor
    public Student(string name, Brush favoriteColor)
    {
        Name = name;
        FavoriteColor = favoriteColor;
    }

    // INotifyPropertyChanged event
    public event PropertyChangedEventHandler PropertyChanged;
}

The class above exposes a name and a favorite color (which I've implemented here as a Brush for convenience). There's also a grade, but we'll come back to that shortly... The goal is for each column representing a student to be drawn using that student's favorite color. To accomplish this, all we need to do is re-template. Using a designer tool like Blend or something simple like my SilverlightDefaultStyleBrowser, we can copy the default Style for ColumnDataPoint and paste it into our project's resources. By removing stuff that's not relevant to the demonstration and making a single change (highlighted below), we arrive at something like the following:

<Style
    x:Key="ColorByPreferenceColumn"
    TargetType="charting:ColumnDataPoint">
    <Setter Property="Background" Value="DarkGray"/>
    <Setter Property="Template">
        <Setter.Value>
            <ControlTemplate
                TargetType="charting:ColumnDataPoint">
                <Border
                    BorderBrush="{TemplateBinding BorderBrush}"
                    BorderThickness="{TemplateBinding BorderThickness}">
                    <Grid Background="{Binding FavoriteColor}">
                        <Rectangle>
                            <Rectangle.Fill>
                                <LinearGradientBrush>
                                    <GradientStop Color="#77ffffff" Offset="0"/>
                                    <GradientStop Color="#00ffffff" Offset="1"/>
                                </LinearGradientBrush>
                            </Rectangle.Fill>
                        </Rectangle>
                        <Border BorderBrush="#ccffffff" BorderThickness="1">
                            <Border BorderBrush="#77ffffff" BorderThickness="1"/>
                        </Border>
                    </Grid>
                </Border>
            </ControlTemplate>
        </Setter.Value>
    </Setter>
</Style>

This is just a tweak of the default template so that each column pulls its Background Brush from the FavoriteColor property of the underlying data object. Hook that up to a Chart/ColumnSeries in XAML, and that's all there is to it:

Color from Student

By the way, here's the XAML for that Chart:

<charting:Chart
    x:Name="FavoriteColorColumnChart"
    Title="Grades - By Favorite Color"
    Grid.Column="0">
    <charting:ColumnSeries
        DependentValueBinding="{Binding Grade}"
        IndependentValueBinding="{Binding Name}"
        DataPointStyle="{StaticResource ColorByPreferenceColumn}">
        <charting:ColumnSeries.DependentRangeAxis>
            <charting:LinearAxis
                Minimum="0"
                Maximum="100"
                Title="Grade"
                ShowGridLines="True"/>
        </charting:ColumnSeries.DependentRangeAxis>
    </charting:ColumnSeries>
</charting:Chart>
Aside: This process is even easier on WPF! (Assuming I had access to something like daily builds of Charting for WPF, I might have even mocked this up quickly to prove it to myself...) Unfortunately, the necessary "Binding in a Setter" capability is not supported by Silverlight 2 in XAML or code:
<Style
    x:Key="ColorByPreferenceColumn"
    TargetType="charting:ColumnDataPoint">
    <Setter Property="Background" Value="{Binding FavoriteColor}"/>
</Style>

So that's how easy it is to get custom column and bar colors if your data objects already expose the information you need!

But what if you want to base the custom colors on something that's not directly available on the data objects and you also don't have the freedom to change the data objects themselves? In other words - continuing the example above - let's say we decided to change things so the columns are colored according to each student's current grade: great grades get green columns, satisfactory grades get yellow columns, and unsatisfactory grades get red columns.

The first thing to consider when faced with a problem like this is whether an IValueConverter will work. I've written about the usefulness of IValueConverter before, so I won't spend more time on that here. IValueConverter is great if you want to take a single property and mutate it as part of a Binding. But what if you want to do something more complicated than that? Well, on WPF there's IMultiValueConverter which might do the trick, but that's not available on Silverlight and it's not always the answer anyway. So let's take advantage of MVVM to wrap our existing Student data objects with an object that's more view-friendly: StudentViewModel. Here's a trivial StudentViewModel class that exposes a Student and a Brush that's colored according to the Student's Grade property. Because Student implements INotifyPropertyChanged (like a well behaved class should), StudentViewModel can listen for changes to the Grade property and update its Brush automatically. StudentViewModel also implements INotifyPropertyChanged - so that anything referencing it will be notified about changes to the GradeColor property it exposes. Here's how it looks in code:

// Custom data object to wrap a Student object for the view model
public class StudentViewModel : INotifyPropertyChanged
{
    // Student object
    public Student Student { get; private set; }

    // Color representing Student's Grade
    public Brush GradeColor { get; private set; }

    // StudentViewModel constructor
    public StudentViewModel(Student student)
    {
        Student = student;
        student.PropertyChanged += new PropertyChangedEventHandler(HandleStudentPropertyChanged);
    }

    // Detect changes to the Student's grade and update GradeColor
    void HandleStudentPropertyChanged(object sender, PropertyChangedEventArgs e)
    {
        if ("Grade" == e.PropertyName)
        {
            if (Student.Grade < 50)
            {
                GradeColor = new SolidColorBrush { Color = Colors.Red };
            }
            else if (Student.Grade < 80)
            {
                GradeColor = new SolidColorBrush { Color = Colors.Yellow };
            }
            else
            {
                GradeColor = new SolidColorBrush { Color = Colors.Green };
            }
            Helpers.InvokePropertyChanged(PropertyChanged, this, "GradeColor");
        }
    }

    // INotifyPropertyChanged event
    public event PropertyChangedEventHandler PropertyChanged;
}
Aside: I've typically seen view model classes implemented by re-exposing each of the interesting data object properties - so for each property Foo on the data object, there will be a property Foo' on the view model object (which is either identical to the original property or some derivative of it). While I can see the value of this approach in some cases, the duplication of properties always bothers me and so I've instead exposed the entire Student object from the StudentViewModel object as a property (along with the new GradeColor property). This saves me from duplicating any existing properties, exposes the entire Student object to users of the StudentViewModel object, and is completely future-proof because any updates to the Student implementation will automatically show up for users of StudentViewModel.

Now that we've got a view model class that exposes a view-friendly property that is exactly what we need, our job is easy: change the chart to use StudentViewModels and change the custom template to reference the GradeColor property. Here's the new template (with the same kind of change as before):

<Style
    x:Key="ColorByGradeColumn"
    TargetType="charting:ColumnDataPoint">
    <Setter Property="Background" Value="DarkGray"/>
    <Setter Property="Template">
        <Setter.Value>
            <ControlTemplate
                TargetType="charting:ColumnDataPoint">
                <Border
                    BorderBrush="{TemplateBinding BorderBrush}"
                    BorderThickness="{TemplateBinding BorderThickness}">
                    <Grid Background="{Binding GradeColor}">
                        <Rectangle>
                            <Rectangle.Fill>
                                <LinearGradientBrush>
                                    <GradientStop Color="#77ffffff" Offset="0"/>
                                    <GradientStop Color="#00ffffff" Offset="1"/>
                                </LinearGradientBrush>
                            </Rectangle.Fill>
                        </Rectangle>
                        <Border BorderBrush="#ccffffff" BorderThickness="1">
                            <Border BorderBrush="#77ffffff" BorderThickness="1"/>
                        </Border>
                    </Grid>
                </Border>
            </ControlTemplate>
        </Setter.Value>
    </Setter>
</Style>

The XAML for this chart is nearly identical and the end result looks just how we wanted it to:

Color from Grade

Having shown off how re-templating and MVVM enable more advanced Charting customization scenarios, I've accomplished what I set out to do and could have stopped here... But there was still one customer scenario I wanted to address: synchronizing the colors of pie slices in a pie chart with the colors of columns in a column chart. Given what we've just discussed, the solution is easy: just repeat the re-templating process for a second chart with a PieSeries and PieDataPoints. Because the column/slice colors come from the data objects and because both charts are sharing the same data objects, the color for every data object (student) will naturally be the same across both charts. The re-templated XAML is the same as before and the final result is exactly what we want:

Color from Student as Pie

Well, actually, that's not entirely true; Getting the pie slices right was trivial - but there was a bit of additional effort required to synchronize the colors of the pie chart's legend items with the pie slices...

The way things work is that the Series creates whatever LegendItems it needs. As part of that creation, it also creates a "fake" DataPoint that's styled just like the "real" ones displayed in the chart. This fake data point exists so that the LegendItem's default Template can create Bindings for things like the Background and BorderBrush properties. (Recall that users can completely change the look of a DataPoint, so the only way we have to know how something will look is to create it and see.) This approach works out pretty well, but there was an oversight that caused problems for me when I tried to provide my own PieSeries.LegendItemStyle: the DataContext of the fake PieDataPoint wasn't set to the corresponding slice's data object. Normally, that's no big deal because it's unused - however in this case it's a problem because the custom Template we created above gets its color from the data object. Without a bound data object to provide context, the legend items weren't using the right colors. :(

I thought about a few ways to work around this, but eventually decided the fix (the setting of the DataContext property for the fake PieDataPoint) belonged in the Charting code itself. Fortunately, Charting is open source, so it's easy for anybody to make such changes if/when the need arises! I've included a copy of the relevant source file with the one-line change I made (Changes\PieSeries.cs, line 317) and changed the sample project to use a custom build of Charting's Microsoft.Windows.Controls.DataVisualization.dll assembly that includes this change.

And because I'm a nice guy, I also made the same change to the actual charting source code that's under development, got it reviewed, and submitted it (along with an associated unit test) for inclusion in the next official release of the Silverlight Toolkit! After all, if I needed this to work for my sample, chances are good that someone else might need it to work for their application as well. :)

With that fix in place, here is the Style that applies the proper color to the LegendItems:

<Style
    x:Key="ColorByPreferenceLegendItem"
    TargetType="charting:LegendItem">
    <Setter Property="Template">
        <Setter.Value>
            <ControlTemplate TargetType="charting:LegendItem">
                <StackPanel Orientation="Horizontal">
                    <Rectangle
                        Width="8" Height="8"
                        Fill="{Binding DataContext.FavoriteColor}"
                        Stroke="{Binding BorderBrush}"
                        StrokeThickness="1" Margin="0,0,3,0"/>
                    <datavis:Title Content="{TemplateBinding Content}"/>
                </StackPanel>
            </ControlTemplate>
        </Setter.Value>
    </Setter>
</Style>


And there you have it: a few simple ways to take Charting and extend it to do exactly what you want! The examples here are fairly simple, but re-templating and MVVM are very powerful concepts which enable a high degree of customization for Silverlight and WPF applications that's pretty hard to come by in other platforms. If you're trying to do something unique and you're not having any luck the "normal" way, please take a few moments to consider the techniques discussed here - you may find that your problem has an easy solution after all!