The blog of dlaa.me

Announcing a free, open source Charting solution for Silverlight [Silverlight Toolkit released today at PDC!]

Today at the Microsoft Professional Developers Conference, we announced the immediate availability of the Silverlight Toolkit. The Silverlight Toolkit is a collection of controls for Silverlight that add new functionality and enable new scenarios. There are some great controls in the Toolkit: WPF favorites (ex: DockPanel, WrapPanel, TreeView), cool new things (ex: AutoCompleteBox, NumericUpDown), and some that are a little of both (ex: ImplicitStyleManager). All of these controls are worth looking at and blogging about - but that's not what I'm going to do. :)

Instead, I'd like to direct your attention to the Microsoft.Windows.Controls.DataVisualization.dll assembly which contains a set of completely new classes that enable Silverlight developers to easily create professional-looking column, bar, pie, line, and scatter charts that follow the same XAML developer/designer metaphor as the rest of the Silverlight platform. We've tried to make Silverlight Charting as easy as possible to use - while also enabling some very powerful scenarios like automatic support for dynamic changes to a bound data collection as well as a powerful extensibility model that allows people to write their own custom chart types with minimal difficulty.

Here's all it takes to create a simple column chart in XAML (note that there's no code required):

<charting:Chart Title="My First Chart">
    <charting:Chart.Series>
        <charting:ColumnSeries>
            <charting:ColumnSeries.ItemsSource>
                <controls:ObjectCollection>
                    <sys:Double>1</sys:Double>
                    <sys:Double>2</sys:Double>
                    <sys:Double>3</sys:Double>
                </controls:ObjectCollection>
            </charting:ColumnSeries.ItemsSource>
        </charting:ColumnSeries>
    </charting:Chart.Series>
</charting:Chart>
Sample Chart

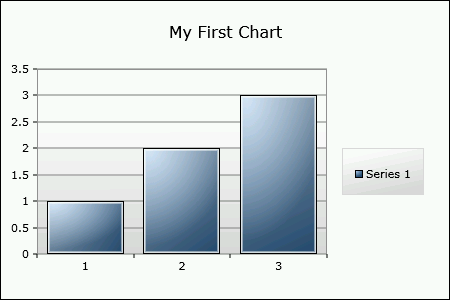
Looking at the structure of that XAML, we start with a Chart control and set its Title. Then we add an instance of the ColumnSeries class to the Chart's Series collection and provide a simple collection of doubles as the ItemsSource of the series (think ItemsControl.ItemsSource). Silverlight Charting does all the rest and renders the chart you see above.

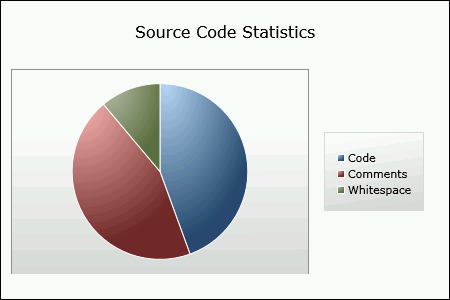
Being able to display static XAML-only data like this is great for learning and experimenting, but more advanced scenarios will usually be working with pre-existing business objects. So let's create a pie chart to display some fictitious statistics about a project's source code. Here's the business object we'll be working with:

public class CodeElement : INotifyPropertyChanged
{
    public string Name { get; set; }

    public int Lines
    {
        get { return _lines; }
        set
        {
            _lines = value;
            var handler = PropertyChanged;
            if (null != handler)
            {
                handler.Invoke(this, new PropertyChangedEventArgs("Lines"));
            }
        }
    }
    private int _lines;

    public event PropertyChangedEventHandler PropertyChanged;
}

And here's a collection of them that we'll use as the source of the data for the chart:

public class CodeElementCollection : ObservableCollection<CodeElement>
{
    public CodeElementCollection()
    {
        Add(new CodeElement { Name = "Code", Lines = 400 });
        Add(new CodeElement { Name = "Comments", Lines = 200 });
        Add(new CodeElement { Name = "Whitespace", Lines = 100 });
    }
}

All we need to do is create a CodeElementCollection (I'll put it in the Resources section for ease of access) and use it with our chart:

<charting:Chart Title="Source Code Statistics">
    <charting:Chart.Series>
        <charting:PieSeries
            ItemsSource="{StaticResource CodeElementCollection}"
            DependentValueBinding="{Binding Lines}"
            IndependentValueBinding="{Binding Name}"/>
    </charting:Chart.Series>
</charting:Chart>
Sample Chart

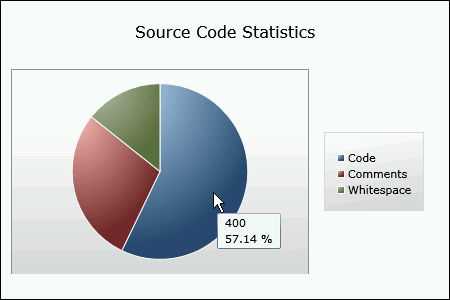
This time the ItemsSource property is being set to a collection of objects. (Note: We could have set the ItemsSource property in code instead.) Because these business objects have multiple properties, the series needs to know which of those properties correspond to the independent and dependent values. So we set the DependentValueBinding and IndependentValueBinding properties of PieSeries to Bindings that identify the relevant business object properties. The chart automatically extracts the data values, creates the properly-named legend items, and renders a pie chart. It's as easy as, uh, pie! :)

Now let's say someone adds a new XAML file to our imaginary project - we want our chart to automatically update itself to show the new code type. And because we've used an ObservableCollection for our collection, it will! In the sample project for this post (you can download it from the attachment link at the bottom of the post), there's a button to add a new CodeElement to the collection; the implementation looks like this:

private void AddXamlStatistics_Click(object sender, RoutedEventArgs e)
{
    _codeElementCollection.Add(new CodeElement { Name = "XAML", Lines = 100 });
}

Pressing that button gives us the following chart:

Sample Chart

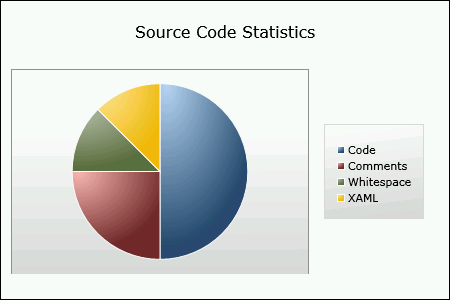
You can't tell from the still images here, but the new pie slice displays with a very smooth animation that's typical of Charting's support for dynamic data.

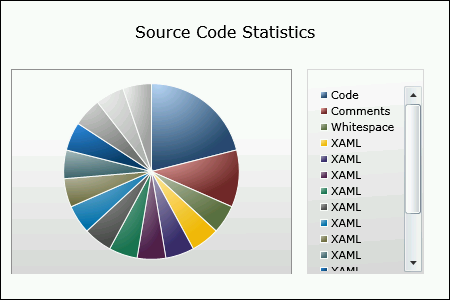
My code for the click handler doesn't stop the user from hitting that button a bunch of times; doing so just for fun gives us the following chart which demonstrates how Charting's Legend control automatically scrolls to accommodate large lists and also demonstrates the complete palette of colors that Charting supports by default:

Sample Chart

Naturally, folks might want to customize the default palette - and it's easy to do so with the StylePalette property on Chart. Here, I've switched the palette to simple, monochromatic red, green, and blue:

<charting:Chart Title="Statistics (Custom Palette)">
    <charting:Chart.StylePalette>
        <datavis:StylePalette>
            <Style TargetType="Control">
                <Setter Property="Background" Value="Blue"/>
            </Style>
            <Style TargetType="Control">
                <Setter Property="Background" Value="Green"/>
            </Style>
            <Style TargetType="Control">
                <Setter Property="Background" Value="Red"/>
            </Style>
        </datavis:StylePalette>
    </charting:Chart.StylePalette>
    <charting:Chart.Series>
        <charting:PieSeries
            ItemsSource="{StaticResource CodeElementCollection}"
            DependentValueBinding="{Binding Lines}"
            IndependentValueBinding="{Binding Name}"/>
    </charting:Chart.Series>
</charting:Chart>
Sample Chart

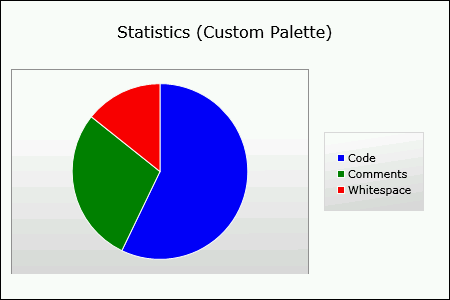
A designer could, of course, make the custom Background brushes much nicer by adding a gradient, an overlay, etc.. The StylePalette is simply the place the Chart goes to get the next Style it needs when it's creating a new DataPoint instance (DataPoint = the visual representation of a column or pie slice) for a Series. The custom palette above uses TargetType="Control" to indicate that each Style is applicable to all the different data point types (ColumnDataPoint, PieDataPoint, etc.), but it's also possible to provide a specific TargetType to customize the data point types individually.

Getting back to the topic of dynamic data, suppose that instead of a new CodeElement instance being added to the collection, the value of one of the existing CodeElements changes as a result of an edit to an existing file of our imaginary project's source code. Again, we want our chart to automatically update - and because our CodeElement business object implements the INotifyPropertyChanged interface, it will! The sample project has a button to increase the number of comment lines by 50 each time it's clicked:

private void ChangeCommentStatistics_Click(object sender, RoutedEventArgs e)
{
    CodeElement commentCodeElement = _codeElementCollection.Where(element => element.Name == "Comments").First();
    commentCodeElement.Lines += 50;
}

After clicking this button a few times, the chart has smoothly animated itself to the following state (there's no XAML entry because I reloaded the sample before doing this):

Sample Chart

Note that in both of the dynamic data scenarios so far, the code that updates the business data doesn't ever need to know that a chart is actively presenting that data. All the code needs to concern itself with is changing the business objects - and the chart automatically handles the rest. It doesn't get much easier than that! :)

Of course, there's lots more to Charting than I've shown off here: drill-down support, reveal/hide animations, customizability, and more. And much of this can only be fully appreciated in a live demonstration - so please have a look at the live sample page for Charting for lots more examples. And remember that the complete source code to Charting, the samples page, and the automated tests is all freely available under the Microsoft Public License (Ms-PL). Believe me when I say we've tried to make it as easy as possible to get started with Charting!

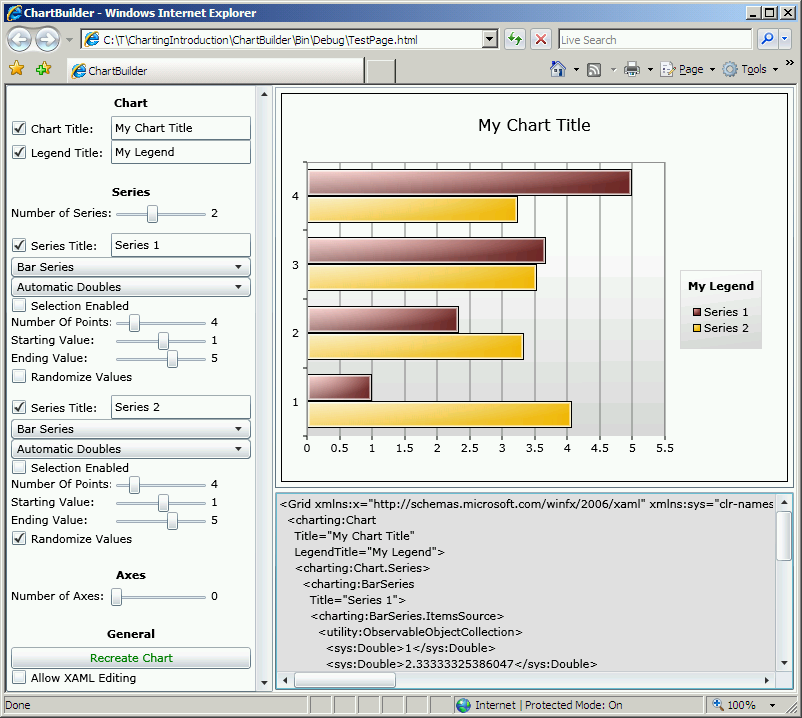
And to make things even easier, I'll be posting the following application (with full source code) to my blog in a day or so. It's called ChartBuilder and is an interactive Charting sample/learning tool/test bed all rolled up in one happy bundle of joy. I hope you'll find it useful:

ChartBuilder

And that's Charting in a nutshell! I expect there will be lots more written about Charting in the coming weeks. Those of us on the Charting team have done our best to come up with an API and an implementation that everyone will love, but a big part of that process is YOU. We're eager to hear your feedback as you start playing around with Charting in your own projects. This release of Silverlight Charting is what's known as a "preview release", so nothing is set in stone and we're completely open to improvements anywhere. We'll do our best to minimize breaking changes, but if there are places where things are just plain broken, we'll do what we can to fix them! If you have any questions about Charting, you can ask them in the Silverlight Controls forum. If you think you've found a bug, please report it with the Issue Tracker in the Toolkit's CodePlex site.

Thank you for taking the time to learn about Silverlight Charting - it's my sincere hope that Charting helps Silverlight application developers deliver even more compelling applications with simplicity and ease!


Aside: The development of Silverlight Charting has been a very interesting experience to be a part of. Throughout the entire process, we've been *extremely* resource-constrained (you wouldn't believe me if I told you), but when all is said and done, I'm really pleased with what we've accomplished!

Further aside: I began leading the Charting effort a few months ago when my manager asked me to "think about developing a Charting story for Silverlight". I soon partnered with a few people on the SQL Data Visualization team and began working on the foundations of what you see today. We spent a lot of time trying to design a good, easy to use API for Charting that also made sense in the Silverlight world of templates, styling, etc.. (There are a lot of challenges here and I may blog more about these challenges in the future.) Near the end of August, Jafar Husain joined our team and the Charting effort. He's been responsible for large parts of the internal Charting infrastructure and there are examples of his influence throughout our final object model. He's going to be blogging about some of the internal details and decision-making process, so please subscribe to his blog if you want the gory details of how this stuff actually fits together.

[ChartingIntroduction.zip]

Roadblock in the way of migrating the proof-of-concept Silverlight XPS reader [SimpleSilverlightXpsViewer sample does not work on Silverlight 2 RTW]

Since the public release of Microsoft Silverlight 2, I've gotten a few internal and external requests to migrate my SimpleSilverlightXpsViewer sample application to the final Silverlight bits. (Background reading: Introductory Post for the Alpha, Beta 1 Update, Beta 2 Update, Interesting Scenario.) Unfortunately, there is a pretty significant roadblock preventing this and I'm afraid I don't have a good solution. :(

Specifically, the "BreakingChangesBetweenBeta2andRelease" document contains the following item:

Font URI is Restricted to Assembly Resource

Who Is Affected:
Silverlight 2 Beta1 or Beta 2 applications (not Silverlight 1.0 applications) that reference fonts (or zip of fonts) via the URI syntax in the Control.FontFamily, TextBlock.FontFamily or Glyphs.FontUri attributes and where the fonts are not embedded within the assembly (dll) of the control or application.
Fix Required:
You can specify a font (or in some cases a zip of fonts) in URI format via the Control.FontFamily, TextBlock.FontFamily and the Glyphs.FontUri attributes. If you are, you will need to ensure your font is marked as a "resource" in the project system.

This is problematic for SimpleSilverlightXpsViewer because it uses Glyphs.FontUri to associate the font for the on-screen text with the corresponding ODTTF font file in the XPS document - and it's impossible for a general-purpose document viewer to have all the fonts in the world compiled into its own assembly. Making matters worse, fonts in an XPS document are identified by GUID, so it doesn't even seem possible to embed the N most common fonts and try to cover the 90% scenario by looking at font names and using the best available match. The seemingly obvious alternative is to use the FontSource property instead - but that's not exposed by the Glyphs class. The only workable option I see is to embed a single font in the viewer's resources and use that ONE font for ALL fonts in every XPS file. Obviously, this puts a pretty big damper on the idea of displaying an arbitrary XPS document how it was meant to be displayed because all the font fidelity of the original document is lost.

In controlled scenarios, it should still be possible to bundle an XPS document and its fonts in a compiled assembly and point some suitably modified version of SimpleSilverlightXpsViewer at that - but by then it's no longer as much of a client-side XPS viewer as it is a client+server document viewing solution (that could use straight XAML when you get down to it!). Unfortunately, my original vision of a Silverlight-based XPS viewer that lets users open any arbitrary XPS file on their computer or on the web is going to have to wait a little while longer to be realized. :(

In case folks are wondering, I did ask why this restriction is present. As I understand things (caveat: I am not a lawyer or a spokesperson for Microsoft), some fonts have copyrights and/or licensing restrictions placed on them by their creator and some of those fonts should not be made available via HTTP (where everybody can access them freely). I may not be happy about the consequences of this for SimpleSilverlightXpsViewer, but I understand why this restriction makes sense.

So to make a long story short: I have not yet come up with a good way to migrate SimpleSilverlightXpsViewer to Silverlight 2 and I apologize to all the folks who have expressed interest in this sample. For what it's worth, if I ever come up with a solution I like, I'll immediately update SimpleSilverlightXpsViewer and post the details! :)

Silverlight 2 has released! [Congratulations to everyone involved!]

I'd like to congratulate the entire Silverlight team for achieving this significant milestone and for building such a remarkable offering for users, developers, and designers. I'm a big believer in the power of the WPF/Silverlight XAML+code programming model and think that bringing the power of that model to the web is very much the right thing for advancing the state of the art of interactive web applications.

I try not to post without contributing anything new, so I'll mention that I - along with a couple of other people - have been working feverishly for the past couple of months on something that will be unveiled at PDC later this month. We're still very much in a race to get as much done as possible, and I'm looking forward to the opportunity to share something exciting with the Silverlight community in a couple of weeks.

Again, my congratulations to the Silverlight team - thanks for all that you've done!

Just a little too eager with the clicking... [Updated binaries and source for MouseButtonClicker]

I described the idea behind my MouseButtonClicker utility in the introductory post for MouseButtonClicker. As you might expect, I've been using this tool ever since I released it a few weeks ago.

All was well - except that every so often I'd get an automatic click that shouldn't have happened. Not frequently enough to stop me from using MouseButtonClicker, but enough to be annoying. I assumed this was simply "jitter" (see the original post for background) beyond what the jitter-prevention code was already filtering out, but I didn't think so because I'd watched the input events and the 2-unit threshold really seemed like it should be large enough.

So one evening when I had a bit of time, I compiled an instrumented version of MouseButtonClicker, started it up, and went about my work. Sure enough, after a half-hour or so, I got an unexpected click! So I had a look at the debug output and found that the bogus click had occurred after a 1-unit jitter movement. But that was below the 2 unit threshold, so the jitter filter should have suppressed the click. To my dismay, it seemed my code had a bug...

And sure enough, once I knew what to look for, I spotted it right off. :) The jitter filter was working fine for the general case - but there was a special case that wasn't handled properly. Specifically, the jitter threshold is always reset when MouseButtonClicker clicks the mouse - because the mouse has stopped moving is likely to stay at rest for a while. However, if the user moved the mouse and clicked the mouse button manually, MouseButtonClicker would suppress its own click (correct behavior) but was neglecting to reset the jitter filter! This problem wasn't immediately obvious to the user because the observable behavior so far was 100% correct - it was only if the mouse was left alone for about 10 minutes and jittered again that the jitter threshold wouldn't do its job and a bogus click would be made.

So I fixed the bug, compiled version 1.01 of MouseButtonClicker, ran with the new bits for a few days to verify the problem was solved (it was!), and updated the public download:

Click here to download the MouseButtonClicker executables (32- and 64-bit) and the complete Visual Studio 2008 source code.

I'm sorry for any trouble this may have caused - I hope the new bits prove even more helpful than the last! :)

Maintaining pretenses with the layout system [LayoutTransform functionality updated for Silverlight 2!]

In the introductory post for LayoutTransformControl and the feature-enhancing follow-up, I gave a variety of examples to convey the need for LayoutTransform. I also noted that Silverlight 2 supports only RenderTransform, but went on to demonstrate how it was possible to use RenderTransform to get LayoutTransform behavior. I'm biased, but I happen think LayoutTransform is a pretty fundamental part of application design - and the feedback I've gotten about LayoutTransformControl suggests that at least some of you agree with me. :)

Soon after the Silverlight 2 release candidate became available, a customer contacted me to ask about updating LayoutTransformControl. I've spent some time doing just that and am happy to share a version that works well on the latest Silverlight 2 bits. The complete implementation - along with demo and test applications - can be found in LayoutTransformControl.cs in the ZIP file attached to this post.

The sample application works the same as it did before (with the updated look-and-feel of the new bits):

LayoutTransformControl Sample Application

It remains my belief that LayoutTransformControl for Silverlight 2 is just as powerful as WPF's LayoutTransform. Your application can take advantage of complete LayoutTransform functionality today - even though the Silverlight platform doesn't support LayoutTransform!

Notes:

  • Unfortunately, Silverlight does not yet behave the same as WPF with regard to automatically calling the property changed handler of a Transform-typed DependencyProperty when any of that Transform's members change. I explain how clean this makes things in my previous post, and outline how I worked around the issue by introducing a set of custom "Ltc" transforms that automatically notify their LayoutTransformControl parent of any changes. But with the release of the Silverlight 2 RC, the Transform class can no longer be derived from - which forces the removal of the "Ltc" Transforms and completely invalidates my workaround. :(
  • There are now just two scenarios for the Transforms provided to a LayoutTransformControl:
    1. The Transforms are static - so change notifications are unnecessary and there's no need to worry about this. (As before, the Motivation project demonstrates this scenario.)
    2. The Transforms are dynamic and it is now necessary to make a call to LayoutTransformControl.TransformUpdated() whenever they change so that LayoutTransformControl can find out and update its rendering. (The Sample project has been changed to demonstrate this scenario.)
  • Silverlight 2 has introduced a feature known as "layout rounding" - it's conceptually very similar to WPF's SnapsToDevicePixels property. (I can't find documentation of the new UIElement.UseLayoutRounding property quite yet, but it's discussed briefly in the Breaking Changes document.) Unlike WPF's SnapsToDevicePixels which takes effect silently (as I understand it), Silverlight's UseLayoutRounding (which defaults to True) does not. Specifically, UseLayoutRounding causes some of the intermediate values used during the measure/arrange pass to change while LayoutTransformControl is busy working its magic. Left alone, these unexpected changes appear to LayoutTransformControl as various special-cases of the layout system and cause incorrect layout for certain special angles/scales/etc. based on whether things get rounded up or down. So LayoutTransformControl disables UseLayoutRounding for itself (which avoids bad layout during scaling) and that automatically inherits to its templated Grid (which avoids bad layout during rotation). Consequently, LayoutTransformControl's rendering behavior remains correct at all times.
  • If UseLayoutRounding is necessary for some element within a LayoutTransformControl, simply set it back to True on that element and things should continue to work as desired. But note that LayoutTransformControl does look at the outermost child element (the value of its .Child property) for some of its calculations, so UseLayoutRounding should not be toggled on that element. If necessary, wrap that element in a container (ex: Grid) and it should then be fine to set UseLayoutRounding on it.

My thanks to everyone who has expressed interest in LayoutTransformControl or is actively using it in their projects! I hope this update continues to serve you well as Silverlight 2 approaches final release.

[LayoutTransformControl.zip]

Preserving access to Silverlight 2's generic.xaml resources [SilverlightDefaultStyleBrowser updated for the Silverlight 2 RC!]

Last night the Silverlight team released Silverlight 2 Release Candidate 0! The new bits include a minor change with a big impact on SilverlightDefaultStyleBrowser (background reading available here, here, here, and here): the path for default styles has changed from generic.xaml to themes/generic.xaml. So SilverlightDefaultStyleBrowser ends up looking in the wrong place for the RC assemblies and doesn't find any styles. That's not very helpful, so I've just updated SilverlightDefaultStyleBrowser to extract styles from both of these paths (which will continue to work with Beta bits and will also work with the new RC bits).

The version number of SilverlightDefaultStyleBrowser appears in the window's title and the latest release number is 1.0.3191.14705. (Note: I haven't updated the screen shot below which shows the introductory version number.) If installed via ClickOnce, the application should automatically prompt you to upgrade when it detects the update (which typically happens after running the app once or twice). If you're using the standalone EXE, you'll need to update manually.

SilverlightDefaultStyleBrowser Application

Click here or on the image above to install SilverlightDefaultStyleBrowser via ClickOnce with automatic updating.

Click here to download the standalone SilverlightDefaultStyleBrowser executable and source code in a ZIP file.

The RC bits of Silverlight introduce some neat new controls: ComboBox, PasswordBox, and ProgressBar. Go play with them now to see how they work - then use the new SilverlightDefaultStyleBrowser to see how they're styled!

"MouseButtonClicker clicks the mouse so you don't have to!" [Releasing binaries and source for a nifty mouse utility]

I first came across the notion of automatic mouse button clicking some time ago. The basic idea can be summarized as follows:

The nearly universal pattern of mouse use is: move/click/wait... move/click/wait... move/click/wait.... In the overwhelming majority of cases, the only reason the mouse gets moved is to position the pointer over the next user interface element that needs to be clicked. Because every move is immediately followed by a click, it should be possible to simplify the process by performing the click automatically when the mouse stops moving (i.e., moves to a new location and stays still for a few moments). This automatic click saves the user only a tiny bit of effort each time it happens, but it eliminates a conceptually unnecessary, repetitive motion that's carried out many, many times over the course of every day. As an additional ergonomic benefit, automatic clicking enables the user to hold the mouse in a variety of new ways now that it's no longer necessary to keep a finger on the mouse button.

My first reaction was that the automatic clicking behavior would be nearly impossible to live with - and for the first couple of minutes I tried using it, it was. :) But, once I got out of the habit of wiggling the mouse needlessly and got into the habit of moving it where I needed when I needed, I found I quite liked the behavior after all. As I became more comfortable, I got used to the timing and found I could manage double clicks with just a single click by timing that click to happen right after the automatic click! The only challenge was to learn what parts of the user interface do nothing when clicked on - because these are the "safe areas" where the mouse can be "parked" if you start moving it and then decide you don't really want to click anything after all.

I found I liked automatic clicking so much, I wrote my own tool to implement it - and I've used that tool happily for nearly a decade. But my tool has a specific hardware dependency as a consequence of some other functionality it implements and that became a problem a few days ago when I changed hardware. So I decided this was a great opportunity to extract the clicking functionality into its own, dedicated, hardware-agnostic tool - and then blog about it!

The new tool I wrote is called MouseButtonClicker and does exactly what I describe above. It's written completely in native code - partly because I saw no need for the overhead of managed code for a simple "always-on" scenario like this one - and partly because it was a good excuse to brush up on my (rusty) native coding skills. MouseButtonClicker is a UI-less application - which means it doesn't have a window, or a notification icon, or anything to look at - it just runs invisibly and does its job. Of course, it wouldn't be hard to add a simple notification icon, but that's unnecessary for my purposes: MouseButtonClicker auto-starts with my computer and never gets closed. If you find you need to exit MouseButtonClicker, simply kill it with Task Manager or via TaskKill /IM MouseButtonClicker.exe - MouseButtonClicker maintains no persistent state and terminating it is completely safe to do at any time. And while the standard 32-bit executable works just fine on 64-bit operating systems, I've also provided a 64-bit version for those who prefer not to mix their bits. :)

Click here to download the MouseButtonClicker executables (32- and 64-bit) and the complete Visual Studio 2008 source code.

Implementation notes:

  • MouseButtonClicker finds out about mouse activity via the raw input API which provides low-level access to input devices like mice and keyboards in a simple, flexible manner. Using the raw input API makes it easy to distinguish between mouse input (where automatic clicking makes sense) and input from a tablet pen or digitizer device (where it does not make sense). This is of particular interest to me because I'm a long-time user of Wacom's fine tablet products and frequently switch between mouse and pen while using my computer; having the wrong behavior for the pen would be simply unacceptable.
  • MouseButtonClicker generates the automatic click with the SendInput function which provides an easy way to inject input events into the system. This works quite nicely, but it's worth noting that on recent operating systems like Vista and Server 2008, the SendInput API is restricted by User Interface Privilege Isolation. Specifically, MSDN notes that "Applications are permitted to inject input only into applications that are at an equal or lesser integrity level". It's my experience that this restriction usually exhibits itself as an inability to click processes that are running in an elevated security context (i.e., as Administrator) or to click in Command Windows that aren't currently active.
  • There are a couple of cases where MouseButtonClicker suppresses the automatic click. For example, there will be no automatic click if any mouse button has been manually clicked since the mouse stopped moving or if any of the mouse buttons is currently pressed. As such, the automatic click doesn't interfere with right clicking to get a context menu, pausing while dragging a window around the screen, or simply clicking the button yourself when you're in too much of a hurry to let MouseButtonClicker do so for you!
  • Some mouse hardware exhibits a small amount of "jitter" that causes single unit move messages from time to time (note: the size of a unit is less than that of a pixel, so these jitters aren't usually visible). My thinking is that this jitter is due to the mouse being *just* on the threshold of moving and then getting nudged slightly (perhaps the table gets bumped, a butterfly flaps its wings, etc.). Whatever the cause, this occasional jitter is an annoyance because it results in occasional - seemingly unprovoked - clicks wherever the mouse happens to be. So MouseButtonClicker has a small jitter-prevention measure that requires the mouse to move at least a little bit (2 units) before an automatic click will be performed.
  • MouseButtonClicker deliberately does not clean up its application-level resources (like the window class it registers) because Windows contractually promises to clean such things up during process exit. I formerly believed this to be lazy, but eventually decided that the best code is code I don't have to write, debug, and maintain. :) For cases like this where someone else is already going to handle resource clean-up - probably more quickly and efficiently than I could - it seems prudent to let them do so. This approach avoids the possibility of bugs in clean-up code, keeps the executable size down (which avoids unnecessary disk access), and keeps the source code just a little bit simpler.
  • The COMPILE_TIME_ASSERT macro provides a handy way of implementing a compile-time assert (also known as a static assert). Compile-time asserts are handy because they do the same thing normal asserts do, but they take effect at compile time and will actually fail the build process if the specified condition is not true. So instead of having to hope that the test cases exercise all the assertions in the code, the simple presence of a successful compile guarantees that all compile-time asserts are valid!
  • The variably-sized buffer for the WM_INPUT message is allocated on the stack via the _malloca/_freea CRT library calls. Allocating memory on the stack isn't usually appropriate, but for situations like this where a small, short-lived buffer of unknown size is needed, allocating on the stack can be more efficient than allocating on the heap.
  • The delay before the automatic click is determined by the result of the GetDoubleClickTime() API. Though the delay MouseButtonClicker implements is not technically for a double-click, the result of this call is the unofficial basis for a variety of different UI timings across the system.
  • MouseButtonClicker.ico Yes, I drew the icon myself; no, I don't have any artistic skill. :) It's supposed to be a robotic finger clicking a mouse button, but I agree it's probably more of a Rorschach inkblot test... If you can do better and want to send me an ICO file with 32x32 and 16x16 images I can freely redistribute, I will pick my favorite submission, include it with the next version of MouseButtonClicker, and credit you publically for your contribution.

So if you're in the mood to try something new and you don't mind a bit of a learning curve, give MouseButtonClicker a try for an hour or two. If you're lucky, you may never need to click again... :)


PS - For the benefit of casual readers and search engines, here is MouseButtonClicker.cpp:

// MouseButtonClicker - http://blogs.msdn.com/Delay
//
// "MouseButtonClicker clicks the mouse so you don't have to!"
//
// Simple Windows utility to click the primary mouse button whenever the mouse
// stops moving as a usability convenience/enhancement.


#include <windows.h>
#include <tchar.h>
#include <malloc.h>
#include <strsafe.h>

// Macro for compile-time assert
#define COMPILE_TIME_ASSERT(e) typedef int CTA[(e) ? 1 : -1]

// Constants for code simplification
#define RI_ALL_MOUSE_BUTTONS_DOWN (RI_MOUSE_BUTTON_1_DOWN | RI_MOUSE_BUTTON_2_DOWN | RI_MOUSE_BUTTON_3_DOWN | RI_MOUSE_BUTTON_4_DOWN | RI_MOUSE_BUTTON_5_DOWN)
#define RI_ALL_MOUSE_BUTTONS_UP (RI_MOUSE_BUTTON_1_UP | RI_MOUSE_BUTTON_2_UP | RI_MOUSE_BUTTON_3_UP | RI_MOUSE_BUTTON_4_UP | RI_MOUSE_BUTTON_5_UP)

// Check that bit-level assumptions are correct
COMPILE_TIME_ASSERT(RI_MOUSE_BUTTON_1_DOWN == (RI_MOUSE_BUTTON_1_UP >> 1));
COMPILE_TIME_ASSERT(RI_MOUSE_BUTTON_2_DOWN == (RI_MOUSE_BUTTON_2_UP >> 1));
COMPILE_TIME_ASSERT(RI_MOUSE_BUTTON_3_DOWN == (RI_MOUSE_BUTTON_3_UP >> 1));
COMPILE_TIME_ASSERT(RI_MOUSE_BUTTON_4_DOWN == (RI_MOUSE_BUTTON_4_UP >> 1));
COMPILE_TIME_ASSERT(RI_MOUSE_BUTTON_5_DOWN == (RI_MOUSE_BUTTON_5_UP >> 1));
COMPILE_TIME_ASSERT(RI_ALL_MOUSE_BUTTONS_DOWN == (RI_ALL_MOUSE_BUTTONS_UP >> 1));

// Macro for absolute value
#define ABS(v) ((0 <= v) ? v : -v)

// Application-level constants
#define APPLICATION_NAME (TEXT("MouseButtonClicker"))
#define TIMER_EVENT_ID (1)
#define MOUSE_MOVE_THRESHOLD (2)

// Window procedure
LRESULT CALLBACK WndProc(const HWND hWnd, const UINT message, const WPARAM wParam, const LPARAM lParam)
{
    // Tracks the mouse move delta threshold across calls to WndProc
    static LONG lLastClickDeltaX = 0;
    static LONG lLastClickDeltaY = 0;
    static bool fOkToClick = false;

    switch (message)
    {
    // Raw input message
    case WM_INPUT:
        {
            // Query for required buffer size
            UINT cbSize = 0;
            if(0 == GetRawInputData(reinterpret_cast<HRAWINPUT>(lParam), RID_INPUT, NULL, &cbSize, sizeof(RAWINPUTHEADER)))
            {
                // Allocate buffer on stack (falls back to heap)
                const LPVOID pData = _malloca(cbSize);
                if(NULL != pData)
                {
                    // Get raw input data
                    if(cbSize == GetRawInputData(reinterpret_cast<HRAWINPUT>(lParam), RID_INPUT, pData, &cbSize, sizeof(RAWINPUTHEADER)))
                    {
                        // Only interested in mouse input
                        const RAWINPUT* const pRawInput = static_cast<LPRAWINPUT>(pData);
                        if (RIM_TYPEMOUSE == pRawInput->header.dwType)
                        {
                            // Only interested in devices that use relative coordinates
                            // Specifically, input from pens/tablets is ignored
                            if(0 == (pRawInput->data.mouse.usFlags & MOUSE_MOVE_ABSOLUTE))
                            {
                                // Tracks the state of the mouse buttons across calls to WndProc
                                static UINT usMouseButtonsDown = 0;

                                // Update mouse delta variables
                                lLastClickDeltaX += pRawInput->data.mouse.lLastX;
                                lLastClickDeltaY += pRawInput->data.mouse.lLastY;

                                // Enable clicking once the mouse has exceeded the threshold in any direction
                                fOkToClick |= ((MOUSE_MOVE_THRESHOLD < ABS(lLastClickDeltaX)) || (MOUSE_MOVE_THRESHOLD < ABS(lLastClickDeltaY)));

                                // Determine the input type
                                const UINT usButtonFlags = pRawInput->data.mouse.usButtonFlags;
                                if(0 == (usButtonFlags & (RI_ALL_MOUSE_BUTTONS_DOWN | RI_ALL_MOUSE_BUTTONS_UP | RI_MOUSE_WHEEL)))
                                {
                                    // Mouse move: (Re)set click timer if no buttons down and mouse moved enough to avoid jitter
                                    if((0 == usMouseButtonsDown) && fOkToClick)
                                    {
                                        // Use double-click time as an indication of the user's responsiveness preference
                                        (void)SetTimer(hWnd, TIMER_EVENT_ID, GetDoubleClickTime(), NULL);
                                    }
                                }
                                else
                                {
                                    // Mouse button down/up or wheel rotation: Cancel click timer
                                    (void)KillTimer(hWnd, TIMER_EVENT_ID);

                                    // Update mouse button state variable (asserts above ensure the bit manipulations are correct)
                                    usMouseButtonsDown |= (usButtonFlags & RI_ALL_MOUSE_BUTTONS_DOWN);
                                    usMouseButtonsDown &= ~((usButtonFlags & RI_ALL_MOUSE_BUTTONS_UP) >> 1);
                                }
                            }
                        }
                    }
                    // Free buffer
                    (void)_freea(pData);
                }
            }
        }
        break;
    // Timer message
    case WM_TIMER:
        {
            // Timeout, stop timer and click primary button
            (void)KillTimer(hWnd, TIMER_EVENT_ID);
            INPUT pInputs[2] = {0};
            pInputs[0].type = INPUT_MOUSE;
            pInputs[0].mi.dwFlags = MOUSEEVENTF_LEFTDOWN;
            pInputs[1].type = INPUT_MOUSE;
            pInputs[1].mi.dwFlags = MOUSEEVENTF_LEFTUP;
            (void)SendInput(2, pInputs, sizeof(INPUT));

            // Reset mouse delta and threshold variables
            lLastClickDeltaX = 0;
            lLastClickDeltaY = 0;
            fOkToClick = false;
        }
        break;
    // Close message
    case WM_DESTROY:
        (void)PostQuitMessage(0);
        break;
    // Unhandled message
    default:
        return DefWindowProc(hWnd, message, wParam, lParam);
    }
    // Return value 0 indicates message was processed
    return 0;
}

// WinMain entry point
int APIENTRY _tWinMain(const HINSTANCE hInstance, const HINSTANCE hPrevInstance, const LPTSTR lpCmdLine, const int nCmdShow)
{
    // Avoid compiler warnings for unreferenced parameters
    UNREFERENCED_PARAMETER(hPrevInstance);
    UNREFERENCED_PARAMETER(lpCmdLine);
    UNREFERENCED_PARAMETER(nCmdShow);

    // Create a mutex to prevent running multiple simultaneous instances
    const HANDLE mutex = CreateMutex(NULL, FALSE, APPLICATION_NAME);
    if((NULL != mutex) && (ERROR_ALREADY_EXISTS != GetLastError()))
    {
        // Register the window class
        WNDCLASS wc = {0};
        wc.lpfnWndProc = WndProc;
        wc.hInstance = hInstance;
        wc.lpszClassName = APPLICATION_NAME;
        if(0 != RegisterClass(&wc))
        {
            // Create a message-only window to receive WM_INPUT and WM_TIMER
            const HWND hWnd = CreateWindow(APPLICATION_NAME, APPLICATION_NAME, 0, CW_USEDEFAULT, CW_USEDEFAULT, CW_USEDEFAULT, CW_USEDEFAULT, HWND_MESSAGE, NULL, hInstance, NULL);
            if (NULL != hWnd)
            {
                // Register for the mouse's raw input data
                RAWINPUTDEVICE rid = {0};
                rid.usUsagePage = 1;  // HID_DEVICE_SYSTEM_MOUSE
                rid.usUsage = 2;  // HID_DEVICE_SYSTEM_MOUSE
                rid.dwFlags = RIDEV_INPUTSINK;
                rid.hwndTarget = hWnd;
                if(RegisterRawInputDevices(&rid, 1, sizeof(rid)))
                {
                    // Pump Windows messages
                    MSG msg = {0};
                    while (GetMessage(&msg, NULL, 0, 0))
                    {
                        TranslateMessage(&msg);
                        DispatchMessage(&msg);
                    }
                    // Return success
                    return static_cast<int>(msg.wParam);
                }
            }
        }
        // Failed to initialize, output a diagnostic message (which is not more
        // friendly because it represents a scenario that should never occur)
        TCHAR szMessage[64];
        if(SUCCEEDED(StringCchPrintf(szMessage, sizeof(szMessage)/sizeof(szMessage[0]), TEXT("Initialization failure. GetLastError=%d\r\n"), GetLastError())))
        {
            (void)MessageBox(NULL, szMessage, APPLICATION_NAME, MB_OK | MB_ICONERROR);
        }
    }
    // Return failure
    return 0;
    // By contract, Windows frees all resources as part of process exit
}

Make life a little easier for designers [WPF Triggers with a little less XAML and a little less code]

When I was writing my video frame grabbing sample, I came up with a potentially useful technique for maintaining the developer/designer separation that's so sought after in the WPF (and Silverlight) world. I'm sure something similar has been discussed before, but I hadn't come across it (and couldn't find anything like it with a quick search), so I thought I'd describe it here for posterity.

Background

The high-level goal is to maintain a separation between how an application works (developer) and how it looks (designer). The conventional approach to this is to follow some kind of model/view pattern where the application exposes various properties that represent its state and the interface binds to those properties to convey that state to the user. In WPF, this is typically done in XAML via Binding or TemplateBinding. These two constructs are very powerful and work quite well. However, it seemed to me that there might be a slightly better way...

The Conventional Way

In my scenario, the application exposes a Boolean DependencyProperty "Processing" which is normally False, but flips to True whenever a video file is being processed. The UI exposes an "Open File" Button which is normally enabled, but should flip to disabled whenever a video file is being processed.

The first instinct is to use a Trigger to apply the style changes to the Button. However, there's a catch - the Trigger needs to be defined on Button itself because the Button properties are being changed, yet the actual Trigger property (the Processing property) is defined on the Window object. I didn't see an obvious way to point the Trigger at the Window from the Button, so I moved on to the next idea which was to use a Binding to attach the Button's IsEnabled property to the Window's Processing property. Depending on whether you prefer ElementName or RelativeSource, the XAML looks like this:

<Button
    IsEnabled="{Binding Processing, ElementName=Window}"
    Content="..."/>
<Button
    IsEnabled="{Binding Processing, RelativeSource={RelativeSource Mode=FindAncestor, AncestorType={x:Type l:Window1}}}"
    Content="..."/>

Both approaches work, but not perfectly: the IsEnabled state of the Button is backwards because we've got IsEnabled == Processing when what we really want is IsEnabled == !Processing. Fortunately, Bindings support Converters and I've already written about the power of IValueConverter. So the designer goes to the developer and asks for a Converter that will invert the state of a Boolean variable and the developer writes the following code:

/// <summary>
/// Simplest implementation of a Converter to invert the state of a bool.
/// </summary>
/// <remarks>
/// Needs parameter validation and error handling.
/// </remarks>
public class BooleanInversionConverter : IValueConverter
{
    public object Convert(object value, Type targetType, object parameter, CultureInfo culture)
    {
        return !((bool)value);
    }
    public object ConvertBack(object value, Type targetType, object parameter, CultureInfo culture)
    {
        throw new NotImplementedException();
    }
}

Now the designer adds an instance of this Converter to the resources of the application:

    <Application.Resources>
        <l:BooleanInversionConverter x:Key="BooleanInversionConverter"/>
    </Application.Resources>

And uses it to achieve the desired effect:

<Button
    IsEnabled="{Binding Processing, ElementName=Window, Converter={StaticResource BooleanInversionConverter}}"
    Content="..."/>
<Button
    IsEnabled="{Binding Processing, RelativeSource={RelativeSource Mode=FindAncestor, AncestorType={x:Type l:Window1}}, Converter={StaticResource BooleanInversionConverter}}"
    Content="..."/>

And the scenario works. But then the designer decides that the text of the Button should also be italic when it's disabled... And that requires the designer to go back to the developer who then needs to write a BooleanToFontStyleItalicConverter. Or maybe the designer attaches the Binding to the Button's Style property and gets the developer to write some kind of Style toggling Converter. Sheesh, what started out as a simple scenario has gotten annoyingly complicated and involves significant developer/designer coordination to accomplish something the designer should have been able to do independently in the first place.

A Different Way

So that's when I came up with a different idea that would let me use a Trigger after all: an attached DependencyProperty that inherits! Simply by changing the registration of the Processing property from Register to RegisterAttached and adding the FrameworkPropertyMetadataOptions.Inherits flag, we end up with a property on Window that looks to the Button just like a property defined on the Button itself. And suddenly the original idea to use a Trigger becomes possible - and even preferable! - because there's no longer a need for Bindings, Converters, or any of the complication above. Now the XAML looks just like it should and the designer can change things with complete autonomy:

<Button Content="...">
    <Button.Style>
        <Style TargetType="{x:Type Button}">
            <Style.Triggers>
                <Trigger Property="l:Window1.Processing" Value="True">
                    <Setter Property="IsEnabled" Value="False"/>
                    <Setter Property="FontStyle" Value="Italic"/>
                </Trigger>
            </Style.Triggers>
        </Style>
    </Button.Style>
</Button>

Much better.

Another Different Way

I discussed this scenario with my teammate Beatriz Costa briefly (she's one of the WPF data binding experts) and she independently suggested a very similar solution to what I came up with: DataTrigger. Using a DataTrigger instead of a Trigger has the nice benefit that the DependencyProperty no longer needs to be made attached/inheritable; any standard DependencyProperty will do. However, DataTrigger uses a Binding instead of a Property, so we end up back in the world of long-ish ElementName/RelativeSource markup syntax. Here's the XAML for the ElementName form:

<Button Content="...">
    <Button.Style>
        <Style TargetType="{x:Type Button}">
            <Style.Triggers>
                <DataTrigger Binding="{Binding Processing, ElementName=Window}" Value="True">
                    <Setter Property="IsEnabled" Value="False"/>
                    <Setter Property="FontStyle" Value="Italic"/>
                </DataTrigger>
            </Style.Triggers>
        </Style>
    </Button.Style>
</Button>

Just as better - pick whichever feels more comfortable. :)

Summary

Achieving a good developer/designer separation is good for a lot of reasons: flexibility, productivity, encapsulation, etc.. Unfortunately, it's not always as easy as we'd like... So if the approaches outlined here can help move us all just a little bit closer to that goal, then this post has served its purpose!

Tags: WPF

Video frame grabbing made easy [How to: Quickly capture multiple video frames with WPF]

When I transfer clips from my digital camera to my computer, I briefly check that the video transferred successfully. For images, this is usually a matter of opening a few of them - for video files I usually load them in Media Player and seek to a couple of different points. Mine is hardly a fail proof system, but it's fairly quick and it makes me feel a little safer about deleting the originals from the camera. :) One day I got to thinking that it would be pretty easy to automatically generate a set of video thumbnails instead of seeking around manually...

So I did some research into video frame capture with WPF and found that it boiled down to a few main ideas:

  1. All it takes to capture a frame of video is an instance of MediaPlayer and a call to RenderTargetBitmap
  2. Setting the ScrubbingEnabled property tells MediaPlayer to update its content dynamically when changes to the Position property are made
  3. The video updates are asynchronous, so it's necessary to delay the capture a short while after changing the Position property in order to capture the new frame
  4. Performing a capture in response to the MediaOpened event is a handy way to capture the first frame reliably
  5. However, nothing I found demonstrated a good way to capture additional frames reliably...

Because of the asynchronous nature of the video frame updates, attempting to capture multiple frames in rapid succession (ex: seek, capture, seek, capture, ...) resulted in duplicate frames every time the capture occurred too soon for the frame's content to update (which was most of the time!). This was clearly unsuitable for my scenario because I wanted my application to generate its thumbnails as quickly as possible. After a bit of experimentation and playing around, I arrived at a technique that seems to work quite reliably in practice.

I wrote a simple WPF application to show how it works - here's an image of VideoThumbnailer displaying a summary of a video of someone tubing in the snow:

VideoThumbnailer sample frame capture application

(The complete source code to VideoThumbnailer is available as an attachment to this post.)

The technique itself is fairly simple, if not entirely as straightforward as it would be if changes to the Position property were synchronous:

  1. Create a MediaPlayer instance and hook the MediaOpened and Changed events
  2. Set ScrubbingEnabled and open the media file
  3. When the MediaOpened handler fires, capture the initial frame and set Position to the first location of interest
  4. When the Changed handler fires, capture the current frame
  5. If that frame is new/different than before, seek to the next position of interest and repeat as necessary; otherwise wait for the Changed handler to fire again

There's nothing particularly clever going on here, but there are a few complicating circumstances worth mentioning:

  • The Changed event fires whenever the MediaPlayer instance gets a new frame from its underlying implementation. However, a single Position change results in multiple invocations of the Changed event (2-5 seems to be the usual range). Typically, the first Changed event doesn't actually correspond to new data, but rather the same frame as before - so simply listening for the first Changed event is not sufficient. What's most desirable is to listen for the last Changed event - but without knowing how many there will be in advance, it's difficult to know which one is the last frame...
  • Fortunately, in practice the first Changed event corresponding to different content (as determined by a pixel-by-pixel comparison of the captured frames) seems to also correspond to the final, desired content. So a very reasonable solution is to wait for the first changed content, call it "good enough", and move on by seeking to the next position in the file.
  • So now the application is quickly seeking to arbitrary positions and capturing the desired frame with a high degree of reliability. We're done, right? Well, not quite... What if a video file contains the same exact content at two different positions? (Note: This is uncommon in motion video, but VERY common at the beginning and ending of clips (ex: 100% black frame) or in generated content (ex: title frame).) The approach described so far will spend forever waiting for a new frame that will never arrive...
  • What's needed here is a separate watchdog timer that fires after a reasonable time has elapsed and aborts the infinite wait. The catch is that this timer should be long enough to give the new video content sufficient time to be made available, but also short enough that it's not onerous if it fires many times during the generation of thumbnails. I experimentally settled on 1 second for the watchdog timeout because it seems to strike a good balance between these competing goals. With the watchdog timer in place, the process of generating a video summary should never hang - and we're done!

Having implemented the technique above, we should have a fast, reliable solution for video file thumbnail generation that works with a wide variety of file types by virtue of the underlying operating system's support. And, indeed, VideoThumbnailer works fine with all the WMV, DVR-MS, MPEG, and AVI files I've tried (and probably supports some other types I didn't try). There are plenty of changes one could make to VideoThumbnailer to make it a more useful application, but I hope it serves pretty well as a concrete example of the concepts discussed here.

Happy frame grabbing!

[VideoThumbnailer.zip]

Tags: WPF

Successfully passing the baton [AJAX Control Toolkit release!]

Bertrand Le Roy posted earlier today about the new 20820 release of the AJAX Control Toolkit! In addition to being compiled for the recently available .NET 3.5 SP1 platform and containing a new user-contributed control (MultiHandleSlider by Daniel Crenna), this release is also notable from my perspective because it represents the first release for which I was not directly involved. As much as I've enjoyed working on the Toolkit, there are only so many hours in the day; organizational changes and my present responsibilities developing for Silverlight are taking up all of my time. So it has been fantastic to have Bertrand continue moving the Toolkit project forward and taking care of all the many tasks that go into publishing a new release.

Congratulations to Bertrand - and all the individual contributors! Thank you for the hard work that made this release possible!