The blog of dlaa.me

Maintaining pretenses with the layout system [LayoutTransform functionality updated for Silverlight 2!]

In the introductory post for LayoutTransformControl and the feature-enhancing follow-up, I gave a variety of examples to convey the need for LayoutTransform. I also noted that Silverlight 2 supports only RenderTransform, but went on to demonstrate how it was possible to use RenderTransform to get LayoutTransform behavior. I'm biased, but I happen think LayoutTransform is a pretty fundamental part of application design - and the feedback I've gotten about LayoutTransformControl suggests that at least some of you agree with me. :)

Soon after the Silverlight 2 release candidate became available, a customer contacted me to ask about updating LayoutTransformControl. I've spent some time doing just that and am happy to share a version that works well on the latest Silverlight 2 bits. The complete implementation - along with demo and test applications - can be found in LayoutTransformControl.cs in the ZIP file attached to this post.

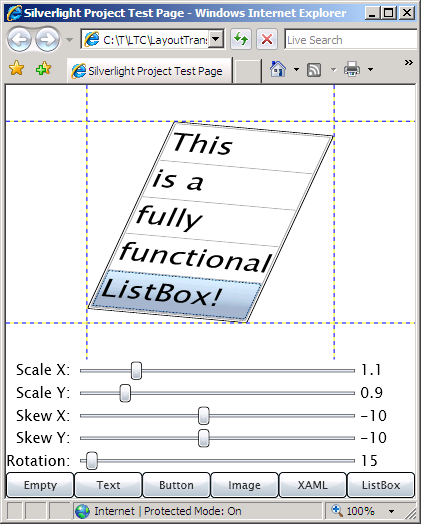
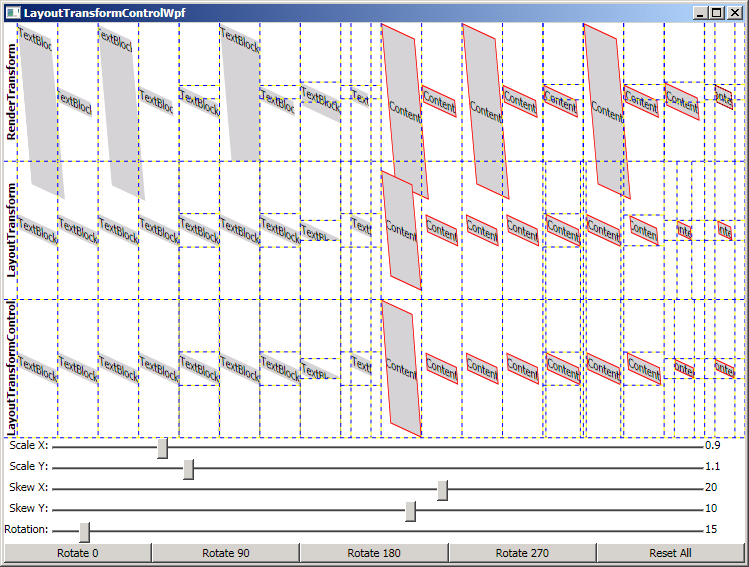
The sample application works the same as it did before (with the updated look-and-feel of the new bits):

LayoutTransformControl Sample Application

It remains my belief that LayoutTransformControl for Silverlight 2 is just as powerful as WPF's LayoutTransform. Your application can take advantage of complete LayoutTransform functionality today - even though the Silverlight platform doesn't support LayoutTransform!

Notes:

  • Unfortunately, Silverlight does not yet behave the same as WPF with regard to automatically calling the property changed handler of a Transform-typed DependencyProperty when any of that Transform's members change. I explain how clean this makes things in my previous post, and outline how I worked around the issue by introducing a set of custom "Ltc" transforms that automatically notify their LayoutTransformControl parent of any changes. But with the release of the Silverlight 2 RC, the Transform class can no longer be derived from - which forces the removal of the "Ltc" Transforms and completely invalidates my workaround. :(
  • There are now just two scenarios for the Transforms provided to a LayoutTransformControl:
    1. The Transforms are static - so change notifications are unnecessary and there's no need to worry about this. (As before, the Motivation project demonstrates this scenario.)
    2. The Transforms are dynamic and it is now necessary to make a call to 
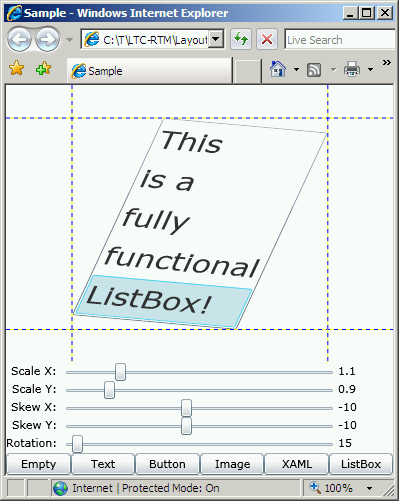
LayoutTransformControl.TransformUpdated() whenever they change so that LayoutTransformControl can find out and update its rendering. (The Sample project has been changed to demonstrate this scenario.)
  • Silverlight 2 has introduced a feature known as "layout rounding" - it's conceptually very similar to WPF's SnapsToDevicePixels property. (I can't find documentation of the new UIElement.UseLayoutRounding property quite yet, but it's discussed briefly in the Breaking Changes document.) Unlike WPF's SnapsToDevicePixels which takes effect silently (as I understand it), Silverlight's UseLayoutRounding (which defaults to True) does not. Specifically, UseLayoutRounding causes some of the intermediate values used during the measure/arrange pass to change while LayoutTransformControl is busy working its magic. Left alone, these unexpected changes appear to LayoutTransformControl as various special-cases of the layout system and cause incorrect layout for certain special angles/scales/etc. based on whether things get rounded up or down. So LayoutTransformControl disables UseLayoutRounding for itself (which avoids bad layout during scaling) and that automatically inherits to its templated Grid (which avoids bad layout during rotation). Consequently, LayoutTransformControl's rendering behavior remains correct at all times.
  • If UseLayoutRounding is necessary for some element within a LayoutTransformControl, simply set it back to True on that element and things should continue to work as desired. But note that LayoutTransformControl does look at the outermost child element (the value of its .Child property) for some of its calculations, so UseLayoutRounding should not be toggled on that element. If necessary, wrap that element in a container (ex: Grid) and it should then be fine to set UseLayoutRounding on it.

My thanks to everyone who has expressed interest in LayoutTransformControl or is actively using it in their projects! I hope this update continues to serve you well as Silverlight 2 approaches final release.

[LayoutTransformControl.zip]

Preserving access to Silverlight 2's generic.xaml resources [SilverlightDefaultStyleBrowser updated for the Silverlight 2 RC!]

Last night the Silverlight team released Silverlight 2 Release Candidate 0! The new bits include a minor change with a big impact on SilverlightDefaultStyleBrowser (background reading available here, here, here, and here): the path for default styles has changed from generic.xaml to themes/generic.xaml. So SilverlightDefaultStyleBrowser ends up looking in the wrong place for the RC assemblies and doesn't find any styles. That's not very helpful, so I've just updated SilverlightDefaultStyleBrowser to extract styles from both of these paths (which will continue to work with Beta bits and will also work with the new RC bits).

The version number of SilverlightDefaultStyleBrowser appears in the window's title and the latest release number is 1.0.3191.14705. (Note: I haven't updated the screen shot below which shows the introductory version number.) If installed via ClickOnce, the application should automatically prompt you to upgrade when it detects the update (which typically happens after running the app once or twice). If you're using the standalone EXE, you'll need to update manually.

SilverlightDefaultStyleBrowser Application

Click here or on the image above to install SilverlightDefaultStyleBrowser via ClickOnce with automatic updating.

Click here to download the standalone SilverlightDefaultStyleBrowser executable and source code in a ZIP file.

The RC bits of Silverlight introduce some neat new controls: ComboBox, PasswordBox, and ProgressBar. Go play with them now to see how they work - then use the new SilverlightDefaultStyleBrowser to see how they're styled!

"MouseButtonClicker clicks the mouse so you don't have to!" [Releasing binaries and source for a nifty mouse utility]

I first came across the notion of automatic mouse button clicking some time ago. The basic idea can be summarized as follows:

The nearly universal pattern of mouse use is: move/click/wait... move/click/wait... move/click/wait.... In the overwhelming majority of cases, the only reason the mouse gets moved is to position the pointer over the next user interface element that needs to be clicked. Because every move is immediately followed by a click, it should be possible to simplify the process by performing the click automatically when the mouse stops moving (i.e., moves to a new location and stays still for a few moments). This automatic click saves the user only a tiny bit of effort each time it happens, but it eliminates a conceptually unnecessary, repetitive motion that's carried out many, many times over the course of every day. As an additional ergonomic benefit, automatic clicking enables the user to hold the mouse in a variety of new ways now that it's no longer necessary to keep a finger on the mouse button.

My first reaction was that the automatic clicking behavior would be nearly impossible to live with - and for the first couple of minutes I tried using it, it was. :) But, once I got out of the habit of wiggling the mouse needlessly and got into the habit of moving it where I needed when I needed, I found I quite liked the behavior after all. As I became more comfortable, I got used to the timing and found I could manage double clicks with just a single click by timing that click to happen right after the automatic click! The only challenge was to learn what parts of the user interface do nothing when clicked on - because these are the "safe areas" where the mouse can be "parked" if you start moving it and then decide you don't really want to click anything after all.

I found I liked automatic clicking so much, I wrote my own tool to implement it - and I've used that tool happily for nearly a decade. But my tool has a specific hardware dependency as a consequence of some other functionality it implements and that became a problem a few days ago when I changed hardware. So I decided this was a great opportunity to extract the clicking functionality into its own, dedicated, hardware-agnostic tool - and then blog about it!

The new tool I wrote is called MouseButtonClicker and does exactly what I describe above. It's written completely in native code - partly because I saw no need for the overhead of managed code for a simple "always-on" scenario like this one - and partly because it was a good excuse to brush up on my (rusty) native coding skills. MouseButtonClicker is a UI-less application - which means it doesn't have a window, or a notification icon, or anything to look at - it just runs invisibly and does its job. Of course, it wouldn't be hard to add a simple notification icon, but that's unnecessary for my purposes: MouseButtonClicker auto-starts with my computer and never gets closed. If you find you need to exit MouseButtonClicker, simply kill it with Task Manager or via TaskKill /IM MouseButtonClicker.exe - MouseButtonClicker maintains no persistent state and terminating it is completely safe to do at any time. And while the standard 32-bit executable works just fine on 64-bit operating systems, I've also provided a 64-bit version for those who prefer not to mix their bits. :)

Click here to download the MouseButtonClicker executables (32- and 64-bit) and the complete Visual Studio 2008 source code.

Implementation notes:

  • MouseButtonClicker finds out about mouse activity via the raw input API which provides low-level access to input devices like mice and keyboards in a simple, flexible manner. Using the raw input API makes it easy to distinguish between mouse input (where automatic clicking makes sense) and input from a tablet pen or digitizer device (where it does not make sense). This is of particular interest to me because I'm a long-time user of Wacom's fine tablet products and frequently switch between mouse and pen while using my computer; having the wrong behavior for the pen would be simply unacceptable.
  • MouseButtonClicker generates the automatic click with the SendInput function which provides an easy way to inject input events into the system. This works quite nicely, but it's worth noting that on recent operating systems like Vista and Server 2008, the SendInput API is restricted by User Interface Privilege Isolation. Specifically, MSDN notes that "Applications are permitted to inject input only into applications that are at an equal or lesser integrity level". It's my experience that this restriction usually exhibits itself as an inability to click processes that are running in an elevated security context (i.e., as Administrator) or to click in Command Windows that aren't currently active.
  • There are a couple of cases where MouseButtonClicker suppresses the automatic click. For example, there will be no automatic click if any mouse button has been manually clicked since the mouse stopped moving or if any of the mouse buttons is currently pressed. As such, the automatic click doesn't interfere with right clicking to get a context menu, pausing while dragging a window around the screen, or simply clicking the button yourself when you're in too much of a hurry to let MouseButtonClicker do so for you!
  • Some mouse hardware exhibits a small amount of "jitter" that causes single unit move messages from time to time (note: the size of a unit is less than that of a pixel, so these jitters aren't usually visible). My thinking is that this jitter is due to the mouse being *just* on the threshold of moving and then getting nudged slightly (perhaps the table gets bumped, a butterfly flaps its wings, etc.). Whatever the cause, this occasional jitter is an annoyance because it results in occasional - seemingly unprovoked - clicks wherever the mouse happens to be. So MouseButtonClicker has a small jitter-prevention measure that requires the mouse to move at least a little bit (2 units) before an automatic click will be performed.
  • MouseButtonClicker deliberately does not clean up its application-level resources (like the window class it registers) because Windows contractually promises to clean such things up during process exit. I formerly believed this to be lazy, but eventually decided that the best code is code I don't have to write, debug, and maintain. :) For cases like this where someone else is already going to handle resource clean-up - probably more quickly and efficiently than I could - it seems prudent to let them do so. This approach avoids the possibility of bugs in clean-up code, keeps the executable size down (which avoids unnecessary disk access), and keeps the source code just a little bit simpler.
  • The COMPILE_TIME_ASSERT macro provides a handy way of implementing a compile-time assert (also known as a static assert). Compile-time asserts are handy because they do the same thing normal asserts do, but they take effect at compile time and will actually fail the build process if the specified condition is not true. So instead of having to hope that the test cases exercise all the assertions in the code, the simple presence of a successful compile guarantees that all compile-time asserts are valid!
  • The variably-sized buffer for the WM_INPUT message is allocated on the stack via the _malloca/_freea CRT library calls. Allocating memory on the stack isn't usually appropriate, but for situations like this where a small, short-lived buffer of unknown size is needed, allocating on the stack can be more efficient than allocating on the heap.
  • The delay before the automatic click is determined by the result of the GetDoubleClickTime() API. Though the delay MouseButtonClicker implements is not technically for a double-click, the result of this call is the unofficial basis for a variety of different UI timings across the system.
  • MouseButtonClicker.ico Yes, I drew the icon myself; no, I don't have any artistic skill. :) It's supposed to be a robotic finger clicking a mouse button, but I agree it's probably more of a Rorschach inkblot test... If you can do better and want to send me an ICO file with 32x32 and 16x16 images I can freely redistribute, I will pick my favorite submission, include it with the next version of MouseButtonClicker, and credit you publically for your contribution.

So if you're in the mood to try something new and you don't mind a bit of a learning curve, give MouseButtonClicker a try for an hour or two. If you're lucky, you may never need to click again... :)


PS - For the benefit of casual readers and search engines, here is MouseButtonClicker.cpp:

// MouseButtonClicker - http://blogs.msdn.com/Delay
//
// "MouseButtonClicker clicks the mouse so you don't have to!"
//
// Simple Windows utility to click the primary mouse button whenever the mouse
// stops moving as a usability convenience/enhancement.


#include <windows.h>
#include <tchar.h>
#include <malloc.h>
#include <strsafe.h>

// Macro for compile-time assert
#define COMPILE_TIME_ASSERT(e) typedef int CTA[(e) ? 1 : -1]

// Constants for code simplification
#define RI_ALL_MOUSE_BUTTONS_DOWN (RI_MOUSE_BUTTON_1_DOWN | RI_MOUSE_BUTTON_2_DOWN | RI_MOUSE_BUTTON_3_DOWN | RI_MOUSE_BUTTON_4_DOWN | RI_MOUSE_BUTTON_5_DOWN)
#define RI_ALL_MOUSE_BUTTONS_UP (RI_MOUSE_BUTTON_1_UP | RI_MOUSE_BUTTON_2_UP | RI_MOUSE_BUTTON_3_UP | RI_MOUSE_BUTTON_4_UP | RI_MOUSE_BUTTON_5_UP)

// Check that bit-level assumptions are correct
COMPILE_TIME_ASSERT(RI_MOUSE_BUTTON_1_DOWN == (RI_MOUSE_BUTTON_1_UP >> 1));
COMPILE_TIME_ASSERT(RI_MOUSE_BUTTON_2_DOWN == (RI_MOUSE_BUTTON_2_UP >> 1));
COMPILE_TIME_ASSERT(RI_MOUSE_BUTTON_3_DOWN == (RI_MOUSE_BUTTON_3_UP >> 1));
COMPILE_TIME_ASSERT(RI_MOUSE_BUTTON_4_DOWN == (RI_MOUSE_BUTTON_4_UP >> 1));
COMPILE_TIME_ASSERT(RI_MOUSE_BUTTON_5_DOWN == (RI_MOUSE_BUTTON_5_UP >> 1));
COMPILE_TIME_ASSERT(RI_ALL_MOUSE_BUTTONS_DOWN == (RI_ALL_MOUSE_BUTTONS_UP >> 1));

// Macro for absolute value
#define ABS(v) ((0 <= v) ? v : -v)

// Application-level constants
#define APPLICATION_NAME (TEXT("MouseButtonClicker"))
#define TIMER_EVENT_ID (1)
#define MOUSE_MOVE_THRESHOLD (2)

// Window procedure
LRESULT CALLBACK WndProc(const HWND hWnd, const UINT message, const WPARAM wParam, const LPARAM lParam)
{
    // Tracks the mouse move delta threshold across calls to WndProc
    static LONG lLastClickDeltaX = 0;
    static LONG lLastClickDeltaY = 0;
    static bool fOkToClick = false;

    switch (message)
    {
    // Raw input message
    case WM_INPUT:
        {
            // Query for required buffer size
            UINT cbSize = 0;
            if(0 == GetRawInputData(reinterpret_cast<HRAWINPUT>(lParam), RID_INPUT, NULL, &cbSize, sizeof(RAWINPUTHEADER)))
            {
                // Allocate buffer on stack (falls back to heap)
                const LPVOID pData = _malloca(cbSize);
                if(NULL != pData)
                {
                    // Get raw input data
                    if(cbSize == GetRawInputData(reinterpret_cast<HRAWINPUT>(lParam), RID_INPUT, pData, &cbSize, sizeof(RAWINPUTHEADER)))
                    {
                        // Only interested in mouse input
                        const RAWINPUT* const pRawInput = static_cast<LPRAWINPUT>(pData);
                        if (RIM_TYPEMOUSE == pRawInput->header.dwType)
                        {
                            // Only interested in devices that use relative coordinates
                            // Specifically, input from pens/tablets is ignored
                            if(0 == (pRawInput->data.mouse.usFlags & MOUSE_MOVE_ABSOLUTE))
                            {
                                // Tracks the state of the mouse buttons across calls to WndProc
                                static UINT usMouseButtonsDown = 0;

                                // Update mouse delta variables
                                lLastClickDeltaX += pRawInput->data.mouse.lLastX;
                                lLastClickDeltaY += pRawInput->data.mouse.lLastY;

                                // Enable clicking once the mouse has exceeded the threshold in any direction
                                fOkToClick |= ((MOUSE_MOVE_THRESHOLD < ABS(lLastClickDeltaX)) || (MOUSE_MOVE_THRESHOLD < ABS(lLastClickDeltaY)));

                                // Determine the input type
                                const UINT usButtonFlags = pRawInput->data.mouse.usButtonFlags;
                                if(0 == (usButtonFlags & (RI_ALL_MOUSE_BUTTONS_DOWN | RI_ALL_MOUSE_BUTTONS_UP | RI_MOUSE_WHEEL)))
                                {
                                    // Mouse move: (Re)set click timer if no buttons down and mouse moved enough to avoid jitter
                                    if((0 == usMouseButtonsDown) && fOkToClick)
                                    {
                                        // Use double-click time as an indication of the user's responsiveness preference
                                        (void)SetTimer(hWnd, TIMER_EVENT_ID, GetDoubleClickTime(), NULL);
                                    }
                                }
                                else
                                {
                                    // Mouse button down/up or wheel rotation: Cancel click timer
                                    (void)KillTimer(hWnd, TIMER_EVENT_ID);

                                    // Update mouse button state variable (asserts above ensure the bit manipulations are correct)
                                    usMouseButtonsDown |= (usButtonFlags & RI_ALL_MOUSE_BUTTONS_DOWN);
                                    usMouseButtonsDown &= ~((usButtonFlags & RI_ALL_MOUSE_BUTTONS_UP) >> 1);
                                }
                            }
                        }
                    }
                    // Free buffer
                    (void)_freea(pData);
                }
            }
        }
        break;
    // Timer message
    case WM_TIMER:
        {
            // Timeout, stop timer and click primary button
            (void)KillTimer(hWnd, TIMER_EVENT_ID);
            INPUT pInputs[2] = {0};
            pInputs[0].type = INPUT_MOUSE;
            pInputs[0].mi.dwFlags = MOUSEEVENTF_LEFTDOWN;
            pInputs[1].type = INPUT_MOUSE;
            pInputs[1].mi.dwFlags = MOUSEEVENTF_LEFTUP;
            (void)SendInput(2, pInputs, sizeof(INPUT));

            // Reset mouse delta and threshold variables
            lLastClickDeltaX = 0;
            lLastClickDeltaY = 0;
            fOkToClick = false;
        }
        break;
    // Close message
    case WM_DESTROY:
        (void)PostQuitMessage(0);
        break;
    // Unhandled message
    default:
        return DefWindowProc(hWnd, message, wParam, lParam);
    }
    // Return value 0 indicates message was processed
    return 0;
}

// WinMain entry point
int APIENTRY _tWinMain(const HINSTANCE hInstance, const HINSTANCE hPrevInstance, const LPTSTR lpCmdLine, const int nCmdShow)
{
    // Avoid compiler warnings for unreferenced parameters
    UNREFERENCED_PARAMETER(hPrevInstance);
    UNREFERENCED_PARAMETER(lpCmdLine);
    UNREFERENCED_PARAMETER(nCmdShow);

    // Create a mutex to prevent running multiple simultaneous instances
    const HANDLE mutex = CreateMutex(NULL, FALSE, APPLICATION_NAME);
    if((NULL != mutex) && (ERROR_ALREADY_EXISTS != GetLastError()))
    {
        // Register the window class
        WNDCLASS wc = {0};
        wc.lpfnWndProc = WndProc;
        wc.hInstance = hInstance;
        wc.lpszClassName = APPLICATION_NAME;
        if(0 != RegisterClass(&wc))
        {
            // Create a message-only window to receive WM_INPUT and WM_TIMER
            const HWND hWnd = CreateWindow(APPLICATION_NAME, APPLICATION_NAME, 0, CW_USEDEFAULT, CW_USEDEFAULT, CW_USEDEFAULT, CW_USEDEFAULT, HWND_MESSAGE, NULL, hInstance, NULL);
            if (NULL != hWnd)
            {
                // Register for the mouse's raw input data
                RAWINPUTDEVICE rid = {0};
                rid.usUsagePage = 1;  // HID_DEVICE_SYSTEM_MOUSE
                rid.usUsage = 2;  // HID_DEVICE_SYSTEM_MOUSE
                rid.dwFlags = RIDEV_INPUTSINK;
                rid.hwndTarget = hWnd;
                if(RegisterRawInputDevices(&rid, 1, sizeof(rid)))
                {
                    // Pump Windows messages
                    MSG msg = {0};
                    while (GetMessage(&msg, NULL, 0, 0))
                    {
                        TranslateMessage(&msg);
                        DispatchMessage(&msg);
                    }
                    // Return success
                    return static_cast<int>(msg.wParam);
                }
            }
        }
        // Failed to initialize, output a diagnostic message (which is not more
        // friendly because it represents a scenario that should never occur)
        TCHAR szMessage[64];
        if(SUCCEEDED(StringCchPrintf(szMessage, sizeof(szMessage)/sizeof(szMessage[0]), TEXT("Initialization failure. GetLastError=%d\r\n"), GetLastError())))
        {
            (void)MessageBox(NULL, szMessage, APPLICATION_NAME, MB_OK | MB_ICONERROR);
        }
    }
    // Return failure
    return 0;
    // By contract, Windows frees all resources as part of process exit
}

Make life a little easier for designers [WPF Triggers with a little less XAML and a little less code]

When I was writing my video frame grabbing sample, I came up with a potentially useful technique for maintaining the developer/designer separation that's so sought after in the WPF (and Silverlight) world. I'm sure something similar has been discussed before, but I hadn't come across it (and couldn't find anything like it with a quick search), so I thought I'd describe it here for posterity.

Background

The high-level goal is to maintain a separation between how an application works (developer) and how it looks (designer). The conventional approach to this is to follow some kind of model/view pattern where the application exposes various properties that represent its state and the interface binds to those properties to convey that state to the user. In WPF, this is typically done in XAML via Binding or TemplateBinding. These two constructs are very powerful and work quite well. However, it seemed to me that there might be a slightly better way...

The Conventional Way

In my scenario, the application exposes a Boolean DependencyProperty "Processing" which is normally False, but flips to True whenever a video file is being processed. The UI exposes an "Open File" Button which is normally enabled, but should flip to disabled whenever a video file is being processed.

The first instinct is to use a Trigger to apply the style changes to the Button. However, there's a catch - the Trigger needs to be defined on Button itself because the Button properties are being changed, yet the actual Trigger property (the Processing property) is defined on the Window object. I didn't see an obvious way to point the Trigger at the Window from the Button, so I moved on to the next idea which was to use a Binding to attach the Button's IsEnabled property to the Window's Processing property. Depending on whether you prefer ElementName or RelativeSource, the XAML looks like this:

<Button
    IsEnabled="{Binding Processing, ElementName=Window}"
    Content="..."/>
<Button
    IsEnabled="{Binding Processing, RelativeSource={RelativeSource Mode=FindAncestor, AncestorType={x:Type l:Window1}}}"
    Content="..."/>

Both approaches work, but not perfectly: the IsEnabled state of the Button is backwards because we've got IsEnabled == Processing when what we really want is IsEnabled == !Processing. Fortunately, Bindings support Converters and I've already written about the power of IValueConverter. So the designer goes to the developer and asks for a Converter that will invert the state of a Boolean variable and the developer writes the following code:

/// <summary>
/// Simplest implementation of a Converter to invert the state of a bool.
/// </summary>
/// <remarks>
/// Needs parameter validation and error handling.
/// </remarks>
public class BooleanInversionConverter : IValueConverter
{
    public object Convert(object value, Type targetType, object parameter, CultureInfo culture)
    {
        return !((bool)value);
    }
    public object ConvertBack(object value, Type targetType, object parameter, CultureInfo culture)
    {
        throw new NotImplementedException();
    }
}

Now the designer adds an instance of this Converter to the resources of the application:

    <Application.Resources>
        <l:BooleanInversionConverter x:Key="BooleanInversionConverter"/>
    </Application.Resources>

And uses it to achieve the desired effect:

<Button
    IsEnabled="{Binding Processing, ElementName=Window, Converter={StaticResource BooleanInversionConverter}}"
    Content="..."/>
<Button
    IsEnabled="{Binding Processing, RelativeSource={RelativeSource Mode=FindAncestor, AncestorType={x:Type l:Window1}}, Converter={StaticResource BooleanInversionConverter}}"
    Content="..."/>

And the scenario works. But then the designer decides that the text of the Button should also be italic when it's disabled... And that requires the designer to go back to the developer who then needs to write a BooleanToFontStyleItalicConverter. Or maybe the designer attaches the Binding to the Button's Style property and gets the developer to write some kind of Style toggling Converter. Sheesh, what started out as a simple scenario has gotten annoyingly complicated and involves significant developer/designer coordination to accomplish something the designer should have been able to do independently in the first place.

A Different Way

So that's when I came up with a different idea that would let me use a Trigger after all: an attached DependencyProperty that inherits! Simply by changing the registration of the Processing property from Register to RegisterAttached and adding the FrameworkPropertyMetadataOptions.Inherits flag, we end up with a property on Window that looks to the Button just like a property defined on the Button itself. And suddenly the original idea to use a Trigger becomes possible - and even preferable! - because there's no longer a need for Bindings, Converters, or any of the complication above. Now the XAML looks just like it should and the designer can change things with complete autonomy:

<Button Content="...">
    <Button.Style>
        <Style TargetType="{x:Type Button}">
            <Style.Triggers>
                <Trigger Property="l:Window1.Processing" Value="True">
                    <Setter Property="IsEnabled" Value="False"/>
                    <Setter Property="FontStyle" Value="Italic"/>
                </Trigger>
            </Style.Triggers>
        </Style>
    </Button.Style>
</Button>

Much better.

Another Different Way

I discussed this scenario with my teammate Beatriz Costa briefly (she's one of the WPF data binding experts) and she independently suggested a very similar solution to what I came up with: DataTrigger. Using a DataTrigger instead of a Trigger has the nice benefit that the DependencyProperty no longer needs to be made attached/inheritable; any standard DependencyProperty will do. However, DataTrigger uses a Binding instead of a Property, so we end up back in the world of long-ish ElementName/RelativeSource markup syntax. Here's the XAML for the ElementName form:

<Button Content="...">
    <Button.Style>
        <Style TargetType="{x:Type Button}">
            <Style.Triggers>
                <DataTrigger Binding="{Binding Processing, ElementName=Window}" Value="True">
                    <Setter Property="IsEnabled" Value="False"/>
                    <Setter Property="FontStyle" Value="Italic"/>
                </DataTrigger>
            </Style.Triggers>
        </Style>
    </Button.Style>
</Button>

Just as better - pick whichever feels more comfortable. :)

Summary

Achieving a good developer/designer separation is good for a lot of reasons: flexibility, productivity, encapsulation, etc.. Unfortunately, it's not always as easy as we'd like... So if the approaches outlined here can help move us all just a little bit closer to that goal, then this post has served its purpose!

Tags: WPF

Video frame grabbing made easy [How to: Quickly capture multiple video frames with WPF]

When I transfer clips from my digital camera to my computer, I briefly check that the video transferred successfully. For images, this is usually a matter of opening a few of them - for video files I usually load them in Media Player and seek to a couple of different points. Mine is hardly a fail proof system, but it's fairly quick and it makes me feel a little safer about deleting the originals from the camera. :) One day I got to thinking that it would be pretty easy to automatically generate a set of video thumbnails instead of seeking around manually...

So I did some research into video frame capture with WPF and found that it boiled down to a few main ideas:

  1. All it takes to capture a frame of video is an instance of MediaPlayer and a call to RenderTargetBitmap
  2. Setting the ScrubbingEnabled property tells MediaPlayer to update its content dynamically when changes to the Position property are made
  3. The video updates are asynchronous, so it's necessary to delay the capture a short while after changing the Position property in order to capture the new frame
  4. Performing a capture in response to the MediaOpened event is a handy way to capture the first frame reliably
  5. However, nothing I found demonstrated a good way to capture additional frames reliably...

Because of the asynchronous nature of the video frame updates, attempting to capture multiple frames in rapid succession (ex: seek, capture, seek, capture, ...) resulted in duplicate frames every time the capture occurred too soon for the frame's content to update (which was most of the time!). This was clearly unsuitable for my scenario because I wanted my application to generate its thumbnails as quickly as possible. After a bit of experimentation and playing around, I arrived at a technique that seems to work quite reliably in practice.

I wrote a simple WPF application to show how it works - here's an image of VideoThumbnailer displaying a summary of a video of someone tubing in the snow:

VideoThumbnailer sample frame capture application

(The complete source code to VideoThumbnailer is available as an attachment to this post.)

The technique itself is fairly simple, if not entirely as straightforward as it would be if changes to the Position property were synchronous:

  1. Create a MediaPlayer instance and hook the MediaOpened and Changed events
  2. Set ScrubbingEnabled and open the media file
  3. When the MediaOpened handler fires, capture the initial frame and set Position to the first location of interest
  4. When the Changed handler fires, capture the current frame
  5. If that frame is new/different than before, seek to the next position of interest and repeat as necessary; otherwise wait for the Changed handler to fire again

There's nothing particularly clever going on here, but there are a few complicating circumstances worth mentioning:

  • The Changed event fires whenever the MediaPlayer instance gets a new frame from its underlying implementation. However, a single Position change results in multiple invocations of the Changed event (2-5 seems to be the usual range). Typically, the first Changed event doesn't actually correspond to new data, but rather the same frame as before - so simply listening for the first Changed event is not sufficient. What's most desirable is to listen for the last Changed event - but without knowing how many there will be in advance, it's difficult to know which one is the last frame...
  • Fortunately, in practice the first Changed event corresponding to different content (as determined by a pixel-by-pixel comparison of the captured frames) seems to also correspond to the final, desired content. So a very reasonable solution is to wait for the first changed content, call it "good enough", and move on by seeking to the next position in the file.
  • So now the application is quickly seeking to arbitrary positions and capturing the desired frame with a high degree of reliability. We're done, right? Well, not quite... What if a video file contains the same exact content at two different positions? (Note: This is uncommon in motion video, but VERY common at the beginning and ending of clips (ex: 100% black frame) or in generated content (ex: title frame).) The approach described so far will spend forever waiting for a new frame that will never arrive...
  • What's needed here is a separate watchdog timer that fires after a reasonable time has elapsed and aborts the infinite wait. The catch is that this timer should be long enough to give the new video content sufficient time to be made available, but also short enough that it's not onerous if it fires many times during the generation of thumbnails. I experimentally settled on 1 second for the watchdog timeout because it seems to strike a good balance between these competing goals. With the watchdog timer in place, the process of generating a video summary should never hang - and we're done!

Having implemented the technique above, we should have a fast, reliable solution for video file thumbnail generation that works with a wide variety of file types by virtue of the underlying operating system's support. And, indeed, VideoThumbnailer works fine with all the WMV, DVR-MS, MPEG, and AVI files I've tried (and probably supports some other types I didn't try). There are plenty of changes one could make to VideoThumbnailer to make it a more useful application, but I hope it serves pretty well as a concrete example of the concepts discussed here.

Happy frame grabbing!

[VideoThumbnailer.zip]

Tags: WPF

Successfully passing the baton [AJAX Control Toolkit release!]

Bertrand Le Roy posted earlier today about the new 20820 release of the AJAX Control Toolkit! In addition to being compiled for the recently available .NET 3.5 SP1 platform and containing a new user-contributed control (MultiHandleSlider by Daniel Crenna), this release is also notable from my perspective because it represents the first release for which I was not directly involved. As much as I've enjoyed working on the Toolkit, there are only so many hours in the day; organizational changes and my present responsibilities developing for Silverlight are taking up all of my time. So it has been fantastic to have Bertrand continue moving the Toolkit project forward and taking care of all the many tasks that go into publishing a new release.

Congratulations to Bertrand - and all the individual contributors! Thank you for the hard work that made this release possible!

Read a Silverlight book - with Silverlight! [SimpleSilverlightXpsViewer adaptation by Laurence Moroney]

At the bottom of the post on migrating SimpleSilverlightXpsViewer to Silverlight Beta 2, I hinted at "a cool, practical, relevant use of SimpleSilverlightXpsViewer that I'll be able to share sometime soon". "Soon" is now, and I'm happy to point readers at the "Read about Silverlight in XPS" post by Laurence Moroney in which he uses an adaptation of my viewer for showcasing the first three chapters of his new book, Introducing Microsoft Silverlight 2.

Here's what it looks like - just click the image to try it out for yourself:

Screen shot of the XPS Viewer adaptation

In addition to modifying the sample for his purposes, Laurence went further and integrated mouse wheel support: zooming in and out is as easy as spinning the wheel. I've got to agree that it's a very nice usability improvement!

Since releasing the XPS Viewer Sample, a few people have expressed interest in repurposing the code for something similar. Kudos to Laurence for doing a great job with this - and I love that it's being used to help spread the word about Silverlight! :)

Maintaining access to Silverlight 2's generic.xaml resources [SilverlightDefaultStyleBrowser updated for build 2.0.30523.8 and beyond!]

A few days ago the Silverlight team released a minor update to Beta 2, changing the version number from 2.0.30523.6 to 2.0.30523.8 in the process. The version number is part of Silverlight's install path and SilverlightDefaultStyleBrowser (background reading available here, here, and here) didn't know to look in the new location when automatically importing Styles. As such, when run on machines with the updated Silverlight bits, the list was missing Styles for the core controls like Button, ListBox, etc.. (As I discovered for myself a short while ago when I tried to use SilverlightDefaultStyleBrowser!)

I've just updated SilverlightDefaultStyleBrowser to look in all subdirectories of %ProgramFiles%\Microsoft Silverlight when starting up. Not only does this fix the current problem, but it should save me from having to do anything next time there's an update, as well! :)

The version number of SilverlightDefaultStyleBrowser always appears in the window's title and the latest release number is 1.0.3123.31689. (Note: I haven't updated the screen shot below which shows the introductory version number.) If installed via ClickOnce, the application should automatically prompt you to upgrade once it detects the update (which typically happens after running the app once or twice). If you're using the standalone EXE, you'll need to update manually.

SilverlightDefaultStyleBrowser Application

Click here or on the image above to install SilverlightDefaultStyleBrowser via ClickOnce with automatic updating.

Click here to download the standalone SilverlightDefaultStyleBrowser executable and source code in a ZIP file.

Notes:

  • On most machines it seems that the upgrade to Silverlight version 2.0.30523.8 automatically uninstalled the bits for 2.0.30523.6. However, on some machines (like one of mine!), the uninstall of 2.0.30523.6 was skipped or incomplete. So it's possible that SilverlightDefaultStyleBrowser's new behavior of importing from all directories under %ProgramFiles%\Microsoft Silverlight will import Styles from more than one version of Silverlight. To help avoid confusion - and to support multiple side-by-side installations of Silverlight in the future - I've modified the ToolTip for the ListBox items to display the path of the assembly from which that Style came. So if you see multiple Button Styles in the list, just hover over each of them to see where they came from - then pick the one that matters to you!
  • I've tweaked the ListBox item ToolTip to pop up when the mouse is over any part of the item (instead of just the Style's name). This was a simple matter of adding HorizontalContentAlignment=Stretch to the ListBoxItems via the ListBox's ItemContainerStyle property.

I'm sorry for any trouble the recent Silverlight upgrade may have caused! The good news is that this particular problem shouldn't happen again. :) And if it does, you can always use the "Add Assembly" button to manually import Styles from any file(s) you want until I get around to fixing things.

Smaller is better! [A simple step to shrink the download size of Silverlight 2 applications]

When putting content on the web, it's important to get that content to the user as quickly as possible. In general, reducing the amount of data users need to download is a big step in the right direction. As such, the XAP packaging format used by Silverlight 2 wraps everything in a single, compressed archive file that's browser-friendly. At the moment, the compression for XAP files in Beta 2 is not as efficient as it could be, and XAP files tend to be a bit larger than necessary. Until this is addressed in a future release of the Silverlight tools, here is something that's almost as good. :)

XAP files are really just standard ZIP files with a different extension, so we can use ZIP-file tools to improve the XAP situation quite easily. I wrote a simple batch file named XapReZip.cmd (contents below) that can be added to a Visual Studio 2008 Silverlight project to automatically re-compress the project's XAP file more efficiently. All you need to do is add a single command to your project's post-build events (detailed below) and from then on all your XAP files will be even smaller and quicker to download!

To demonstrate its effectiveness, I've run XapReZip against three test applications, two simple demonstration applications of mine, and the current version of two professional-grade applications you're probably already familiar with. The table below shows the starting XAP file size, the size after running XapReZip, the difference between the two, and the percent difference. (All sizes are in bytes.)

Scenario Starting Size After XapReZip Difference Reduction
New Silverlight Project 3,980 3,202 778 20%
... with DatePicker 73,228 56,513 16,715 23%
... and DataGrid 194,452 151,646 42,806 22%
HtmlTextBlock 12,360 10,312 2,048 17%
SimpleSilverlightXpsViewer 13,879 11,408 2,471 18%
NBC Olympics Video Player 789,523 615,239 174,284 22%
Line Rider 789,496 538,784 250,712 32%

Basically, you can expect to see about a 22% reduction in size for XAP files in general - slightly less for code-intensive XAPs and potentially much more for larger, richer XAPs. For example, it looks like Line Rider could shave a quarter of a megabyte off its download size without breaking a sweat - which is even more compelling given how easy it would be! :)

The complete code for XapReZip.cmd is below. As written, XapReZip assumes that Zip.exe and UnZip.exe will be located in the same directory as XapReZip.cmd (this is easy to change) and that all of the files that are part of the XAP are available in the same directory as the XAP file itself (which just happens to be true after compiling with Visual Studio or MSBuild). For the purposes of this demonstration, I've used Zip 2.32 and UnZip 5.52 from the Info-ZIP group because they're free and have a nice license. Of course, you can use whatever tools you're most comfortable with.

@REM XapReZip - Recompresses XAP files smaller

@REM Invoke as a VS post-build event like so:
@REM C:\XapReZip\XapReZip.cmd $(TargetName).xap

@echo off
setlocal

REM Define paths to zip.exe and unzip.exe
set ZIPEXE="%~p0zip.exe"
set UNZIPEXE="%~p0unzip.exe"

REM Define paths for intermediate files
set XAP=%1
set XAPDIR=%~p1
set XAPBAK=%1.bak
set XAPZIP=%1.zip

REM Output a banner message
echo XapReZip: %XAP%

REM Change to XAP file directory
pushd %XAPDIR%

REM Create new XAP file with maximum compression
%UNZIPEXE% -Z -1 %XAP% | %ZIPEXE% -@ -9 -X %XAPZIP%

REM Abort if something went wrong
if ERRORLEVEL 1 goto :DONE

REM Replace original XAP file with smaller one
copy /y %XAP% %XAPBAK% > NUL
copy /y %XAPZIP% %XAP% > NUL
del %XAPZIP%

REM Output a success message
echo XapReZip: Success

:DONE

REM Restore previous directory
popd

endlocal

Adding XapReZip to a Silverlight Project in Visual Studio is easy. Just go to the Project menu, choose Properties (it's the last item), switch to the Build Events tab, and set a post-build event command line like this: C:\XapReZip\XapReZip.cmd $(TargetName).xap. Here's what it looks like in Visual Studio:

Configuring XapReZip as a post-build event in Visual Studio

After you've set that one command, you can forget about it - XapReZip will go to work every time you recompile the application and you'll be able to run and debug it just like always. Except a little smaller. :)

So if you're eager to keep your Silverlight applications as lean as possible, consider adding XapReZip to your project. It'll probably be the easiest 22% savings you get all day!

[XapReZip.cmd]

The layout system lies have become a bit more elaborate [LayoutTransform functionality updated and enhanced for Silverlight 2 Beta 2!]

In the introductory post for LayoutTransformControl, I showed a trivial use case to demonstrate the need for LayoutTransform in some scenarios. I also noted that Silverlight 2 supports only RenderTransform, but went on to demonstrate how it was possible to use RenderTransform to get LayoutTransform behavior. I described how my LayoutTransformControl sample did just that, but implemented only RotateTransform functionality for its initial release. My impression then - as now - is that rotation is easily the most common use of LayoutTransform. However, there are plenty of scenarios where the other Transform subclasses (scale, skew, matrix, etc.) are required, and I wanted to have a solution for them as well.

So I've added full support for arbitrary transformations to LayoutTransformControl along with updating it for Beta 2! (The complete implementation - along with demo and test applications - can be found in LayoutTransformControl.cs in the attached ZIP.)

Where you might previously have written:

<local:LayoutTransformControl Angle="15">
    <TextBlock Text="I am rotated 15 degrees!"/>
</local:LayoutTransformControl>

You now write:

<local:LayoutTransformControl>
    <local:LayoutTransformControl.Transform>
        <RotateTransform Angle="15"/>
    </local:LayoutTransformControl.Transform>
    <TextBlock Text="I am rotated 15 degrees!"/>
</local:LayoutTransformControl>

Wait a second! That's more typing than before - why is this an improvement? Well, because you can also do this (just as you would on WPF):

<local:LayoutTransformControl>
    <local:LayoutTransformControl.Transform>
        <ScaleTransform ScaleX="1.5" ScaleY="2.5"/>
    </local:LayoutTransformControl.Transform>
    <TextBlock Text="I am a little wider and a lot taller!"/>
</local:LayoutTransformControl>

Or this:

<local:LayoutTransformControl>
    <local:LayoutTransformControl.Transform>
        <MatrixTransform Matrix="-1,0,0,1,0,0"/>
    </local:LayoutTransformControl.Transform>
    <TextBlock Text="I am flipped horizontally!"/>
</local:LayoutTransformControl>

Or even this:

<local:LayoutTransformControl>
    <local:LayoutTransformControl.Transform>
        <TransformGroup>
            <ScaleTransform ScaleX="1.5" ScaleY="2.5"/>
            <SkewTransform AngleX="10"/>
            <MatrixTransform Matrix="-1,0,0,1,0,0"/>
            <RotateTransform Angle="15"/>
        </TransformGroup>
    </local:LayoutTransformControl.Transform>
    <TextBlock Text="I am all of the above - and tilted, too!!"/>
</local:LayoutTransformControl>

So maybe it's a bit of an improvement, after all... :)

Naturally, I updated my sample application to show off the new capabilities:

LayoutTransformControl Sample Application

And I updated my cross-platform test suite as well (here's the WPF version):

LayoutTransformControl Test Matrix on WPF

LayoutTransformControl should now be just as powerful as WPF's LayoutTransform is. Your application can take advantage of complete LayoutTransform functionality today - even though the Silverlight platform still doesn't officially support LayoutTransform!

Notes:

  • Improvements to Silverlight in Beta 2 (vs. Beta 1) meant that I was able to remove the lesser of the two Silverlight-specific workarounds present in the Beta 1 code.
  • I removed Button from the test matrix and added two new test cases to cover scenarios where LayoutTransformControl was previously behaving incorrectly. (Unfortunately, the default Button template in Beta 2 still causes the Button to measure/arrange itself incorrectly in some cases. The existing ContentControl test cases already cover correct Button behavior, so there's no loss of coverage.)
  • In WPF, changes to the members of a Transform property (be it an individual Transform or a TransformGroup) automatically cause the Transform property's property changed handler to be invoked (even though OldValue==NewValue). This is a wonderfully elegant way to handle the situation - and unfortunately this behavior isn't present on Silverlight. So LayoutTransformControl needs a way to know when one of its Transform members has been updated and it can't rely on Silverlight to tell it. One solution is to try to create a Binding to the relevant properties of each of the members. Unfortunately, Bindings don't work on Transform-derived classes in Silverlight (my theory: because Transform derives from DependencyObject instead of FrameworkElement where the SetBinding method is implemented). So what I've done is create a set of "Ltc"-prefixed Transform-derived classes that do provide automatic notifications (but still not Binding support - due to the same Silverlight limitation, I suspect). So instead of RotateTransform, you use LtcRotateTransform and get change notifications for free. The "Ltc" Transforms have the same transformation properties (ex: Angle, ScaleX) as their counterparts, so they're simple, plug-compatible replacements - with two caveats: LtcTranslateTransform doesn't exist (because TranslateTransform has no effect during LayoutTransform), and the CenterX/CenterY properties aren't implemented (for the same reason).
  • The "Ltc" Transforms are a pretty good workaround, but you don't have to use them. If the members of the LayoutTransformControl's Transform property never change, then change notification is unnecessary and the standard Transforms can be used without issue. The code in the "Motivation" project (part of the attached solution) demonstrates this approach. If the members of the Transform property do change and you're able to use the "Ltc" transforms, then the right thing should happen automatically. The code in the "Sample" project demonstrates this approach. But if your scenario is such that the members of the Transform property do change and you're unable to use the "Ltc" Transforms, all is not lost! LayoutTransformControl exposes a public TransformUpdated method that you can call to notify it of changes to the members of its Transform property. The code for the test matrix projects uses this last approach.
  • In any kind of project where the goal is to duplicate an existing behavior, it's common to do side-by-side comparisons to find bugs in the new implementation. This is exactly what my WPF test matrix does and it helped me find and fix a number of problems during the development of LayoutTransformControl. However, there typically comes a point at which this comparison process starts revealing differences that turn out to be bugs in the reference implementation. That's usually a pretty good sign that the new implementation is approaching the same level of quality as the old one - and it's a milestone I've hit with LayoutTransformControl. In addition to the "maximal area rectangle" improvement mentioned in the original blog post, LayoutTransformControl exhibits two new, deliberate behavior differences (improvements!) from WPF's LayoutTransform implementation. They're subtle, but they can both be demonstrated in the test matrix. Let me know if you think you've found one! :)
  • The examples above assume the "local" namespace prefix has been mapped to an assembly containing the LayoutTransformControl implementation:

    xmlns:local="clr-namespace:LayoutTransformControlSample;assembly=YourAssemblyName"

My goal with LayoutTransformControl has always been to address a perceived need. It began life as a bit of an experiment, but by now I've become rather fond of the solution and plan to incorporate it into projects of my own. I hope that if you have a need for LayoutTransform behavior in Silverlight, you'll consider LayoutTransformControl, too!

[LayoutTransformControl.zip]