The blog of dlaa.me

Posts tagged "WPF"

Bringing the Silverlight Toolkit's TreeMap to WPF [Silverlight/WPF Data Visualization Development Release 0]

Now that Data Visualization is part of the Silverlight Toolkit and the WPF Toolkit, it has an official release vehicle for both platforms of interest. This is great because it means that any customers who need to be running signed bits from an official release have a place to get what they need. Of course, because the two Toolkits are not on the same ship schedule, there will probably always be a delta between them: some features or fixes that are present for one platform but not the other. Fortunately, the release cadence for the Toolkits is pretty short (on the order of months), so it won't take long for features to make their way into both releases.

But for folks who always want to be running the latest-and-greatest stuff, that wait can feel like an eternity... :) The good news is that both Toolkits are Ms-Pl open source, so anyone can migrate code between the two. (And, in fact, I made some small tweaks recently to make that even easier!) But why should everyone have to reinvent the wheel? Wouldn't it be better if one person simplified the process and shared the results with everybody? Yeah, I thought so too...


Announcing Silverlight/WPF Data Visualization Development Release 0!

The Silverlight/WPF Data Visualization Development Release is a side project of mine to make it easier for Silverlight and WPF customers to get their hands on the latest Data Visualization code for both platforms. From time to time, I plan to release a single, comprehensive ZIP file with the complete Data Visualization source code, projects for all supported platforms, a unifying solution, and pre-compiled release-mode binaries for all supported platforms (unsigned). These development releases will contain the latest internal source code changes with all the fixes and features that are in progress. Interested parties can evaluate the newest stuff and provide early feedback on what works and what's broken - feedback that can help ensure the things you care about get some love and attention.

The catch - and there's always a catch - is that I'm not committing to any kind of schedule for these releases - and they won't be as thoroughly tested as what's in the official Toolkit releases. But if that doesn't bother you, I'd love to have your feedback!


[Please click here to download the complete SilverlightWpfDataVisualization solution.]


Release Notes

  • The source code for Development Release 0 is identical to what's included with the recent Silverlight Toolkit July 09 release, so there are no new features for the Silverlight assembly. However, the WPF assembly includes the new TreeMap control and a better performing BubbleSeries! (Please see my release announcement and notes for more information about what TreeMap is and how to use it.)
  • Please remember that whenever you add a project reference to the Data Visualization assembly on WPF, you also need to add a reference to WPFToolkit.dll or you'll get weird runtime errors because the Visual State Manager (VSM) isn't available.
  • The file structure of the archive looks like this (highlighted items are files; everything else is directories):
    SilverlightWpfDataVisualization
    |   SilverlightWpfDataVisualization.sln
    +---Binaries
    |   +---Silverlight3
    |   |       System.Windows.Controls.DataVisualization.Toolkit.dll
    |   |       
    |   \---WPF35
    |           System.Windows.Controls.DataVisualization.Toolkit.dll
    |           WPFToolkit.dll
    +---Platforms
    |   +---Silverlight3
    |   |   |   Core.Silverlight3.csproj
    |   |   +---Properties
    |   |   \---Themes
    |   \---WPF35
    |       |   Core.WPF35.csproj
    |       +---Properties
    |       \---Themes
    \---SourceCode
        \---Core
            +---Charting
            |   +---Axis
            |   +---Chart
            |   +---DataPoint
            |   +---Primitives
            |   \---Series
            +---Collections
            +---Legend
            +---Properties
            +---Title
            \---TreeMap
                +---Interpolators
                \---Layout
    The pre-compiled release-mode binaries are located under the Binaries directory. All the common source code is under the SourceCode directory. Platform-specific project and source files are under the Platforms directory. The unified Visual Studio solution is in the root.
  • Design-time assemblies are not part of this release because I don't expect the target audience to make changes to them and also because they add a lot of complexity. However, if there's strong interest in having the design-time assemblies included with future development releases, I'm open to doing so.
  • I haven't updated my DataVisualizationDemos application for this unofficial release, but it's fairly easy to file-link the included TreeMap sample page into the WPF project to get those TreeMap samples running on WPF. (And that's exactly what I did to make sure TreeMap still works well on WPF!)


This whole idea of doing development releases is a bit of an experiment for me and I'm interested to see how it works out... If folks really love the idea, I'll try to do development releases more frequently. Or if it's simply too much churn for everyone to keep up with, people can always just wait for the next official Silverlight/WPF Toolkit release to come around. But however people get at it, I hope the Silverlight/WPF Data Visualization project helps customers continue to do great things with Silverlight and WPF!!

Silverlight Charting gets an update - and a TreeMap! [Silverlight Toolkit July 2009 release now available!]

We've just published the July 2009 release of the Silverlight Toolkit to help celebrate today's release of Silverlight 3! Silverlight 3 includes a wide variety of new features that significantly enhance the platform and make developing powerful applications easier than ever! The Silverlight Toolkit helps extends the Silverlight platform by offering a compelling set of additional controls to enable even more advanced scenarios. I encourage everyone to have a look at the live samples for Silverlight 2 or Silverlight 3, download the Toolkit installer, and enjoy!

Note: The Silverlight Toolkit includes support for both Silverlight 2 and Silverlight 3, so please have a look even if you're not upgrading to 3 today. :)


That said, you're probably here because what you really care about is Silverlight/WPF Charting! You may remember my last post announcing the June 2009 release of the WPF Toolkit with the first official release of WPF Charting. I'm pleased to announce that this release of Silverlight Charting is almost exactly in sync with its WPF Charting sibling! There were just two notable change that happened too late to be included with WPF Charting - they're in italics below (along with a third, very minor tweak):

Notable Changes

Included new TreeMap control! Please refer to the second half of this post for lots more about what a TreeMap is, what it's good for, and how to use it!

Improved performance of internal data structures for many common scenarios. Charting now makes use of left-leaning red-black trees to maintain properly balanced data structures. For more detail on this change, please refer to my post about the LeftLeaningRedBlackTree implementation.

Numerous bug fixes for animation inconsistencies between Silverlight and WPF. Storyboards and Animations sometimes behave a little differently on Silverlight/WPF, and a good bit of effort was spent trying to ensure that Charting will behave the same way on both platforms. In most cases, this was a matter of finding an implementation both platforms agreed on - in some it meant resorting to small, localized #if blocks.

Fixed handling of data objects with non-unique hash codes. When each data object had a unique hash code, things already worked fine. But data sets containing items sharing the same hash code could exhibit incorrect behavior in previous releases. Most typical data sets would not have encountered this problem because hash codes are nearly always unique - but there are certain classes that report quite UNunique hash codes and could trigger the problem fairly easily. This is no longer an issue.

Corrected behavior of charts at very small sizes and during animations. Some third party controls offer so-called "fluid" layout in which size changes are all animated and elements can easily shrink to a size of 0x0. This kind of environment could previously trigger layout bugs that would result in an unhandled exception from the Chart control. These issues have been fixed and dynamic layout changes are now handled seamlessly.

Improved the performance of BubbleSeries. Scenarios with many bubbles animating simultaneously could have previously exhibited some sluggishness. In this release for Silverlight we've implemented an optimization that saves a significant amount of time in such cases. Animations of BubbleSeries data changes are now considerably smoother.

Breaking Changes

IRequireGlobalSeriesIndex's GlobalSeriesIndexChanged method takes a nullable int parameter. This should affect only people who have written custom Series implementations - and the code change is a trivial.

Other Changes

Many other fixes and improvements.

  • Better handling of non-double data by shared Series
  • Addition of StrokeMiterLimit to the Polyline used by LineSeries
  • Fixes for edge case scenarios when removing a Series
  • Ability to set Series.Title with a Binding (on Silverlight 3 and WPF)
  • Automatic inheritance of the Foreground property by the Title control
  • Visual improvements to the LegendItem DataPoint marker
  • Improvement to AreaSeries default Style StrokeThickness behavior


In my earlier post about WPF Charting, I announced a new DataVisualizationDemos sample that consolidates all the Charting samples I've posted to my blog into one handy place and compiles/runs on both Silverlight and WPF. I've just updated DataVisualizationDemos for this release so it includes everything through the "Letter Frequency" sample I introduced last time, the original easing functions sample from the March 2009 release notes, my recent "Jelly Charting" demonstration, and a completely new sample:
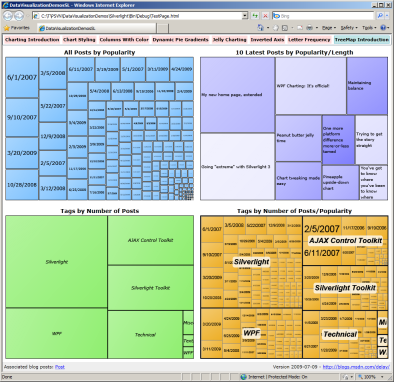
TreeMap Introduction

Click here to download the complete source code for the DataVisualizationDemos sample application.


The new sample shows off the TreeMap control that's now part of the System.Windows.Controls.DataVisualization namespace. The Wikipedia entry explains TreeMaps in detail; the executive summary is that TreeMaps are used to visualize the values of a single property (ex: team scores) across an entire data set. They do this by adjusting the size (i.e., area) of each element so items with larger values are bigger, items with smaller values are littler, and the relative proportions are correct. There are some different algorithms to do this layout; our TreeMap implements the common "squarified" algorithm.

But enough background - let's use a TreeMap to visualize some data!


To begin, imagine that we have a data set listing all the blog posts I've made and the following details for each: post date, length, tags, and relative popularity. (Aside: The popularity measure is not accurate because it's based on an incomplete set of statistics - but it's sufficient for our purposes.) Let's begin by displaying all the posts ranked by popularity - that looks like this:
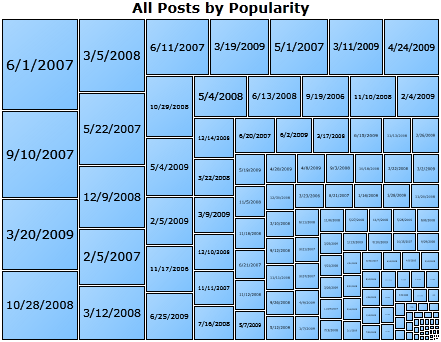
Simple TreeMap

The XAML is a tad verbose, but it's quite easy to understand:

<datavis:TreeMap
    x:Name="AllPosts"
    ItemsSource="{Binding}">
    <datavis:TreeMap.ItemDefinition>
        <datavis:TreeMapItemDefinition
            ValueBinding="{Binding Popularity}">
            <DataTemplate>
                <Grid>
                    <Border
                        BorderBrush="Black"
                        BorderThickness="1"
                        Background="#ff7fc3ff"
                        Margin="0 0 1 1">
                        <Grid Background="{StaticResource GradientOverlay}">
                            <controls:Viewbox Margin="3 0 3 0">
                                <TextBlock Text="{Binding FormattedDate}"/>
                            </controls:Viewbox>
                        </Grid>
                        <ToolTipService.ToolTip>
                            <StackPanel>
                                <TextBlock Text="{Binding Title}"/>
                                <TextBlock Text="{Binding FormattedTags}" FontStyle="Italic"/>
                                <TextBlock Text="{Binding FormattedDate}"/>
                            </StackPanel>
                        </ToolTipService.ToolTip>
                    </Border>
                </Grid>
            </DataTemplate>
        </datavis:TreeMapItemDefinition>
    </datavis:TreeMap.ItemDefinition>
</datavis:TreeMap>

We start out by creating a TreeMap and pointing it at our data set using the standard ItemsControl pattern of setting the ItemsSource property. Then we specify a TreeMapItemDefinition to describe what the items should look like and provide a Binding to identify the value we're visualizing.

At this point, you may be wondering whether there's a corresponding TreeMapItem control for each element (think ListBoxItem). Well, there is not. The reason being that TreeMaps are often used to display very large data sets with hundreds of elements - and it turns out that the overhead of having a wrapper control for each of those elements adds up quickly. So TreeMap takes the slightly different approach of allowing you to define a DataTemplate for its item (as with ItemsControl.ItemTemplate). This DataTemplate can be as simple or as complex as you'd like - and can even use a custom TreeMapItem-like control - so there's no loss of flexibility. However, there's a big win in performance: this approach is roughly four times faster!

The contents of the DataTemplate used here are pretty typical: a border around some text that's bound to the underlying data object and a helpful ToolTip to display more detail when the user mouses over the element. It's as easy as that!


Okay, let's get a little more advanced and display two values at the same time! The conventional way of showing a second value in a TreeMap is by varying the color of the items, so we'll do that. Size corresponds to popularity as before, but now we're using color saturation to visualize post length (where darker=longer):
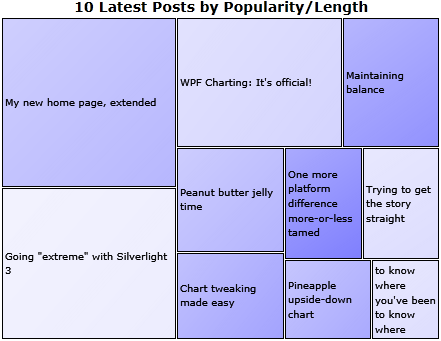
TreeMap with Interpolator

The basic TreeMap definition is basically the same as last time - the interesting part is the contents of the Interpolators collection:

...
<datavis:TreeMap.Interpolators>
    <datavis:SolidColorBrushInterpolator
        TargetName="Border"
        TargetProperty="Background"
        DataRangeBinding="{Binding Length}"
        From="#ffeeeeff"
        To="#ff8080ff"/>
</datavis:TreeMap.Interpolators>
...

What's an Interpolator? It's a new concept we've introduced for TreeMap to automatically map a particular value ("Length" in this case) to a range of something. In this case, the something is colors, so we're using SolidColorBrushInterpolator which works great for backgrounds and foregrounds. There's also DoubleInterpolator which is handy for changing opacity, font size, and things like that. And if you want to do something different, it's simple to create your own mapping by deriving from Interpolator (or RangeInterpolator<T>)!

We've purposely made SolidColorBrushInterpolator easy to use - note how it cleanly incorporates the familiar notions of Storyboard's TargetName and TargetProperty properties with ColorAnimation's From and To. The remaining property, DataRangeBinding, provides a Binding that's used to identify the relevant variable on the data objects. Once everything's in place, the Interpolator automatically interpolates each value according to where it falls in the overall range of values!

It's a simple, yet powerful concept that makes it easy to build powerful visualizations without writing any code at all. And please note that the TreeMap.Interpolators property is a collection, so you can add as many of these as you'd like in order to visualize multiple values or control multiple properties!


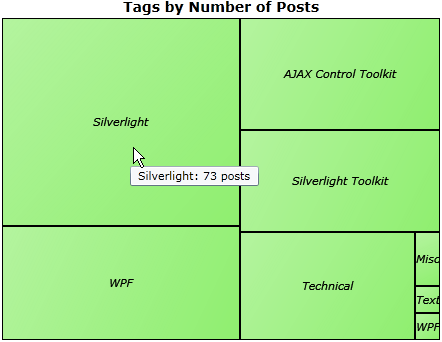
This time, instead of visualizing posts, let's visualize tags. Specifically, let's see how many posts have been tagged with each tag name (remembering that some posts have multiple tags):
TreeMap via Linq

The aggregation of per-post data into per-tag data is made easy by a simple bit of Linq that first creates a unique tag/post object for each tag/post pairing, then groups these all by tag, and finally selects them into a new collection of objects:

var blogPostsByTag = blogPosts
    .SelectMany(p => p.Tags.Select(t => new { Tag = t, Post = p }))
    .GroupBy(p => p.Tag)
    .Select(g => new BlogTag { Tag = g.Key, Posts = g.Select(p => p.Post).ToArray() });

After that, creating the TreeMap is easy - it's just a minor variation of what we've already seen.


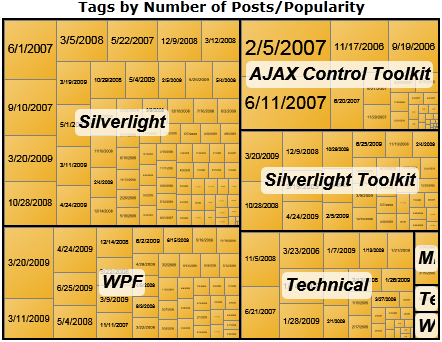
For our final trick, let's enhance the previous sample so we can see posts sorted by popularity within each tag grouping:
Nested TreeMaps

This is pretty easy to do as well - it's the previous TreeMap with copies of the first TreeMap nested inside each tag node! Nested TreeMaps? Sure! Like I said, the DataTemplate model is totally flexible. The outer TreeMap creates the bounding boxes, and the inner TreeMaps sub-divide them according to post popularity. No sweat... :)


As I hope you'll agree, the new TreeMap is a pretty cool addition to the Data Visualization assembly! And we wouldn't have it if not for the tireless efforts of the folks on the GPD-E (Global Product Development Europe) team who we partnered with to deliver this new control. In particular, all the real work was done by Cristian Costache, Marek Latuskiewicz, and Gareth Bradshaw - I mainly helped coordinate things and do a bit of testing. I'd like to extend my sincere thanks to these guys for their passion and dedication these past few weeks! Please check out their blogs for more information about TreeMap in the coming weeks! :)


PS - If you have any questions or feedback, the right places to start are the Silverlight Discussion Forum or the WPF Discussion List. Bugs and feature requests can be logged with the Silverlight Issue Tracker or the WPF Issue Tracker. Please raise issues that are clearly unique to one platform or the other in the obvious place. But for general questions and things that are common to both platforms, the Silverlight forum/list is probably a better place because there's more context and history there.

PPS - TreeMap is currently available only as part of the Silverlight Toolkit. However, it should run perfectly well on WPF; in fact, I did that as part of the testing process! Interested parties can recompile the Silverlight source code for WPF in order to start playing with TreeMaps on WPF today; the process should be pretty easy because both the Silverlight and WPF Toolkits are open source and share the same source code files/layout/etc.. However, I'll be posting more about this in the next few days and hope to have explicit directions and a script to make the entire process easy for everyone! :)

WPF Charting: It's official! [June 2009 release of the WPF Toolkit is now available!]

The WPF Toolkit team just published the June 2009 release of the WPF Toolkit. Those of you who know I'm on the Silverlight Toolkit team are probably wondering why this is relevant - so let's get right to the release notes for the next version of Silverlight/WPF Charting because they'll clear things up:


Notable Changes

WPF is now an official platform for Charting! Today's release of the June 2009 WPF Toolkit includes the binaries for WPF Charting, the associated design-time assemblies for both Visual Studio 2008 and Blend 3, and the complete source code for everything (under the usual Ms-PL license). Prior to today, WPF Charting only existed informally because of a blog post I'd written and some bits I'd shared. As of today, that "do it yourself" approach is a thing of the past - customers can get signed binaries and ready-to-build source code for Charting as part of the WPF Toolkit. And, as always, Charting exposes the same API and supports the same XAML on both platforms - making application portability trivial!

WPF Toolkit installer

Improved performance of internal data structures for many common scenarios. Charting now makes use of left-leaning red-black trees to maintain properly balanced data structures. For more detail on this change, please refer to my post about the LeftLeaningRedBlackTree implementation.

Numerous bug fixes for animation inconsistencies between Silverlight and WPF. Storyboards and Animations sometimes behave a little differently on Silverlight/WPF, and a good bit of effort was spent trying to ensure that Charting will behave the same way on both platforms. In most cases, this was a matter of finding an implementation both platforms agreed on - in some it meant resorting to small, localized #if blocks.

Fixed handling of data objects with non-unique hash codes. When each data object had a unique hash code, things already worked fine. But data sets containing items sharing the same hash code could exhibit incorrect behavior in previous releases. Most typical data sets would not have encountered this problem because hash codes are nearly always unique - but there are certain classes that report quite UNunique hash codes and could trigger the problem fairly easily. This is no longer an issue.

Corrected behavior of charts at very small sizes and during animations. Some third party controls offer so-called "fluid" layout in which size changes are all animated and elements can easily shrink to a size of 0x0. This kind of environment could previously trigger layout bugs that would result in an unhandled exception from the Chart control. These issues have been fixed and dynamic layout changes are now handled seamlessly.

Breaking Changes

IRequireGlobalSeriesIndex's GlobalSeriesIndexChanged method takes a nullable int parameter. This should affect only people who have written custom Series implementations - and the code change is a trivial.

Other Changes

Many other fixes and improvements.

  • Proper RoutedEvent support for DataPointSeries.SelectionChangedEvent
  • Better handling of non-double data by shared Series
  • Addition of StrokeMiterLimit to the Polyline used by LineSeries
  • Fixes for edge case scenarios when removing a Series
  • Ability to set Series.Title with a Binding (on Silverlight 3 and WPF)
  • Automatic inheritance of the Foreground property by the Title control
  • Visual improvements to the LegendItem DataPoint marker
  • Addition of SnapsToDevicePixels to the default Chart Template (WPF-only; unnecessary on Silverlight)

Build Notes

If you plan to recompile the WPF Toolkit from source, please be aware that two of the three Charting design-time assemblies reference Blend 3 DLLs Microsoft.Windows.Design.Extensibility.dll and Microsoft.Windows.Design.Interaction.dll. Unlike their Visual Studio counterparts, these design-time assemblies are not automatically found by the build and their absence causes 84 build errors in the Controls.DataVisualization.Toolkit.Design and Controls.DataVisualization.Toolkit.Expression.Design projects. :(

Most people won't care about building the Blend-specific design-time assemblies and can simply right-click the two failing projects in Visual Studio and choose "Unload Project". After that, everything builds successfully.

Alternatively, users with Blend installed can update these projects' references to both assemblies and then everything (including the Blend design-time assemblies!) builds successfully. The default location of the Blend assemblies is something like C:\Program Files (x86)\Microsoft Expression\Blend 3 Beta. (If you're on a 32-bit OS, remove the " x86"; once Blend releases, remove the " Beta".

Sorry for the inconvenience - we didn't want to ship pre-release Blend components with the WPF Toolkit.


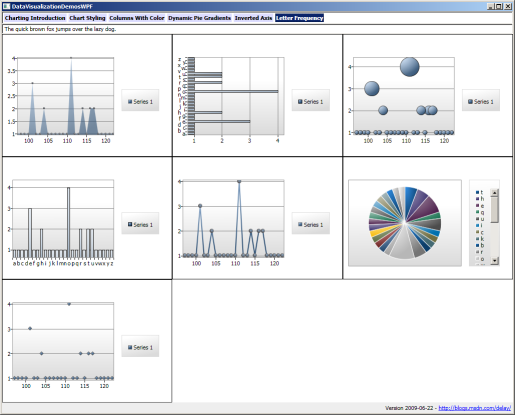
Long-time readers know that I always include some new Charting samples with my release notes to showcase new features. The big feature here is WPF Charting, so I've put together a solution that contains almost all of the public Charting samples I've ever posted to my blog - now in one handy place! Naturally, the DataVisualizationDemos sample runs on both Silverlight (2 or 3!) and WPF with the exact same code and XAML. And it includes a brand new scenario called "Letter Frequency" that I wrote to help test some of the recent changes.

Here it is on WPF:

DataVisualizationDemos Letter Frequency sample

Click here to download the complete source code for the DataVisualizationDemos sample application.

(Note: To find the blog post associated with each sample, please refer to the "My posts" section of my Charting Links collection.)


Jafar and I spent most of the previous release cycle helping other teams with their deliverables, so we didn't get as nearly much time to spend on Charting as we would have liked. [Otherwise the release notes would be much longer! :) ] Fortunately, we did make the time to deliver some good fixes for this release and that should help make customers' lives a little easier. Of course, while we've done our best to make Charting as useful and problem-free as possible, there's always room for improvement...

So if you have any questions or feedback, the right places to start are the Silverlight Discussion Forum or the WPF Discussion List. Bugs and feature requests can be logged with the Silverlight Issue Tracker or the WPF Issue Tracker. Please raise issues that are clearly unique to one platform or the other in the obvious place. But for general questions and things that are common to both platforms, the Silverlight forum/list is probably a better place - just because there's more context and history there.

A big "thank you" goes out to everyone who's worked with Charting and helped to make it what it is today! Today's release and announcement are specifically directed at the WPF early-adopters who've truly gone the extra mile to use Charting. We thank you for your dedication! Also, my personal thanks go out to the WPF Toolkit team for making this possible - in particular to Samantha Durante, Vamsee Potharaju, and Alexis Roosa for their assistance and support!


PS - If you're a loyal Silverlight Charting user who's feeling a little left out right about now, I have some good news for you, too. :) The Silverlight Toolkit will also be releasing an update fairly soon. And when it does, Silverlight Charting will contain all the fixes described here, one or two others that came in too late to make this release, AND a nice little surprise that will make the wait worthwhile...

Peanut butter jelly time [How to: Create a pleasing visual effect with Silverlight/WPF Charting]

I was recently part of an e-mail thread with Pete Brown discussing the prospects of reproducing Richard Zadorozny's cool "jelly chart" behavior with the official Silverlight/WPF Charting controls from the Silverlight Toolkit. Richard's sample is really fun to play around with - but at the core it's really just a slick user experience demo masquerading as a charting solution. The question was: how hard it would be to take a real-world charting solution and get it to masquerade as a slick user experience demo... :)

I had some particular opinions on how to go about this, and said I'd put together a quick sample to show off my approach. I was aware of this sample when we started work on Silverlight/WPF Charting and made sure that Charting supported two specific things to make this kind of behavior easy: the DataPointSeries.AnimationSequence property and the Reveal/Show VSM state. In fact, I wrote a similar sample that's been part of the public charting samples since our first release. To find it, load the samples, pick the "Column Series" page from the left-hand column, then switch to the "Animation" tab at the top. The "Custom: Grow" samples show off the basic concept - all that's missing is the easing and that's easy (no pun intended) to add via Silverlight 3's built-in support.

However, as I thought about duplicating the jelly scenario for a few moments, I realized line series would be more challenging - because the line's shape tracks the actual data values and isn't covered by a VSM animation the way its points are. Fortunately, I had another trick up my sleeve - and thus the following Silverlight 3 sample was born:


JellyCharting sample

Click here or on the image above to run the sample in your browser.

Click here to download the complete source code for the sample.

While I didn't go out of my way to duplicate every aspect of the original demo, I did try to pay homage to it. :)


My solution is a straightforward IValueConverter implementation (more background) that can be easily dropped into an existing chart to add the cool jelly behavior. For simplicity, my implementation assumes the original data is Points and uses fixed values for delays and stuff - but that's just to keep things easy to read and understand. It would be quite easy to modify or extend what I've done to flexibly support more general scenarios.

Here's the relevant code:

// IValueConverter implementation that creates a "jelly" effect for showing chart data
public class JellyConverter : IValueConverter
{
    // Converts an ICollection of Points to an ICollection of animated JellyPoints
    public object Convert(object value, Type targetType, object parameter, CultureInfo culture)
    {
        // Type-check input
        var originalPoints = value as ICollection<Point>;
        if (null == originalPoints)
        {
            throw new NotImplementedException("JellyConverter only supports value type ICollection<T>.");
        }

        // Fixed paramaters (could be set via properties or parameter)
        var duration = TimeSpan.FromSeconds(0.5);
        var delay = TimeSpan.FromSeconds(0.5);
        var ease = new ElasticEase { Oscillations = 1 };

        // Prepare Storyboard
        var count = originalPoints.Count;
        var jellyPoints = new List<JellyPoint>(count);
        var storyboard = new Storyboard();
        var propertyPath = new PropertyPath("Y");
        var i = 0;

        // For each Point...
        foreach (var originalItem in originalPoints)
        {
            // Add a corresponding JellyPoint
            var jellyPoint = new JellyPoint { X = originalItem.X, Y = 0 };
            jellyPoints.Add(jellyPoint);

            // Create an animation
            var animation = new DoubleAnimationUsingKeyFrames();
            Storyboard.SetTarget(animation, jellyPoint);
            Storyboard.SetTargetProperty(animation, propertyPath);

            // Configure the initial delay and "jelly" behavior
            var thisDelay = TimeSpan.FromSeconds(delay.TotalSeconds * ((i + 1.0) / count));
            animation.KeyFrames.Add(new LinearDoubleKeyFrame
            {
                KeyTime = thisDelay,
                Value = 0
            });
            animation.KeyFrames.Add(new EasingDoubleKeyFrame
            {
                KeyTime = thisDelay + duration,
                Value = originalItem.Y,
                EasingFunction = ease
            });

            // Add animation to Storyboard
            animation.Duration = thisDelay + duration;
            storyboard.Children.Add(animation);
            i++;
        }

        // Play the Storyboard
        storyboard.Begin();

        return jellyPoints;
    }

    // Custom Point-like class allows easy animation of Y property
    public class JellyPoint : DependencyObject, INotifyPropertyChanged
    {
        // Static X value
        public double X { get; set; }

        // Dynamic Y value
        public static readonly DependencyProperty YProperty = DependencyProperty.Register(
            "Y", typeof(double), typeof(JellyPoint), new PropertyMetadata(YPropertyChanged));
        public double Y
        {
            get { return (double)GetValue(YProperty); }
            set { SetValue(YProperty, value); }
        }
        private static void YPropertyChanged(DependencyObject o, DependencyPropertyChangedEventArgs e)
        {
            var jellyPoint = (JellyPoint)o;
            var handler = jellyPoint.PropertyChanged;
            if (null != handler)
            {
                handler.Invoke(jellyPoint, _yPropertyChangedEventArgs);
            }
        }
        private static PropertyChangedEventArgs _yPropertyChangedEventArgs =
            new PropertyChangedEventArgs("Y");

        // INotifyPropertyChanged event
        public event PropertyChangedEventHandler PropertyChanged;
    }

    // Unimplemented/unnecessary method
    public object ConvertBack(object value, Type targetType, object parameter, CultureInfo culture)
    {
        throw new NotImplementedException();
    }
}


Notes:

  • The IValueConverter works by looking at the input Point collection and replacing it with a corresponding collection of JellyPoint objects. These JellyPoint objects are special in that their Y property is a DependencyProperty and can therefore be animated by a Storyboard. Furthermore, they implement the INotifyPropertyChanged interface, so Charting automatically registers to get notifications every time the value changes. That done, a Storyboard is created to animate each of the Y values of the JellyPoints from zero to their target values in left-to-right sequence. An easing function is applied to each animation to give the desired "jelly" effect. And Charting's built-in support for dynamic data automatically does all the rest of the work!
  • Note that DataPointSeries.TransitionDuration is set to 0 so Charting knows not to try to animate each value change itself - that's what the custom Storyboard is doing, after all!
  • You can click the little thumbnail in the upper right of the chart to switch from line to column. The switch is done smoothly with a standard Storyboard - though I do register a Completed event handler so I can bring the new thumbnail to the top after the animation is done. (Recall that when two elements overlap, one of them is always on top - and that role swaps every time the thumbnail is clicked.)
  • I mentioned above that the IValueConverter shouldn't be necessary for the column sample because Charting natively supports everything that's needed - but I used the IValueConverter anyway... What gives? Well, this is one of those things where it's harder to do a sample than it would be to do the real thing... When I run the sample, I always end up clicking the "More jelly!" button like a hyperactive monkey - and Charting wasn't designed for that kind of behavior. Specifically, when the AnimationSequence property is set, the corresponding in- and out-animations are always run to completion. They each have a duration of one second, so when someone goes nuts clicking, the animations start falling behind and the visuals start to lag. Things eventually settle correctly, but I'm not very patient and I used the IValueConverter just in case there are any other click-happy folks out there.


I've always thought the original "jelly charts" sample was really well done - it was fun to reproduce it using a "real" charting package. :)

Maintaining balance [A versatile red-black tree implementation for .NET (via Silverlight/WPF Charting)]

Problem

I spent some time in my last post explaining how Silverlight/WPF Charting takes advantage of an ordered multi-dictionary to improve the performance of various scenarios. I wrote about Charting's use of a custom binary tree implementation and outlined some limitations of that algorithm and our particular implementation of it. In this post, I'm going to explain how we're addressing those limitations for the next release of Charting and share the general purpose code we're using to do it!

The fundamental problem with our current BinaryTree implementation is that offers no guarantee of balance, and can devolve into linear performance even when dealing with fairly typical data. And this isn't an implementation problem - it's an algorithmic one: if you want balancing behavior, you should really use a data structure that balances. (Duh...) One of the most popular data structures for implementing a balanced binary tree is the red-black tree. Red-black trees get their name from the colors they assign to their nodes - which they use to perform various "rotations" on the tree in order to maintain a set of invariants that guarantee the tree remains more-or-less balanced. (I'm not going to go into more detail here; the Wikipedia article is a great resource for learning more.) The "problem" with red-black trees is that they're notoriously tricky to implement correctly - especially the remove scenarios. There are a lot of special cases to deal with, and things can get messy pretty quickly...

Solution

Which is why I was so excited to read about Robert Sedgewick's research paper on "left-leaning red-black trees". (If you want something a little more colorful than a research paper, here's a presentation on the same topic.) Basically, Dr. Sedgewick took advantage of a correspondence between red-black trees and 2-3-4 trees to introduce a constraint (that red nodes must be "left-leaning") which significantly simplifies the overall implementation. This new algorithm sounded perfect for our purposes, and I spent a few bus rides developing a C# implementation of left-leaning red-black trees based on the published research.

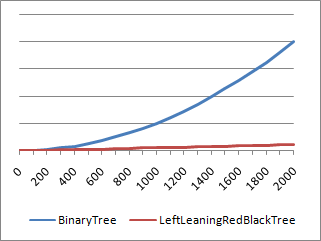
Performance comparison of up to 2000 elements

But wait! Charting needs an ordered multi-dictionary whereas red-black trees implement a standard dictionary - what gives? Well, do you remember the trick I wrote about in my binary tree post where I figured out that I could turn a standard dictionary into an ordered multi-dictionary by adding a value comparison into the mix? Good, because I've done exactly the same thing here. :)

But this time it's even a little bit better! Instead of storing "identical" nodes next "beside" each other (which is not as easy in a red-black tree), I realized that I could collapse all duplicate nodes into the same node by adding a Sibling count to the Node structure. This makes duplicate nodes really easy to deal with because the standard add and remove code stays exactly the same until the very end when it checks for siblings.

But wait - there's more. :) Because it was so easy to implement the ordered multi-dictionary Charting needed, I decided to make my LeftLeaningRedBlackTree implementation both an ordered multi-dictionary and a normal dictionary! You can choose which one you want by passing in either key+value comparison functions to the constructor (to create an ordered multi-dictionary) or just a key comparison function (to create a standard dictionary). All the class's properties and methods work exactly the same in both modes, so switching between them is easy! (To make it even easier, I've added two trivial helper methods to simplify the standard dictionary scenarios: Remove(key) and GetValueForKey(key).)

Performance

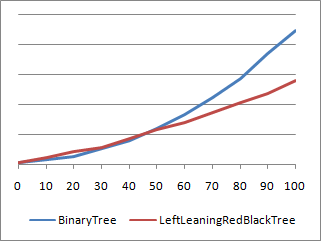
Okay, so this is all well and good, but the real question is whether LeftLeaningRedBlackTree runs faster than BinaryTree or not. Well, if you looked at the graph above comparing the elapsed time (vertical axis) of the two solutions for different node counts (horizontal axis), then you already know the answer. LeftLeaningRedBlackTree is a clear win for the tested scenario (which was sequential adds, a bunch of min/max search operations, then sequential removes - typical Charting behavior). Okay, so once you've decided that LeftLeaningRedBlackTree is a win when node counts start getting large, the next question is how the two implementations compare for low node counts. Because the scale of the previous graph is large and could be obscuring some detail in the low range, let's specifically measure the performance for small numbers of nodes:

Performance comparison focus on less than 100 elements

And there you have it: BinaryTree beats LeftLeaningRedBlackTree when the node count is close to 20. Which isn't very surprising when you think about it - for small numbers of nodes, the unbalance of BinaryTree is not yet significant enough to outweigh the overhead that LeftLeaningRedBlackTree incurs from its balancing process. But does this particular region of performance inversion really matter? Not so much - the range where BinaryTree wins is very small, the difference in timings is small, and the impact of sorting on performance at those node counts is basically insignificant. So the next version of Charting doesn't bother trying to pick the best sorting algorithm for different scenarios - it uses LeftLeaningRedBlackTree for everything. And you'll be glad it does when your node count starts growing! :)

Aside: There is a scenario where BinaryTree beats LeftLeaningRedBlackTree even at large node counts. Specifically, if the original data is already completely random, then BinaryTree naturally ends up nicely balanced as a direct consequence of that randomness - and it didn't need to spend any cycles making itself that way! LeftLeaningRedBlackTree doesn't know the data is random and spends cycles balancing itself unnecessarily. However, this performance delta between the algorithms doesn't diverge like in the charts above - LeftLeaningRedBlackTree has a consistent ~35% overhead across the board. It's been said that you never get something for nothing - and this overhead is just part of the cost of having guaranteed balancing behavior across all inputs.

Testing

Okay, so it's faster - but is it correct? Yes, I'm prepared to suggest that it is - and I happen to have a set of automated test cases to back my claim up! :) The tests I've written pick a random number of elements across randomly sized key and value spaces, add all these random pairs to the tree, make sure everything's behaving correctly, and then remove them all in random order. After each add or remove, the complete state of the entire tree is checked against a separate algorithm. And all the while LeftLeaningRedBlackTree is running its own internal code to ensure the invariants of a left-leaning red-black tree are maintained at all times.

I call this whole thing a "scenario". I've found that 100% code coverage is achieved after running just 1 or 2 scenarios; 40 scenarios is all it takes to exercise the set of problematic corner cases I've seen. Well, the automated tests run 1000 scenarios - 250 known scenarios against a normal dictionary, 250 known scenarios against an ordered multi-dictionary, 250 random ones on a normal dictionary, and 250 random ones on an ordered multi-dictionary. Whew!

Of course, no code is ever perfect - but I'm pretty happy with the level of coverage here and optimistic that it's helped squash the bugs that matter.

API

You might expect LeftLeaningRedBlackTree to implement IDictionary<TKey, TValue> - but it doesn't. However, it does have an API that strongly resembles that interface, so it should look pretty familiar. For example, Add looks exactly the same and the single-parameter form of Remove (for normal dictionary mode) is exactly the same as well. Ordered multi-dictionary mode necessitates a two-parameter form of Remove, but it's just what you'd expect. Clear and Count (via IDictionary's base class ICollection<T>) are identical as well.

However, things start to diverge a bit after that. Instead of ICollection<T> properties for Keys and Values (which may be unnecessarily costly to compute if the caller only needed a few of the elements), there are IEnumerable<T> methods GetKeys and GetValuesForAllKeys. It's the same idea, but more efficient thanks to being sequence-based! The array accessor (this[T]) is deliberately absent because it doesn't make much sense for the ordered multi-dictionary mode - I'd rather things be more explicit via Add or GetValueForKey/GetValuesForKey. The latter of those last two methods works in both modes; the first is available as a simplification for normal dictionary mode (and throws KeyNotFoundException for consistency with IDictionary implementations). ContainsKey and TryGetValue are both absent - and trivial to add if you want them. As for the rest of the IDictionary<T>/ICollection<T>/IEnumerable<T>/IEnumerable properties and methods, they either don't make sense on an ordered multi-dictionary or are easy enough to add. And finally, the API is rounded out by the MinimumKey and MaximumKey properties - specifically implemented for efficiency because Charting makes such heavy use of them.

In case that was all just a confusing jumble of class names and interfaces, here's what it looks like in code:

/// <summary>
/// Implements a left-leaning red-black tree.
/// </summary>
/// <remarks>
/// Based on the research paper "Left-leaning Red-Black Trees"
/// by Robert Sedgewick. More information available at:
/// http://www.cs.princeton.edu/~rs/talks/LLRB/RedBlack.pdf
/// http://www.cs.princeton.edu/~rs/talks/LLRB/08Penn.pdf
/// </remarks>
/// <typeparam name="TKey">Type of keys.</typeparam>
/// <typeparam name="TValue">Type of values.</typeparam>
public class LeftLeaningRedBlackTree<TKey, TValue>
{
    /// <summary>
    /// Initializes a new instance of the LeftLeaningRedBlackTree class implementing a normal dictionary.
    /// </summary>
    /// <param name="keyComparison">The key comparison function.</param>
    public LeftLeaningRedBlackTree(Comparison<TKey> keyComparison)

    /// <summary>
    /// Initializes a new instance of the LeftLeaningRedBlackTree class implementing an ordered multi-dictionary.
    /// </summary>
    /// <param name="keyComparison">The key comparison function.</param>
    /// <param name="valueComparison">The value comparison function.</param>
    public LeftLeaningRedBlackTree(Comparison<TKey> keyComparison, Comparison<TValue> valueComparison)

    /// <summary>
    /// Adds a key/value pair to the tree.
    /// </summary>
    /// <param name="key">Key to add.</param>
    /// <param name="value">Value to add.</param>
    public void Add(TKey key, TValue value)

    /// <summary>
    /// Removes a key (and its associated value) from a normal (non-multi) dictionary.
    /// </summary>
    /// <param name="key">Key to remove.</param>
    /// <returns>True if key present and removed.</returns>
    public bool Remove(TKey key)

    /// <summary>
    /// Removes a key/value pair from the tree.
    /// </summary>
    /// <param name="key">Key to remove.</param>
    /// <param name="value">Value to remove.</param>
    /// <returns>True if key/value present and removed.</returns>
    public bool Remove(TKey key, TValue value)

    /// <summary>
    /// Removes all nodes in the tree.
    /// </summary>
    public void Clear()

    /// <summary>
    /// Gets a sorted list of keys in the tree.
    /// </summary>
    /// <returns>Sorted list of keys.</returns>
    public IEnumerable<TKey> GetKeys()

    /// <summary>
    /// Gets the value associated with the specified key in a normal (non-multi) dictionary.
    /// </summary>
    /// <param name="key">Specified key.</param>
    /// <returns>Value associated with the specified key.</returns>
    public TValue GetValueForKey(TKey key)

    /// <summary>
    /// Gets a sequence of the values associated with the specified key.
    /// </summary>
    /// <param name="key">Specified key.</param>
    /// <returns>Sequence of values.</returns>
    public IEnumerable<TValue> GetValuesForKey(TKey key)

    /// <summary>
    /// Gets a sequence of all the values in the tree.
    /// </summary>
    /// <returns>Sequence of all values.</returns>
    public IEnumerable<TValue> GetValuesForAllKeys()

    /// <summary>
    /// Gets the count of key/value pairs in the tree.
    /// </summary>
    public int Count

    /// <summary>
    /// Gets the minimum key in the tree.
    /// </summary>
    public TKey MinimumKey

    /// <summary>
    /// Gets the maximum key in the tree.
    /// </summary>
    public TKey MaximumKey
}

Debugging

At this point, I'm reasonably confident that LeftLeaningRedBlackTree behaves correctly - but that wasn't always the case! :) Three particular debugging aids served me well and I'd like to call them out (Note: to enable the bottom two debugging aids, you need to uncomment the line #define DEBUGGING at the top of LeftLeaningRedBlackTree.cs):

  • The first is a standard .NET technique, but one many people don't seem to be familiar with: DebuggerDisplayAttribute. Specifically, this attribute improves the debugging experience by turning the visual representation of a node from {LeftLeaningRedBlackTree<int,int>.Node} into Key=4, Value=15, Siblings=0. Granted, it's the same information you'd get by expanding to display the node's properties, but it's automatically used in the Autos and Watch windows as well as by tooltips! What's more, this is easy to enable for any class - just provide a customized format string like this: "Key={Key}, Value={Value}, Siblings={Siblings}".
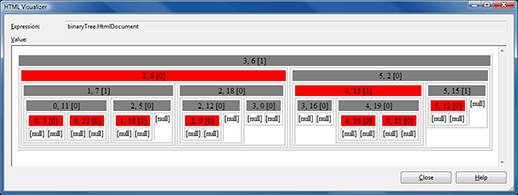
  • Both LeftLeaningRedBlackTree and its private Node class expose a string property that returns an HTML representation of the tree/node and its children. Here's what it looks like when viewed with Visual Studio's built-in "HTML Visualizer" for strings:

    HTML debugging display

    More than just a cool trick, the HtmlDocument and HtmlFragment properties are an invaluable resource for visualizing the many rotations/manipulations of the tree as it balances itself. After you've stared at this kind of stuff for a while, you start to develop a sense of what looks wrong - and this visualization makes finding algorithmic problems quite a bit easier than if the in-memory representation of the tree was all you had!

  • When enabled for debugging, the AssertInvariants method gets called at the end of every method that manipulates the tree. The purpose of this method is to ensure the basic requirements of a left-leaning red-black tree are maintained - specifically, it Asserts that the following conditions are true every time it's called:
    • Root node is black
    • Every path from the root to leaf nodes contains the same number of black nodes
    • Left node is less
    • Right node is greater
    • Both children of a red node are black
    • Nodes are always left-leaning
    • No consecutive red nodes

Summary

LeftLeaningRedBlackTree has been a fun project and I'm glad to be able to leverage it to help make significant improvements to Charting's performance for some very real customer scenarios. I'd like to extend my thanks to Dr. Sedgewick for his research in this area and express my hope that others will be able to take advantage of LeftLeaningRedBlackTree to improve the performance of their own applications. As always, if you run into any problems, please let me know - any errors here are my fault, not anyone else's! :)


[Please click here to download the source code for LeftLeaningRedBlackTree, its test application, unit tests, and the comparison project.]

You've got to know where you've been to know where you're going [Some background on Charting's ordered multiple dictionary implementation]

As I've said before, one of our key goals for the March 09 release of Silverlight/WPF Charting was to improve the performance of key customer scenarios. I didn't go into a lot of details with the release notes, but one of the ways we accomplished this was to change some code that had been doing a linear search to use a binary search instead. (Example: Finding the high/low data point values as part of the process of setting the range of an axis.) If this optimization seems obvious and makes you think "golly, they should have done it that way in the first place", you're absolutely right. :) It's not that we didn't want to do this earlier; it was just that we didn't have the resources to do so...

What we hoped to take advantage of was some already-written-and-tested class implementing an ordered multi-dictionary (a kind of associative array) that could be dropped right into the Silverlight Toolkit source code and used without concern. After we found a suitable implementation, we established that it did, indeed, improve performance on non-trivial data sets in the way that we hoped. Unfortunately, something came up at the last minute and we decided not to proceed with the code we'd been using for the previous few weeks. That left us in kind of a funk because we didn't want to give up the performance improvements we'd already seen...

So I set aside some other tasks and dashed off a quick binary tree implementation to do what we needed and preserve the performance gains from faster searching. The resulting code for BinaryTree is part of the Charting source code and can be viewed here or as part of the Silverlight Toolkit download. It's fairly simple and straightforward, though there are a few things worth calling out:

  • A binary tree (indexed by key, duplicates replace, values don't matter) doesn't follow quite the same semantics as an ordered multi-dictionary (indexed by key, duplicates do not replace, values matter). I needed to come up with an easy way to merge the two notions and the trick I came up with was to change the search function (named KeyAndValueComparison) from being key-based to being key-and-value-based. Simply by incorporating the value into the comparison, I pretty easily created a multi-dictionary (i.e., something that can store multiple values for the same key). What's more, it automatically clusters by key and orders the values under every key! The only remaining problem is what to do with key+value duplicates - and the answer is simple: store them all together in the tree. By relaxing the binary tree definition slightly to allow for same-valued nodes, it's easy enough to store identical nodes "beside" each other. The same search/remove logic still applies under the new rules - all that changes is a slight tweak to the add logic!
  • This implementation is just a simple binary tree, so there's no guarantee of balance like there is with more sophisticated algorithms. In fact, because the rules about where new nodes go are strict, there's no freedom when it comes time to place a new node. The only time there's any choice is when a key+value duplicate is added (or removed) - once the matching node in the tree is found, the new node could be added to its left or its right. In a feeble attempt to create balance, this BinaryTree implementation alternates left/right in these cases. Unfortunately, it's not likely to help much because key+value duplicates are typically not the primary scenario...
  • Because it was an easy performance win, this implementation uses an iterative add implementation (vs. the traditional recursive one). The delete operation is somewhat more complex and follows the usual recursive approach - which can be problematic for certain inputs. :( Imagine the scenario of adding 1000 elements to a BinaryTree where the keys are already in numerical order. (By the way, this isn't as unlikely as it sounds; people frequently chart data that is already sorted!) In this case, the tree will "go linear" and all the nodes will lie in a line off to the right side. Conveniently, removing the same nodes in the same order (the common scenario for Charting!) is wicked fast - the node that gets removed is always the root node which is both fast to find and fast to update. However, if one were to remove the nodes in reverse order, there's a good chance the stack would overflow instead. :( This is because the node that should be removed is at the end of a long chain of 1000 nodes and the recursive remove calls build up quickly and soon overwhelm the system. So please don't do that with this implementation!
  • One of the handy helper methods I ended up writing is Traverse which does an iterative inorder walk of the entire tree and returns a sequence of items selected by the selection function from nodes that match the comparison function. Traverse makes it easy to build more sophisticated methods - GetKeys, GetValuesForKey, and GetValuesForAllKeys are all simple 1-liners thanks to the power of Traverse. Similarly, the GetExtreme method does a binary search according to the successor function and returns some aspect of the most extreme node according to the selector function. MinimumKey, MaximumKey, MinimumValue, and MaximumValue are all simple 1-liners thanks to the flexibility of GetExtreme.
  • BinaryTree is a generic class and supports completely arbitrary key and value types. In order to avoid imposing unnecessary restrictions on the generic types (ex: that they implement the IComparable interface), BinaryTree's constructor takes a Comparison(T) delegate for comparing keys and another for comparing values. As long as you can write code to compare two keys/values of the type you've chosen according to the necessary contract, BinaryTree is happy to work with them!

So that's a bit of background on the BinaryTree class that's used by Silverlight/WPF Charting today. An unbalanced binary tree doesn't give the best performance in the world, but it was quick and easy to implement (under time pressure!) and gives a noticeable boost to many of the common scenarios we set out to improve.

And as it happens, this is all very relevant to the topic of my next post! Here's a hint; see if you can guess what it is... :)

Chart tweaking made easy [How to: Make four simple color/ToolTip changes with Silverlight/WPF Charting]

While answering a support forum question I'd seen a couple of times before, I figured it would be helpful to write a post showing how to make simple styling changes to charts created by the Charting controls that come with the Silverlight Toolkit. Note that I said simple changes - if you want to make more dramatic changes, you should go read some of the excellent tutorials Pete Brown has written on the topic. Links to Pete's posts (and other interesting posts) can be found on my latest Charting links post.


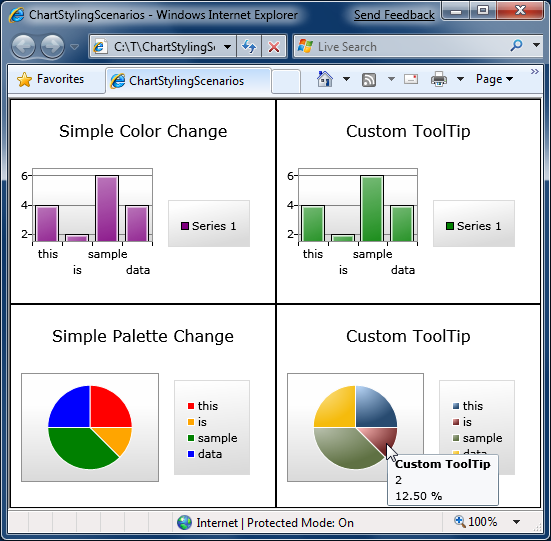
The sample application we'll be working with here shows off four scenarios and looks like this:

Styling Sample


Simple Color Change

In this scenario we have a basic Chart with a ColumnSeries and want to change the color to purple. As you'd expect, this is quite easy to do: we provide a custom Style that sets the Background color to purple and we're done!

It's worth pointing out that we could add more Setters to this Style to customize things further - but I promised I'd keep this simple, so we won't do that right now. :)

<charting:Chart
    Title="Simple Color Change">
    <charting:ColumnSeries
        ItemsSource="{Binding}"
        DependentValueBinding="{Binding Length}"
        IndependentValueBinding="{Binding}">
        <charting:ColumnSeries.DataPointStyle>
            <Style TargetType="charting:ColumnDataPoint">
                <Setter Property="Background" Value="Purple"/>
            </Style>
        </charting:ColumnSeries.DataPointStyle>
    </charting:ColumnSeries>
</charting:Chart>


Custom ToolTip (Column)

For this example, the setup is the same as last time except that now we want to change the default ToolTip that appears when the user hovers over any of the columns. As with just about every other visual default, the standard ToolTip is part of the ColumnDataPoint's default Template. So in order to customize it we start with a copy of that Template and modify it to suit our needs. Blend makes this easy, but I'm most comfortable in Visual Studio, so what we'll do here is go to the source code for ColumnDataPoint.xaml and copy the Style there to the Application.Resources section of our App.xaml.

Aside: You can also use my handy-dandy SilverlightDefaultStyleBrowser for this. What's more, SilverlightDefaultStyleBrowser works even when you don't have access to source code for the control you're styling, so it's something to keep in mind for those occasions when Blend isn't readily available. :)

Copying done, we can tweak the ToolTip to include a custom message as follows:

<ToolTipService.ToolTip>
    <StackPanel>
        <ContentControl
            Content="Custom ToolTip"
            FontWeight="Bold"/>
        <ContentControl
            Content="{TemplateBinding FormattedDependentValue}"/>
    </StackPanel>
</ToolTipService.ToolTip>

After that, and it's simply a matter of assigning our customized Style/Template to the DataPointStyle property of the ColumnSeries:

<charting:Chart
    Title="Custom ToolTip">
    <charting:ColumnSeries
        ItemsSource="{Binding}"
        DependentValueBinding="{Binding Length}"
        IndependentValueBinding="{Binding}"
        DataPointStyle="{StaticResource MyColumnDataPointStyle}"/>
</charting:Chart>


Simple Palette Change

What we've done so far will work for all of the current series except for PieSeries which is special because each of its PieDataPoints gets a unique Style. In other words, there's no DataPointStyle property on PieSeries because one value just isn't enough! Therefore, PieSeries exposes a StylePalette property just like Chart does and we can use that to provide a collection of Styles for the pie slices. (Note that we can provide as many or as few as we want; PieSeries will start at the beginning and automatically loop through the collection as necessary.)

In this case, we know our data has exactly four items, so we'll provide exactly four custom Styles to set the colors we want. Other than using a list this time around, it's just like the first example we saw:

<charting:Chart
    Title="Simple Palette Change">
    <charting:PieSeries
        ItemsSource="{Binding}"
        DependentValueBinding="{Binding Length}"
        IndependentValueBinding="{Binding}">
        <charting:PieSeries.StylePalette>
            <datavis:StylePalette>
                <Style TargetType="charting:PieDataPoint">
                    <Setter Property="Background" Value="Red"/>
                </Style>
                <Style TargetType="charting:PieDataPoint">
                    <Setter Property="Background" Value="Orange"/>
                </Style>
                <Style TargetType="charting:PieDataPoint">
                    <Setter Property="Background" Value="Green"/>
                </Style>
                <Style TargetType="charting:PieDataPoint">
                    <Setter Property="Background" Value="Blue"/>
                </Style>
            </datavis:StylePalette>
        </charting:PieSeries.StylePalette>
    </charting:PieSeries>
</charting:Chart>


Custom ToolTip (Pie)

Finally, let's customize the ToolTip for the slices of a PieSeries. Like before, we'll start by copying the default Style/Template from the source code for PieDataPoint.xaml and then customize the ToolTip found within:

<ToolTipService.ToolTip>
    <StackPanel>
        <ContentControl
            Content="Custom ToolTip"
            FontWeight="Bold"/>
        <ContentControl
            Content="{TemplateBinding FormattedDependentValue}"/>
        <ContentControl
            Content="{TemplateBinding FormattedRatio}"/>
    </StackPanel>
</ToolTipService.ToolTip>

Because we want our PieSeries to use all the same colors as the default, the next step is to copy the default StylePalette from the code for Chart.xaml and add a single Setter for the Template property of each of the Styles within. All of which point to the one Template we just customized, so if we make any changes in the future there's exactly one place we need to touch and our changes automatically shows up everywhere they should:

<datavis:StylePalette
    x:Key="MyStylePalette">
    <!--Blue-->
    <Style TargetType="Control">
        <Setter Property="Template"
                Value="{StaticResource MyPieDataPointTemplate}"/>
        <Setter Property="Background">
            <Setter.Value>
                ...
            </Setter.Value>
        </Setter>
    </Style>
    <!--Red-->
    <Style TargetType="Control">
        <Setter Property="Template"
                Value="{StaticResource MyPieDataPointTemplate}"/>
        <Setter Property="Background">
            <Setter.Value>
                ...
            </Setter.Value>
        </Setter>
    </Style>
    ...

With that out of the way, all that remains is to use our customized StylePalette by assigning it to the StylePalette property of PieSeries:

<charting:Chart
    Title="Custom ToolTip">
    <charting:PieSeries
        ItemsSource="{Binding}"
        DependentValueBinding="{Binding Length}"
        IndependentValueBinding="{Binding}"
        StylePalette="{StaticResource MyStylePalette}">
    </charting:PieSeries>
</charting:Chart>


Done!

If you've gotten this far, I hope that you've gained at least a somewhat better understanding of how to perform some basic style changes to the Toolkit's Charting controls. We've really only scratched the surface, though, so I encourage interested readers to have a look at some of the other charting links for more details, ideas, and inspiration!


[Please click here to download the source code for the sample application.]

Pineapple upside-down chart [How to: Invert the axis of a chart for "smaller is better" scenarios]

Let's imagine that we want to use Silverlight (or WPF!) to chart the performance of a book on one of those "bestsellers" lists... The book we care about has been doing very well lately; here's the corresponding data we want to display:

var items = new List<DataItem>
{
    new DataItem(new DateTime(2009, 4, 1), 10),
    new DataItem(new DateTime(2009, 4, 8),  5),
    new DataItem(new DateTime(2009, 4, 15), 2),
    new DataItem(new DateTime(2009, 4, 22), 1),
    new DataItem(new DateTime(2009, 4, 29), 1),
};

Naturally, we'll use the Charting controls that are part of the Silverlight Toolkit (and also available for WPF). :) Charting is easy to use and we quickly bang out the following XAML to create something suitable:

<charting:Chart
    FontSize="9">
    <charting:LineSeries
        ItemsSource="{Binding}"
        DependentValuePath="Place"
        IndependentValuePath="Date"
        Title="Book">
        <charting:LineSeries.DataPointStyle>
            <Style TargetType="charting:LineDataPoint">
                <Setter Property="Background" Value="Maroon"/>
            </Style>
        </charting:LineSeries.DataPointStyle>
        <charting:LineSeries.DependentRangeAxis>
            <charting:LinearAxis
                Orientation="Y"
                Minimum="0.5"
                Maximum="10.5"
                Interval="1"
                ShowGridLines="True"/>
        </charting:LineSeries.DependentRangeAxis>
    </charting:LineSeries>
</charting:Chart>

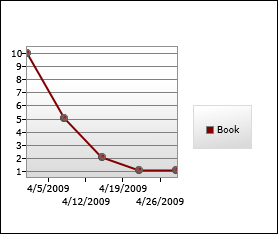
It looks like this:

Initial attempt

Hurm...

The chart is 100% correct, but there's a problem: it looks like the book is becoming less popular, not more popular. Most of us are used to assuming that "bigger/taller is better", but that's not the case for the data in this scenario and so the chart's meaning is not intuitively obvious. In the ideal world, there would be a bool Invert property on LinearAxis that you could toggle to "flip" the vertical axis and save the day. Unfortunately, we haven't yet implemented such a property (though it's on our list of things to do)...

Therefore, it looks like a clever solution is called for - and in this case the simple trick is to invert the values before charting them. After inversion, the "best" values (low numbers like 1) will be numerically greater than the "worst" values (high numbers like 10) and will therefore appear towards the top of the chart. This seems almost too easy, so let's see how it works out in practice by writing a simple IValueConverter to invert the values and then making the highlighted changes to the XAML:

public class InverterConverter : IValueConverter
{
    public object Convert(object value, Type targetType, object parameter, CultureInfo culture)
    {
        if (value is int)
        {
            return -(int)value;
        }
        throw new NotImplementedException();
    }

    public object ConvertBack(object value, Type targetType, object parameter, CultureInfo culture)
    {
        throw new NotImplementedException();
    }
}
<charting:Chart
    FontSize="9">
    <charting:LineSeries
        ItemsSource="{Binding}"
        DependentValueBinding="{Binding Place, Converter={StaticResource InverterConverter}}"
        IndependentValuePath="Date"
        Title="Book">
        <charting:LineSeries.DataPointStyle>
            <Style TargetType="charting:LineDataPoint">
                <Setter Property="Background" Value="Maroon"/>
            </Style>
        </charting:LineSeries.DataPointStyle>
        <charting:LineSeries.DependentRangeAxis>
            <charting:LinearAxis
                Orientation="Y"
                Minimum="-10.5"
                Maximum="-0.5"
                Interval="1"
                ShowGridLines="True"/>
        </charting:LineSeries.DependentRangeAxis>
    </charting:LineSeries>
</charting:Chart>

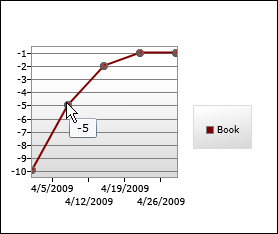
The resulting chart:

Inverted axis

Woot - the chart now clearly communicates the book's recent popularity! But the trick we played with negative numbers is plainly visible for everyone to see and they will probably mock us mercilessly. :( If only there were some way to customize the chart's visuals to hide what we've done and complete the illusion...

Wait - there is a way! All we need to do is take advantage of Charting's DataPoint.DependentValueStringFormat and LinearAxis.AxisLabelStyle properties and mix in a little of .NET's support for "Section Separators and Conditional Formatting".

[Type, type, type...]

<charting:Chart
    FontSize="9">
    <charting:LineSeries
        ItemsSource="{Binding}"
        DependentValueBinding="{Binding Place, Converter={StaticResource InverterConverter}}"
        IndependentValuePath="Date"
        Title="Book">
        <charting:LineSeries.DataPointStyle>
            <Style TargetType="charting:LineDataPoint">
                <Setter Property="Background" Value="Maroon"/>
                <Setter Property="DependentValueStringFormat" Value="{}{0:0.#;0.#}"/>
            </Style>
        </charting:LineSeries.DataPointStyle>
        <charting:LineSeries.DependentRangeAxis>
            <charting:LinearAxis
                Orientation="Y"
                Minimum="-10.5"
                Maximum="-0.5"
                Interval="1"
                ShowGridLines="True">
                <charting:LinearAxis.AxisLabelStyle>
                    <Style TargetType="charting:AxisLabel">
                        <Setter Property="StringFormat" Value="{}{0:0.#;0.#}"/>
                    </Style>
                </charting:LinearAxis.AxisLabelStyle>
            </charting:LinearAxis>
        </charting:LineSeries.DependentRangeAxis>
    </charting:LineSeries>
</charting:Chart>

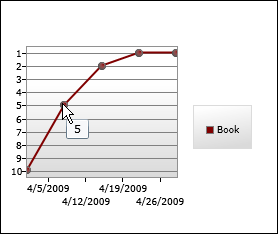
Presto:

Complete success

Success - our chart looks exactly how we want it to and we barely even broke a sweat! You can go ahead and pat yourself on the back a few times - then stop spending time imagining Charting scenarios and get back to work! :)

[Click here to download the complete source code for the sample application used to create the charts shown above.]

Trying to get the story straight [A brief summary of Storyboard differences between WPF and Silverlight]

I was investigating a Silverlight Toolkit bug this morning and got into a spirited discussion about Storyboard behavior with Jafar. We disagreed on a couple of points, so I [grudgingly :) ] coded up a quick test application to help sort things out. Unfortunately, it turns out that the situation is a little weirder than either of us realized... I knew I'd never be able to remember the specifics, so I'm documenting my findings here for everyone's benefit.

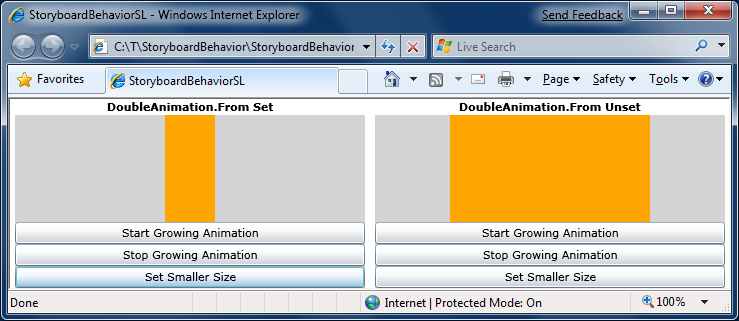
StoryboardBehavior on WPF

At the heart of the matter is the way Storyboards fit into the Silverlight/WPF property system. What's generally expected is that when a Storyboard is actively animating a property, the animation value takes precedence over the local value. It should still be possible to change the local value, but such changes shouldn't be visible until the Storyboard gives up control of the property. That said, there are a few ways in which WPF and Silverlight seem to disagree - as the following table illustrates. To help keep things clear, I've colored things green or red according to whether I believe the behavior to be correct or incorrect (respectively) based on my current understanding. (Note: All tests were performed with the default HoldEnd FillBehavior.)

Scenario WPF Silverlight 2 /
Silverlight 3 Beta
[DoubleAnimation.From specified]
  1. Start animation from value A to value B
  2. Set value C during animation
  3. Stop animation when complete
Property has value C Property has value A
[DoubleAnimation.From specified]
  1. Start animation from value A to value B
  2. Set value C after animation completes
Property has value B Property has value C
[DoubleAnimation.From not specified]
  1. Start animation from value A to value B
  2. Set value C during animation
Animation "jitters" when value C is set No "jitter"

You can experiment with these behaviors using the sample application I built for this purpose. It works quite simply: the width of the orange rectangle starts at 200 pixels and is changed by either animating it wider to 300 pixels or by directly setting it narrower to 50 pixels. The animation is performed by a 2 second Storyboard, so there's plenty of time to change things during the animation. (The relevant code is included below.)

StoryboardBehavior on Silverlight

As far as I can tell, the WPF behavior is the most correct. Granted, the animation "jitter" is visually jarring (and doesn't fit with my understanding of the property system hierarchy), but things quickly work themselves out and the final results on that platform make the most sense to me. Of course, I'll be passing all this information on to the folks who actually own this functionality and will help get bugs get opened for any behavior that turns out to be wrong. And with luck, these inconsistencies will be gone in a future release of Silverlight and/or WPF! :)


[Click here to download the StoryboardBehavior test application source code for WPF and Silverlight.]


public partial class DemoControl : UserControl
{
    public DemoControl()
    {
        InitializeComponent();
    }

    public bool SetFrom { get; set; }

    private Storyboard Storyboard
    {
        get
        {
            if (null == _storyboard)
            {
                _storyboard = new Storyboard();
                Storyboard.SetTarget(_storyboard, Indicator);
                Storyboard.SetTargetProperty(_storyboard, new PropertyPath("Width"));
                DoubleAnimation doubleAnimation = new DoubleAnimation();
                doubleAnimation.Duration = new Duration(TimeSpan.FromSeconds(2));
                if (SetFrom)
                {
                    doubleAnimation.From = 200;
                }
                doubleAnimation.To = 300;
                _storyboard.Children.Add(doubleAnimation);
            }
            return _storyboard;
        }
    }
    private Storyboard _storyboard;

    private void StartGrowingAnimation(object sender, RoutedEventArgs e)
    {
        Storyboard.Begin();
    }

    private void StopGrowingAnimation(object sender, RoutedEventArgs e)
    {
        Storyboard.Stop();
    }

    private void SetSmallerSize(object sender, RoutedEventArgs e)
    {
        Indicator.Width = 50;
    }
}

My new home page, extended [Updated collection of great Silverlight and WPF Charting resources!]

It's been a while since the March 09 release of the Silverlight Toolkit - and even longer since I last posted a collection of Charting links. It's clearly time for an update, so I've added a bunch of new links to the collection below (FYI: previously published links are gray):

Overviews (100 level)

Scenarios (200 level)

Internals (300 level)

Jafar Husain's posts (Partner level)

My posts (Ego level)

Many, many thanks to everyone who has spent time helping others learn how to use Silverlight/WPF Charting!

PS - If I've missed any good resources, please leave a comment with a link - I'm always happy to find more quality Charting content! :)