The blog of dlaa.me

Posts tagged "Technical"

No rest for the weary [Free tool and source code to temporarily prevent a computer from entering sleep mode - now available for .NET, 32-bit, and 64-bit!]

It was over a year ago that I wrote and shared the first version of my Insomnia utility. A few months later, I published a new version of Insomnia to satisfy the two most popular feature requests. Here's how I explained Insomnia's motivation at the time:

The default power settings for Windows are set up so a computer will go to sleep after 15 to 30 minutes of inactivity (i.e., no mouse or keyboard input). This is great because a computer that's not being used doesn't need to be running at full power. By letting an idle machine enter sleep mode, the user benefits from a significant reduction in electricity use, heat generation, component wear, etc.. And because sleep mode preserves the state of everything in memory, it's quick to enter, quick to exit, and doesn't affect the user's work-flow. All the same applications continue running, windows stay open and where they were, etc.. So sleep mode is a Good Thing and I'm a fan.

However, sometimes a computer is busy even though someone isn't actively using the mouse and keyboard; common examples include playing a movie, burning a DVD, streaming music, etc.. In these cases, you don't want the machine to go to sleep because you're using it - even though you're not actually using it! So most media players and disc burners tell Windows not to go to sleep while they're running. In fact, there's a dedicated API for exactly this purpose: the SetThreadExecutionState Win32 Function.

But what about those times when the computer is busy doing something and the relevant program doesn't suppress the default sleep behavior? For example, it might be downloading a large file, re-encoding a music collection, backing up the hard drive, or hashing the entire contents of the disk. You don't want the machine to go to sleep for now, but are otherwise happy with the default sleep behavior. Unfortunately, the easiest way I know of to temporarily suppress sleeping is to go to Control Panel, open the Power Options page, change the power plan settings, commit them - and then remember to undo everything once the task is finished. It's not hard; but it's kind of annoying...


I've gotten a bunch of positive feedback on Insomnia and heard from a lot of people who use it for exactly the kinds of things I expected. (Thanks, everyone!) But I've also heard from a number of people who use Insomnia for a slightly different purpose: as an override of their machine's current power settings. For one reason or another, these people don't have control over their power configuration (perhaps because their domain enforces the relevant group policy), but still want to prevent their computer from going to sleep. This is usually because they want to connect to their machine remotely (ex: via file sharing or Remote Desktop) and can't do that if the machine is forced to sleep...
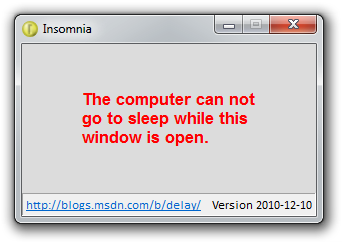
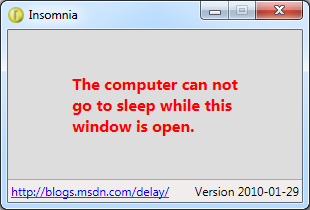
Insomnia application

These people tend to put a shortcut to Insomnia in their Startup group (click Start Menu, All Programs, Startup) and set the "Minimize" flag to automatically run Insomnia as an icon in the notification area whenever they log in. Because they leave Insomnia running all the time, their computer stays awake and they're able to use it whenever they need to. I've always thought this is a cool scenario - and felt that maybe a lower-overhead version of Insomnia would be particularly compelling here.


I wrote the original Insomnia using the .NET Framework - which meant it was super-easy to write and took practically no time or effort on my part. That's the way (uh-huh, uh-huh!) I like it, because the thing I have the least of is spare time and so anything that makes me more productive is full of win. And in my experience, .NET isn't just more productive, it's dramatically more productive.

That said, everything has a cost, and one of the common downsides of .NET is longer startup time and higher memory use. All the stuff .NET does for you (comprehensive APIs, high-level abstractions, garbage collection, etc.) takes extra time to load and extra memory to keep around. That said, I'll confidently suggest these costs are negligible in the majority of cases and the benefits of .NET (developer productivity, rich feature set, security, etc.) are overwhelmingly in its favor. But Insomnia is a little different than most programs: the application exists only as a wrapper for a single API (SetThreadExecutionState), so the people who run it all the time aren't really benefitting from the power of .NET...

Insomnia minimized to the notification area

I thought it might be fun to re-implement Insomnia in native code (vs. managed code) since it was such a simple program. I've done exactly that - and the result is that Insomnia is now available in three versions: .NET, 32-bit native, and 64-bit native!


[Click here to download all three flavors of Insomnia along with the complete source code for managed and native.]


Of course, while it was neat to do some Windows API coding for a change, the experience served to reinforce my belief in the fundamental productivity benefits of .NET and the power of the WPF/Silverlight layout system. About half the code in native Insomnia exists for the purpose of layout - which the .NET version accomplishes much more succinctly with XAML. The other half of the code handles basic framework-y stuff like creating a window, configuring it, etc. - more things WPF handles for you or makes quite convenient. And the last half of the code [ ;) ] deals with a variety of little things that are quite simple in the managed world, but require non-trivial effort in native code (ex: copying strings, setting up a complicated function call, etc.).

Please don't get me wrong; I completely agree that native code has its place in life (and there's a certain feeling of power one gets from using it). But I've had enough of that for now and will be happy to return to .NET for my next project. :)


Notes:

  • The most common question I get about Insomnia is whether it also disables the screen saver - it does not. When Insomnia is running, the screen saver will continue to kick in and turn off the monitor on its usual schedule. The difference is that the computer itself will not be allowed to enter sleep mode. Once the Insomnia window is closed, the computer can sleep again and will do so on its usual schedule.

  • The second most common question I get is why the Insomnia window stays above other windows. As I explained in the introductory post, this is so Insomnia is always visible when running and people will be less likely to accidentally leave their computers sleep-less by forgetting they've started it. This seems like the right behavior for the original "temporarily prevent sleep mode" scenario; for the "always on" scenario, minimizing Insomnia to the notification area seems to work well for everyone I've talked to.

  • My goal for the native version of Insomnia was to duplicate the functionality of the .NET version as closely as possible - not because I think the .NET version is perfect, but because it works well and it's what people are already familiar with. So while I wasn't obsessive about matching the font face and size exactly, a side-by-side comparison of the two programs shows a very strong correlation. :)

  • The one thing I didn't port from the .NET version was the "/minimize" command-line switch. Originally intended to make it easy for users to start Insomnia minimized, commenter rbirkby reminded me that Windows shortcuts already made that easy enough. It didn't seem necessary to duplicate this somewhat unnecessary feature, so I've omitted it to keep the native version just a bit simpler.

  • To start Insomnia minimized, just create a shortcut to it (right-click+drag+drop its icon somewhere (like the Start Menu / All Programs / Startup folder) then edit the shortcut's settings (right-click it and choose Properties) and choose "Minimized":
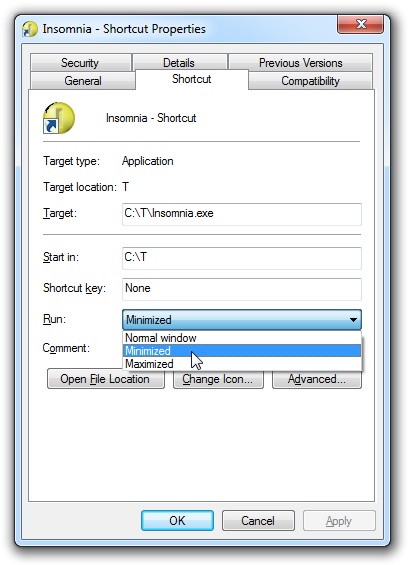
    Shortcut to start Insomnia minimized

    Alternatively, the following syntax will do the same thing from a batch file:

    start /MIN Insomnia.exe
  • Because the whole point of this exercise was to reduce Insomnia's run-time footprint, it's interesting to see how things worked out. Here's a table of the Resource Monitor statistics for each flavor as measured by opening and minimizing them all on my 64-bit Windows 7 machine:

    Flavor Commit (KB) Private (KB)
    .NET 66,972 17,940
    64-bit 2,144 1,876
    32-bit 1,652 1,332

    (Note that the .NET version uses somewhat less memory on a 32-bit version of Windows 7.)

  • Not only do the native versions of Insomnia use less memory - they start faster, too! Because they have fewer dependencies, there's simply less stuff to load from disk - and because disk access is (relatively) slow, minimizing it can do a lot to improve startup speeds.

  • Something that made life a little more pleasant for the native version was the SysLink common control - specifically its LM_GETIDEALSIZE message. This message is used to "Retrieve[s] the preferred height of a link for the control's current width." and it enabled me to approximate something kind of like WPF's measure/arrange-based layout system without having to write a bunch of code myself. So while I'd originally thought to use SysLink only for the hyperlink (duh!), I ended up using it for the version text and message as well!

  • As you'd expect, the Visual Studio solution/project for the new, native version of Insomnia uses the Visual Studio 2010 format. However, the solution/project for the original, managed version is still in the 2008 format I originally released it in (of course, opening it in VS 2010 automatically "upgrades" it).

Hash for the holidays [Managed implementation of CRC32 and MD5 algorithms updated; new release of ComputeFileHashes for Silverlight, WPF, and the command-line!]

It feels like a long time since I last wrote about hash functions (though certain curmudgeonly coworkers would say not long enough!), and there were a few loose ends I've been meaning to deal with...

Aside: If my hashing efforts are new to you, more information can be found in my introduction to the ComputeFileHashes command-line tool and the subsequent release of ComputeFileHashes versions for the WPF and Silverlight platforms.


When I first needed a managed implementation of the CRC-32 algorithm a while back, I ended up creating one from the reference implementation. Thanks to the strong similarities between C and C#, the algorithm itself required only minimal tweaks and the majority of my effort was packaging it up as a .NET HashAlgorithm. Because HashAlgorithm is the base class of all .NET hash functions, the CRC32 class ends up being trivial to drop into any .NET application that already deals with hashing.

ComputeFileHashesWPF

The Silverlight platform doesn't include an implementation of the MD5 algorithm like "desktop" .NET does, and I soon ended up creating an MD5 implementation from the reference code so I could support that algorithm on Silverlight (and now Windows Phone, too). Again, the C algorithm translated to C# fairly easily - though there's quite a lot more code for MD5 than CRC32 - and the HashAlgorithm base class makes it easy to reuse. Over the next few days, I made a couple of minor revisions to the CRC32 and MD5Managed classes, but have otherwise left things alone. I've used ComputeFileHashes successfully ever since, and things seemed to be in a pretty good state.


Then one day kind reader Maurizio contacted me (from Italy!) to report a bug in my CRC32 wrapper: there was a missing variable in a loop that could lead to problems if someone passed a non-0 value as the inputOffset parameter of TransformBlock. Fortunately, this isn't a particularly common scenario - the "primary" overload of ComputeHash doesn't do it, none of my ComputeFileHashes code does it, and most typical scenarios probably won't do it, either. That said, a bug is a bug (is a bug), and I made a note to fix it when I got a chance... And I finally had that chance last week! :)

C:\T>ComputeFileHashesCL.exe ZeroByteFile.txt

C:\T\ZeroByteFile.txt
100.0%
CRC32: 00000000
MD5: D41D8CD98F00B204E9800998ECF8427E
SHA1: DA39A3EE5E6B4B0D3255BFEF95601890AFD80709
SHA256: E3B0C44298FC1C149AFBF4C8996FB92427AE41E4649B934CA495991B7852B855
SHA384: 38B060A751AC96384CD9327EB1B1E36A21FDB71114BE07434C0CC7BF63F6E1DA274EDEBFE76F65FBD51AD2F14898B95B
SHA512: CF83E1357EEFB8BDF1542850D66D8007D620E4050B5715DC83F4A921D36CE9CE47D0D13C5D85F2B0FF8318D2877EEC2F63B931BD47417A81A538327AF927DA3E
RIPEMD160: 9C1185A5C5E9FC54612808977EE8F548B2258D31


And as long as I was already messing with the ComputeFileHashes code (which meant recompiling for each platform, re-packaging, uploading, etc.), there were a few other things I decided to take care of at the same time. And it's just as well - in the process of doing so, I discovered (and fixed) a seemingly obscure bug in MD5Managed (which I suspect has never been hit in real life). Along the way, I added the complete suite of .NET HashAlgorithms to each tool so you'll automatically get the results of every supported algorithm when you hash a file!


ComputeFileHashes has been a fun project and a nice demonstration of how .NET lets you run the same code across a wide variety of environments and platforms. And the comprehensive automated test framework I added this time around makes me feel better about the correctness of these two HashAlgorithms. I deal with hashes regularly and have found all flavors of ComputeFileHashes to be handy tools to have around - especially the Silverlight version which brings simple, lightweight, install-free hashing to nearly every machine in the world. :)


[Click here to download the complete source code for the command-line, Silverlight, and WPF implementations of ComputeFileHashes along with the new test project.]

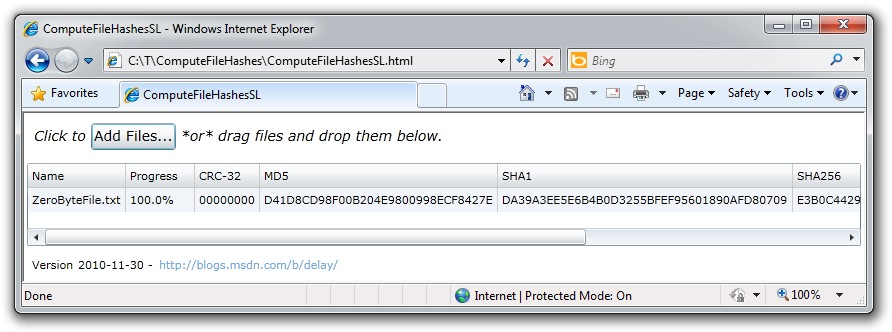
Click here or on the image below to run ComputeFileHashes in your browser with Silverlight 4:

ComputeFileHashesSL

Note: Bookmark the link above for easy access to hashing anytime, anywhere, on any machine!


Here are the major changes since last time:

  • CRC32 bug fix: HashCore was not adding the ibStart offset in its for loop. This is the issue Maurizio reported and would affect all scenarios where a non-0 value was passed for ibStart.

  • MD5Managed bug fix: MD5Update was not adding the inputIndex offset in its call to MD5Transform. This is the obscure issue found by the new test framework - in certain fairly specific circumstances (mostly around odd offsets and buffer sizes), the incorrect offset could result in an invalid hash result.

  • All supported algorithms are run on each file. Initially, only CRC32, MD5, and SHA1 were supported because they were the most common at the time and because I didn't want to waste CPU cycles on obscure algorithms that were hardly ever used. But since then, some of the "obscure" algorithms have become more common (ex: SHA256) and multi-core CPUs have become much more widespread. Because the ComputeFileHashes tools are already multi-processor friendly and because quad-processor CPUs are now commonplace, I've decided not to limit them due to CPU cycles. Most files hash instantaneously anyway, so the additional algorithms won't slow things down there; for longer files where CPU might start to dominate over disk access, the additional overhead shouldn't be that big of a deal. With this release, the bias is for convenience, and I'm optimistic that's the right tradeoff most of the time. :)

    Here's what each tool supports:

    • ComputeFileHashesCL, ComputeFileHashesWPF: CRC32, MD5, SHA1, SHA256, SHA384, SHA512, RIPEMD160
    • ComputeFileHashesSL: CRC32, MD5, SHA1, SHA256

    (Note: The Silverlight platform doesn't provide SHA384/SHA512/RIPEMD160. (And I haven't done my own implementation. (Yet...)))

  • There's a comprehensive set of automated tests for CRC32 and MD5Managed. I'd done some basic testing of this code in the past, but hadn't covered the edge cases - and a few bugs slipped by because of that. So I wanted to create a thorough automated test suite this time around and do what I could to cover all the bases.

    • The automated tests have a small library of different inputs and known-good hashes and process it in lots of different ways: all at once, in all different chunk sizes, with and without Initialize, etc.. If any of these techniques generates the wrong hash, the test suite reports the failure.
    • The new tests are thorough enough to yield 100% code coverage on both the CRC32 and MD5Managed implementations.
    • In addition to testing my CRC32 and MD5Managed classes, the automated tests also test the .NET MD5CryptoServiceProvider class - not because I expect to find errors in it, but so I can ensure both MD5 implementations behave the same in each scenario.
    • Consequently (and as a result of the more thorough coverage) CRC32 and MD5Managed now behave the same as the .NET implementations for invalid scenarios, too - all the way to exception-level compatibility for misuse of the API!
    • The only difference is for CryptographicUnexpectedOperationException which can't be constructed on Silverlight - its base class CryptographicException is thrown instead in cases where the hash value is retrieved before the process has been finalized.
  • The Visual Studio solution and project files have been upgraded to the Visual Studio 2010 format. This makes developing ComputeFileHashes in Visual Studio 2010 easy and enables the use of its new and improved feature set.

  • The CRC32/MD5Managed classes and the three ComputeFileHashes programs are now code analysis-clean for the complete Visual Studio 2010 rule set. Additional code analysis rules were introduced with VS 2010 and they reported some new violations in the code. These have all been fixed (or suppressed where appropriate).

  • The namespace of the CRC32 and MD5Managed classes has been changed to "Delay". This change brings these classes inline with the rest of the sample code I publish and makes their generality a bit clearer.

  • ComputeFileHashesCL remains a .NET 2.0 application for maximum versatility. By targeting .NET 2.0, ComputeFileHashesCL runs nearly everywhere .NET does.

  • ComputeFileHashesWPF is now a .NET 4 application for compactness and ease of distribution. ComputeFileHashesWPF used to have a dependency on the WPFToolkit for its DataGrid control. Because that control is part of the .NET 4 Framework, the new ComputeFileHashesWPF no longer depends on any non-Framework assemblies and can be distributed as a single file.

  • ComputeFileHashesSL is now a Silverlight 4 application to make use of new features in that platform. Most notably, ComputeFileHashesSL uses Silverlight's drag+drop support to enable the handy scenario of dragging a file directly from Windows Explorer and dropping it onto the ComputeFileHashesSL window to hash it (just like ComputeFileHashesWPF already supported). Additionally, I'm making use of my SetterValueBindingHelper class to use Bindings in a Setter and create the same ToolTip experience that ComputeFileHashesWPF already had: hovering over a hash failure shows the reason for the failure (typically because the file was locked by another process). Consequently, the "Details" column is no longer necessary in ComputeFileHashesSL and has been removed.

  • The ClickOnce flavor of ComputeFileHashesWPF is no longer supported. With ComputeFileHashesSL's functionality getting closer to that of ComputeFileHashesWPF and the elimination of the WPFToolkit.dll dependency from ComputeFileHashesWPF, the need for a ClickOnce install seems minimal and has been removed.

  • The version number has been updated to 2010-11-30.

"Silence is the virtue of fools." [Why the Windows Phone 7 Emulator can sometimes take forever to access the network - and how to fix it!]

If you've used the Windows Phone 7 emulator to access the network, you might have noticed that in some environments it takes an absurdly long time for network activity to complete. For example, a single HTTP request with Internet Explorer or an HttpWebRequest from a custom Silverlight application can take upwards of 20-30 seconds to complete - even when the remote server responds immediately.

Now, a lot of you probably haven't experienced this problem and have no idea what I'm talking about - but I bet those of you who have are eager for a solution! I had to deal with this myself, and I know it makes developing a network-oriented application exceedingly frustrating...

Fortunately, there's a fix! :)


The Cause

I got so tired of the delays one evening, I decided to install Microsoft's Network Monitor (AKA NetMon) so I could look at what was happening at the network level. (Aside: Network Monitor is a fantastic tool for sniffing packets. Another great program (which works cross-platform) is Wireshark.) So I ran a new instance of the emulator, started the trace, and opened IE (which navigated to its default page). The problem was immediately evident from the timestamps (the left-most column below) and the nature of the traffic:

15.2837914  DNS:QueryId = 0xE7D1, QUERY (Standard query), Query  for go.microsoft.com of type Host Addr on class Internet
15.2838039  DNS:QueryId = 0xD4AE, QUERY (Standard query), Query  for go.microsoft.com of type AAAA on class Internet
15.3120594  DNS:QueryId = 0xE7D1, QUERY (Standard query), Response - Success, 64.4.11.160, 96.6.112.198
16.2787382  DNS:QueryId = 0xD4AE, QUERY (Standard query), Query  for go.microsoft.com of type AAAA on class Internet
17.2787318  DNS:QueryId = 0xD4AE, QUERY (Standard query), Query  for go.microsoft.com of type AAAA on class Internet
19.2787138  DNS:QueryId = 0xD4AE, QUERY (Standard query), Query  for go.microsoft.com of type AAAA on class Internet
23.2788677  DNS:QueryId = 0xD4AE, QUERY (Standard query), Query  for go.microsoft.com of type AAAA on class Internet
27.2923071  DNS:QueryId = 0x91B, QUERY (Standard query), Query  for go.microsoft.com of type AAAA on class Internet
28.2888689  DNS:QueryId = 0x91B, QUERY (Standard query), Query  for go.microsoft.com of type AAAA on class Internet
29.2888390  DNS:QueryId = 0x91B, QUERY (Standard query), Query  for go.microsoft.com of type AAAA on class Internet
31.2889078  DNS:QueryId = 0x91B, QUERY (Standard query), Query  for go.microsoft.com of type AAAA on class Internet
35.2889120  DNS:QueryId = 0x91B, QUERY (Standard query), Query  for go.microsoft.com of type AAAA on class Internet
39.3462453  HTTP:Request, GET /fwlink/, Query:LinkID=192163

The trace above is just a snippet; the total time taken from when IE began its navigation until the (very basic) page had completely loaded was 182 seconds, or just over three minutes!


Looking a little closer, we see that Windows Phone 7 (and/or the emulator) sends out two DNS queries for the IP address of the go.microsoft.com server corresponding to the IE home page URL. The IPv4 query returns immediately, but there's no response to the IPv6 query. At this point, two things are going wrong:

  1. Windows Phone 7 has received a valid IPv4 response to its DNS query and could proceed with the HTTP request. But it doesn't... Instead, it delays everything waiting for an IPv6 reply to its query - and eventually times out (presumably) after about 25 seconds. While I'm not aware of a specification that covers this scenario, it just plain seems wrong. If the network stack prefers to have an IPv6 address "on file", that's fine - but there seems to be no need to delay everything waiting for it. A better approach might be to proceed with the current transaction using the valid IPv4 address that's already been returned - then switch to the IPv6 address later on if/when it becomes available.

  2. The DNS server should reply to the IPv6 query with either a valid response or an error code - and not ignore it as though nothing happened. In this case, the DNS server happens to be my DSL modem, which I suspect knows nothing about IPv6 and is therefore unable to return a valid IPv6 address. However, that's no excuse for ignoring the IPv6 queries - according to my reading of RFC1035, it should respond to these queries with a "Format error" response code (or similar). If it did, Windows Phone 7 would presumably process the failure and move on with its life instead of hanging around waiting for a reply that never shows up...


This trace also explains why some people experience the slowness and others don't - if the IPv6 query gets a reply (instead of timing out), the network transaction proceeds immediately. So if you're fortunate enough to have a well-mannered DNS server (as I am at work), you'll be fine. But if you're unfortunate enough to have a poorly-mannered DNS server (as I am at home), you'll be spending a lot of time twiddling your thumbs waiting for the network...


The Fix

Fortunately, there's an easy fix: get a better DNS server! :) Either reconfigure your (or your company's) DNS server, upgrade its firmware, or flat-out replace the darn thing and you'll be set. Unfortunately, most people don't have a lot of control over the networking hardware/configuration they're using - or maybe they're just not eager to mess with this stuff. No problem - there's another fix: swap out the DNS server your computer is using for one that works better!

But where can you find a better DNS server? As it happens, there are a number of free DNS options already out there, just waiting to be utilized! The most well-known might be OpenDNS, but there are others like Google Public DNS, etc.. In my experience, OpenDNS and Google Public DNS both handle the IPV6 DNS request immediately - just like we want. So all you need to do is point your computer to one of these DNS servers, and things should work better!


The Details

By default, most home computers get their DNS server address via DHCP from their router or modem. So you could change the DNS server address in the router/modem configuration and that ought to work fine. However, you might not have access/permission for that - and besides it would affect everything else on the network. Unless you're a network administrator, this path may be more trouble than it's worth...

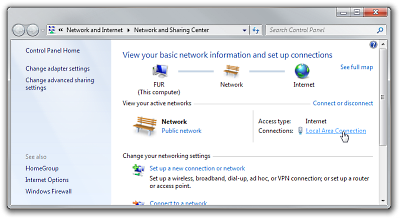
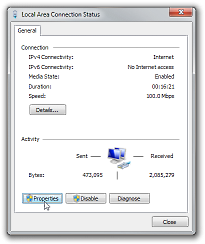
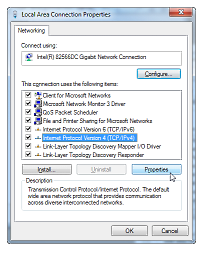
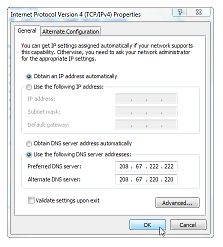
The good news is there's an easy way to change the DNS settings for a computer's network connection within Windows - and it's even easier to automate! To make this change in the UI, open the Network and Sharing Center (either via the Start Menu or the Control Panel or right-clicking the network icon in the system tray), click on the active network adapter (typically "Local Area Connection" or "Wireless Network Connection", click the Properties button in the lower left of the dialog, click the "Internet Protocol Version 4 (TCP/IPv4)" item, click the Properties button below it, select the "Use the following DNS server addresses", type the IP addresses of the "Preferred DNS server" and "Alternate DNS server", and hit OK/Close a bunch of times. To undo the change, repeat those steps, but choose "Obtain DNS server automatically" instead at the last step.

Step 0 Step 1 Step 2 Step 3


Okay, the UI approach may be pretty, but it's hardly efficient. :) If you're going to do this more than a couple of times, you may want use (or customize) one of one of the following scripts I've written based on the Windows netsh utility and the IP addresses from the corresponding Wikipedia entries (please don't forget to change the adapter name if you're using a wireless connection):

D:\T>type DNS-OpenDNS.cmd
@echo off
netsh interface ipv4 add dnsservers "Local Area Connection" 208.67.222.222 index=1
netsh interface ipv4 add dnsservers "Local Area Connection" 208.67.220.220 index=2
netsh interface ipv4 show dnsservers

D:\T>type DNS-GooglePublicDNS.cmd
@echo off
netsh interface ipv4 add dnsservers "Local Area Connection" 8.8.8.8 index=1
netsh interface ipv4 add dnsservers "Local Area Connection" 8.8.4.4 index=2
netsh interface ipv4 show dnsservers

D:\T>type DNS-Default.cmd
@echo off
netsh interface ipv4 delete dnsservers "Local Area Connection" all
netsh interface ipv4 show dnsservers

D:\T>

To run one of these scripts, open a Command Prompt with administrative privileges (right-click "Command Prompt" on the Start Menu and pick "Run as administrator") and run the appropriate script. It'll tell you a bit about what it has done and the changes will take effect immediately (i.e., there's no need to reboot). (For what it's worth, the underlying configuration changes made by the two methods I've discussed should be exactly the same, so you could even use the command-line to enable a custom DNS and then use the UI to disable it!)

Personally, I tend to make this switch just before I start working with the Windows Phone emulator - and then switch back to the default configuration when I'm done. Theoretically, I could run my development machine with a custom DNS all the time, but then it wouldn't be configured the same as the rest of the household and I worry that could trip me up some day long after I've forgotten about any of this. But personal issues aside, I encourage people to switch as often or rarely as they'd like. :)


The Benefits

Returning to the IE home page example from earlier, let's take a new trace after configuring a custom DNS:

2.7696164  DNS:QueryId = 0x4E64, QUERY (Standard query), Query  for go.microsoft.com of type AAAA on class Internet
2.8465201  DNS:QueryId = 0x4E64, QUERY (Standard query), Response - Success,
2.8590985  DNS:QueryId = 0xE75, QUERY (Standard query), Query  for go.microsoft.com of type Host Addr on class Internet
2.8678965  DNS:QueryId = 0x64D2, QUERY (Standard query), Query  for go.microsoft.com of type AAAA on class Internet
2.9341095  DNS:QueryId = 0xE75, QUERY (Standard query), Response - Success, 54, 0
2.9441158  DNS:QueryId = 0x64D2, QUERY (Standard query), Response - Success,
3.0086106  HTTP:Request, GET /fwlink/, Query:LinkID=192163

Yup, that's looking much better! To be fair, it's not clear to me why there's a duplicate query for the IPv6 address, but even with three queries (vs. two), it still manages to get the initial HTTP request sent in less than a quarter of a second. Stepping back and looking at the time taken by the entire transaction, it now completes in just under 5 seconds - less than 3% of the original time!


With a custom DNS in place, my frustration developing network applications for Windows Phone 7 went away and I was able to spend my time coding instead of waiting. I'm guessing the underlying DNS server problem that causes these long delays isn't super pervasive (or else they would have fixed the Windows Phone 7 emulator and/or Windows Phone OS by now), but I've also got to imagine I'm not the only one who's affected by this problem. So if you've ever wondered what in the world is taking so long, maybe your DNS server is the problem - and now you know how to fix it! :)

If they build it, I will come (and link to it) [WPPFormatter plug-in now available for TextAnalysisTool.NET]

I went public with TextAnalysisTool.NET a few years back - it's a handy tool for interactive log file analysis that's popular with people in many parts of the company. The introductory post has more background and detail, but this snippet from the README gives an overview:

The Problem: For those times when you have to analyze a large amount of textual data, picking out the relevant line(s) of interest can be quite difficult. Standard text editors usually provide a generic "find" function, but the limitations of that simple approach quickly become apparent (e.g., when it is necessary to compare two or more widely separated lines). Some more sophisticated editors do better by allowing you to "bookmark" lines of interest; this can be a big help, but is often not enough.

The Solution: TextAnalysisTool.NET - a program designed from the start to excel at viewing, searching, and navigating large files quickly and efficiently. TextAnalysisTool.NET provides a view of the file that you can easily manipulate (through the use of various filters) to display exactly the information you need - as you need it.

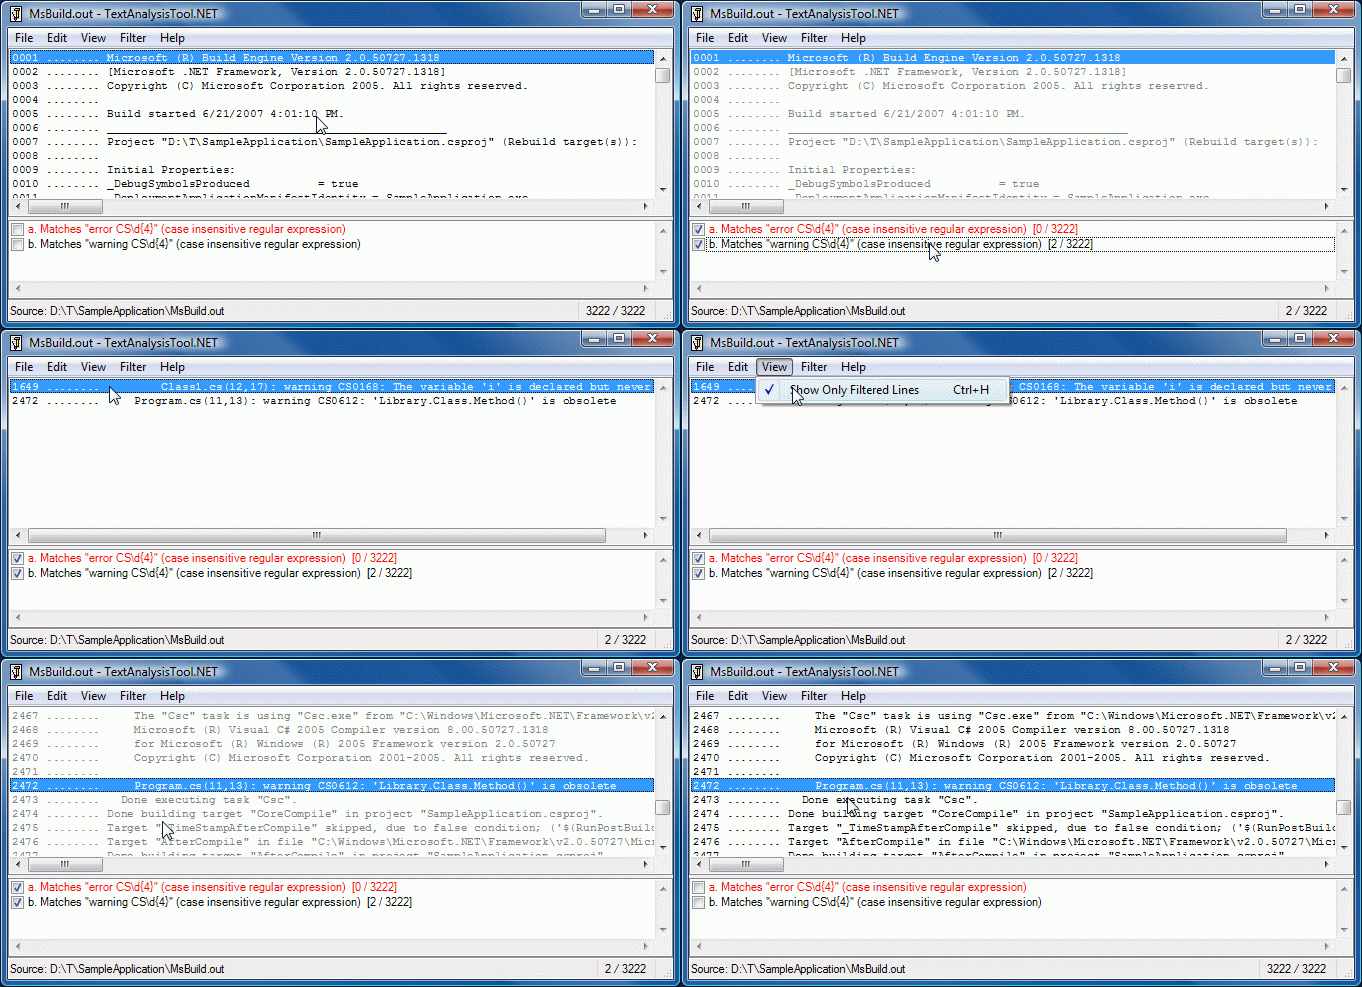
And here's an animated GIF showing TextAnalysisTool.NET working with some MSBuild output:

TextAnalysisTool.NET demonstration


I don't talk about it in the introductory post, but one of the things TextAnalysisTool.NET supports is a flexible plug-in architecture for handling custom file formats. Here's what the included documentation says:

TextAnalysisTool.NET's support for plug-ins allows users to add in their own code that understands specialized file types. Every time a file is opened, each plug-in is given a chance to take responsibility for parsing that file. When a plug-in takes responsibility for parsing a file, it becomes that plug-in's job to produce a textual representation of the file for display in the usual line display. If no plug-in supports a particular file, then it gets opened using TextAnalysisTool.NET's default parser (which displays the file's contents directly). One example of what a plug-in could do is read a binary file format and produce meaningful textual output from it (e.g., if the file is compressed or encrypted). Another plug-in might add support for the .zip format and display a list of the files within the archive. A particularly ambitious plug-in might translate text files from one language to another. The possibilities are endless!


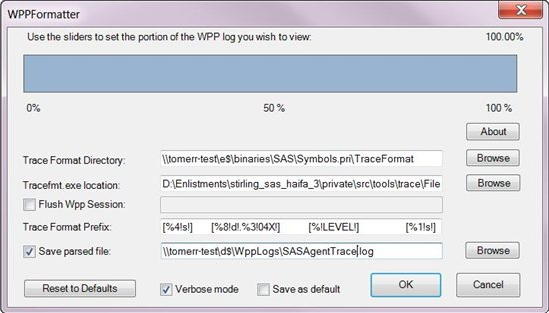
Over the years, I've been contacted by various people wanting to use the plug-in architecture to add support for specialized file formats. One of those people is Tomer Rotstein who recently released a WPPFormatter plug-in. (If the acronym "WPP" isn't familiar to you, you might start by reading the Windows software trace preprocessor entry on Wikipedia - it's the file format used by the event tracing infrastructure in Windows.) But Tomer has gone above and beyond what I ever had in mind - as you can see from the following screen shot of WPPFormatter's "open file" dialog:

WPPFormatter demonstration

I encourage people to read Tomer's post to get a full sense of what WPPFormatter does. There's a download link at the end of that post, so please try it out if it seems useful!


And for those of you who aren't already TextAnalisisTool.NET users, please:

[Click here to download the latest version of TextAnalysisTool.NET.]


Aside: Tomer's accomplishment is even more notable when you realize that TextAnalysisTool.NET was the first .NET application I ever wrote and that it targets .NET 1.1 - from a time before there were generics, extensibility frameworks, and all the other goodness we've come to take for granted! Truth be told, the plug-in model for TextAnalysisTool.NET is downright wacky in some ways, so I congratulate Tomer on succeeding in spite of my goofy design. :)

The source code IS the executable, RTM edition [Updated CSI, a C# interpreter (with source and tests) for .NET 4 RTM]

CSI is a simple C# interpreter and has been available for .NET 1.1, 2.0, 3.0, and 3.5 for a while now. Earlier this year, I updated CSI for .NET 4 Beta 2, and now I've (somewhat belatedly) updated it for the final, public .NET 4 Framework. Today's post is mainly about getting an official .NET 4 RTM-compiled build of CSI released, so there aren't any functional changes to the tool itself.

FYI: I have a TODO list and there are some interesting things on it - it's just that none of them seemed particularly urgent.

The links above explain what CSI is and how it works; the executive summary is that CSI offers an alternative to typical CMD-based batch files by enabling the use of the full .NET framework and stand-alone C# source code files for automating simple, repetitive tasks. It accomplishes that by compiling source code "on the fly" and executing the resulting assembly behind the scenes. The benefit is that it's easy to represent tasks with a simple, self-documenting code file that leaves no need to worry about compiling a binary, trying to keep it in sync with changes to the code, or tracking project files and remembering how to build everything.


[Click here to download CSI for .NET 4.0, 3.5, 3.0, 2.0, and 1.1 - along with the complete source code and test suite.]


Notes:

  • The copy of CSI.exe in the root of the download ZIP is now the .NET 4 version because that's the latest public .NET Framework. Previous versions of CSI can be found in the Previous Versions folder: CSI11.exe, CSI20.exe, CSI30.exe, and CSI35.exe.
  • As with the previous release, I have not re-compiled the .NET 1.1 version, CSI11.exe - largely because I don't have .NET 1.1 installed anywhere. :)


Here's the "read me" file for a slightly better idea of how CSI works:

====================================================
==  CSI: C# Interpreter                           ==
==  David Anson (http://blogs.msdn.com/b/delay/)  ==
====================================================


Summary
=======
CSI: C# Interpreter
     Version 2010-06-07 for .NET 4.0
     http://blogs.msdn.com/b/delay/

Enables the use of C# as a scripting language by executing source code files
directly. The source code IS the executable, so it is easy to make changes and
there is no need to maintain a separate EXE file.

CSI (CodeFile)+ (-d DEFINE)* (-r Reference)* (-R)? (-q)? (-c)? (-a Arguments)?
   (CodeFile)+      One or more C# source code files to execute (*.cs)
   (-d DEFINE)*     Zero or more symbols to #define
   (-r Reference)*  Zero or more assembly files to reference (*.dll)
   (-R)?            Optional 'references' switch to include common references
   (-q)?            Optional 'quiet' switch to suppress unnecessary output
   (-c)?            Optional 'colorless' switch to suppress output coloring
   (-a Arguments)?  Zero or more optional arguments for the executing program

The list of common references included by the -R switch is:
   System.dll
   System.Data.dll
   System.Drawing.dll
   System.Windows.Forms.dll
   System.Xml.dll
   PresentationCore.dll
   PresentationFramework.dll
   WindowsBase.dll
   System.Core.dll
   System.Xml.Linq.dll
   Microsoft.CSharp.dll
   System.Xaml.dll

CSI's return code is 2147483647 if it failed to execute the program or 0 (or
whatever value the executed program returned) if it executed successfully.

Examples:
   CSI Example.cs
   CSI Example.cs -r System.Xml.dll -a ArgA ArgB -Switch
   CSI ExampleA.cs ExampleB.cs -d DEBUG -d TESTING -R


Notes
=====
CSI was inspired by net2bat, an internal .NET 1.1 tool whose author had left
Microsoft. CSI initially added support for .NET 2.0 and has now been extended
to support .NET 3.0, 3.5, and 4.0. Separate executables are provided to
accommodate environments where the latest version of .NET is not available.


Version History
===============

Version 2010-06-07
Update .NET 4 (RTM) version
Make .NET 4 version primary

Version 2010-01-04
Add .NET 4 (Beta 2) version
Minor updates

Version 2009-01-06
Initial public release

Version 2005-12-15
Initial internal release

If found, please return to... [Using XAML to create a custom wallpaper image for your mobile device]

Background

These days it seems like everybody has a mobile device with them practically all the time. It's pretty amazing that we're able to be "always connected" - technology has made great progress! However, humankind hasn't changed nearly as quickly, and occasional forgetfulness is still a part of everyone's life. :) So it's fairly common that someone forgets their device in a meeting room, drops it out of their pocket on the bus, or otherwise misplaces it. What's to be done?

Well, there are all kinds of high-tech approaches like GPS location services, network-based tracking, and the like. But sometimes a low-tech solution works, too! In particular, just slapping a label with your name and phone number on the back is probably enough to get a lost device returned when someone finds it. But that's really low-tech - and besides, some people don't want to mar the shiny surface of their pretty hardware with stickers, etchings, and the like...


One solution

I propose a mid-tech approach. It begins with the observation that most mobile devices allow you to customize the default wallpaper image. Because "pixels is pixels", it's clear the custom wallpaper image could include text - and that text is perfect for our purposes! Creating a custom wallpaper is quite easy and leads to a nice, attractive experience like this:

Custom wallpaper on an iPod touch

The example above uses an iPod touch (it's an iPhone without the phone), but the concept applies to any device that allows you to customize the login screen wallpaper (even laptops!).


One implementation

Creating a custom wallpaper can be done in lots of different ways. For the purposes of this exercise, I wanted complete control over the layout, high quality graphics, and a flexible, hierarchical, vector-based approach. The answer was obvious: XAML! :)

So I created a simple WPF application and added some scaffolding to represent the size of the device and the placement of its UI overlays. (Aside: I could have used Silverlight, too; WPF seemed like it might make the image capture step a smidge easier.) With that framework in place, it was easy to create the custom content you see here with an image, some layout containers, and some text. The resulting MobileDeviceHomeScreenMaker application looks like this (and I mean exactly like this: no title, no borders, etc.):

Custom wallpaper application

From there, it's easy to get the custom wallpaper onto the device:

  1. Left-click on the MobileDeviceHomeScreenMaker window to hide the overlays
  2. Press Alt+Print Screen to copy the foreground window to the clipboard
  3. Paste it into your favorite graphics program (I used Windows Paint)
  4. Save the image to a file (I used the lossless PNG format)
  5. Transfer that image to the device (with a dedicated sync program, by surfing to it on the web, etc.)
  6. Tell the device to use the custom image as its wallpaper (in the settings app, from the photo viewer, etc.)

It's really that easy! All that's left is to...

[Click here to download the complete MobileDeviceHomeScreenMaker .NET 4 application as a Visual Studio 2010 solution.]


The XAML

<!--
MobileDeviceHomeScreenMaker
http://blogs.msdn.com/delay/
-->

<Window x:Class="MobileDeviceHomeScreenMaker.MainWindow"
        xmlns="http://schemas.microsoft.com/winfx/2006/xaml/presentation"
        xmlns:x="http://schemas.microsoft.com/winfx/2006/xaml"
        Title="MobileDeviceHomeScreenMaker"
        SizeToContent="WidthAndHeight"
        ResizeMode="NoResize"
        WindowStyle="None"
        WindowStartupLocation="CenterScreen"
        Background="Black">

    <!-- Frame -->
    <Grid Height="480" Width="320">
        <Grid.RowDefinitions>
            <RowDefinition Height="116"/>
            <RowDefinition Height="*"/>
            <RowDefinition Height="96"/>
        </Grid.RowDefinitions>

        <!-- Instructional ToolTip -->
        <ToolTipService.ToolTip>
            <ToolTip>
                <StackPanel>
                    <TextBlock Text="Left-click toggles overlay"/>
                    <TextBlock Text="Right-click closes window"/>
                    <TextBlock Text="Alt-PrintScreen captures"/>
                </StackPanel>
            </ToolTip>
        </ToolTipService.ToolTip>

        <!-- Overall background -->
        <Grid.Background>
            <ImageBrush
                ImageSource="C:\Users\Public\Pictures\Sample Pictures\Tulips.jpg"
                Stretch="UniformToFill"
                Opacity="0.9"/>
        </Grid.Background>

        <!-- Top and bottom overlays -->
        <Label
            x:Name="TimeOverlay"
            Grid.Row="0"
            Background="#80808080"
            Content="Time"
            HorizontalContentAlignment="Center"
            VerticalContentAlignment="Center"
            Foreground="White"
            FontSize="40"
            FontWeight="Bold"/>
        <Label
            x:Name="SlideOverlay"
            Grid.Row="2"
            Background="#80808080"
            Content="Slide"
            HorizontalContentAlignment="Center"
            VerticalContentAlignment="Center"
            Foreground="White"
            FontSize="40"
            FontWeight="Bold"/>

        <!-- Container for content -->
        <Grid
            Grid.Row="1">

            <Grid
                HorizontalAlignment="Center"
                VerticalAlignment="Center">
                <StackPanel
                    TextBlock.Foreground="White"
                    TextBlock.FontSize="16"
                    TextBlock.FontFamily="Segoe UI Light"
                    TextOptions.TextHintingMode="Fixed"
                    TextOptions.TextRenderingMode="Grayscale">
                    <StackPanel.Effect>
                        <DropShadowEffect
                            BlurRadius="2"
                            ShadowDepth="1"
                            RenderingBias="Quality"/>
                    </StackPanel.Effect>
                    <TextBlock
                        Text="mobile user"
                        FontSize="28"
                        FontFamily="Segoe UI Semibold"/>
                    <Grid Height="12"/>
                    <TextBlock
                        Text="mobile.user@example.com"/>
                    <Grid Height="12"/>
                    <TextBlock
                        Text="+1 (555) 555-5555"/>
                    <Grid Height="12"/>
                    <TextBlock
                        Text="One Mobile Way"/>
                    <TextBlock
                        Text="Mobile Town, MO 12345"
                        Margin="0 -2 0 0"/>
                </StackPanel>
            </Grid>

        </Grid>
    </Grid>
</Window>

The customer is always right [Updated free tool and source code to prevent a machine from going to sleep!]

It was a few months back that I released Insomnia, a simple utility to prevent a computer from entering sleep mode. (For more on why that can be desirable (or other details about what Insomnia is and how it works), please refer to the original post.) Insomnia is a very simple program (it boils down to a single Win32 API call), but it fills a need many of us have - and the feedback I've gotten has been much appreciated!


Insomnia application

[Click here to download the Insomnia application along with its complete source code.]


My original post explains why Insomnia makes its window Topmost: "so it's always visible and people will be less likely to accidentally leave their computers sleep-less". My reasoning made plenty of sense to me (obviously!), but I received some public and private requests (like these) to add the ability to minimize Insomnia to the tray. I'm not one to argue with customers, so I decided to spend a commute adding the requested feature. Fortunately, I've already written and shared a WPF-based "minimize to tray" implementation, so I added that file to the Insomnia project and pasted the single line of code it took to enable "minimize to tray". And though I was done, I still had most of the bus ride left... :)


Insomnia minimized to the tray


So I figured I'd address the other popular request while I was at it: the ability to start Insomnia already minimized. To do that, I added the following code to the constructor which looks for a "-minimize" argument on the command-line and starts Insomnia minimized when it's present:

// Start minimized if requested via the command-line
foreach (var arg in Environment.GetCommandLineArgs())
{
    if (0 == string.Compare(arg, "-minimize", true))
    {
        Loaded += delegate { WindowState = WindowState.Minimized; };
    }
}
Aside: Because I'm using the Loaded event, there can be a brief instant where Insomnia shows up on the screen before minimizing itself. While my initial implementation actually set the Minimized state directly from the constructor, there's enough going on at that point (and enough non-standard window settings in Insomnia) that WPF got confused and showed a small, empty window even though the application was minimized. I probably could have added more code to suppress that, but this implementation is so clean and obvious about what it's doing that I didn't want to trade it in for an alternate one that would be more complex and hacky.


You know, when everything is said and done, I find that I really like Insomnia's new ability to get out of the way by minimizing to the tray. :) So thanks for everyone's feedback here - and please keep the great suggestions coming!


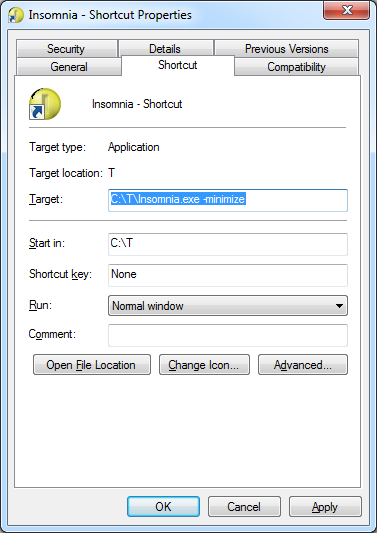
PS - If you want a simple way to start Insomnia minimized, create a customized shortcut:

  1. Right-click on the Insomnia program
  2. Choose "Create shortcut"
  3. Right-click on "Insomnia - Shortcut"
  4. Choose "Properties"
  5. Add  -minimize to the end of the command line
  6. Press OK
  7. Optionally: Move that shortcut to the "Startup" folder in the Start Menu to have Insomnia start minimized every time you log in to Windows
Editing Insomnia shortcut

Flattery will get you everywhere [Html5Canvas source code now available on CodePlex!]

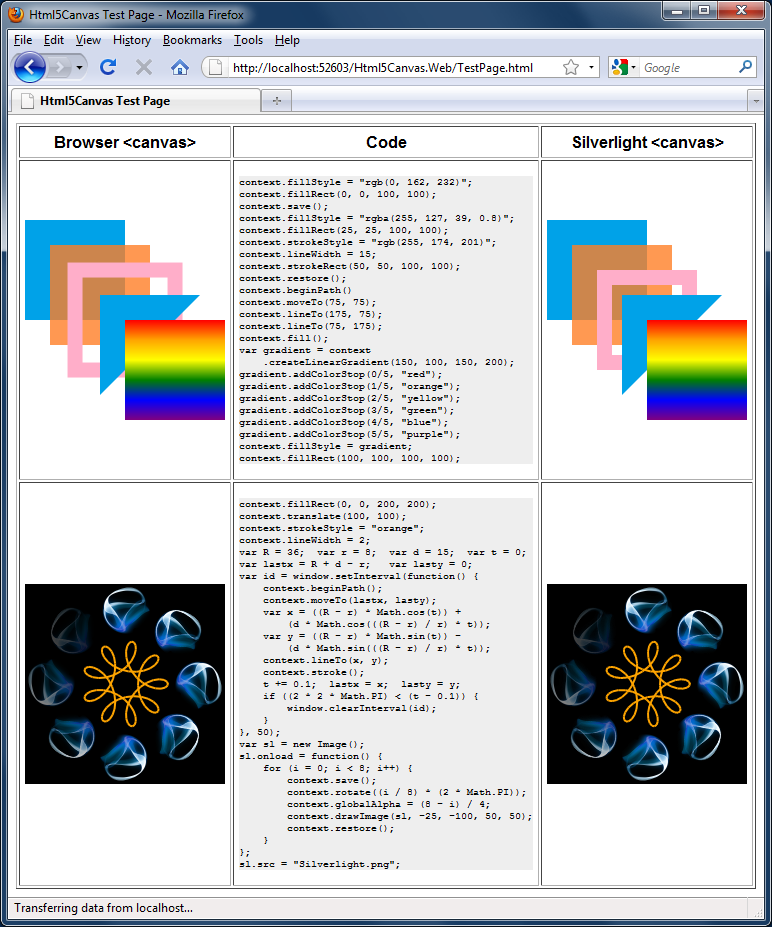
A few months ago, I described a proof-of-concept project and learning exercise I'd worked on to implement some of the basics of the HTML 5 <canvas> specification using Silverlight as the underlying platform: HTML 5 <canvas> announcement, fix for other cultures. As I explain in the introductory post, I didn't set out to come up with the most efficient, most complete implementation - just to get some familiarity with the <canvas> specification and see what it would be like to implement it with Silverlight. Html5Canvas was a lot of fun and even generated a small amount of buzz when I posted it...

Sample application in Firefox

Earlier today, fellow programmer Jon Davis emailed me to ask if he could put that sample up on CodePlex to share with others in the community. I replied that he was welcome to do so (all the code I post is under the OSI-approved Ms-PL license) - and soon got a reply from Jon pointing me to:

http://slcanvas.codeplex.com/

Jon has written about his motivations here - I encourage interested parties to have a read. [And I swear I didn't bribe him to say nice things! :) ] This was not the first time I'd been asked about putting the source code for HTML 5 <canvas> on CodePlex, so if you've been waiting for an opportunity like this, please follow up with Jon to see how you might be able to help contribute to the effort!

Looks the same - with half the overhead! [Update to free ConvertClipboardRtfToHtmlText tool and source code gives more compact output; Can you do better?]

I recently updated my ConvertClipboardRtfToHtmlText tool to work with Visual Studio 2010 (Beta 2). This utility takes the RTF clipboard format Visual Studio puts on the clipboard, converts it into HTML, and substitutes the converted text for pasting into web pages, blog posts, etc.. It works great and I use it all the time for my blog.

In the comments to that post, kind reader Sameer pointed out that the converted HTML was more verbose than it needed to be - and I quickly replied that it wasn't my fault. :) Here's the example Sameer gave (which is particularly inefficient):

public partial class

And here's the corresponding HTML (on multiple lines because it's so long):

<pre>
<span style='color:#000000'></span>
<span style='color:#0000ff'>public</span>
<span style='color:#000000'> </span>
<span style='color:#0000ff'>partial</span>
<span style='color:#000000'> </span>
<span style='color:#0000ff'>class</span>
</pre>

Yup, that's almost obnoxiously inefficient: there's a useless black span at the beginning and a bunch of pointless color swapping for both of the space characters. Something more along the lines of the following would be much better:

<pre style='color:#0000ff'>public partial class</pre>

The HTML for both examples ends up looking exactly the same in a web browser, so wouldn't it be nice if the tool produced the second, more compact form?

I thought so, too!


[Click here to download the ConvertClipboardRtfToHtmlText tool along with its complete source code.]


I had a bit of spare time the other night and decided to make a quick attempt at optimizing the output of ConvertClipboardRtfToHtmlText according to some ideas I'd been playing around with. Specifically, instead of outputting the converted text as it gets parsed, the new code builds an in-memory representation of the entire clipboard contents and associated color changes. After everything has been loaded, it performs some basic optimization steps to remove unnecessary color changes by ignoring whitespace and collapsing text runs. Once that's been done, the optimized HTML is placed on the clipboard just like before.

Here's what the relevant code looks like (recall that this tool compiles for .NET 2.0, so it's can't use Linq):

int j = runs.Count - 1;
while (0 <= j)
{
    Run run = runs[j];

    // Remove color changes for whitespace runs
    if (0 == run.Text.Trim().Length)
    {
        runs.RemoveAt(j);
        if (j < runs.Count)
        {
            runs[j].Text = run.Text + runs[j].Text;
        }
        else
        {
            j--;
        }
        continue;
    }

    // Remove redundant color changes
    if ((j + 1 < runs.Count) && (run.Color == runs[j + 1].Color))
    {
        runs.RemoveAt(j);
        runs[j].Text = run.Text + runs[j].Text;
    }

    j--;
}

// Find most common color
Dictionary<Color, int> colorCounts = new Dictionary<Color, int>();
foreach (Run run in runs)
{
    if (!colorCounts.ContainsKey(run.Color))
    {
        colorCounts[run.Color] = 0;
    }
    colorCounts[run.Color]++;
}
Color mostCommonColor = Color.Empty;
int mostCommonColorCount = 0;
foreach (Color color in colorCounts.Keys)
{
    if (mostCommonColorCount < colorCounts[color])
    {
        mostCommonColor = color;
        mostCommonColorCount = colorCounts[color];
    }
}

...

// Build HTML for run stream
sb.Length = 0;
sb.AppendFormat("<pre style='color:#{0:x2}{1:x2}{2:x2}'>", mostCommonColor.R, mostCommonColor.G, mostCommonColor.B);
foreach (Run run in runs)
{
    if (run.Color != mostCommonColor)
    {
        sb.AppendFormat("<span style='color:#{0:x2}{1:x2}{2:x2}'>", run.Color.R, run.Color.G, run.Color.B);
    }
    sb.Append(run.Text);
    if (run.Color != mostCommonColor)
    {
        sb.Append("</span>");
    }
}
sb.Append("</pre>");


The code comments explain what's going on and it's all pretty straightforward. The one sneaky thing is the part that finds the most commonly used color and makes that the default color of the entire block. By doing so, the number of span elements can be reduced significantly: switching to that common color becomes as simple as exiting the current span (which needed to happen anyway).

So was this coding exercise worth the effort? Is the resulting HTML noticeably smaller, or was this all just superficial messing around? To answer that, let's look at some statistics for converting the entire ConvertClipboardRtfToHtmlText.cs file:

Normal Optimized Change
Character count of .CS file 11,996 11,996 N/A
Character count converted HTML 32,091 21,158 -34%
Extra characters for HTML representation 20,095 9,162 -54%

Hey, those are pretty good results for just an hour's effort! And not only is the new representation significantly smaller, it's also less cluttered and easier to read - so it's easier to deal with, too. I'm happy with the improvement and switched to the new version of ConvertClipboardRtfToHtmlText a couple of posts ago. So if you notice my blog posts loading slightly faster than before, this could be why... :)


A challenge just for fun: I haven't thought about it too much (which could be my downfall), but I'll suggest that the output of the new approach is just about optimal for what it's doing. Every color change is now necessary, and they're about as terse as they can be. Unless I decide to throw away some information (ex: by using the 3-character HTML color syntax) or change the design (ex: by creating a bunch of 1-character CSS classes), I don't think things can get much better than this and still accurately reproduce the appearance of the original content in Visual Studio. Therefore, if you can reduce the overhead for this version of ConvertClipboardRtfToHtmlText.cs by an additional 5% (without resorting to invalid HTML), I will credit you and your technique in a future blog post! :)

The source code IS (still) the executable [Updated CSI, a C# interpreter (with source and tests) for .NET 4]

I published CSI, a simple C# interpreter, exactly one year ago. In that introductory post, I explained how CSI offers a nice alternative to typical CMD-based batch files by enabling the use of the full .NET framework and stand-alone C# source code files for automating simple, repetitive tasks. CSI accomplishes this by compiling source code "on the fly" and executing the resulting assembly seamlessly. What this means for users is that it's easy to represent tasks with a simple, self-documenting code file and never need to worry about compiling a binary, trying to keep it in sync with changes to the code, or even tracking project files and remembering how to build it in the first place!

Aside: The difference may not seem like much at first, but once you start thinking in terms of running .CS files instead of running .EXE files, things just seem to get simpler and more transparent! :)

And I'm happy to say that today, on the first birthday of CSI's public introduction, I'm releasing a new version!


[Click here to download CSI for .NET 4.0, 3.5, 3.0, 2.0, and 1.1 - along with the complete source code and test suite.]


Notes:

  • Today's release of CSI includes CSI40.exe, a version of CSI that uses the .NET 4 Beta 2 Framework to enable the execution of programs that take full advantage of the latest .NET Framework! Correspondingly, the -R "include common references" switch now includes the new Microsoft.CSharp.dll and System.Xaml.dll assemblies that are part of .NET 4. This new version of CSI makes it easy to take advantage of the late-binding dynamic type, the push-based IObservable interface, the handy Tuple class, or any of the other neat, new features of .NET 4.
  • CSI previously required a program's entry point be of the Main(string[] args) kind and would fail if asked to run a program using the (also valid) Main() form. This restriction has been lifted and all new flavors of CSI will successfully call into a parameter-less entry point.
  • CSI could formerly fail to execute programs requiring the single-threaded apartment model. While this probably wasn't an issue for most people because apartment models don't matter much in general, if you were working in an area where it did matter (like WPF), things were unnecessarily difficult. No longer - CSI's entry point has been decorated with the STAThread attribute, and it now runs STA programs smoothly.
  • Please note that I have not updated the .NET 1.1 version of CSI, CSI11.exe, for this release. There don't seem to be enough people running .NET 1.1 (and expecting updates!) for it to be worth creating a virtual machine and installing .NET 1.1 just to compile a new version of CSI for that platform. Therefore, the version of CSI11.exe that comes with this release is the previous version and doesn't include the changes described above.
  • The CSI.exe in the root of the release folder corresponds to the .NET 3.5 version of CSI; this is the "official" version just as it was with the previous release. The file CSI40.exe in the same folder is the .NET 4 Beta 2 version of CSI (the obvious heir apparent, but not king quite yet...). Previous versions (CSI30.exe, CSI20.exe, and CSI11.exe) can be found in the "Previous Versions" folder.
  • The -R "include common references" switch of the .NET 3.5 version of CSI no longer includes a reference to System.Data.DataSetExtensions.dll because that assembly is unlikely to be used in common CSI scenarios. If needed, a reference can be added via -r System.Data.DataSetExtensions.dll in the usual manner. (The .NET 4 version of CSI's -R doesn't reference this assembly, either, but because this is the first release of CSI40.exe, it's not a breaking change.)


For fun, here's an example of the new Main() support:

C:\T>type Main.cs
public class Test
{
  public static void Main()
  {
    System.Console.WriteLine("Hello world");
  }
}

C:\T>CSI Main.cs
Hello world


And here's an example of the new ability to run WPF code. Note that I've used the RegisterCSI.cmd script (included with the release; see here for details) to register the .CSI file type with Windows to make it even easier to run CSI-based programs. (And by the way, check out how easy it is to output the default style of a WPF control!)

C:\T>type WpfDefaultStyleBrowser.csi
using System;
using System.Windows;
using System.Windows.Controls;
using System.Windows.Markup;
using System.Xml;

class WpfDefaultStyleBrowser
{
    [STAThread]
    public static void Main()
    {
        Style style = (new FrameworkElement()).FindResource(typeof(ContentControl)) as Style;
        XmlWriterSettings settings = new XmlWriterSettings();
        settings.Indent = true;
        settings.NewLineOnAttributes = true;
        settings.OmitXmlDeclaration = true;
        XamlWriter.Save(style, XmlWriter.Create(Console.Out, settings));
    }
}

C:\T>WpfDefaultStyleBrowser.csi
<Style
  TargetType="ContentControl" xmlns="http://schemas.microsoft.com/winfx/2006/xaml/presentation">
  <Style.Resources>
    <ResourceDictionary />
  </Style.Resources>
  <Setter
    Property="Control.Template">
    <Setter.Value>
      <ControlTemplate
        TargetType="ContentControl">
        <ContentPresenter
          Content="{TemplateBinding ContentControl.Content}"
          ContentTemplate="{TemplateBinding ContentControl.ContentTemplate}"
          ContentStringFormat="{TemplateBinding ContentControl.ContentStringFormat}" />
      </ControlTemplate>
    </Setter.Value>
  </Setter>
</Style>


Finally, here's the contents of the "read me" file, with the CSI syntax, release notes, and version history:

==================================================
==  CSI: C# Interpreter                         ==
==  David Anson (http://blogs.msdn.com/delay/)  ==
==================================================


Summary
=======
CSI: C# Interpreter
     Version 2010-01-04 for .NET 3.5
     http://blogs.msdn.com/delay/

Enables the use of C# as a scripting language by executing source code files
directly. The source code IS the executable, so it is easy to make changes and
there is no need to maintain a separate EXE file.

CSI (CodeFile)+ (-d DEFINE)* (-r Reference)* (-R)? (-q)? (-c)? (-a Arguments)?
   (CodeFile)+      One or more C# source code files to execute (*.cs)
   (-d DEFINE)*     Zero or more symbols to #define
   (-r Reference)*  Zero or more assembly files to reference (*.dll)
   (-R)?            Optional 'references' switch to include common references
   (-q)?            Optional 'quiet' switch to suppress unnecessary output
   (-c)?            Optional 'colorless' switch to suppress output coloring
   (-a Arguments)?  Zero or more optional arguments for the executing program

The list of common references included by the -R switch is:
   System.dll
   System.Data.dll
   System.Drawing.dll
   System.Windows.Forms.dll
   System.Xml.dll
   PresentationCore.dll
   PresentationFramework.dll
   WindowsBase.dll
   System.Core.dll
   System.Xml.Linq.dll

CSI's return code is 2147483647 if it failed to execute the program or 0 (or
whatever value the executed program returned) if it executed successfully.

Examples:
   CSI Example.cs
   CSI Example.cs -r System.Xml.dll -a ArgA ArgB -Switch
   CSI ExampleA.cs ExampleB.cs -d DEBUG -d TESTING -R


Notes
=====
CSI was inspired by net2bat, an internal .NET 1.1 tool whose author had left
Microsoft. CSI initially added support for .NET 2.0 and has now been extended
to support .NET 3.0, 3.5, and 4.0. Separate executables are provided to
accommodate environments where the latest version of .NET is not available.


Version History
===============

Version 2010-01-04
Add .NET 4 (Beta 2) version
Minor updates

Version 2009-01-06
Initial public release

Version 2005-12-15
Initial internal release