The blog of dlaa.me

Posts tagged "Technical"

If they build it, I will come (and link to it) [WPPFormatter plug-in now available for TextAnalysisTool.NET]

I went public with TextAnalysisTool.NET a few years back - it's a handy tool for interactive log file analysis that's popular with people in many parts of the company. The introductory post has more background and detail, but this snippet from the README gives an overview:

The Problem: For those times when you have to analyze a large amount of textual data, picking out the relevant line(s) of interest can be quite difficult. Standard text editors usually provide a generic "find" function, but the limitations of that simple approach quickly become apparent (e.g., when it is necessary to compare two or more widely separated lines). Some more sophisticated editors do better by allowing you to "bookmark" lines of interest; this can be a big help, but is often not enough.

The Solution: TextAnalysisTool.NET - a program designed from the start to excel at viewing, searching, and navigating large files quickly and efficiently. TextAnalysisTool.NET provides a view of the file that you can easily manipulate (through the use of various filters) to display exactly the information you need - as you need it.

And here's an animated GIF showing TextAnalysisTool.NET working with some MSBuild output:

TextAnalysisTool.NET demonstration


I don't talk about it in the introductory post, but one of the things TextAnalysisTool.NET supports is a flexible plug-in architecture for handling custom file formats. Here's what the included documentation says:

TextAnalysisTool.NET's support for plug-ins allows users to add in their own code that understands specialized file types. Every time a file is opened, each plug-in is given a chance to take responsibility for parsing that file. When a plug-in takes responsibility for parsing a file, it becomes that plug-in's job to produce a textual representation of the file for display in the usual line display. If no plug-in supports a particular file, then it gets opened using TextAnalysisTool.NET's default parser (which displays the file's contents directly). One example of what a plug-in could do is read a binary file format and produce meaningful textual output from it (e.g., if the file is compressed or encrypted). Another plug-in might add support for the .zip format and display a list of the files within the archive. A particularly ambitious plug-in might translate text files from one language to another. The possibilities are endless!


Over the years, I've been contacted by various people wanting to use the plug-in architecture to add support for specialized file formats. One of those people is Tomer Rotstein who recently released a WPPFormatter plug-in. (If the acronym "WPP" isn't familiar to you, you might start by reading the Windows software trace preprocessor entry on Wikipedia - it's the file format used by the event tracing infrastructure in Windows.) But Tomer has gone above and beyond what I ever had in mind - as you can see from the following screen shot of WPPFormatter's "open file" dialog:

WPPFormatter demonstration

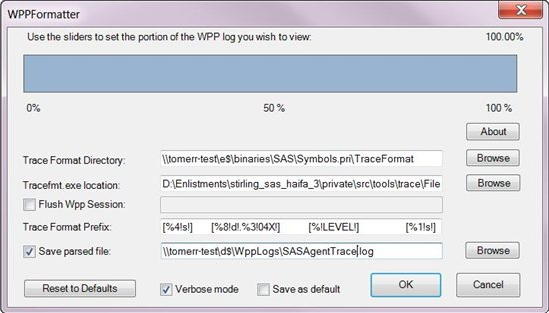
I encourage people to read Tomer's post to get a full sense of what WPPFormatter does. There's a download link at the end of that post, so please try it out if it seems useful!


And for those of you who aren't already TextAnalisisTool.NET users, please:

[Click here to download the latest version of TextAnalysisTool.NET.]


Aside: Tomer's accomplishment is even more notable when you realize that TextAnalysisTool.NET was the first .NET application I ever wrote and that it targets .NET 1.1 - from a time before there were generics, extensibility frameworks, and all the other goodness we've come to take for granted! Truth be told, the plug-in model for TextAnalysisTool.NET is downright wacky in some ways, so I congratulate Tomer on succeeding in spite of my goofy design. :)

The source code IS the executable, RTM edition [Updated CSI, a C# interpreter (with source and tests) for .NET 4 RTM]

CSI is a simple C# interpreter and has been available for .NET 1.1, 2.0, 3.0, and 3.5 for a while now. Earlier this year, I updated CSI for .NET 4 Beta 2, and now I've (somewhat belatedly) updated it for the final, public .NET 4 Framework. Today's post is mainly about getting an official .NET 4 RTM-compiled build of CSI released, so there aren't any functional changes to the tool itself.

FYI: I have a TODO list and there are some interesting things on it - it's just that none of them seemed particularly urgent.

The links above explain what CSI is and how it works; the executive summary is that CSI offers an alternative to typical CMD-based batch files by enabling the use of the full .NET framework and stand-alone C# source code files for automating simple, repetitive tasks. It accomplishes that by compiling source code "on the fly" and executing the resulting assembly behind the scenes. The benefit is that it's easy to represent tasks with a simple, self-documenting code file that leaves no need to worry about compiling a binary, trying to keep it in sync with changes to the code, or tracking project files and remembering how to build everything.


[Click here to download CSI for .NET 4.0, 3.5, 3.0, 2.0, and 1.1 - along with the complete source code and test suite.]


Notes:

  • The copy of CSI.exe in the root of the download ZIP is now the .NET 4 version because that's the latest public .NET Framework. Previous versions of CSI can be found in the Previous Versions folder: CSI11.exe, CSI20.exe, CSI30.exe, and CSI35.exe.
  • As with the previous release, I have not re-compiled the .NET 1.1 version, CSI11.exe - largely because I don't have .NET 1.1 installed anywhere. :)


Here's the "read me" file for a slightly better idea of how CSI works:

====================================================
==  CSI: C# Interpreter                           ==
==  David Anson (http://blogs.msdn.com/b/delay/)  ==
====================================================


Summary
=======
CSI: C# Interpreter
     Version 2010-06-07 for .NET 4.0
     http://blogs.msdn.com/b/delay/

Enables the use of C# as a scripting language by executing source code files
directly. The source code IS the executable, so it is easy to make changes and
there is no need to maintain a separate EXE file.

CSI (CodeFile)+ (-d DEFINE)* (-r Reference)* (-R)? (-q)? (-c)? (-a Arguments)?
   (CodeFile)+      One or more C# source code files to execute (*.cs)
   (-d DEFINE)*     Zero or more symbols to #define
   (-r Reference)*  Zero or more assembly files to reference (*.dll)
   (-R)?            Optional 'references' switch to include common references
   (-q)?            Optional 'quiet' switch to suppress unnecessary output
   (-c)?            Optional 'colorless' switch to suppress output coloring
   (-a Arguments)?  Zero or more optional arguments for the executing program

The list of common references included by the -R switch is:
   System.dll
   System.Data.dll
   System.Drawing.dll
   System.Windows.Forms.dll
   System.Xml.dll
   PresentationCore.dll
   PresentationFramework.dll
   WindowsBase.dll
   System.Core.dll
   System.Xml.Linq.dll
   Microsoft.CSharp.dll
   System.Xaml.dll

CSI's return code is 2147483647 if it failed to execute the program or 0 (or
whatever value the executed program returned) if it executed successfully.

Examples:
   CSI Example.cs
   CSI Example.cs -r System.Xml.dll -a ArgA ArgB -Switch
   CSI ExampleA.cs ExampleB.cs -d DEBUG -d TESTING -R


Notes
=====
CSI was inspired by net2bat, an internal .NET 1.1 tool whose author had left
Microsoft. CSI initially added support for .NET 2.0 and has now been extended
to support .NET 3.0, 3.5, and 4.0. Separate executables are provided to
accommodate environments where the latest version of .NET is not available.


Version History
===============

Version 2010-06-07
Update .NET 4 (RTM) version
Make .NET 4 version primary

Version 2010-01-04
Add .NET 4 (Beta 2) version
Minor updates

Version 2009-01-06
Initial public release

Version 2005-12-15
Initial internal release

If found, please return to... [Using XAML to create a custom wallpaper image for your mobile device]

Background

These days it seems like everybody has a mobile device with them practically all the time. It's pretty amazing that we're able to be "always connected" - technology has made great progress! However, humankind hasn't changed nearly as quickly, and occasional forgetfulness is still a part of everyone's life. :) So it's fairly common that someone forgets their device in a meeting room, drops it out of their pocket on the bus, or otherwise misplaces it. What's to be done?

Well, there are all kinds of high-tech approaches like GPS location services, network-based tracking, and the like. But sometimes a low-tech solution works, too! In particular, just slapping a label with your name and phone number on the back is probably enough to get a lost device returned when someone finds it. But that's really low-tech - and besides, some people don't want to mar the shiny surface of their pretty hardware with stickers, etchings, and the like...


One solution

I propose a mid-tech approach. It begins with the observation that most mobile devices allow you to customize the default wallpaper image. Because "pixels is pixels", it's clear the custom wallpaper image could include text - and that text is perfect for our purposes! Creating a custom wallpaper is quite easy and leads to a nice, attractive experience like this:

Custom wallpaper on an iPod touch

The example above uses an iPod touch (it's an iPhone without the phone), but the concept applies to any device that allows you to customize the login screen wallpaper (even laptops!).


One implementation

Creating a custom wallpaper can be done in lots of different ways. For the purposes of this exercise, I wanted complete control over the layout, high quality graphics, and a flexible, hierarchical, vector-based approach. The answer was obvious: XAML! :)

So I created a simple WPF application and added some scaffolding to represent the size of the device and the placement of its UI overlays. (Aside: I could have used Silverlight, too; WPF seemed like it might make the image capture step a smidge easier.) With that framework in place, it was easy to create the custom content you see here with an image, some layout containers, and some text. The resulting MobileDeviceHomeScreenMaker application looks like this (and I mean exactly like this: no title, no borders, etc.):

Custom wallpaper application

From there, it's easy to get the custom wallpaper onto the device:

  1. Left-click on the MobileDeviceHomeScreenMaker window to hide the overlays
  2. Press Alt+Print Screen to copy the foreground window to the clipboard
  3. Paste it into your favorite graphics program (I used Windows Paint)
  4. Save the image to a file (I used the lossless PNG format)
  5. Transfer that image to the device (with a dedicated sync program, by surfing to it on the web, etc.)
  6. Tell the device to use the custom image as its wallpaper (in the settings app, from the photo viewer, etc.)

It's really that easy! All that's left is to...

[Click here to download the complete MobileDeviceHomeScreenMaker .NET 4 application as a Visual Studio 2010 solution.]


The XAML

<!--
MobileDeviceHomeScreenMaker
http://blogs.msdn.com/delay/
-->

<Window x:Class="MobileDeviceHomeScreenMaker.MainWindow"
        xmlns="http://schemas.microsoft.com/winfx/2006/xaml/presentation"
        xmlns:x="http://schemas.microsoft.com/winfx/2006/xaml"
        Title="MobileDeviceHomeScreenMaker"
        SizeToContent="WidthAndHeight"
        ResizeMode="NoResize"
        WindowStyle="None"
        WindowStartupLocation="CenterScreen"
        Background="Black">

    <!-- Frame -->
    <Grid Height="480" Width="320">
        <Grid.RowDefinitions>
            <RowDefinition Height="116"/>
            <RowDefinition Height="*"/>
            <RowDefinition Height="96"/>
        </Grid.RowDefinitions>

        <!-- Instructional ToolTip -->
        <ToolTipService.ToolTip>
            <ToolTip>
                <StackPanel>
                    <TextBlock Text="Left-click toggles overlay"/>
                    <TextBlock Text="Right-click closes window"/>
                    <TextBlock Text="Alt-PrintScreen captures"/>
                </StackPanel>
            </ToolTip>
        </ToolTipService.ToolTip>

        <!-- Overall background -->
        <Grid.Background>
            <ImageBrush
                ImageSource="C:\Users\Public\Pictures\Sample Pictures\Tulips.jpg"
                Stretch="UniformToFill"
                Opacity="0.9"/>
        </Grid.Background>

        <!-- Top and bottom overlays -->
        <Label
            x:Name="TimeOverlay"
            Grid.Row="0"
            Background="#80808080"
            Content="Time"
            HorizontalContentAlignment="Center"
            VerticalContentAlignment="Center"
            Foreground="White"
            FontSize="40"
            FontWeight="Bold"/>
        <Label
            x:Name="SlideOverlay"
            Grid.Row="2"
            Background="#80808080"
            Content="Slide"
            HorizontalContentAlignment="Center"
            VerticalContentAlignment="Center"
            Foreground="White"
            FontSize="40"
            FontWeight="Bold"/>

        <!-- Container for content -->
        <Grid
            Grid.Row="1">

            <Grid
                HorizontalAlignment="Center"
                VerticalAlignment="Center">
                <StackPanel
                    TextBlock.Foreground="White"
                    TextBlock.FontSize="16"
                    TextBlock.FontFamily="Segoe UI Light"
                    TextOptions.TextHintingMode="Fixed"
                    TextOptions.TextRenderingMode="Grayscale">
                    <StackPanel.Effect>
                        <DropShadowEffect
                            BlurRadius="2"
                            ShadowDepth="1"
                            RenderingBias="Quality"/>
                    </StackPanel.Effect>
                    <TextBlock
                        Text="mobile user"
                        FontSize="28"
                        FontFamily="Segoe UI Semibold"/>
                    <Grid Height="12"/>
                    <TextBlock
                        Text="mobile.user@example.com"/>
                    <Grid Height="12"/>
                    <TextBlock
                        Text="+1 (555) 555-5555"/>
                    <Grid Height="12"/>
                    <TextBlock
                        Text="One Mobile Way"/>
                    <TextBlock
                        Text="Mobile Town, MO 12345"
                        Margin="0 -2 0 0"/>
                </StackPanel>
            </Grid>

        </Grid>
    </Grid>
</Window>

The customer is always right [Updated free tool and source code to prevent a machine from going to sleep!]

It was a few months back that I released Insomnia, a simple utility to prevent a computer from entering sleep mode. (For more on why that can be desirable (or other details about what Insomnia is and how it works), please refer to the original post.) Insomnia is a very simple program (it boils down to a single Win32 API call), but it fills a need many of us have - and the feedback I've gotten has been much appreciated!


Insomnia application

[Click here to download the Insomnia application along with its complete source code.]


My original post explains why Insomnia makes its window Topmost: "so it's always visible and people will be less likely to accidentally leave their computers sleep-less". My reasoning made plenty of sense to me (obviously!), but I received some public and private requests (like these) to add the ability to minimize Insomnia to the tray. I'm not one to argue with customers, so I decided to spend a commute adding the requested feature. Fortunately, I've already written and shared a WPF-based "minimize to tray" implementation, so I added that file to the Insomnia project and pasted the single line of code it took to enable "minimize to tray". And though I was done, I still had most of the bus ride left... :)


Insomnia minimized to the tray


So I figured I'd address the other popular request while I was at it: the ability to start Insomnia already minimized. To do that, I added the following code to the constructor which looks for a "-minimize" argument on the command-line and starts Insomnia minimized when it's present:

// Start minimized if requested via the command-line
foreach (var arg in Environment.GetCommandLineArgs())
{
    if (0 == string.Compare(arg, "-minimize", true))
    {
        Loaded += delegate { WindowState = WindowState.Minimized; };
    }
}
Aside: Because I'm using the Loaded event, there can be a brief instant where Insomnia shows up on the screen before minimizing itself. While my initial implementation actually set the Minimized state directly from the constructor, there's enough going on at that point (and enough non-standard window settings in Insomnia) that WPF got confused and showed a small, empty window even though the application was minimized. I probably could have added more code to suppress that, but this implementation is so clean and obvious about what it's doing that I didn't want to trade it in for an alternate one that would be more complex and hacky.


You know, when everything is said and done, I find that I really like Insomnia's new ability to get out of the way by minimizing to the tray. :) So thanks for everyone's feedback here - and please keep the great suggestions coming!


PS - If you want a simple way to start Insomnia minimized, create a customized shortcut:

  1. Right-click on the Insomnia program
  2. Choose "Create shortcut"
  3. Right-click on "Insomnia - Shortcut"
  4. Choose "Properties"
  5. Add  -minimize to the end of the command line
  6. Press OK
  7. Optionally: Move that shortcut to the "Startup" folder in the Start Menu to have Insomnia start minimized every time you log in to Windows
Editing Insomnia shortcut

Flattery will get you everywhere [Html5Canvas source code now available on CodePlex!]

A few months ago, I described a proof-of-concept project and learning exercise I'd worked on to implement some of the basics of the HTML 5 <canvas> specification using Silverlight as the underlying platform: HTML 5 <canvas> announcement, fix for other cultures. As I explain in the introductory post, I didn't set out to come up with the most efficient, most complete implementation - just to get some familiarity with the <canvas> specification and see what it would be like to implement it with Silverlight. Html5Canvas was a lot of fun and even generated a small amount of buzz when I posted it...

Sample application in Firefox

Earlier today, fellow programmer Jon Davis emailed me to ask if he could put that sample up on CodePlex to share with others in the community. I replied that he was welcome to do so (all the code I post is under the OSI-approved Ms-PL license) - and soon got a reply from Jon pointing me to:

http://slcanvas.codeplex.com/

Jon has written about his motivations here - I encourage interested parties to have a read. [And I swear I didn't bribe him to say nice things! :) ] This was not the first time I'd been asked about putting the source code for HTML 5 <canvas> on CodePlex, so if you've been waiting for an opportunity like this, please follow up with Jon to see how you might be able to help contribute to the effort!

Looks the same - with half the overhead! [Update to free ConvertClipboardRtfToHtmlText tool and source code gives more compact output; Can you do better?]

I recently updated my ConvertClipboardRtfToHtmlText tool to work with Visual Studio 2010 (Beta 2). This utility takes the RTF clipboard format Visual Studio puts on the clipboard, converts it into HTML, and substitutes the converted text for pasting into web pages, blog posts, etc.. It works great and I use it all the time for my blog.

In the comments to that post, kind reader Sameer pointed out that the converted HTML was more verbose than it needed to be - and I quickly replied that it wasn't my fault. :) Here's the example Sameer gave (which is particularly inefficient):

public partial class

And here's the corresponding HTML (on multiple lines because it's so long):

<pre>
<span style='color:#000000'></span>
<span style='color:#0000ff'>public</span>
<span style='color:#000000'> </span>
<span style='color:#0000ff'>partial</span>
<span style='color:#000000'> </span>
<span style='color:#0000ff'>class</span>
</pre>

Yup, that's almost obnoxiously inefficient: there's a useless black span at the beginning and a bunch of pointless color swapping for both of the space characters. Something more along the lines of the following would be much better:

<pre style='color:#0000ff'>public partial class</pre>

The HTML for both examples ends up looking exactly the same in a web browser, so wouldn't it be nice if the tool produced the second, more compact form?

I thought so, too!


[Click here to download the ConvertClipboardRtfToHtmlText tool along with its complete source code.]


I had a bit of spare time the other night and decided to make a quick attempt at optimizing the output of ConvertClipboardRtfToHtmlText according to some ideas I'd been playing around with. Specifically, instead of outputting the converted text as it gets parsed, the new code builds an in-memory representation of the entire clipboard contents and associated color changes. After everything has been loaded, it performs some basic optimization steps to remove unnecessary color changes by ignoring whitespace and collapsing text runs. Once that's been done, the optimized HTML is placed on the clipboard just like before.

Here's what the relevant code looks like (recall that this tool compiles for .NET 2.0, so it's can't use Linq):

int j = runs.Count - 1;
while (0 <= j)
{
    Run run = runs[j];

    // Remove color changes for whitespace runs
    if (0 == run.Text.Trim().Length)
    {
        runs.RemoveAt(j);
        if (j < runs.Count)
        {
            runs[j].Text = run.Text + runs[j].Text;
        }
        else
        {
            j--;
        }
        continue;
    }

    // Remove redundant color changes
    if ((j + 1 < runs.Count) && (run.Color == runs[j + 1].Color))
    {
        runs.RemoveAt(j);
        runs[j].Text = run.Text + runs[j].Text;
    }

    j--;
}

// Find most common color
Dictionary<Color, int> colorCounts = new Dictionary<Color, int>();
foreach (Run run in runs)
{
    if (!colorCounts.ContainsKey(run.Color))
    {
        colorCounts[run.Color] = 0;
    }
    colorCounts[run.Color]++;
}
Color mostCommonColor = Color.Empty;
int mostCommonColorCount = 0;
foreach (Color color in colorCounts.Keys)
{
    if (mostCommonColorCount < colorCounts[color])
    {
        mostCommonColor = color;
        mostCommonColorCount = colorCounts[color];
    }
}

...

// Build HTML for run stream
sb.Length = 0;
sb.AppendFormat("<pre style='color:#{0:x2}{1:x2}{2:x2}'>", mostCommonColor.R, mostCommonColor.G, mostCommonColor.B);
foreach (Run run in runs)
{
    if (run.Color != mostCommonColor)
    {
        sb.AppendFormat("<span style='color:#{0:x2}{1:x2}{2:x2}'>", run.Color.R, run.Color.G, run.Color.B);
    }
    sb.Append(run.Text);
    if (run.Color != mostCommonColor)
    {
        sb.Append("</span>");
    }
}
sb.Append("</pre>");


The code comments explain what's going on and it's all pretty straightforward. The one sneaky thing is the part that finds the most commonly used color and makes that the default color of the entire block. By doing so, the number of span elements can be reduced significantly: switching to that common color becomes as simple as exiting the current span (which needed to happen anyway).

So was this coding exercise worth the effort? Is the resulting HTML noticeably smaller, or was this all just superficial messing around? To answer that, let's look at some statistics for converting the entire ConvertClipboardRtfToHtmlText.cs file:

Normal Optimized Change
Character count of .CS file 11,996 11,996 N/A
Character count converted HTML 32,091 21,158 -34%
Extra characters for HTML representation 20,095 9,162 -54%

Hey, those are pretty good results for just an hour's effort! And not only is the new representation significantly smaller, it's also less cluttered and easier to read - so it's easier to deal with, too. I'm happy with the improvement and switched to the new version of ConvertClipboardRtfToHtmlText a couple of posts ago. So if you notice my blog posts loading slightly faster than before, this could be why... :)


A challenge just for fun: I haven't thought about it too much (which could be my downfall), but I'll suggest that the output of the new approach is just about optimal for what it's doing. Every color change is now necessary, and they're about as terse as they can be. Unless I decide to throw away some information (ex: by using the 3-character HTML color syntax) or change the design (ex: by creating a bunch of 1-character CSS classes), I don't think things can get much better than this and still accurately reproduce the appearance of the original content in Visual Studio. Therefore, if you can reduce the overhead for this version of ConvertClipboardRtfToHtmlText.cs by an additional 5% (without resorting to invalid HTML), I will credit you and your technique in a future blog post! :)

The source code IS (still) the executable [Updated CSI, a C# interpreter (with source and tests) for .NET 4]

I published CSI, a simple C# interpreter, exactly one year ago. In that introductory post, I explained how CSI offers a nice alternative to typical CMD-based batch files by enabling the use of the full .NET framework and stand-alone C# source code files for automating simple, repetitive tasks. CSI accomplishes this by compiling source code "on the fly" and executing the resulting assembly seamlessly. What this means for users is that it's easy to represent tasks with a simple, self-documenting code file and never need to worry about compiling a binary, trying to keep it in sync with changes to the code, or even tracking project files and remembering how to build it in the first place!

Aside: The difference may not seem like much at first, but once you start thinking in terms of running .CS files instead of running .EXE files, things just seem to get simpler and more transparent! :)

And I'm happy to say that today, on the first birthday of CSI's public introduction, I'm releasing a new version!


[Click here to download CSI for .NET 4.0, 3.5, 3.0, 2.0, and 1.1 - along with the complete source code and test suite.]


Notes:

  • Today's release of CSI includes CSI40.exe, a version of CSI that uses the .NET 4 Beta 2 Framework to enable the execution of programs that take full advantage of the latest .NET Framework! Correspondingly, the -R "include common references" switch now includes the new Microsoft.CSharp.dll and System.Xaml.dll assemblies that are part of .NET 4. This new version of CSI makes it easy to take advantage of the late-binding dynamic type, the push-based IObservable interface, the handy Tuple class, or any of the other neat, new features of .NET 4.
  • CSI previously required a program's entry point be of the Main(string[] args) kind and would fail if asked to run a program using the (also valid) Main() form. This restriction has been lifted and all new flavors of CSI will successfully call into a parameter-less entry point.
  • CSI could formerly fail to execute programs requiring the single-threaded apartment model. While this probably wasn't an issue for most people because apartment models don't matter much in general, if you were working in an area where it did matter (like WPF), things were unnecessarily difficult. No longer - CSI's entry point has been decorated with the STAThread attribute, and it now runs STA programs smoothly.
  • Please note that I have not updated the .NET 1.1 version of CSI, CSI11.exe, for this release. There don't seem to be enough people running .NET 1.1 (and expecting updates!) for it to be worth creating a virtual machine and installing .NET 1.1 just to compile a new version of CSI for that platform. Therefore, the version of CSI11.exe that comes with this release is the previous version and doesn't include the changes described above.
  • The CSI.exe in the root of the release folder corresponds to the .NET 3.5 version of CSI; this is the "official" version just as it was with the previous release. The file CSI40.exe in the same folder is the .NET 4 Beta 2 version of CSI (the obvious heir apparent, but not king quite yet...). Previous versions (CSI30.exe, CSI20.exe, and CSI11.exe) can be found in the "Previous Versions" folder.
  • The -R "include common references" switch of the .NET 3.5 version of CSI no longer includes a reference to System.Data.DataSetExtensions.dll because that assembly is unlikely to be used in common CSI scenarios. If needed, a reference can be added via -r System.Data.DataSetExtensions.dll in the usual manner. (The .NET 4 version of CSI's -R doesn't reference this assembly, either, but because this is the first release of CSI40.exe, it's not a breaking change.)


For fun, here's an example of the new Main() support:

C:\T>type Main.cs
public class Test
{
  public static void Main()
  {
    System.Console.WriteLine("Hello world");
  }
}

C:\T>CSI Main.cs
Hello world


And here's an example of the new ability to run WPF code. Note that I've used the RegisterCSI.cmd script (included with the release; see here for details) to register the .CSI file type with Windows to make it even easier to run CSI-based programs. (And by the way, check out how easy it is to output the default style of a WPF control!)

C:\T>type WpfDefaultStyleBrowser.csi
using System;
using System.Windows;
using System.Windows.Controls;
using System.Windows.Markup;
using System.Xml;

class WpfDefaultStyleBrowser
{
    [STAThread]
    public static void Main()
    {
        Style style = (new FrameworkElement()).FindResource(typeof(ContentControl)) as Style;
        XmlWriterSettings settings = new XmlWriterSettings();
        settings.Indent = true;
        settings.NewLineOnAttributes = true;
        settings.OmitXmlDeclaration = true;
        XamlWriter.Save(style, XmlWriter.Create(Console.Out, settings));
    }
}

C:\T>WpfDefaultStyleBrowser.csi
<Style
  TargetType="ContentControl" xmlns="http://schemas.microsoft.com/winfx/2006/xaml/presentation">
  <Style.Resources>
    <ResourceDictionary />
  </Style.Resources>
  <Setter
    Property="Control.Template">
    <Setter.Value>
      <ControlTemplate
        TargetType="ContentControl">
        <ContentPresenter
          Content="{TemplateBinding ContentControl.Content}"
          ContentTemplate="{TemplateBinding ContentControl.ContentTemplate}"
          ContentStringFormat="{TemplateBinding ContentControl.ContentStringFormat}" />
      </ControlTemplate>
    </Setter.Value>
  </Setter>
</Style>


Finally, here's the contents of the "read me" file, with the CSI syntax, release notes, and version history:

==================================================
==  CSI: C# Interpreter                         ==
==  David Anson (http://blogs.msdn.com/delay/)  ==
==================================================


Summary
=======
CSI: C# Interpreter
     Version 2010-01-04 for .NET 3.5
     http://blogs.msdn.com/delay/

Enables the use of C# as a scripting language by executing source code files
directly. The source code IS the executable, so it is easy to make changes and
there is no need to maintain a separate EXE file.

CSI (CodeFile)+ (-d DEFINE)* (-r Reference)* (-R)? (-q)? (-c)? (-a Arguments)?
   (CodeFile)+      One or more C# source code files to execute (*.cs)
   (-d DEFINE)*     Zero or more symbols to #define
   (-r Reference)*  Zero or more assembly files to reference (*.dll)
   (-R)?            Optional 'references' switch to include common references
   (-q)?            Optional 'quiet' switch to suppress unnecessary output
   (-c)?            Optional 'colorless' switch to suppress output coloring
   (-a Arguments)?  Zero or more optional arguments for the executing program

The list of common references included by the -R switch is:
   System.dll
   System.Data.dll
   System.Drawing.dll
   System.Windows.Forms.dll
   System.Xml.dll
   PresentationCore.dll
   PresentationFramework.dll
   WindowsBase.dll
   System.Core.dll
   System.Xml.Linq.dll

CSI's return code is 2147483647 if it failed to execute the program or 0 (or
whatever value the executed program returned) if it executed successfully.

Examples:
   CSI Example.cs
   CSI Example.cs -r System.Xml.dll -a ArgA ArgB -Switch
   CSI ExampleA.cs ExampleB.cs -d DEBUG -d TESTING -R


Notes
=====
CSI was inspired by net2bat, an internal .NET 1.1 tool whose author had left
Microsoft. CSI initially added support for .NET 2.0 and has now been extended
to support .NET 3.0, 3.5, and 4.0. Separate executables are provided to
accommodate environments where the latest version of .NET is not available.


Version History
===============

Version 2010-01-04
Add .NET 4 (Beta 2) version
Minor updates

Version 2009-01-06
Initial public release

Version 2005-12-15
Initial internal release

Blogging code samples stays easy [Update to free ConvertClipboardRtfToHtmlText tool and source code for Visual Studio 2010!]

A big part of my blog is sharing code and so most of the posts I write include sample source. Therefore, it's pretty important to me that the code I share be easy for readers to understand and use. For me, that means I want it to be static, syntax-highlighted, and in text form so it's copy+paste-able and indexable by search engines.

I'm a big fan of keeping things simple and avoiding dependencies, so I ended up writing a very simple tool about two years ago called ConvertClipboardRtfToHtmlText. As you can see from the original ConvertClipboardRtfToHtmlText post and the subsequent follow-up, it's a very simple tool intended for a very specific scenario. That said, it works beautifully for my purposes and I've used it to blog every snippet of source code since then!

So I was surprised and a little disappointed when it stopped working recently... Why? Because I switched to Visual Studio 2010 (Beta 2) and they've changed the RTF clipboard format slightly with that release. Now, while I'm sure VS 2010's RTF is still 100% legal RTF, it's different enough from VS 2008's output that ConvertClipboardRtfToHtmlText chokes on it. Clearly, it was time to dust off the source code and make it work again! :)

Not surprisingly, the update process was quite painless - and by tweaking the code slightly, I've arrived at an implementation that works well for both versions of Visual Studio: 2008 and 2010! The source code download includes a VS 2010 solution and project, but takes advantage of the multi-targeting capabilities of Visual Studio to compile for the .NET 2.0 Framework, ensuring that the resulting executable runs pretty much everywhere.

As long as I was touching the code, I added the following simple banner text:

ConvertClipboardRtfToHtmlText
Version 2009-12-19 - http://blogs.msdn.com/delay/

Converts the Visual Studio 2008/2010 RTF clipboard format to HTML by replacing
the RTF clipboard contents with its HTML representation in text form.

Instructions for use:
1. Copy syntax-highlighted text to the clipboard in Visual Studio
2. Run ConvertClipboardRtfToHtmlText (which has no UI and exits immediately)
3. Paste HTML text into an editor, web page, blog post, etc.

So if you're in the market for a nice way to blog code and you're using Visual Studio 2008 or 2010, maybe ConvertClipboardRtfToHtmlText can help you out!


[Click here to download the ConvertClipboardRtfToHtmlText tool along with its complete source code.]


Here's the complete source code for ConvertClipboardRtfToHtmlText, provided by - you guessed it! - ConvertClipboardRtfToHtmlText:

using System;
using System.Collections.Generic;
using System.Drawing;
using System.Text;
using System.Windows.Forms;

// NOTE: This is NOT a general-purpose RTF-to-HTML converter! It works well
// enough on the input I've tried, but may break in other scenarios.
// TODO: Convert into a real application with a notify icon and hotkey.
namespace ConvertClipboardRtfToHtmlText
{
    static class ConvertClipboardRtfToHtmlText
    {
        private const string colorTbl = "\\colortbl;";
        private const string colorFieldTag = "cf";
        private const string tabExpansion = "    ";

        [STAThread]
        static void Main()
        {
            Console.WriteLine("ConvertClipboardRtfToHtmlText");
            Console.WriteLine("Version 2009-12-19 - http://blogs.msdn.com/delay/");
            Console.WriteLine();
            Console.WriteLine("Converts the Visual Studio 2008/2010 RTF clipboard format to HTML by replacing");
            Console.WriteLine("the RTF clipboard contents with its HTML representation in text form.");
            Console.WriteLine();
            Console.WriteLine("Instructions for use:");
            Console.WriteLine("1. Copy syntax-highlighted text to the clipboard in Visual Studio");
            Console.WriteLine("2. Run ConvertClipboardRtfToHtmlText (which has no UI and exits immediately)");
            Console.WriteLine("3. Paste HTML text into an editor, web page, blog post, etc.");
            if (Clipboard.ContainsText(TextDataFormat.Rtf))
            {
                // Create color table, populate with default color
                List<Color> colors = new List<Color>();
                Color defaultColor = Color.FromArgb(0, 0, 0);
                colors.Add(defaultColor);

                // Get RTF
                string rtf = Clipboard.GetText(TextDataFormat.Rtf);

                // Strip meaningless "\r\n" pairs (used by VS 2008)
                rtf = rtf.Replace("\r\n", "");

                // Parse color table
                int i = rtf.IndexOf(colorTbl);
                if (-1 != i)
                {
                    i += colorTbl.Length;
                    while ((i < rtf.Length) && ('}' != rtf[i]))
                    {
                        // Add color to color table
                        SkipExpectedText(rtf, ref i, "\\red");
                        byte red = (byte)ParseNumericField(rtf, ref i);
                        SkipExpectedText(rtf, ref i, "\\green");
                        byte green = (byte)ParseNumericField(rtf, ref i);
                        SkipExpectedText(rtf, ref i, "\\blue");
                        byte blue = (byte)ParseNumericField(rtf, ref i);
                        colors.Add(Color.FromArgb(red, green, blue));
                        SkipExpectedText(rtf, ref i, ";");
                    }
                }
                else
                {
                    throw new NotSupportedException("Missing/unknown colorTbl.");
                }

                // Find start of text and parse
                i = rtf.IndexOf("\\fs");
                if (-1 != i)
                {
                    // Skip font size tag
                    while ((i < rtf.Length) && (' ' != rtf[i]))
                    {
                        i++;
                    }
                    i++;

                    // Begin building HTML text
                    StringBuilder sb = new StringBuilder();
                    sb.AppendFormat("<pre><span style='color:#{0:x2}{1:x2}{2:x2}'>",
                        defaultColor.R, defaultColor.G, defaultColor.B);
                    while (i < rtf.Length)
                    {
                        if ('\\' == rtf[i])
                        {
                            // Parse escape code
                            i++;
                            if ((i < rtf.Length) &&
                                (('{' == rtf[i]) || ('}' == rtf[i]) || ('\\' == rtf[i])))
                            {
                                // Escaped '{' or '}' or '\'
                                sb.Append(rtf[i]);
                            }
                            else
                            {
                                // Parse tag
                                int tagEnd = rtf.IndexOf(' ', i);
                                if (-1 != tagEnd)
                                {
                                    if (rtf.Substring(i, tagEnd - i).StartsWith(colorFieldTag))
                                    {
                                        // Parse color field tag
                                        i += colorFieldTag.Length;
                                        int colorIndex = ParseNumericField(rtf, ref i);
                                        if ((colorIndex < 0) || (colors.Count <= colorIndex))
                                        {
                                            throw new NotSupportedException("Bad color index.");
                                        }

                                        // Change to new color
                                        sb.AppendFormat(
                                            "</span><span style='color:#{0:x2}{1:x2}{2:x2}'>",
                                            colors[colorIndex].R, colors[colorIndex].G,
                                            colors[colorIndex].B);
                                    }
                                    else if ("tab" == rtf.Substring(i, tagEnd - i))
                                    {
                                        sb.Append(tabExpansion);
                                    }
                                    else if ("par" == rtf.Substring(i, tagEnd - i))
                                    {
                                        sb.Append("\r\n");
                                    }

                                    // Skip tag
                                    i = tagEnd;
                                }
                                else
                                {
                                    throw new NotSupportedException("Malformed tag.");
                                }
                            }
                        }
                        else if ('}' == rtf[i])
                        {
                            // Terminal curly; done
                            break;
                        }
                        else
                        {
                            // Normal character; HTML-escape '<', '>', and '&'
                            switch (rtf[i])
                            {
                                case '<':
                                    sb.Append("&lt;");
                                    break;
                                case '>':
                                    sb.Append("&gt;");
                                    break;
                                case '&':
                                    sb.Append("&amp;");
                                    break;
                                default:
                                    sb.Append(rtf[i]);
                                    break;
                            }
                        }
                        i++;
                    }

                    // Trim any trailing empty lines
                    while ((2 <= sb.Length) && ('\r' == sb[sb.Length - 2]) && ('\n' == sb[sb.Length - 1]))
                    {
                        sb.Length -= 2;
                    }

                    // Finish building HTML text
                    sb.Append("</span></pre>");

                    // Update the clipboard text
                    Clipboard.SetText(sb.ToString());
                }
                else
                {
                    throw new NotSupportedException("Missing text section.");
                }
            }
        }

        // Skip the specified text
        private static void SkipExpectedText(string s, ref int i, string text)
        {
            foreach (char c in text)
            {
                if ((s.Length <= i) || (c != s[i]))
                {
                    throw new NotSupportedException("Expected text missing.");
                }
                i++;
            }
        }

        // Parse a numeric field
        private static int ParseNumericField(string s, ref int i)
        {
            int value = 0;
            while ((i < s.Length) && char.IsDigit(s[i]))
            {
                value *= 10;
                value += s[i] - '0';
                i++;
            }
            return value;
        }
    }
}

Normal booting is old school [Windows 7 tricks detailed: USB key install, VHD creation, and native VHD boot/dual-boot!]

Windows 7 can boot and run in some ways that are a little surprising when you first learn about them. One example is that it can seamlessly install from any sufficiently large USB key; another is that it can natively boot VHD files. Neither of these is hard to configure and both have already been discussed by other web sites. However, it has been my experience that some of the relevant information on the web is confusing, misleading, or incomplete. So in the interest of saving others - and myself! - some trouble, I explain a few interesting scenarios below with exact steps and brief notes on what each step does. (That way, if anything goes wrong, troubleshooting is a lot easier.)

If you already do this kind of thing and have a process that's working for you, there's probably little here that's new. But if you've been thinking of getting your feet wet with any of this, maybe I can help make things a little easier! :)


Notes:

  • The tasks described here are potentially dangerous and can result in the complete loss of your data if done improperly. Always back up your data first, think about what you're doing, check your work, and otherwise take sensible precautions! While I've done my best to ensure the steps below work as intended, I can offer no guarantee they'll work the same under all conditions. Caveat emptor.
  • Things you type look like this - things you do look like [this] - things you need to replace when you type them (like drive letters that vary by machine) look like this.
  • Unless otherwise noted, all tasks should be carried out on a machine running Windows 7.
  • Each task is self-contained and can be done independently of the others.
  • Although I refer to Windows 7 everywhere, Windows Server 2008 R2 supports these same scenarios as well.
  • While it's possible to apply BitLocker drive encryption to a natively-booted VHD, the host drive (i.e., the drive containing the VHD) can not be encrypted. (And if you're going to use BitLocker, you should be aware that the default location for pagefile.sys of a natively-booted VHD is on the host disk outside the VHD.)
  • Here are some good resources for more information:


Installing Windows 7 (or Vista) from a USB Key

Besides making it possible to install Windows on machines without a DVD drive, installing from a USB key has a big advantage: it's fast. All you need is a blank USB key that's big enough to hold everything on the DVD (typically about 3GB of data). Then follow these easy steps and - BAM! - install runs faster than ever!

  1. [Open a Command Prompt as administrator]

    Open the Start Menu, expand "All Programs", "Accessories", right-click on "Command Prompt", then "Run as administrator".

  2. [Insert the USB key]

    Give the system a moment to identify it.

  3. diskpart

    Run the interactive disk partitioning tool.

  4. list disk

    Display the available disks.

  5. select disk #

    Select the USB key; identify it using the "Size" column. USB keys will usually be near the bottom of the list, especially if they've just been plugged-in (when they're likely to be last).

  6. list disk

    Look for the '*' identifying the selected disk and be sure you've selected the right one because the next step will delete all data on that disk.

  7. clean

    Remove all partition/formatting information from the selected disk.

  8. create partition primary

    Create a primary partition on the selected disk.

  9. format quick

    Format the new partition of the selected disk with the default file system.

  10. active

    Mark the new partition on the selected disk active and bootable.

  11. assign

    Assign a drive letter to the new volume of the selected disk.

  12. list volume

    Display the available volumes. Look for the '*' identifying the newly created volume.

  13. exit

    Exit the interactive disk partitioning tool.

  14. robocopy W:\ U:\ /e

    Copy the entire contents of the Windows 7 (or Vista) DVD in drive W to the USB key at drive U.

  15. [Safely remove/unplug the USB key]

    This key can now be inserted in any machine that supports booting from USB (nearly all of them do these days). The experience will be just the same as if the original DVD were used - but it runs considerably faster!

    Note: You may need to hit a special key as the machine starts to tell it to boot from the USB key instead of the internal hard drive - it's usually one of F2/F12/DEL/ESC, but check the manual if you're not sure.


Create a VHD containing an up-to-date Windows 7 image

Installing from USB may be fast, but what's even faster is not having to install at all! If you'll be running Windows 7 in Windows Virtual PC, Hyper-V, or natively from a VHD, it's convenient to start out with an image that already has the bits in the right places and the latest security patches applied. What's cool is that there's a script to make creating one of these VHDs easy: WIM2VHD by Mike Kolitz. Start by going to that web site and following the directions to download WIM2VHD and its dependencies before carrying out the steps below.

  1. [Open a Command Prompt as administrator]

    Open the Start Menu, expand "All Programs", "Accessories", right-click on "Command Prompt", then "Run as administrator".

  2. [Change to the directory containing WIM2VHD.wsf]

    For convenience, this directory should also contain all the QFE patches that will be applied.

  3. cscript WIM2VHD.wsf
      /wim:W:\sources\install.wim
      /sku:ULTIMATE
      /disktype:fixed
      /size:10000
      /vhd:Windows7Ultimate.vhd
      /qfe:Windows6.1-KB973525-x86.msu,Windows6.1-KB974332-x86.msu,Windows6.1-KB974431-x86.msu,Windows6.1-KB974455-x86.msu,Windows6.1-KB974571-x86.msu,Windows6.1-KB975364-x86.msu,Windows6.1-KB975467-x86.msu,Windows6.1-KB976749-x86.msu
    

    Create a VHD named Windows7Ultimate.vhd from the original Windows 7 DVD in drive W using the Ultimate SKU, a fixed size disk of 10GB, and with the listed QFEs pre-applied.

    Note: I'm using the x86 DVD here, so I'm providing the x86 versions of the relevant security patches. This should all work the same for 64-bit, but I prefer 32-bit because it's smaller and works pretty much everywhere.

    Note: You can create a dynamic disk (which starts small and grows as necessary) by omitting the italic /disktype and /size options above. That's going to be faster and easier to deal with for Virtual PC and Hyper-V - but for native VHD boot a fixed size is easier and performs better. That's what I'm going to do in the next task, so I've specified a small, fixed disk above. (Please refer to the FAQ for more detail.)

    Note: Per the FAQ, "Native boot from VHD is only available with Windows 7 Enterprise, Windows 7 Ultimate and all versions of Windows Server 2008 R2."


Configure a clean machine for native VHD booting

Is it possible to boot a machine without a "real" operating system? Yes!

The steps below will clean a machine and configure it to boot into a VHD image from a nearly-empty hard drive. While there are some sensible reasons to do this (e.g., implementing poor-man's undo disks or making it easy to transfer a pre-configured Windows 7 install around), this is mainly just a cool way to show off. :) Rumor has it that these steps can even be used to create a USB key that hosts and boots a running copy of Windows 7, though I don't have a USB key large enough to try myself. (And besides, that would probably wear out the USB key's flash memory quite quickly.)

Note: If you already have Windows 7 installed on a machine, and want to add an additional boot option for VHD, please scroll down to the next task instead.

  1. [Boot the machine from the Windows 7 DVD or a Windows 7 USB key created by the steps above]

    Load a simple shell that can be used to make low-level changes to the disk.

  2. [Wait for the "Install Windows" dialog to display]

    Allow the system to boot completely.

  3. [Optional: Plug in an external USB drive containing the VHD image]

    If you're booting from the DVD or using a USB key that's too small to hold the 10GB VHD image, you can store the VHD file on a separate USB hard disk. Plug that disk in now, and give the system a moment to find it and assign it a drive letter.

  4. [Press Shift+F10]

    Open an interactive command prompt with administrator permissions

  5. diskpart

    Run the interactive disk partitioning tool.

  6. list disk

    Display the available disks.

  7. select disk #

    Select the primary hard disk; it will usually be at index 0.

  8. list disk

    Look for the '*' identifying the selected disk and be sure you've selected the right one because the next step will delete all data on that disk.

  9. clean

    Remove all partition/formatting information from the selected disk.

  10. create partition primary

    Create a primary partition on the selected disk.

  11. format quick

    Format the new partition of the selected disk with the default file system.

  12. active

    Mark the new partition on the selected disk active and bootable.

  13. assign

    Assign a drive letter to the new volume of the selected disk.

  14. list volume

    Display the available volumes. Look for the '*' identifying the newly created volume.

  15. exit

    Exit the interactive disk partitioning tool.

  16. copy E:\Windows7Ultimate.vhd C:\

    Copy the VHD file Windows7Ultimate.vhd from (external) drive E to the now-empty primary hard drive C. This may take a little while...

  17. diskpart

    Run the interactive disk partitioning tool.

  18. select vdisk file=C:\Windows7Ultimate.vhd

    Select the VHD file Windows7Ultimate.vhd just copied to the primary hard drive C. Make sure not to reference the VHD file on the removable disk because that disk won't be available in the future.

  19. attach vdisk

    Attach the selected virtual disk to the system.

  20. list volume

    Display the available volumes. Look for the new virtual disk volume; identify it using the "Size" column (it will probably be the last one listed).

  21. exit

    Exit the interactive disk partitioning tool.

  22. bcdboot V:\Windows /s C:

    Configure primary hard disk drive C to boot into the copy of Windows installed on virtual drive V (the newly attached virtual disk volume).

  23. exit

    Close the Command Prompt window.

  24. [Close the "Install Windows" dialog by clicking the 'X' in the upper-right corner]

    Cancel the install process.

  25. [Confirm you want to cancel the install process]

    Yes, really cancel the install process.

  26. [Wait while the machine automatically reboots]

    Allow the machine to boot into the new VHD image. (Note: This may require unplugging the USB key and/or external USB drive.) After booting into the VHD image, Windows will run through the last stages of setup (e.g., user name, time zone, etc.) and finalize the install.

    Enjoy your new VHD-based Windows!


Add native VHD booting to a machine with Windows 7

If you already have a machine with Windows 7 installed (perhaps via the previous set of steps), you can modify it to boot a separate instance of Windows 7 from VHD.

  1. [Open a Command Prompt as administrator]

    Open the Start Menu, expand "All Programs", "Accessories", right-click on "Command Prompt", then "Run as administrator".

  2. copy E:\Windows7Ultimate.vhd C:\

    Copy the VHD file Windows7Ultimate2.vhd from (any) drive E to drive C which should be the machine's primary hard disk. (It will already contain a VHD file if you're continuing along from the previous task.) Make sure drive C does not correspond to a VHD-based disk.

  3. bcdedit /copy {default} /d "Windows 7 VHD"

    Creates a copy of the default boot configuration with the name Windows 7 VHD. Note the GUID that is returned by this command; use it in place of GUID in the following commands.

  4. bcdedit /set GUID device vhd=[C:]\Windows7Ultimate2.vhd

    Set the device for the new boot configuration to the Windows7Ultimate2.vhd file on drive C. (Note: Use the "[C:]\..." syntax exactly as shown above with the square brackets.)

  5. bcdedit /set GUID osdevice vhd=[C:]\Windows7Ultimate2.vhd

    Set the OS device for the new configuration to the Windows7Ultimate2.vhd file on drive C. (Note: Use the "[C:]\..." syntax exactly as shown above with the square brackets.)

  6. [Reboot and choose the new ""Windows 7 VHD" option]

    Boot into the new VHD.

    Note: If that doesn't work, please have a look at the end of this document and try the "detecthal on" step. I haven't found this to be necessary, so I haven't listed it - but if others find that it's helpful, I'll call that out.

Tags: Technical

Creating something from nothing - and knowing it [Developer-friendly virtual file implementation for .NET refined!]

A couple of weeks ago I wrote about VirtualFileDataObject, my developer-friendly virtual file implementation for .NET and WPF. I followed that up by adding support for asynchronous behavior to improve the user experience during long-running operations. Last week, these posts got a shout-out from blogging legend Raymond Chen, whose work provided the inspiration for the project. [Best week ever! :) ] Now it's time for one last tweak to wrap things up!


Recall that the Windows APIs for drag-and-drop and clipboard operations deal with objects that implement the IDataObject COM interface. And while the native DoDragDrop function tries to provide a mechanism for the source and target to communicate (via the pdwEffect parameter and the function's return value), there's nothing similar available for the SetClipboardData function. And once you enable asynchronous drag-and-drop, it's clear that the return value of DoDragDrop isn't going to work, either, because the call returns immediately (before the operation has completed). So it seems like there must be some other way for the source and target to share information...

Sure enough, there are some shell clipboard formats specifically for enabling communication between the source and target! For the purposes of this sample, we're interested in using two of them:

And here's another which is relevant enough that I wrote code to support it, though I'll only mention it once more here:

  • CFSTR_PASTESUCCEEDED - Indication that a paste succeeded and what kind of operation (copy/move/link) it did


Armed with that knowledge, let's tweak the sample application so one of the scenarios does a move/cut instead of a copy:

VirtualFileDataObjectDemo sample application

The first tweak to the code modifies our helper function to accept a DragDropEffects parameter so the caller can indicate its copy/move preference with the new PreferredDropEffect property in the clipboard scenario:

private static void DoDragDropOrClipboardSetDataObject(MouseButton button, DependencyObject dragSource,
    VirtualFileDataObject virtualFileDataObject, DragDropEffects allowedEffects)
{
    try
    {
        if (button == MouseButton.Left)
        {
            // Left button is used to start a drag/drop operation
            VirtualFileDataObject.DoDragDrop(dragSource, virtualFileDataObject, allowedEffects);
        }
        else if (button == MouseButton.Right)
        {
            // Right button is used to copy to the clipboard
            // Communicate the preferred behavior to the destination
            virtualFileDataObject.PreferredDropEffect = allowedEffects;
            Clipboard.SetDataObject(virtualFileDataObject);
        }
    }
    catch (COMException)
    {
        // Failure; no way to recover
    }
}

Then we can tweak the VirtualFileDataObject constructor to pass a custom "end" action that uses the new PerformedDropEffect property to find out what action took place. If the target performed a move (or a cut with the clipboard), then we'll hide the corresponding "button" to reflect that fact:

private void VirtualFile_MouseButtonDown(object sender, MouseButtonEventArgs e)
{
    var virtualFileDataObject = new VirtualFileDataObject(
        null,
        (vfdo) =>
        {
            if (DragDropEffects.Move == vfdo.PerformedDropEffect)
            {
                // Hide the element that was moved (or cut)
                // BeginInvoke ensures UI operations happen on the right thread
                Dispatcher.BeginInvoke((Action)(() => VirtualFile.Visibility = Visibility.Hidden));
            }
        });

    // Provide a virtual file (generated on demand) containing the letters 'a'-'z'
    ...

    DoDragDropOrClipboardSetDataObject(e.ChangedButton, TextUrl, virtualFileDataObject, DragDropEffects.Move);
}

Please note that the begin/end actions are now of type Action<VirtualFileDataObject>. The new parameter is always a reference to the active VirtualFileDataObject instance and is provided to make it easy to use anonymous methods like you see above.

Aside: Otherwise you'd need to capture the VirtualFileDataObject instance so you could pass it to the action being provided to that same instance's constructor! (Catch-22 much?) While there may be a clever way to do this without making the begin/end actions properties of the class (which I didn't want to do because that wouldn't ensure they're invariant), passing the VirtualFileDataObject in this manner is both easy and obvious.
Further aside: As a consequence of the changes to support these new properties, VirtualFileDataObject now implements the IDataObject::SetData method for HGLOBAL-style data. So if there's some other CFSTR_ property that's relevant to your scenario, you can query it off the VirtualFileDataObject instance in much the same manner!


[Click here to download the complete code for VirtualFileDataObject and the sample application.]


And that's pretty much all there is to it! With the addition of PreferredDropEffect and PerformedDropEffect (and PasteSucceeded, though it's not demonstrated above), VirtualFileDataObject makes it easy for your application to provide a seamless virtual file drag/drop experience with all the sophisticated nuances users expect from a polished Windows application.

Enjoy!