The blog of dlaa.me

"I never did mind about the little things..." [Free HideShowDesktopButtonOnTaskbar utility hides the "Show desktop" button on the Windows taskbar]

Over the holidays, a relative emailed me the following rant:

Most of my conversation with technical support was to find out how to turn off the "Show desktop" icon in the lower right corner of the screen. This icon can be engaged by clicking on it or hovering over it (if you select Peek). On a desktop or a laptop this is NO PROBLEM. But on a tablet, there is no difference between clicking and hovering so Peek is meaningless. VERY OFTEN when using and holding the slate/tablet the heel of my thumb ever so gently touches the "Show desktop" icon and I am taken to the desktop in the middle of what I am doing. As I work, I am in constant fear of touching this icon. I know that everything on my hard drive will not be erased if I do, but it is very annoying. I went on the internet and found a program that turns the icon off and it worked (so it can be done), but then my antivirus program said that it was a THREAT AND ADVISED ME TO PUT IT IN A VAULT WHERE IT COULD NOT HARM MY COMPUTER. I agreed and the program was deleted. I'm not the only one with this problem. The internet has many complaining about the "Show desktop" icon. MS allows me to turn the Clock and Volume icon off; why not the "Show Desktop" icon?????

If you want a somewhat more positive spin, "Aero Peek" and the "Show desktop" button are described in this article about new Windows 7 taskbar features. I don't use either myself, but a bit of internet searching confirmed some people really don't like these features.

"Show desktop" button


The best way to disable a feature is to use an officially supported mechanism - and the good news is that disabling Aero Peek is easy to do by following the directions "To turn off desktop previews" near the bottom of this article. However, I was not able to find similar support for disabling the "Show desktop" button, so I resorted to looking for the next best thing: a group policy setting or documented registry key. Unfortunately, I struck out there, too. But I did find this snippet from a Channel 9 video where Gov Maharaj confirms there's no built-in way to disable the button.

Aside: The relevant discussion is interesting, so maybe have a look even if you're not opposed to the feature itself!


Well, if there's no official way to remove the "Show desktop" button and enough people want to do it, then it's time to start considering other solutions. According to the original rant (and the video discussion), there already are third-party utilities for this purpose - although they're not supported by Microsoft. But it sounds like at least one of these tools might be malware, so I'm not super enthusiastic about trying them out...

Fortunately, I have a rudimentary understanding of both Windows and programming [ :) ], so I wondered if the simplest, most obvious trick would work here. I coded it up one night while waiting for something to compile and was pleased to find that it worked! So I've gone ahead and prettied the code up and am sharing a simple utility to get rid of the Windows 7 taskbar's "Show desktop" button:

HideShowDesktopButtonOnTaskbar icon

[Click here to download the HideShowDesktopButtonOnTaskbar utility and its complete source code.]


Of course, HideShowDesktopButtonOnTaskbar is just as unsupported and unofficial as the other utilities out there - so why choose it?

  • I've included the complete source code for HideShowDesktopButtonOnTaskbar, so you can review everything and re-compile it yourself if you're paranoid. Also, you can be pretty confident I'm not a 1337 h4x0r trying to root your box. :)

  • HideShowDesktopButtonOnTaskbar makes no persistent changes to the machine, so there are no lingering effects and a simple logoff is all it takes to restore everything to the way it was.

  • HideShowDesktopButtonOnTaskbar is simple, small, unobtrusive, and easy to use - just add it to your Startup group to have it run every time you log into Windows!


Okay, enough with the goofy sales pitch... how about some developer notes?

  • As I mentioned, HideShowDesktopButtonOnTaskbar works the simplest way you can imagine: it finds the window corresponding to the "Show desktop" button and hides it. Obviously, hidden windows aren't visible - but they also don't receive input (clicks or hover status), so although the taskbar is still listening for input messages, they don't get sent. Running HideShowDesktopButtonOnTaskbar a second time finds and unhides the "Show desktop" button, restoring things back to how they started. Logging off disposes of the entire taskbar and logging back on creates a new one from scratch, so HideShowDesktopButtonOnTaskbar's changes don't persist.
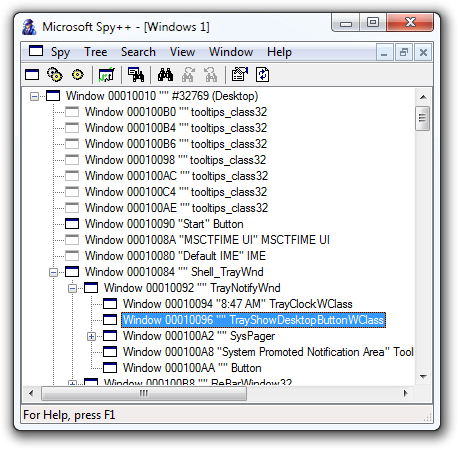
  • Spy++ of "Show desktop" button

    I figured out the right window class to target by using the handy-dandy Spy++ Windows development tool. Specifically, I ran Spy++, clicked the "Find Window" tool, dragged the crosshairs over the "Show desktop" button, and hit OK. That showed the window hierarchy to the right beginning with the desktop window at the top and going down to the "Show desktop" button. Translating that into three nested calls to FindWindowEx was trivial, as was adding a call to ShowWindow to hide the window. Using IsWindowVisible to unhide the button when it was already hidden was just icing on the cake. :)

    Aside: If the window hierarchy changes or if any of the hard-coded class names is different in a newer version of Windows, this will stop working... Yep, that's how it is with simple hacks like this - if it matters to anyone, I can always tweak things to accommodate.
  • Because HideShowDesktopButtonOnTaskbar ended up being easy to write, I was looking for a bit more challenge and set out to make it small. Specifically, the executable is just 11,776 bytes - and 7,015 bytes of that is due to the icon! While I could have squeezed a few more bytes out if I felt like it, the big win was by not linking to the standard C Run-Time library (the use of which results in a 41,472 byte file assuming static linking (i.e., /MT) is used to remove the dependency on MSVCR100.dll). Eschewing the CRT is an advanced scenario, but it was easy to do for HideShowDesktopButtonOnTaskbar because it's so small and simple.

    Aside: This is why the code's entry point is named WinMainCRTStartup instead of the usual WinMain. And by the way: if you're interested in reading more about what it means to get rid of the default CRT, Matt Pietrek's classic "Reduce EXE and DLL Size with LIBCTINY.LIB" is a good place to start.
  • Of course, everything has a price, and I needed to make two other changes as a result of omitting the default CRT. Both are found in Visual Studio's project Properties, Configuration Properties, C/C++, Code Generation settings: changing Basic Runtime Checks (known as <BasicRuntimeChecks> in the .vcxproj file) to Default (i.e., no /RTC? option) and changing Buffer Security Check (<BufferSecurityCheck>) to false (i.e., /GS-). Disabling these checks isn't something you should do in general (especially the latter), but HideShowDesktopButtonOnTaskbar takes no input, has no buffers, and is so simple that I'm (tentatively!) okay sacrificing these two security/resiliency measures.

  • The call to HeapSetInformation / HeapEnableTerminationOnCorruption is almost definitely overkill - but it's good practice and so easy to add that I did so anyway (FYI that the default CRT call this automatically). Plus, doing this made me feel a little better about losing /GS. :)


If you're bothered by Windows 7's "Show desktop" button and are looking for a solution, maybe HideShowDesktopButtonOnTaskbar is the answer. If you're curious how a hack like this works or are looking to dabble with replacing the CRT in your own programs, there might be something of interest here. Either way, HideShowDesktopButtonOnTaskbar was a fun side project - I hope you like it! :)


The code:

// Include system headers (at warning level 3 because they're not /Wall-friendly) #pragma warning(push, 3)
#include <windows.h> #pragma warning(pop)

// Disable harmless /Wall warning C4514 "unreferenced inline function has been removed" #pragma warning(disable: 4514)

// Default entry point function int __stdcall WinMainCRTStartup()
{
    // Enable "terminate-on-corruption"
    (void)HeapSetInformation(NULL, HeapEnableTerminationOnCorruption, NULL, 0);

    // Find the "Show desktop" button/window (starting from the Desktop window)    const HWND hwndTaskbar = FindWindowEx(NULL, NULL, TEXT("Shell_TrayWnd"), NULL);
    if (NULL != hwndTaskbar)
    {
        const HWND hwndNotify = FindWindowEx(hwndTaskbar, NULL, TEXT("TrayNotifyWnd"), NULL);
        if (NULL != hwndNotify)
        {
            const HWND hwndShowDesktopButton = FindWindowEx(hwndNotify, NULL, TEXT("TrayShowDesktopButtonWClass"), NULL);
            if (NULL != hwndShowDesktopButton)
            {
                // Toggle the visibility of the button                const int nCmdShow = IsWindowVisible(hwndShowDesktopButton) ? SW_HIDE : SW_SHOW;
                (void)ShowWindow(hwndShowDesktopButton, nCmdShow);
            }
        }
    }

    // Return 0 because a message loop wasn't entered    return 0;
}
"Make things as simple as possible, but not simpler." [ManagedMsiExec sample app shows how to use the Windows Installer API from managed code]

Windows Installer is the installation and configuration service used by Windows to add and remove applications. (For more information, Wikipedia has a great overview of Windows Installer, covering products, components, setup phases, permissions, etc..) In addition to exposing a rich, native API, Windows Installer comes with msiexec.exe, a command-line tool that offers fine-grained control over the install/uninstall process.

I wanted to familiarize myself with the use of the Windows Installer API from .NET, so I wrote a wrapper class to expose it to managed applications and then a simple program to exercise it. Unlike msiexec.exe which can do all kinds of things, my ManagedMsiExec supports only UI-less install and uninstall of a .MSI Windows Installer package (i.e., /quiet mode). By default, ManagedMsiExec provides simple status reporting on the command line and renders a text-based progress bar that shows how each phase is going. In its "verbose" mode, ManagedMsiExec outputs the complete set of status/progress/diagnostic messages generated by Windows Installer (i.e., /l*) so any problems can be investigated.

Aside: Although I haven't tested ManagedMsiExec exhaustively, it's fundamentally just a thin wrapper around Windows Installer, so I'd expect it to work for pretty much any MSI out there.


Here's how it looks when run:

C:\T>ManagedMsiExec
SYNTAX: ManagedMsiExec <--Install|-i|--Uninstall|-u> Package.msi [--Verbose|-v]
Windows Installer result: 87 (INVALID_PARAMETER)

Doing a simple install:

C:\T>ManagedMsiExec -i Package.msi
ManagedMsiExec: Installing C:\T\Package.msi
Windows Installer result: 0 (SUCCESS)

Doing a simple uninstall:

C:\T>ManagedMsiExec -u Package.msi
ManagedMsiExec: Uninstalling C:\T\Package.msi
Windows Installer result: 0 (SUCCESS)

Using verbose mode to diagnose a failure:

C:\T>ManagedMsiExec -u Package.msi -v
ManagedMsiExec: Uninstalling C:\T\Package.msi
ACTIONSTART: Action 18:31:21: INSTALL.
INFO: Action start 18:31:21: INSTALL.
COMMONDATA: 1: 0 2: 1033 3: 1252
PROGRESS:
PROGRESS: 1: 2 2: 189440
COMMONDATA: 1: 0 2: 1033 3: 1252
INFO: This action is only valid for products that are currently installed.
C:\T\Package.msi
COMMONDATA: 1: 2 2: 0
COMMONDATA: 1: 2 2: 1
INFO: DEBUG: Error 2755:  Server returned unexpected error 1605 attempting to
  install package C:\T\Package.msi.
ERROR: The installer has encountered an unexpected error installing this package.
  This may indicate a problem with this package. The error code is 2755.
INFO: Action ended 18:31:21: INSTALL. Return value 3.
TERMINATE:
Windows Installer result: 1603 (INSTALL_FAILURE)


Of note:

  • Msi.cs, the class containing a set of .NET platform invoke definitions for interoperating with the native MSI.dll that exposes Windows Installer APIs. The collection of functions and constants in this file is not comprehensive, but it covers enough functionality to get simple scenarios working. Most of the definitions are straightforward, and all of them have XML documentation comments (via MSDN) explaining their purpose. For convenience, many of the relevant Windows error codes from winerror.h are exposed by the ERROR enumeration.

  • ManagedMsiExec.cs, the sample application itself which works by calling the relevant Msi APIs in the right order. Conveniently, a complete install can be done in as few as three calls: MsiOpenPackage, MsiDoAction, and MsiCloseHandle (with MsiSetProperty an optional fourth for uninstall or customization). To provide a better command-line experience, the default UI for status reporting is customized via MsiSetInternalUI, MsiSetExternalUI, and MsiSetExternalUIRecord. Implementing the handler for a MsiSetExternalUI callback is easy because it is passed pre-formatted strings; parsing record structures in the handler for the MsiSetExternalUIRecord callback requires a few more API calls (and a closer reading of the documentation!).

Note: When providing delegates to the MsiSetExternalUI and MsiSetExternalUIRecord methods, it's important to ensure they won't be garbage collected while still in use (or else the application will crash!). Because the managed instances are handed off to native code and have a lifetime that extends beyond the function call itself, it's necessary to maintain a reference for the life of the application (or until the callback is unregistered). A common technique for maintaining such a reference is the GC.KeepAlive method (though ManagedMsiExec simply stores its delegate references in a static member for the same effect). Conveniently, the callbackOnCollectedDelegate managed debugging assistant can help identify lifetime problems during debugging


[Click here to download a pre-compiled executable along with the complete source code for the ManagedMsiExec sample.]


The introduction of Windows Installer helped unify the way applications install on Windows and encapsulates a great deal of complexity that installers previously needed to deal with. The openness and comprehensiveness of the Windows Installer native API makes it easy for applications to orchestrate installs directly, and the power of .NET's interoperability support makes it simple for managed applications to do the same.

The Msi class I'm sharing here should allow developers to get started with the Windows Installer API a bit more simply - as the ManagedMsiExec sample demonstrates. The wrapper class and the sample are both pretty straightforward - I hope they're useful, informative, or at least somewhat interesting! :)

"You are now up to date." [IfModifiedSinceWebClient makes it easy to keep a local file in sync with online content - and do so asynchronously]

Recently, I was working with a program that needs to cache the content of a network file on the local disk for faster, easier access. The network file is expected to change periodically according to an unpredictable schedule; the objective is to keep the local file in "close" sync with the online copy without a lot of cost or complex protocols.

The network content is static (when it's not changing!), so hosting it on a web server and accessing it via HTTP seems like a reasonable start. Implementation-wise, it turns out the file is needed immediately when accessed, so downloading it on-demand is not an option due to the possibility of lengthy network delays or connectivity issues. Fortunately, it's okay to use an out-of-date version as long as there's a good chance the next access will use the latest one. So a reasonable approach seems to be to wait for the local file to be needed, use it immediately in its current state, then update it to the latest version by asynchronously downloading the network file and replacing the local copy in the background.

IfModifiedSinceWebClientDemo sample

That approach satisfies the requirements of the scenario, but it's a little wasteful because the local file is likely to be used much more frequently than the online version gets updated - which means most of the downloads will end up being the same version that's already cached locally! Fortunately, we can improve things easily: the HTTP specification defines the If-Modified-Since header for exactly this purpose! By including that header with the HTTP request, the server "knows" whether the local file is out of date. If so, it returns the data for the network file as usual - but if the network file has not changed more recently, the web server returns a 304 Not Modified result and no content. This "short circuiting" of the HTTP response eliminates the need to send redundant data and reduces the network traffic to a single, short HTTP request/response pair.


When implementing a solution like this with the .NET Framework, two approaches spring to mind. The first is to use the low-level HttpWebRequest/HttpWebResponse classes and manage the entire operation directly. HttpWebRequest has an IfModifiedSince property that can be used to set the relevant HTTP header (and format it correctly), so this approach is straightforward and quite flexibile. However, it also requires the caller to manage the transfer of bits from the source to the destination (including reading, writing, buffering, etc.), and that's not really code we want to write. The second approach is to use something like the higher-level WebClient class's DownloadFileAsync method to do the entire download and call us back when everything has been taken care of. That seems preferable, so lets go ahead and set the WebClient.IfModifiedSince property and... umm... wait... WebClient doesn't have an IfModifiedSince property! And not only doesn't the property exist, you're not allowed to set it manually via the Headers property: "In addition, some other headers are also restricted when using a WebClient object. These restricted headers include, but are not limited to the following: ... If-Modified-Since ...".

Darn, I really wanted to use WebClient and avoid having to encode the If-Modified-Since header myself. If only it were possible to tweak the way WebClient initializes its underlying HttpWebRequest, we'd be set... Hey, what about the WebClient.GetWebRequest method? Isn't this exactly what it's for? Yes, it is! :)


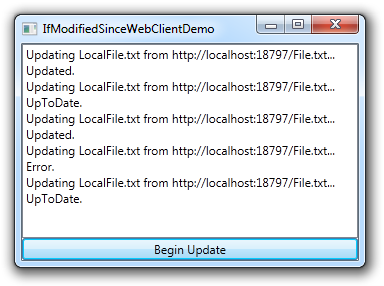
To make this all work, I created IfModifiedSinceWebClient which is a WebClient subclass that adds an IfModifiedSince property and overrides GetWebRequest to set that DateTime value onto the underlying HttpWebRequest. Unfortunately, there are two issues: the destination file gets deleted before the download starts (so it ends up being 0 bytes when HTTP 304 is returned) and HTTP 304 is defined as a failure code, so WebClient thinks a successful (NOOP) download has failed. To address both issues and offer a seamless experience, IfModifiedSinceWebClient exposes a custom UpdateFileIfNewer method that's asynchronous (i.e., "fire and forget") and simple. Just pass it the path to a local file to create/update and a URI for the remote file. (You can optionally pass a "completed" method to be called with the result of the asynchronous update.) UpdateFileIfNewer sets the If-Modified-Since header and initiates a call to DownloadFileAsync, providing a temporary file path. If the remote file is not newer than the local one, no transfer occurs and the UpToDate result is passed to the completion method. If the remote file is newer (or the server doesn't support If-Modified-Since), the local file will be replaced with the just-downloaded copy and the Updated result will be returned. And if something goes wrong, the local file is left alone and the Error result is used.


Here's what a typical call looks like:

private void MyMethod()
{
    // ...

    var localFile = "LocalFile.txt";
    var uri = new Uri("http://example.com/NetworkFile.txt");
    IfModifiedSinceWebClient.UpdateFileIfNewer(localFile, uri, UpdateFileIfNewerCompleted);
    // Note: Download occurs asynchronously

    // ...
}

private void UpdateFileIfNewerCompleted(IfModifiedSinceWebClient.UpdateFileIfNewerResult result)
{
    switch (result)
    {
        case IfModifiedSinceWebClient.UpdateFileIfNewerResult.Updated:
            // ...
            break;
        case IfModifiedSinceWebClient.UpdateFileIfNewerResult.UpToDate:
            // ...
            break;
        case IfModifiedSinceWebClient.UpdateFileIfNewerResult.Error:
            // ...
            break;
    }
}


[Click here to download the source code for IfModifiedSinceWebClient and the sample application shown at the start of the post.]

(Don't forget to update the sample's localhost test URI to a valid URI for your environment.)


IfModifiedSinceWebClient is a simple subclass that adds If-Modified-Since functionality to the .NET Framework's WebClient. But that's only half the battle - the UpdateFileIfNewer method makes the "asynchronously update a file if necessary" scenario work by building on that with a temporary file, error detection, and result codes. The result is a seamless, unobtrusive way for an application to keep itself up to date with dynamically changing online content without incurring unnecessary network overhead. Although there are other, more sophisticated solutions to this problem, it's hard to beat the simplicity and compactness of IfModifiedSinceWebClient!

Aside: For bonus points, IfModifiedSinceWebClient could also set the local file's "last modified" time to the Last-Modified value returned by the server. I haven't done so in the sample because it doesn't seem like the subtle time skew (between the client and server clocks) will matter in most cases. However, I reserve the right to change my mind if practical experience contradicts me. :)
Tags: Technical

Don't make the audience sit through all your typo-ing [Overview of implementing an extension for WebMatrix - and the complete source code for the Snippets sample]

When I wrote about WebMatrix's new extensibility features a couple of posts back, I said I'd share the complete source code to Snippets, one of the sample extensions in the gallery. In this post, I'll be doing that along with explaining the overall extension model in a bit more detail. To begin with, here's the code so those of you who want to follow along at home can do so:

[Click here to download the complete source code for the Snippets extension]


Background

I created the Snippets extension by starting from the "WebMatrix Extension" Visual Studio Project template I wrote about previously. When expanded, the project template automatically set up the right project references (i.e., Microsoft.WebMatrix.Extensibility.dll) and build steps and created a functioning extension with a single Ribbon button. From there, creating Snippets was a simple matter of adding the functionality I wanted on top of that foundation. But more on that later - I want to go over the default code first.


The default project template extension

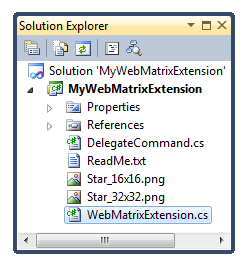
WebMatrix Extension project template

One key thing to notice is that the template-generated WebMatrixExtension class derives from ExtensionBase, a base class which implements WebMatrix's IExtension interface and simplifies some of the work of dealing with it. In the interest of generality (and because it's just an interface), IExtension doesn't do much beyond identifying a few required properties. ExtensionBase builds on that to offer concrete collections for the IEnumerable(T) properties, automatically MEF Imports the IWebMatrixHost interface, creates an OnWebMatrixHostChanged override, and so on. Of course, none of this is rocket science and the decision to use ExtensionBase is completely up to you. But the whole reason it exists to make your life easier, so I'd suggest at least giving it a chance. :)

In order for an extension to be loaded by WebMatrix, it needs to be located in the right directory (more on that in the previous post) and it needs to MEF Export the IExtension interface. You might think that ExtensionBase should do the latter for you, but it doesn't because that might restrict your own class hierarchy (i.e., intermediary classes would advertise themselves as extensions even though they're not). Therefore, subclasses like the template-generated WebMatrixExtension class need to explicitly export IExtension.

With the groundwork out of the way, the basic functionality of the example extension is to add a Ribbon button and handle activation of that button to open the current web site in the browser. Providing content for the Ribbon is as easy as adding instances implementing the relevant interfaces (IRibbonButton, IRibbonMenuButton, IRibbonGroup, etc.) to the generated class's RibbonItemsCollection. It's important to do this exactly once (typically in the extension's constructor) because subsequent changes are not honored (FYI, that may change in the future, but please don't count on it). Of course, you can show and hide Ribbon content whenever you wish; you just can't add or remove items after initialization. Again, there are simple, concrete subclasses for each of the relevant interfaces (IRibbonButton->RibbonButton, etc.) so you don't need to spend time implementing these simple things yourself. And just like before, using the "helper implementations" is completely optional.

Creating a RibbonButton requires a label, an ICommand implementation, and (optionally) a small/large image. The template's sample includes a couple of images already configured properly to provide a working example. Wiring up the images correctly is standard WPF, but the pack URI syntax can be a little tricky and it's common to forget to change the build type of the image files to "Resource" - so that's already been done for you as a helpful reminder. :) For its ICommand implementation, the template sample uses a simple DelegateCommand class (also included). The sample DelegateCommand is very much in line with other implementations of DelegateCommand or RelayCommand. (Feel free to use whatever version you'd like; the sample DelegateCommand exists simply to avoid introducing a dependency on a third-party library.) As you'd expect, the ICommand's CanExecute and CanExecuteChanged methods are used to dynamically enable/disable the button and its Execute method is called when the button is clicked.

Yeah, it takes a while to describe what's going on, but there's hardly any code at all! :)


The Snippets extension

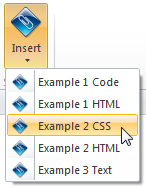
Snippets extension in use

With the foundation behind us, it's time to consider the Snippets extension itself - and for that, it's helpful to know what it does. Snippets was created with the typical demo scenario in mind: a presenter is showing off WebMatrix and wants to add a block of code to a document, but doesn't want to type it out in front of the audience because that can be slow and boring. Instead, he or she clicks on the Snippets button in the Ribbon, selects from a list of available snippets, and the relevant text is automatically inserted in the editor. Of course, individual snippets should be easy for the user to add or modify and they should allow small and large amounts of text as well as blank lines, etc..

There are probably a hundred ways you could build this extension; here's how I've done it:

  • Each snippet is stored as a text file (ex: "Empty DIV.txt") in the Snippets folder of the user's Documents folder (i.e., %USERPROFILE%\Documents\Snippets). The file's name identifies the snippet and its contents get added when the snippet is used. You can have as many or few snippet files as you'd like; they're read when the extension is loaded and cached. If there aren't any snippet files (or the Snippets folder doesn't exist), the extension provides a simple message with instructions for how to set things up.

    Aside: WebMatrix needs to be restarted in order for snippet changes to take effect. An obvious improvement would be for the Snippets extension to monitor the Snippets directory for changes and apply them on the fly.
  • The Snippets user interface is a RibbonMenuButton which contains a collection of RibbonButton instances corresponding to each of the available snippets. When the RibbonMenuButton is clicked, it automatically shows the IRibbonButton instances from its Itemscollection in a small, drop-down menu. When a selection is made, the menu is automatically closed.

    Aside: A RibbonSplitButton could have been used if there was a scenario where the user could click the top half of the button to perform a similar action (like inserting a default snippet).
  • The Snippets button only makes sense when the "Files" workspace is active (i.e., a document is being edited), so the extension listens to the IWebMatrixHost.WorkspaceChanged event and shows/hides its Ribbon button according to whether the new workspace is an instance of the IEditorWorkspace interface.

    Aside: One of the bits of feedback we've gotten so far is that this scenario (i.e., "only available for a single workspace") is common and should be simplified. Yep, message received. :)
  • To insert text into the document, Snippets invokes the Paste command via the IWebMatrixHost.HostCommands property. While it's possible to get and set editor text directly for more advanced scenarios, the Paste command works nicely because the editor automatically updates the caret position, replaces selected text, etc.. The downside to using the (application-wide) Paste command is that if the input focus isn't in the body of an open file, then the paste action will be directed elsewhere and won't work as it's meant to.

    Aside: The editor interfaces are almost rich enough to manage everything here and avoid using Paste. However, there were a couple of glitches when I tried which led me to use the simpler paste approach for the sample.
  • Input focus aside, one thing that's clear is that Snippets can never be added without an open document visible. To determine if that's the case, Snippets uses an unnamed host command to populate an instance of IEditorContainer. If that fails or the IEditorExt within is null, that means no document is open and Snippets knows to disable its Ribbon buttons.

    Unnamed host commands work just like named commands (i.e., Paste), though they're a little harder to get to. The HostCommands.GetCommand method exists for this purpose and allows the caller to pass a GUID/ID for the command to return. The relevant code looks like this:

    /// <summary>
    /// Gets an IEditorExt instance if the editor is in use.
    /// </summary>
    /// <returns>IEditorExt reference.</returns>
    private IEditorExt GetEditorExt()
    {
        var editorContainer = new EditorContainer();
        _editorContainerCommand = WebMatrixHost.HostCommands.GetCommand(new Guid("27a0f541-c86c-4f0b-b436-0b50bf9f7ef8"), 10);
        if (_editorContainerCommand != null)
        {
            _editorContainerCommand.Execute(editorContainer);
        }
    
        return editorContainer.Editor;
    }

    Helper properties for this and other unnamed commands be added in the future. For now, FYI about a useful one. :)

  • Although the RibbonButton class supports a parameter parameter for passing to the ICommand's CanExecute/Execute methods to provide additional context, this value is not actually passed through in some cases. :( This bug was found too late to fix for the Beta, but the good news is that it's easy to work around by creating a closure to capture the relevant parameter information instead. If you're not familiar with this technique, it involves defining an anonymous method that references the desired data; the compiler automatically captures the necessary values and passes them along when the delegate gets called.

    Here's what it looks like in the sample (using LINQ to create the collection):

    // Create buttons for each snippet
    var snippetsButtons = _snippets
        .Select(s =>
            new RibbonButton(
                s.Key,
                new DelegateCommand(
                    (parameter) => GetEditorExt() != null,
                    (parameter) =>
                    {
                        // parameter is (incorrectly) null, so add this indirection for now
                        HandleSnippetInvoke(s.Value);
                    }),
                s.Value,
                _snippetsImageSmall,
                _snippetsImageLarge));
  • It turns out there's a subtle bug because of the following code in the sample:

    // Paste the snippet into the editor
    var paste = WebMatrixHost.HostCommands.Paste;
    if (paste.CanExecute(insertText))
    {
        paste.Execute(insertText);
    }

    Note that Snippets is invoking a special flavor of the Paste command by providing the text as the parameter property for the CanExecute/Execute methods (meaning "paste this text, please"). However, the underlying editor code is returning a CanExecute result based on whether or not it could paste from the clipboard (i.e., it's not honoring the meaning of the text parameter). Therefore, if the clipboard is empty or contains non-text data like a file, CanExecute returns false and Snippets isn't able to insert text.

    The easy workaround is to copy some text to the clipboard so the underlying implementation will return true for CanExecute and the specialized paste operation will be invoked.


Summary

Snippets is a small extension that builds on the default WebMatrix Extension project template to implement some useful (if limited) functionality. Its original purpose was to simplify demos, but if people find practical uses for it, that's great, too! :)

But whether or not people use it, the Snippets extension touches on enough interesting areas of extensibility that people can probably learn from it. If you're getting started with WebMatrix extensions and are looking for a "real world" sample, I hope Snippets can be helpful. If you have feedback or questions - about Snippets or more generally - please let me know!

TextAnalysisTool.NET to Windows 8: "Y U no run me under .NET 4?" [How to avoid the "please install .NET 3.5" dialog when running older .NET applications on the Windows 8 Developer Preview]

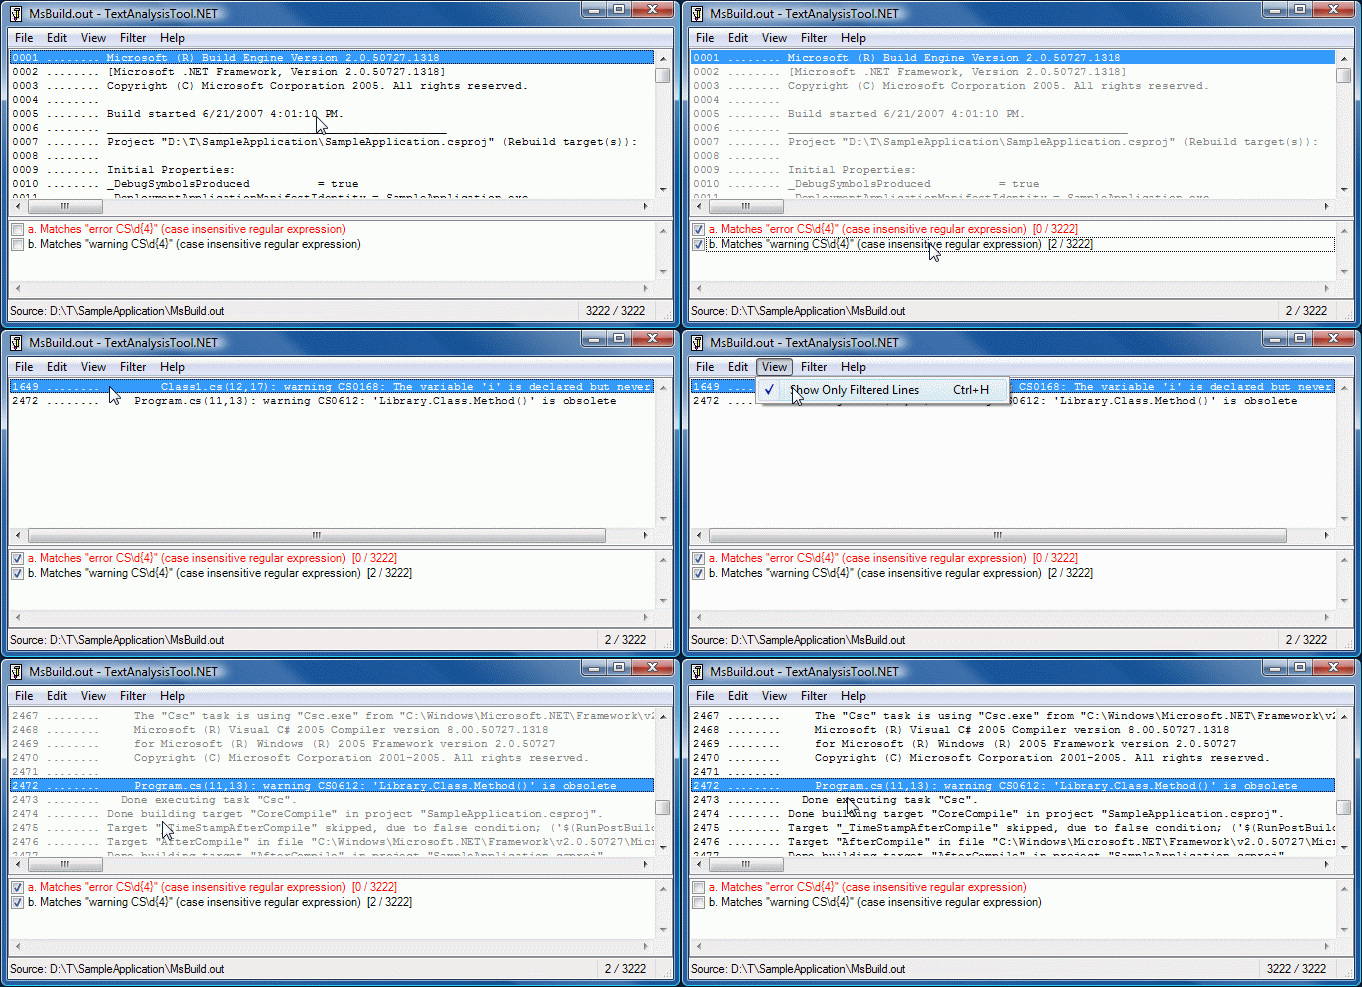
I wrote TextAnalysisTool.NET a number of years ago to streamline the task of analyzing large log files by creating an interactive experience that combines searching, filtering, and tagging and allow the user to quickly identify interesting portions of a large log file. Although .NET 2.0 was out at the time, I targeted .NET 1.1 because it was more widely available, coming pre-installed on Windows Server 2003 (the "latest and greatest" OS then). In the years since, I've heard from folks around the world running TextAnalysisTool.NET on subsequent Windows operating systems and .NET Framework versions. Because Windows and the .NET Framework do a great job maintaining backwards compatibility, the same TextAnalysisTool.NET binary has continued to work as-is for the near-decade since its initial release.

TextAnalysisTool.NET demonstration


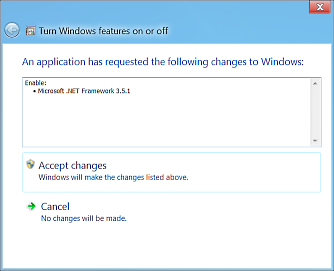
But the story changes with Windows 8! Although Windows 8 has the new .NET 4.5 pre-installed (including .NET 4.0 upon which it's based), it does not include .NET 3.5 (and therefore .NET 2.0). While I can imagine some very sensible reasons for the Windows team to take this approach, it's inconvenient for existing applications because .NET 4 in this scenario does not automatically run applications targeting an earlier framework version. What is cool is that the public Windows 8 Developer Preview detects when an older .NET application is run and automatically prompts the user to install .NET 3.5:

Windows 8 .NET 3.5 install prompt

That's pretty slick and is a really nice way to bridge the gap. However, it's still kind of annoying for users as it may not always be practical for them to perform a multi-megabyte download the first time they try to run an older .NET program. So it would be nice if there were an easy way for older .NET applications to opt into running under the .NET 4 framework that's already present on Windows 8...

And there is! :) One aspect of .NET's "side-by-side" support involves using .config files to specify which .NET versions an application is known to work with. (For more information, please refer to the MSDN article How to: Use an Application Configuration File to Target a .NET Framework Version.) Consequently, improving the Windows 8 experience for TextAnalisisTool.NET should be as easy as creating a suitable TextAnalysisTool.NET.exe.config file in the same folder as TextAnalysisTool.NET.exe.


Specifically, the following should do the trick:

<?xml version="1.0"?>
<configuration>
  <startup>
    <supportedRuntime version="v1.1.4322"/>
    <supportedRuntime version="v2.0.50727"/>
    <supportedRuntime version="v4.0"/>
  </startup>
</configuration>

And it does! :) With that TextAnalysisTool.NET.exe.config file in place, TextAnalysisTool.NET runs on a clean install of the Windows 8 Developer Preview as-is and without prompting the user to install .NET 3.5. I've updated the download ZIP to include this file so new users will automatically benefit; existing users should drop TextAnalysisTool.NET.exe.config in the right place, and they'll be set as well!

Aside: Although this trick will work in many cases, it isn't guaranteed to work. In particular, if there has been a breaking change in .NET 4, then attempting to run a pre-.NET 4 application in this manner might fail. Therefore, it's prudent to do some verification when trying a change like this!


[Click here to download a ZIP file containing TextAnalysisTool.NET, the relevant .config file, its documentation, and a ReadMe.]


TextAnalysisTool.NET has proven to be extremely popular with support engineers and it's always nice to hear from new users. I hope today's post extends the usefulness of TextAnalysisTool.NET by making the Windows 8 experience as seamless as people have come to expect!

Make it your own [WebMatrix's new extensibility support enables developers and applications to customize the web development experience to their liking!]

In conjunction with Microsoft's ongoing BUILD Windows conference, we have just released betas of the next version of the Microsoft Web Platform. Today's releases include a lot of new functionality and I encourage interested parties to have a look at what's new in ASP.NET and WebMatrix.

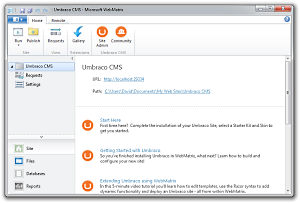
In this post, I'm going to focus on one aspect of the WebMatrix 2 Beta: extensibility. By exposing a public API and opening up the application to others, WebMatrix enables individuals and community members to customize the experience to best fit their own unique processes and workflow. Many aspects of the development experience are configurable, so users can become more productive by streamlining common tasks, automating monotonous ones, and simplifying difficult ones!


Task-based extensibility

Extensibility for the WebMatrix 2 Beta takes three forms: task-based extensibility, help extensibility, and extensions.

  1. Task-based extensibility refers to the ability of a web application like Umbraco or WordPress to embed a file within the install package to customize the WebMatrix user interface for that particular application. By providing some simple XML, applications in the Web App Gallery can add custom links to the Ribbon or dashboard, protect core application files, provide enhanced Intellisense for PHP, and more.

  2. Help extensibility makes it possible to integrate custom content with WebMatrix's new, context-sensitive help pane. The new help system shows links to relevant content and videos based on where the user is in the application and what he or she is doing. Help content is drawn from a variety of sources; content providers can create custom feeds to cover new topics or provide more context on existing ones. This article explains how to create custom help content.

  3. For developers, the real power lies in the ability to write extensions that run inside WebMatrix because they're capable of far richer customization. WebMatrix extensions can be written in any .NET language, are loaded by MEF, the Managed Extensibility Framework, and installed/uninstalled (behind the scenes) as NuGet packages (with a slight twist I'll explain in a different post). Similar to Visual Studio, WebMatrix has an extension gallery that allows users to browse and install extensions from a central feed - or create and share custom feeds!


ColorThemeManager

Opening WebMatrix's extension gallery (by clicking the "Extensions/Gallery" Ribbon button from the Site workspace) shows some of the extensions that have been created to help give an idea what's possible. I'll call out three of them:

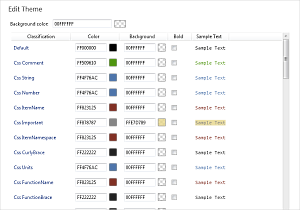
  • ColorThemeManager - This extension by Yishai Galatzer allows you to customize the colors used by the file editor in WebMatrix, export your settings, and import settings from other sources. So if you're one of those people who enjoys looking at green on black text, then you're in luck. :)

  • ImageOptimizer - This extension by Mads Kristensen makes it easy to "optimize" the PNG and JPEG images of a web site by removing unnecessary metadata and recompressing content to minimize file sizes - thereby keeping bandwidth down and site responsiveness up.

  • Snippets - This extension by me makes it easy to insert snippets of text into an open document in the Files workspace. It was written to make WebMatrix demos a little easier (watch for it in the WebMatrix: uber geek in designer clothes presentation today at BUILD!), but its simplicity makes it a good learning tool, too. I'll be blogging the complete source code for Snippets in a few days.


WebMatrix Extension project template

In addition to providing an overview of the Snippets sample, I plan to discuss other aspects of WebMatrix extensibility over the next few weeks. In the meantime, you can start exploring WebMatrix extensibility today:

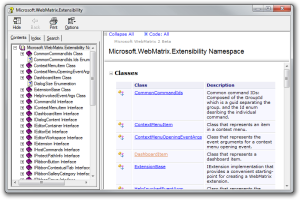
  1. Download the Microsoft.WebMatrix.Extensibility CHM file, unblock it (important: click here for directions on "unblocking" a file), open it, and browse the contents. (If you see the message "Navigation to the webpage was canceled", then the file is still blocked.)

  2. Download the "WebMatrix Extension" Visual Studio project template, save the ZIP file in your "%USERPROFILE%\Documents\Visual Studio 2010\Templates\ProjectTemplates" directory, choose File, New, Project in Visual Studio 2010, select the "Visual C#" node, click the "WebMatrix Extension" item, type a project name (ex: "MyExtension" (no spaces, please)), and click OK.

The project template sets up the right infrastructure, all the necessary references, includes pre- and post-build rules to make development a little easier, and helps get you started with a simple Ribbon-based extension that demonstrates some of the basic extensibility points. The template's ReadMe.txt explains how to configure Visual Studio so that pressing F5 will automatically load the extension inside WebMatrix for a simple, seamless debugging experience with complete breakpoint support, etc.. FYI that I'd like to improve this template by adding support for NuGet package generation (so it will be easier to deploy extensions to a gallery) and maybe also create a VISX wrapper for it (to enable more seamless install of the template itself).

Aside: While the project template "helpfully" copies your extension to the right place for WebMatrix to load it on startup, the extension is not properly installed and so WebMatrix doesn't know how to uninstall it. For now, the easiest way to get rid of a custom extension is to close WebMatrix and delete the contents of the "%USERPROFILE%\AppData\Local\Microsoft\WebMatrix\Components" directory.


The new extensibility APIs in the WebMatrix 2 Beta allow developers to get started with extensions today. And while there aren't yet extension points for everything, there are enough to enable some pretty interesting scenarios. Available extension points include:

Microsoft.WebMatrix.Extensibility help file
  • Ribbon content
    • Buttons, groups, tabs, etc.
  • Application information
    • Name, local path, remote URI
  • Integrated dialog and notification UI
  • Context menu items for application files/directories
  • Editor manipulation
    • Text buffer, settings, theming, custom types
  • Dashboard content
  • Simple commanding
  • Active workspace
  • More...

That said, people are going to have a lot of great extension ideas that are either difficult or impossible to achieve with the Beta APIs. Not being able to put good ideas into practice is certainly disappointing, but it's also a great opportunity to let us know what features are missing from the API and how we can improve it! To make that easy, there's a WebMatrix forum where you can ask questions and exchange ideas. Once you've tried things out, please go there and share your thoughts!


Aside: It probably goes without saying (but I'll say it anyway!) that the APIs available in the WebMatrix 2 Beta are subject to change and it's likely that extensions written for Beta will need to be modified in order to run on later releases. That's not to discourage people from writing extensions, but rather an attempt to set expectations appropriately. :)
Further aside: It's natural to wonder if existing plugins for Visual Studio will "just work" in WebMatrix. The answer is that they will not - but in most cases it turns out that trying to load a Visual Studio extension inside WebMatrix wouldn't be all that meaningful anyway... At this point, the functionality of these two products and the target audience (both users and developers) are different enough that things don't align in a way that makes this scenario work.

Know your place in life [Free PlaceImage control makes it easy to add placeholder images to any WPF, Silverlight, or Windows Phone application!]

One of the challenges with referencing online content is that you never know just how long it will take to download... On a good day, images show up immediately and your application has exactly the experience you want. On a bad day, images take a looong time to load - or never load at all! - and your application's interface is full of blank spaces. Applications that make use of remote images need to be prepared for variability like this and should have "placeholder" content to display when the desired image isn't available.

Of course, there are a variety of ways to deal with this; I thought it would be neat to create a reusable, self-contained class and share it here. I envisioned a simple control that "looked" like a standard Image element (i.e., had the same API), but that seamlessly handled the work of displaying placeholder content before an image loaded and getting rid of it afterward. Naturally, I also wanted code that would run on WPF, Silverlight, and Windows Phone! :)


<delay:PlaceImage
 PlaceholderSource="PlaceholderPhoto.png"
 Source="{Binding ImageUri}"/>

The result of this exercise is something I've called PlaceImage. PlaceImage has the same API as the framework's Image and can be dropped in pretty much anywhere an Image is used. To enable the "placeholder" effect, simply set the PlaceholderSource property to a suitable image. (Aside: While you could specify another remote image for the placeholder, the most sensible thing to do is to reference an image that's bundled with the application (e.g., as content or a resource).) PlaceImage immediately shows your placeholder image and waits for the desired image to load - at which point, PlaceImage swaps it in and gets rid of the placeholder!


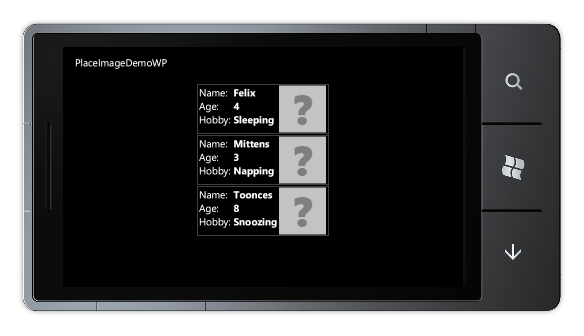
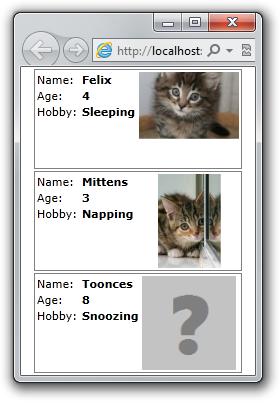
I've written a sample application for each of the supported platforms that displays contact cards of imaginary employees. When the sample first runs, none of the remote images have loaded, so each card shows the "?" placeholder image:

PlaceImageDemo on Windows Phone

After a while, some of the remote images will have loaded:

PlaceImageDemo on Silverlight

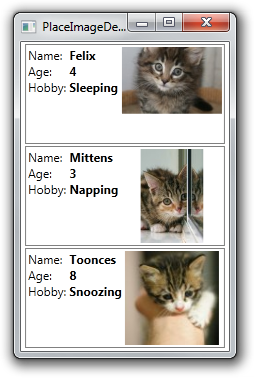
Eventually, all the remote images load:

PlaceImageDemo on WPF

Thanks to placekitten for the handy placeholder images!


Making use of online content in an application is easy to do and a great way to enrich an application. However, the unpredictable nature of the network means content might not always be available when it's needed. PlaceImage makes it easy to add placeholder images to common scenarios and helps keep the user interface free of blank spaces. With easy support for WPF, Silverlight, and Windows Phone, you can add it to pretty much any XAML-based application!


[Click here to download the PlaceImageDemo project which includes PlaceImage.cs and sample applications for WPF, Silverlight, and Windows Phone.]


Notes:

  • Just like Image, PlaceImage has properties for Source, Stretch, and StretchDirection (the last being available only on WPF). PlaceImage's additional PlaceholderSource property is used just like Source and identifies the placeholder image to be displayed before the Source image is available. (So set it to a local image!)

  • Changes to the Source property of a loaded Image immediately clear its contents. Similarly, changing the Source of a loaded PlaceImage immediately switches to its placeholder image while the new remote content loads. You can trigger this behavior in the sample application by clicking any kitten.

  • Because the Silverlight version of the demo application references web content, it needs to be run from the PlaceImageDemoSL.Web project. (Although running PlaceImageDemoSL will show placeholders, the kitten pictures never load.) The MSDN article URL Access Restrictions in Silverlight has more information on Silverlight's "cross-scheme access" limitations.

  • Control subclasses typically live in a dedicated assembly and define their default Style/Template in Generic.xaml. This is a great, general-purpose model, but I wanted PlaceImage to be easy to add to existing projects in source code form, so it does everything in a single file. All you need to do is include PlaceImage.cs in your project, and PlaceImage will be available in the Delay namespace.

  • The absence of the StretchDirection property on Silverlight and Windows Phone isn't the only platform difference PlaceImage runs into: whereas Silverlight and Windows Phone offer the handy Image.ImageOpened event, WPF has only the (more cumbersome) BitmapSource.DownloadCompleted event. The meaning of these two events isn't quite identical, but for the purposes of PlaceImage, they're considered equivalent.

Invisible pixels are just as clickable as real pixels! [Tip: Use a Transparent brush to make "empty" parts of a XAML element respond to mouse and touch input]

Tip

Use a Transparent brush to make "empty" parts of a XAML element respond to mouse and touch input

Explanation

I got a question yesterday and thought the answer would make a good addition to my Development Tips series. As you probably know, WPF, Silverlight, and Windows Phone support a rich, hierarchical way of laying out an application's UI. Elements can be created in XAML or in code and respond to input by firing the relevant events (MouseLeftButtonDown, Click, etc.). Input events bubble from the element "closest" to the user all the way up to the root element (stopping if an event is marked Handled). Every now and then someone finds that an element they expect to be getting input is not (and they've made sure none of its children are "eating" the event). The most common reason is that the element doesn't have any pixels for the user to click on! For example, in a 100x100 panel containing a short message, only the text pixels are considered part of the panel and respond to mouse input - everything else passes "through" the empty area and bubbles up to the parent. This behavior enables the creation of elements with any shape, but sometimes it's not what you want. Fortunately, it's simple to get empty parts of an element to respond to input: just draw some pixels! And while a Brush of any color will do the trick, painting with Transparent pixels is a fantastic way to keep empty space looking empty while also being clickable!

Good Example

<Grid
    Background="Transparent"
    MouseLeftButtonDown="Grid_MouseLeftButtonDown">
    <TextBlock
        Text="You can click anywhere in the Grid!"
        HorizontalAlignment="Center"
        VerticalAlignment="Center"/>
</Grid>

More information

Preprocessor? .NET don't need no stinkin' preprocessor! [DebugEx.Assert provides meaningful assertion failure messages automagically!]

If you use .NET's Debug.Assert method, you probably write code to validate assumptions like so:

Debug.Assert(args == null);

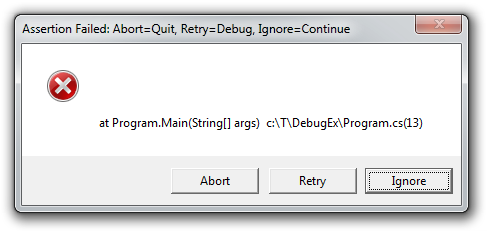
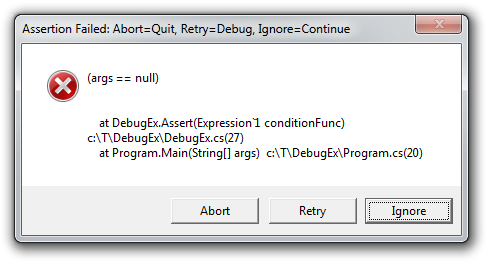
If the expression above evaluates to false at run-time, .NET immediately halts the program and informs you of the problem:

Typical Debug.Assert

The stack trace can be really helpful (and it's cool you can attach a debugger right then!), but it would be even more helpful if the message told you something about the faulty assumption... Fortunately, there's an overload of Debug.Assert that lets you provide a message:

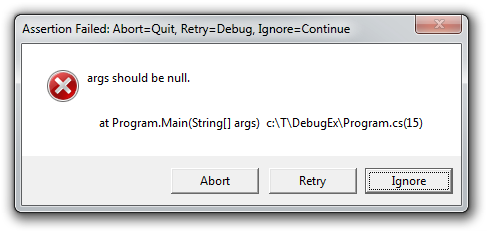
Debug.Assert(args == null, "args should be null.");

The failure dialog now looks like this:

Debug.Assert with message

That's a much nicer experience - especially when there are lots of calls to Assert and you're comfortable ignoring some of them from time to time (for example, if a network request failed and you know there's no connection). Some code analysis tools (notably StyleCop) go as far as to flag a warning for any call to Assert that doesn't provide a custom message.

At first, adding a message to every Assert seems like it ought to be pure goodness, but there turn out to be some drawbacks in practice:

  • The comment is often a direct restatement of the code - especially for very simple conditions. Redundant redundancy is redundant, and when I see messages like that, I'm reminded of code comments like this:

    i++; // Increment i
  • It takes time and energy to type out all those custom messages, and the irony is that most of them will never be seen at all!


Because the code for the condition is often expressive enough as-is, it would be nice if Assert automatically used the code as the message!

Aside: This is hardly a new idea; C developers have been doing this for years by leveraging macro magic in the preprocessor to create a string from the text of the condition.
Further aside: This isn't even a new idea for .NET; I found a couple places on the web where people ask how to do this. And though nobody I saw seemed to have done quite what I show here, I'm sure there are other examples of this technique "in the wild".

As it happens, displaying the code for a condition can be accomplished fairly easily in .NET without introducing a preprocessor! However, it requires that calls to Assert be made slightly differently so as to defer execution of the condition. In a normal call to Assert, the expression passed to the condition parameter is completely evaluated before being checked. But by changing the type of the condition parameter from bool to Func<bool> and then wrapping it in the magic Expression<Func<bool>>, we're able to pass nearly complete information about the expression into the Assert method where it can be used to recreate the original source code at run-time!


To make this a little more concrete, the original "message-less" call I showed at the beginning of the post can be trivially changed to:

DebugEx.Assert(() => args == null);

And the DebugEx.Assert method I've written will automatically provide a meaningful message (by calling the real Debug.Assert and passing the condition and a message):

DebugEx.Assert with automatic message


The message above is identical to the original code - but maybe that's because it's so simple... Let's try something more complex:

DebugEx.Assert(() => args.Select(a => a.Length).Sum() == 10);

Becomes:

Assertion Failed: (args.Select(a => a.Length).Sum() == 10)

Wow, amazing! So is it always perfect? Unfortunately, no:

DebugEx.Assert(() => args.Length == 5);

Becomes:

Assertion Failed: (ArrayLength(args) == 5)

The translation of the code to an expression tree and back seems to have lost a little fidelity along the way; the compiler translated the Length access into an expression tree that doesn't map back to code exactly the same. Similarly:

DebugEx.Assert(() => 5 + 3 + 2 >= 100);

Becomes:

Assertion Failed: False

In this case, the compiler evaluated the constant expression at compile time (it's constant, after all!), and the information about which numbers were used in the computation was lost.

Yep, the loss of fidelity in some cases is a bit of a shame, but I'll assert (ha ha!) that nearly all the original intent is preserved and that it's still quite easy to determine the nature of the failing code without having to provide a message. And of course, you can always switch an ambiguous DebugEx.Assert back to a normal Assert and provide a message parameter whenever you want. :)


[Click here to download the source code for DebugEx.Assert and the sample application used for the examples above.]


DebugEx.Assert was a fun experiment and a great introduction to .NET's powerful expression infrastructure. DebugEx.Assert is a nearly-direct replacement for Debug.Assert and (similarly) applies only when DEBUG is defined, so it costs nothing in release builds. It's worth noting there will be a bit of extra overhead due to the lambda, but it should be negligible - especially when compared to the time you'll save by not having to type out a bunch of unnecessary messages!

If you're getting tired of typing the same code twice, maybe DebugEx.Assert can help! :)


Notes:

  • The code for DebugEx.Assert turned out to be simple because nearly all the work is done by the Expression(T) class. The one bit of trickiness stems from the fact that in order to create a lambda to pass as the Func(T), the compiler creates a closure which introduces an additional class (though they're never exposed to the developer). Therefore, even simple statements like the original example become kind of hard to read: Assertion Failed: (value(Program+<>c__DisplayClass0).args == null).

    To avoid that problem, I created an ExpressionVisitor subclass to rewrite the expression tree on the fly, getting rid of the references to such extra classes along the way. What I've done with SimplifyingExpressionVisitor is simple, but seems to work nicely for the things I've tried. However, if you find scenarios where it doesn't work as well, I'd love to know so I can handle them too!

Tags: Technical

Use it or lose it, part deux [New Delay.FxCop code analysis rule helps identify uncalled public or private methods and properties in a .NET assembly]

Previous posts introduced the Delay.FxCop custom code analysis assembly and demonstrated the benefits of automated code analysis for easily identifying problem areas in an assembly. The Delay.FxCop project included two rules, DF1000: Check spelling of all string literals and DF1001: Resources should be referenced - today I'm introducing another! The new rule follows in the footsteps of DF1001 by identifying unused parts of an assembly that can be removed to save space and reduce complexity. But while DF1001 operated on resources, today's DF1002: Uncalled methods should be removed analyzes the methods and properties of an assembly to help find those stale bits of code that aren't being used any more.

Note: If this functionality seems familiar, it's because CA1811: Avoid uncalled private code is one of the standard FxCop rules. I've always been a big fan of CA1811, but frequently wished it could look beyond just private code to consider all code. Of course, limiting the scope of the "in-box" rule makes perfect sense from an FxCop point of view: you don't want the default rules to be noisy or else they'll get turned off and ignored. But the Delay.FxCop assembly isn't subject to the same restrictions, so I thought it would be neat to experiment with an implementation that analyzed all of an assembly's code.
Further note: One of the downsides of this increased scope is that DF1002 can't distinguish between methods that are part of a library's public API and those that are accidentally unused. As far as DF1002 is concerned, they're both examples of code that's not called from within the assembly. Therefore, running this rule on a library involves some extra overhead to suppress the warnings for public APIs. If it's just a little extra work, maybe it's still worthwhile - but if it's overwhelming, you can always disable DF1002 for library assemblies and restrict it to applications where it's more relevant.


Implementation-wise, DF1002: Uncalled methods should be removed isn't all that different from its predecessors - in fact, it extends and reuses the same assembly node enumeration helper introduced with DF1001. During analysis, every method of the assembly is visited and if it isn't "used" (more on this in a moment), a code analysis warning is output:

DF1002 : Performance : The method 'SilverlightApplication.MainPage.UnusedPublicMethod' does not appear to be used in code.

Of course, these warnings can be suppressed in the usual manner:

[assembly: SuppressMessage("Usage", "DF1001:ResourcesShouldBeReferenced",
           MessageId = "app.xaml", Scope = "resource", Target = "SilverlightApplication.g.resources",
           Justification = "Loaded by Silverlight for App.xaml.")]


It's interesting to consider what it means for a method or a property to be "used"... (Internally, properties are implemented as a pair of get/set methods.) Clearly, a direct call to a method means it's used - but that logic alone results in a lot of false positives! For example, a class implementing an interface must define all the relevant interface methods in order to compile successfully. Therefore, explicit and implicit interface method implementations (even if uncalled) do not result in a DF1002 warning. Similarly, a method override may not be directly called within an assembly, but can still be executed and should not trigger a warning. Other kinds of "unused" methods that do not result in a warning include: static constructors, assembly entry-points, and methods passed as parameters (ex: to a delegate for use by an event).

With all those special cases, you might think nothing would ever be misdiagnosed. :) But there's a particular scenario that leads to many DF1002 warnings in a perfectly correct application: reflection-based access to properties and methods. Granted, reflection is rare at the application level - but at the framework level, it forms the very foundation of data binding as implemented by WPF and Silverlight! Therefore, running DF1002 against a XAML application with data binding can result in warnings for the property getters on all model classes...

To avoid that problem, I've considered whether it would make sense to suppress DF1002 for classes that implement INotifyPropertyChanged (which most model classes do), but it seems like that would also mask a bunch of legitimate errors. The same reasoning applies to subclasses of DependencyObject or implementations of DependencyProperty (though the latter might turn out to be a decent heuristic with a bit more work). Another approach might be for the rule to also parse the XAML in an assembly and identify the various forms of data binding within. That seems promising, but goes way beyond the initial scope of DF1002! :)

Of course, there may be other common patterns which generate false positives - please let me know if you find one and I'll look at whether I can improve things for the next release.


[Click here to download the Delay.FxCop rule assembly, associated .ruleset files, samples, and the complete source code.]

For directions about running Delay.FxCop on a standalone assembly or integrating it into a project, please refer to the steps in my original post.


Unused code is an unnecessary tax on the development process. It's a distraction when reading, incurs additional costs during coding (ex: when refactoring), and it can mislead others about how an application really works. That's why there's DF1002: Uncalled methods should be removed - to help you easily identify unused methods. Try running it on your favorite .NET application; you might be surprised by what you find! :)

Tags: Technical