The blog of dlaa.me

Posts tagged "Windows Phone"

Mo controls, mo controls, mo controls... [Announcing the second release of the Silverlight for Windows Phone Toolkit!]

I'm happy to report that we've just published the Silverlight for Windows Phone Toolkit November 2010 release! This is the second iteration of the Windows Phone Toolkit and effectively doubles the number of controls we've created to help developers and designers build more compelling, more platform-consistent user experiences with ease. The first Windows Phone Toolkit release has been a big hit and we've seen a lot of developers using it (in both binary and source forms) to build their Windows Phone 7 applications. But while we tried to address the most pressing needs with that release, there were still a couple of prominent controls missing...

With today's update, we've tried to provide more of the fundamental controls customers have been asking for - as well as API documentation and fixes for some of the bugs people reported with the first release. Recall that the Windows Phone Toolkit is published on CodePlex under the Ms-PL open-source license so anyone who wants can look at the source code to learn how we've done things - or customize any control to suit their specific scenario. As always, if you have suggestions for things we should add or change, please search the CodePlex issue tracker and vote for the issue (or create a new one if the idea is unique). We use your input to help prioritize our efforts and ensure we're delivering the right things for the community!
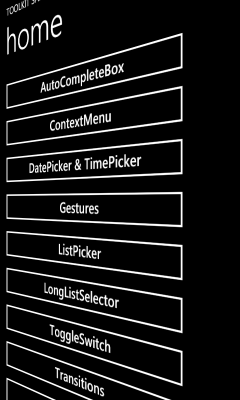
 

What's New?


ListPicker

ListPicker sample ListPicker popup sample
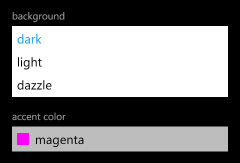
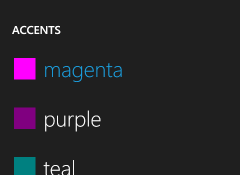
<toolkit:ListPicker Header="background">
    <sys:String>dark</sys:String>
    <sys:String>light</sys:String>
    <sys:String>dazzle</sys:String>
</toolkit:ListPicker>

ListPicker is the Windows Phone 7 equivalent of the ComboBox control: give it a list of items and it will show the selected one and also allow the user to pick from a list if they want to change it. The core applications on Windows Phone 7 implement two kinds of list selection: an in-place expander for picking among five or fewer items, and a full-screen popup for picking among more. The Toolkit's ListPicker control combines both experiences into one handy package by automatically selecting the right UX based on the number of items in its list! It is a standard ItemsControl subclass with all the common elements of a Selector, so the API will be familiar to just about everyone. In fact, you can take most existing ListBoxes and convert them to ListPickers just by changing the control name in XAML!
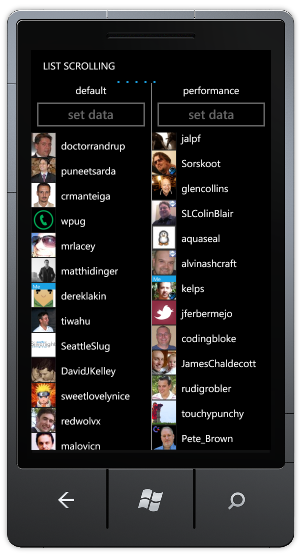
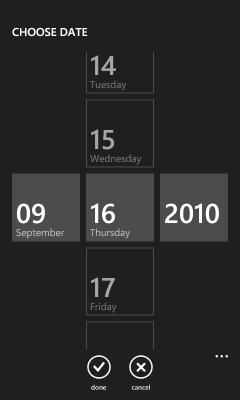
 

LongListSelector

LongListSelector movies sample LongListSelector people sample LongListSelector jump-list sample
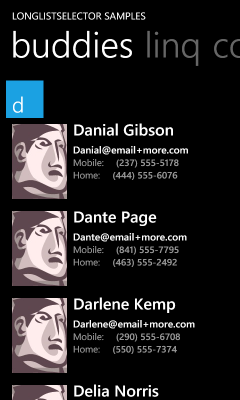
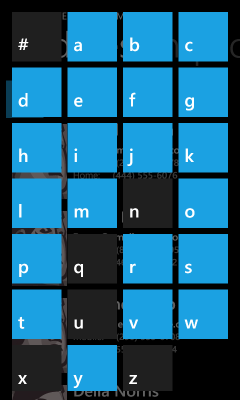
<toolkit:LongListSelector
    ItemsSource="{StaticResource movies}"
    ListHeaderTemplate="{StaticResource movieListHeader}"
    GroupHeaderTemplate="{StaticResource movieGroupHeader}"
    GroupFooterTemplate="{StaticResource movieGroupFooter}"
    GroupItemTemplate="{StaticResource groupItemHeader}"
    ItemTemplate="{StaticResource movieItemTemplate}">
</toolkit:LongListSelector>

While ListPicker is about simple selection scenarios, LongListSelector is about advanced ones! Think of it as ListBox++--, it has everything you expect from ListBox plus a bunch of advanced capabilities and great on-device performance minus the levels of abstraction and generality that tend to slow ListBox down. LongListSelector supports full data and UI virtualization, flat lists, grouped lists (with headers!), and also implements the "jump list" header navigation UI that makes the "People" app so efficient! The theory behind LongListSelector is that it should be easy to fix a poorly-performing ListBox scenario by swapping in a LongListSelector instead: it handles all the tricky parts for you, so there's less to worry about and it "just works". Unless you've spent a lot of time fine-tuning your application's list behavior, you should see improved performance by switching to LongListSelector!


TransitionFrame (and Transitions)

TransitionFrame sample
RootFrame = new TransitionFrame();
<toolkit:TransitionService.NavigationInTransition>
    <toolkit:NavigationInTransition>
        <toolkit:NavigationInTransition.Backward>
            <toolkit:TurnstileTransition Mode="BackwardIn"/>
        </toolkit:NavigationInTransition.Backward>
        <toolkit:NavigationInTransition.Forward>
            <toolkit:TurnstileTransition Mode="ForwardIn"/>
        </toolkit:NavigationInTransition.Forward>
    </toolkit:NavigationInTransition>
</toolkit:TransitionService.NavigationInTransition>
<toolkit:TransitionService.NavigationOutTransition>
    <toolkit:NavigationOutTransition>
        <toolkit:NavigationOutTransition.Backward>
            <toolkit:TurnstileTransition Mode="BackwardOut"/>
        </toolkit:NavigationOutTransition.Backward>
        <toolkit:NavigationOutTransition.Forward>
            <toolkit:TurnstileTransition Mode="ForwardOut"/>
        </toolkit:NavigationOutTransition.Forward>
    </toolkit:NavigationOutTransition>
</toolkit:TransitionService.NavigationOutTransition>

The Windows Phone UI Guidelines encourage smooth, attractive page-to-page animations like the core applications show, but there has been little platform support for creating similar experiences in your own applications - until now! :) The new transition classes in the Windows Phone Toolkit aims to make it easy for application developers to add attractive, platform-consistent transitions to their applications. All that's necessary to enable transitions for an application's pages is tweak App.xaml.cs (shown above) and add a bit of XAML to each page to specify its transitions (also shown above). Everything else is done for you!

Aside: This release includes support for multiple flavors of the following transitions: turnstile, slide, rotate, swivel, and roll. It's also possible to implement custom transitions using the same framework!


AutoCompleteBox

AutoCompleteBox sample
<toolkit:AutoCompleteBox
    ItemsSource="{StaticResource words}"/>

AutoCompleteBox first appeared in the Silverlight 2 Toolkit, then later graduated to the Silverlight 3 SDK. Now it's back in the Toolkit - this time for Windows Phone 7! Because phones are about being small and quick to use, simplifying tedious tasks like text input is an important goal. Toward that end, a number of the core applications (like Bing search) make use of auto-completion to predict what the user is typing and save time by allowing them to click on the completed word instead. AutoCompleteBox makes it easy to bring the same convenience to your own applications by taking advantage of a phone-friendly implementation of this popular Silverlight control. By providing a suitable completion list (in any of a variety of ways), users are automatically prompted with the relevant matches as they start typing!


API Documentation

CHM file example

The source code for the Windows Phone Toolkit has included full XML Documentation Comments from the beginning, but now we've begun generating a separate CHM file with all the property/method/event comments in a single, easy-to-browse location. The documentation file is automatically installed by the Windows Phone Toolkit installer and a handy link is added to the "Silverlight for Windows Phone Toolkit" folder in the Start Menu. Because we don't have dedicated documentation writers on the Toolkit team, our documentation is a bit on the terse side - but the CHM file is still a great way to survey the Toolkit classes and get a feel for what's available. And because the sample syntax is available in both C# and VB, everyone should be comfortable with the examples!


Bug fixes for existing controls

The previous Toolkit release wasn't all that long ago and we've been quite busy since then, but we've still managed to squeeze in fixes for some of the more annoying bugs customers reported. That's not to say that we fixed them all or that we had a chance to squash your favorite bug, but we were fortunate to be able to fix a good number of customer-impacting issues and I hope everyone finds the new controls even more pleasant to use! :)


[Click here to download the Silverlight for Windows Phone Toolkit November 2010 release.]


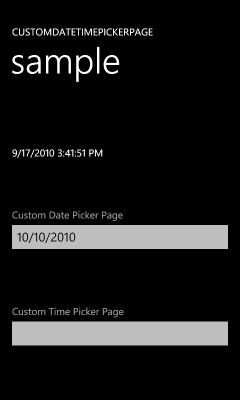
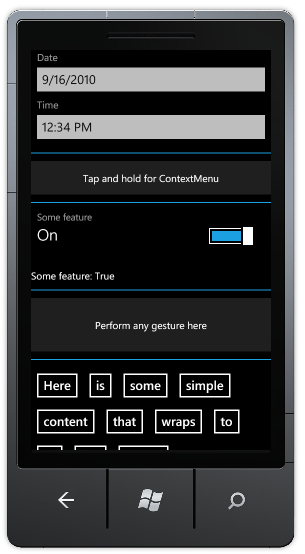
The screen shots and XAML shown above are all from the sample application you can download along with the Toolkit. I encourage people to play around with the sample if they want to experiment with any of these controls (in the emulator or on the device) or if they want to learn more about how these controls work. I anticipate more in-depth coverage will show up in the coming weeks (I will be posting a detailed ListPicker overview tomorrow!), but for now the sample application is a great springboard to get folks started!


In closing, I'm really glad we've been able to get this second round of controls out to the community in such a short time! While there are probably still some "nice to have" controls that could be added to further round-out the Windows Phone 7 control offering, I think that what we've included in the Windows Phone Toolkit represents nearly all the critical ones needed to unblock important scenarios. I hope people continue to enjoy their Windows Phone development experience and that the new Windows Phone Toolkit makes application development even easier! :)

"Silence is the virtue of fools." [Why the Windows Phone 7 Emulator can sometimes take forever to access the network - and how to fix it!]

If you've used the Windows Phone 7 emulator to access the network, you might have noticed that in some environments it takes an absurdly long time for network activity to complete. For example, a single HTTP request with Internet Explorer or an HttpWebRequest from a custom Silverlight application can take upwards of 20-30 seconds to complete - even when the remote server responds immediately.

Now, a lot of you probably haven't experienced this problem and have no idea what I'm talking about - but I bet those of you who have are eager for a solution! I had to deal with this myself, and I know it makes developing a network-oriented application exceedingly frustrating...

Fortunately, there's a fix! :)


The Cause

I got so tired of the delays one evening, I decided to install Microsoft's Network Monitor (AKA NetMon) so I could look at what was happening at the network level. (Aside: Network Monitor is a fantastic tool for sniffing packets. Another great program (which works cross-platform) is Wireshark.) So I ran a new instance of the emulator, started the trace, and opened IE (which navigated to its default page). The problem was immediately evident from the timestamps (the left-most column below) and the nature of the traffic:

15.2837914  DNS:QueryId = 0xE7D1, QUERY (Standard query), Query  for go.microsoft.com of type Host Addr on class Internet
15.2838039  DNS:QueryId = 0xD4AE, QUERY (Standard query), Query  for go.microsoft.com of type AAAA on class Internet
15.3120594  DNS:QueryId = 0xE7D1, QUERY (Standard query), Response - Success, 64.4.11.160, 96.6.112.198
16.2787382  DNS:QueryId = 0xD4AE, QUERY (Standard query), Query  for go.microsoft.com of type AAAA on class Internet
17.2787318  DNS:QueryId = 0xD4AE, QUERY (Standard query), Query  for go.microsoft.com of type AAAA on class Internet
19.2787138  DNS:QueryId = 0xD4AE, QUERY (Standard query), Query  for go.microsoft.com of type AAAA on class Internet
23.2788677  DNS:QueryId = 0xD4AE, QUERY (Standard query), Query  for go.microsoft.com of type AAAA on class Internet
27.2923071  DNS:QueryId = 0x91B, QUERY (Standard query), Query  for go.microsoft.com of type AAAA on class Internet
28.2888689  DNS:QueryId = 0x91B, QUERY (Standard query), Query  for go.microsoft.com of type AAAA on class Internet
29.2888390  DNS:QueryId = 0x91B, QUERY (Standard query), Query  for go.microsoft.com of type AAAA on class Internet
31.2889078  DNS:QueryId = 0x91B, QUERY (Standard query), Query  for go.microsoft.com of type AAAA on class Internet
35.2889120  DNS:QueryId = 0x91B, QUERY (Standard query), Query  for go.microsoft.com of type AAAA on class Internet
39.3462453  HTTP:Request, GET /fwlink/, Query:LinkID=192163

The trace above is just a snippet; the total time taken from when IE began its navigation until the (very basic) page had completely loaded was 182 seconds, or just over three minutes!


Looking a little closer, we see that Windows Phone 7 (and/or the emulator) sends out two DNS queries for the IP address of the go.microsoft.com server corresponding to the IE home page URL. The IPv4 query returns immediately, but there's no response to the IPv6 query. At this point, two things are going wrong:

  1. Windows Phone 7 has received a valid IPv4 response to its DNS query and could proceed with the HTTP request. But it doesn't... Instead, it delays everything waiting for an IPv6 reply to its query - and eventually times out (presumably) after about 25 seconds. While I'm not aware of a specification that covers this scenario, it just plain seems wrong. If the network stack prefers to have an IPv6 address "on file", that's fine - but there seems to be no need to delay everything waiting for it. A better approach might be to proceed with the current transaction using the valid IPv4 address that's already been returned - then switch to the IPv6 address later on if/when it becomes available.

  2. The DNS server should reply to the IPv6 query with either a valid response or an error code - and not ignore it as though nothing happened. In this case, the DNS server happens to be my DSL modem, which I suspect knows nothing about IPv6 and is therefore unable to return a valid IPv6 address. However, that's no excuse for ignoring the IPv6 queries - according to my reading of RFC1035, it should respond to these queries with a "Format error" response code (or similar). If it did, Windows Phone 7 would presumably process the failure and move on with its life instead of hanging around waiting for a reply that never shows up...


This trace also explains why some people experience the slowness and others don't - if the IPv6 query gets a reply (instead of timing out), the network transaction proceeds immediately. So if you're fortunate enough to have a well-mannered DNS server (as I am at work), you'll be fine. But if you're unfortunate enough to have a poorly-mannered DNS server (as I am at home), you'll be spending a lot of time twiddling your thumbs waiting for the network...


The Fix

Fortunately, there's an easy fix: get a better DNS server! :) Either reconfigure your (or your company's) DNS server, upgrade its firmware, or flat-out replace the darn thing and you'll be set. Unfortunately, most people don't have a lot of control over the networking hardware/configuration they're using - or maybe they're just not eager to mess with this stuff. No problem - there's another fix: swap out the DNS server your computer is using for one that works better!

But where can you find a better DNS server? As it happens, there are a number of free DNS options already out there, just waiting to be utilized! The most well-known might be OpenDNS, but there are others like Google Public DNS, etc.. In my experience, OpenDNS and Google Public DNS both handle the IPV6 DNS request immediately - just like we want. So all you need to do is point your computer to one of these DNS servers, and things should work better!


The Details

By default, most home computers get their DNS server address via DHCP from their router or modem. So you could change the DNS server address in the router/modem configuration and that ought to work fine. However, you might not have access/permission for that - and besides it would affect everything else on the network. Unless you're a network administrator, this path may be more trouble than it's worth...

The good news is there's an easy way to change the DNS settings for a computer's network connection within Windows - and it's even easier to automate! To make this change in the UI, open the Network and Sharing Center (either via the Start Menu or the Control Panel or right-clicking the network icon in the system tray), click on the active network adapter (typically "Local Area Connection" or "Wireless Network Connection", click the Properties button in the lower left of the dialog, click the "Internet Protocol Version 4 (TCP/IPv4)" item, click the Properties button below it, select the "Use the following DNS server addresses", type the IP addresses of the "Preferred DNS server" and "Alternate DNS server", and hit OK/Close a bunch of times. To undo the change, repeat those steps, but choose "Obtain DNS server automatically" instead at the last step.

Step 0 Step 1 Step 2 Step 3


Okay, the UI approach may be pretty, but it's hardly efficient. :) If you're going to do this more than a couple of times, you may want use (or customize) one of one of the following scripts I've written based on the Windows netsh utility and the IP addresses from the corresponding Wikipedia entries (please don't forget to change the adapter name if you're using a wireless connection):

D:\T>type DNS-OpenDNS.cmd
@echo off
netsh interface ipv4 add dnsservers "Local Area Connection" 208.67.222.222 index=1
netsh interface ipv4 add dnsservers "Local Area Connection" 208.67.220.220 index=2
netsh interface ipv4 show dnsservers

D:\T>type DNS-GooglePublicDNS.cmd
@echo off
netsh interface ipv4 add dnsservers "Local Area Connection" 8.8.8.8 index=1
netsh interface ipv4 add dnsservers "Local Area Connection" 8.8.4.4 index=2
netsh interface ipv4 show dnsservers

D:\T>type DNS-Default.cmd
@echo off
netsh interface ipv4 delete dnsservers "Local Area Connection" all
netsh interface ipv4 show dnsservers

D:\T>

To run one of these scripts, open a Command Prompt with administrative privileges (right-click "Command Prompt" on the Start Menu and pick "Run as administrator") and run the appropriate script. It'll tell you a bit about what it has done and the changes will take effect immediately (i.e., there's no need to reboot). (For what it's worth, the underlying configuration changes made by the two methods I've discussed should be exactly the same, so you could even use the command-line to enable a custom DNS and then use the UI to disable it!)

Personally, I tend to make this switch just before I start working with the Windows Phone emulator - and then switch back to the default configuration when I'm done. Theoretically, I could run my development machine with a custom DNS all the time, but then it wouldn't be configured the same as the rest of the household and I worry that could trip me up some day long after I've forgotten about any of this. But personal issues aside, I encourage people to switch as often or rarely as they'd like. :)


The Benefits

Returning to the IE home page example from earlier, let's take a new trace after configuring a custom DNS:

2.7696164  DNS:QueryId = 0x4E64, QUERY (Standard query), Query  for go.microsoft.com of type AAAA on class Internet
2.8465201  DNS:QueryId = 0x4E64, QUERY (Standard query), Response - Success,
2.8590985  DNS:QueryId = 0xE75, QUERY (Standard query), Query  for go.microsoft.com of type Host Addr on class Internet
2.8678965  DNS:QueryId = 0x64D2, QUERY (Standard query), Query  for go.microsoft.com of type AAAA on class Internet
2.9341095  DNS:QueryId = 0xE75, QUERY (Standard query), Response - Success, 54, 0
2.9441158  DNS:QueryId = 0x64D2, QUERY (Standard query), Response - Success,
3.0086106  HTTP:Request, GET /fwlink/, Query:LinkID=192163

Yup, that's looking much better! To be fair, it's not clear to me why there's a duplicate query for the IPv6 address, but even with three queries (vs. two), it still manages to get the initial HTTP request sent in less than a quarter of a second. Stepping back and looking at the time taken by the entire transaction, it now completes in just under 5 seconds - less than 3% of the original time!


With a custom DNS in place, my frustration developing network applications for Windows Phone 7 went away and I was able to spend my time coding instead of waiting. I'm guessing the underlying DNS server problem that causes these long delays isn't super pervasive (or else they would have fixed the Windows Phone 7 emulator and/or Windows Phone OS by now), but I've also got to imagine I'm not the only one who's affected by this problem. So if you've ever wondered what in the world is taking so long, maybe your DNS server is the problem - and now you know how to fix it! :)

Is that a BLOB in your pocket, or are you just happy to see me? [Silverlight REST-based Azure/S3 BLOB API updated to run on Windows Phone 7!]

It was about five months ago that I blogged about BlobStore, a simple Silverlight 4 REST-based cloud-oriented file management app for Azure and S3. I pitched it like this:

It's a small, lightweight Silverlight 4 application that acts as a basic front-end for the Windows Azure Simple Data Storage and the Amazon Simple Storage Service (S3)! Just run the BlobStore app, point it at a properly provisioned Azure or S3 account (see below for details on provisioning), and all of a sudden sharing files with yourself and others becomes as simple as dragging and dropping them!

...

Included with every code download is a free REST wrapper for basic Azure and S3 blob access that handles all the tricky Authorization header details for you. It's almost guaranteed to make your next Azure/S3 application a snap to develop and a wild success in the marketplace.

BlobStore with silly sample data

Disclaimer: None of the file names above is accurate. :)


I know people have incorporated my REST API wrapper code (BlobStoreApi.cs) into their Silverlight projects, so it wasn't too surprising when I heard that some of you want the same functionality for your Windows Phone 7 applications. While you might expect the existing code to work as-is, there's a catch: Windows Phone 7's version of the Silverlight framework doesn't support the HttpWebRequest.AllowWriteStreamBuffering or WebRequest.ContentLength properties - and both are used by the original BlobStoreApi.cs implementation...

Fortunately, the lack of AllowWriteStreamBuffering isn't a big deal because it's used in only one place and can be commented-out with no loss of functionality (assuming the default behavior of buffering the entire upload doesn't bother you). However, the lack of ContentLength is a little more problematic because its use is more tightly integrated with the rest of code. So it seemed worthwhile for me to update BlobStoreApi.cs for Windows Phone 7 - and it turned out to be fairly simple to remove ContentLength for Windows Phone 7 without changing the existing behavior for Silverlight 4 and desktop .NET.

Because the original file management sample application didn't translate very well to the phone, I dashed off a quick "note taking" sample instead:

BlobStoreOnWindowsPhone sample

The way the new sample works is that the user can type short notes in a text box and then hit the "add" button to upload them to their pre-configured Azure/S3 account as BLOBs with the blob name being the current DateTime.Now.Ticks value and its content being the text of the note. All available notes are listed by date of creation; their text contents are downloaded on demand and shown to the user when selected. Any note can be deleted by tapping it and hitting the "delete" button.

It's a simple application, but it shows off the list/get/put/delete functionality that BlobStoreApi implements for Azure, S3, and IsolatedStorage (the last existing mainly for test purposes). During calls to the BLOB service, the sample application shows a simple progress screen informing the user of the ongoing transaction. (Of course, IsolatedStorage is very fast, so the progress screen is little more than a flicker by default - it's more meaningful for Azure/S3 web access.)

The complete implementation can be found in BlobStore\BlobStoreApi.cs and compiles/runs on the .NET, Silverlight, and Windows Phone 7 platforms. I encourage readers to use this code to create way more compelling applications than my samples! :)


[Click here to download the complete BlobStore source code and sample applications for both Silverlight 4 and Windows Phone 7.]


Note: By default, the Windows Phone sample uses IsolatedStorage because I don't want to publish the keys to my Azure/S3 accounts. :) If you want to try it with your own account(s), just open MainPage.xaml.cs, uncomment the relevant line below, and add the missing information:
// TODO: Switch to AzureBlobStoreClient or S3BlobStoreClient after entering your connection information
private readonly BlobStoreClient _client = new IsolatedStorageBlobStoreClient();
//private readonly BlobStoreClient _client = new AzureBlobStoreClient("Account Name", "Access Key");
//private readonly BlobStoreClient _client = new S3BlobStoreClient("Access Key ID", "Secret Access Key", "Bucket Name");
Aside: Don't forget to provision your account first; see the notes here for more information!

There's no substitute for customer feedback! [Improving Windows Phone 7 application performance now a bit easier with LowProfileImageLoader and DeferredLoadListBox updates]

PhonePerformance List Scrolling sample Windows Phone 7 applications run on hardware that's considerably less powerful than what drives typical desktop and laptop machines. Therefore, tuning phone applications for optimum performance is an important task - and a challenging one! To help other developers, I previously coded and blogged about two classes: LowProfileImageLoader (pushes much of the cost of loading images off the UI thread) and DeferredLoadListBox (improves the scrolling experience for long lists). These two classes can be used individually or together and have become a regular part of the recommendations for developers experiencing performance issues.


I've heard from lots of people who've benefitted from LowProfileImageLoader and DeferredLoadListBox - thank you! I've also received some great suggestions; I recently implemented some of them and wanted to share the new code/bits:

  • The first issue was reported to me by Corrado Cavalli via email. Whereas my sample applications loaded data after they'd initialized, Corrado's DeferredLoadListBox scenario populated its data during initialization. This led to code running in OnApplyTemplate which made the (wrong) assumption that the ListBox's ListBoxItem containers would already have been created. That's not the case during OnApplyTemplate, so DeferredLoadListBox got confused and threw an exception. The simple fix for this problem is to allow for missing containers during OnApplyTemplate - which I've done. Fortunately, subsequent activity (container creation during PrepareContainerForItemOverride) already ensures the right things happen after the containers are created.

  • The second issue was reported to me by Pat Long in the comments to my first blog post. The problem he encountered was that Blend would crash when working with an application using LowProfileImageLoader in certain cases (presumably because of the background worker thread it creates). There's an easy fix here as well - simply short-circuit the worker thread at design-time because the performance implications of LowProfileImageLoader aren't relevant then anyway. I reproduced the problem myself with Visual Studio and fixed it there - then I checked Pat's blog and found he'd done almost exactly the same thing for his Blend-based scenario! [It's nice when separate efforts arrive at the same place. :) ]

  • The third suggestion also came from comments to that blog post - David Burela wanted to use LowProfileImageLoader for images that were part of his application. I'd only been considering the cost of downloading images when I wrote this class, but David pointed out that much of the same "UI thread-friendly" logic should apply to local images as well. Fortunately, it was a simple matter to add support for relative Uris (ex: "/Images/Picture.jpg") - and now LowProfileImageLoader works well with both kinds of images!

    Note: For this new functionality to work, the project's images must have their "Build Action" set to "Content" (not "Resource"). (Here's what that setting looks like in Visual Studio.)
  • The fourth suggestion came from the comments to my second blog post where Johnny Westlake pointed out that LowProfileImageLoader could be counterproductive once it had already worked its magic. In other words, though it's great for lowering the cost of initial image load, the throttling behavior might be undesirable during subsequent loads (ex: during Back button navigation) because by that time the image has been cached by the web stack and the download cost is much lower. At first, I wasn't sure how LowProfileImageLoader could tell which situation a particular image was in - then I realized I didn't have to! :)

    What I've done instead is add a static LowProfileImageLoader.IsEnabled property (true by default) that the developer can toggle whenever he/she wants to (ex: on Back navigation to a page that has already used LowProfileImageLoader). When this property is set to false, LowProfileImageLoader doesn't perform its UI thread sleight-of-hand so the image load behavior is the same as it would have been if LowProfileImageLoader weren't present at all. While this might seem like a bit of a pass the buck move on my part, the practical truth is that the application's author has way more context than LowProfileImageLoader does. So in lieu of a reliable way to detect the cache state of individual images (I'm open to suggestions, by the way!), the new IsEnabled property seems like a reasonable "next best thing".


[Click here to download the compiled PhonePerformance assembly, sample applications, and full source code for everything.]


My thanks go out to the people who have shared their experience and suggestions with/for LowProfileImageLoader and DeferredLoadListBox! While these two classes are not appropriate in every situation, they seem to be useful in enough situations that it's worth giving them a quick try if you're experiencing relevant performance problems. Both classes are easy to hook up, so trying them out takes no more than a couple of minutes - which will be time well spent if the problem goes away!

I wish everyone good luck with their Windows Phone 7 applications - and please don't forget the value of great performance! :)

This one's for you, Gregor Mendel [Code to animate and fade Windows Phone orientation changes now supports a new mode: hybrid!]

This isn't my first time discussing animating device orientation changes, so I won't spend a lot of time explaining the motivation. Here's where things left off last time:

For "in your face" transitions, there's AnimateOrientationChangesFrame which animates the rotation interactively (but might get bogged down by complex layouts). For more subtle transitions that perform smoothly regardless of how complex the page layout is, there's FadeOrientationChangesFrame which fades between the before/after layouts. Both classes have the same API and both are used in the same manner - it's just a matter of choosing the right one for your scenario.


The purpose of this post is to announce a new class, HybridOrientationChangesFrame, which is meant to combine the best parts of the two existing classes!

HybridOrientationChanges sample

By coincidence, René Schulte and Steve Starck independently contacted me last week to ask about implementing something that unified AnimateOrientationChangesFrame and FadeOrientationChangesFrame: code that animated the rotation between the "before" and "after" states - but faded between them instead of morphing from one shape into the other. The idea behind their request is to get some of the same "Ooh, the application is turning!" visual appeal of AnimateOrientationChangesFrame without the undesirable performance implications for complex layouts. Because the "before" and "after" states don't change size in the proposed scenario, the entire animation can be done on the composition (render) thread! This same visual effect is implemented by some of the core Windows Phone 7 applications - so now it's easy to match that effect in your own applications with HybridOrientationChangesFrame!

While all three of my classes continue to share the same API, the implementation of HybridOrientationChangesFrame is much closer to FadeOrientationChangesFrame than AnimateOrientationChangesFrame. The main difference is that HybridOrientationChangesFrame runs four simultaneous Timelines instead of just one. However, that's not a cause for concern because they're all part of the same Storyboard and the right kind to run on the composition thread (specifically: DoubleAnimations of UIElement.Opacity and RotateTransform.Angle). So although there's a little more activity going on here, there's no need to run expensive (UI thread-bound) layout passes or anything like that. Consequently, HybridOrientationChangesFrame (just like FadeOrientationChangesFrame) should run smoothly even for applications with complex page layouts.

It's good to have choices in life - and now you have 50% more choice when it comes to handling Windows Phone 7 orientation changes! :)


[Click here to download the DynamicOrientationChanges sample and pre-compiled assembly for the Windows Phone 7 platform.]


FadeOrientationChanges sample


The steps for adding a rotation/fade/hybrid animation to a new application remain the same:

  1. Enable support for orientation changes by making the following change to the XAML for the relevant PhoneApplicationPages (note that rotation is not enabled by default for new pages):
    SupportedOrientations="Portrait"
    SupportedOrientations="PortraitOrLandscape"
  2. Verify (by running in the emulator or on the device) the pages you expect to support rotation really do - if things aren't rotating at this point, trying to animate the rotations won't help. :)
  3. Add the AnimateOrientationChangesFrame.cs or FadeOrientationChangesFrame.cs or HybridOrientationChangesFrame.cs source code file from the sample to your project/solution.

    -OR-

    Add a reference to the pre-compiled DynamicOrientationChanges.dll assembly from the sample download to your project/solution.

  4. Open App.xaml.cs and change the RootFrame initialization in the InitializePhoneApplication method (you may need to expand the Phone application initialization region at the bottom):
    RootFrame = new PhoneApplicationFrame();
    RootFrame = new Delay.AnimateOrientationChangesFrame();

    -OR-

    RootFrame = new Delay.FadeOrientationChangesFrame();

    -OR-

    RootFrame = new Delay.HybridOrientationChangesFrame();
  5. Done; rotations will now be animated! To customize the animation, use the Duration, EasingFunction, and IsAnimationEnabled properties which are all present and continue to work as outlined in the original post.


AnimateOrientationChanges sample

There are lots of ways to ask for a date [Creating custom DatePicker/TimePicker experiences is easy with the Windows Phone Toolkit]

DatePicker and TimePicker sample picker

In my previous post announcing the release of the Windows Phone Toolkit, I explained the motivation for the PhoneApplicationPage-based design of the DatePicker and TimePicker controls. Though justified, the current implementation is fairly unusual and has the potential to trip people up if they're not ready for it. So I highly recommend reading the details at the end of that post if you're using DatePicker or TimePicker.

[Waits patiently...]

Okay, if you read the notes, then you understand what we've done and why. And while I'm happy to discuss the pros and cons of the current implementation, that's what we've got for now and I'm going to spend a little time highlighting its extensibility!


As with the rest of the Phone Toolkit, our primary goal was to make it easy for developers to match the core Windows Phone 7 experience in their own applications. Toward that end, adding an instance of DatePicker or TimePicker to a page gives the same "small button expands to full-page date/time picker with infinite scrolly thingies" experience that's found in the core Settings, Calendar, and Alarms applications. But sometimes you want to do things a little differently, and maybe you've got a date/time picking interface in mind that's more relevant to your scenario...


Aside: If what you want to do is change the format used to display the date/time on the face of the initial "button", then all you need to do is set the ValueStringFormat property to the standard date and time format string or custom date and time format string of your choice!

But because format strings include "{" and "}", they're a little tricky to code in XAML; you need to escape the special characters. here's an example of what this looks like in its simplest form: ValueStringFormat="{}{0:d}"

And here are a few practical examples (using the culture settings for USA):

Description XAML Sample
Short date format (DatePicker default) "{}{0:d}" 9/20/2010
Short time format (TimePicker default) "{}{0:t}" 4:00 PM
Long date format "{}{0:D}" Monday, September 20, 2010
Long time format "{}{0:T}" 4:00:00 PM
Explicit month/day/year format "{}{0:MM-dd-yyyy}" 09-20-2010
Explicit 24-hour time format with text "{}The 24-hour time is {0:HH:mm}." The 24-hour time is 16:00.


Customizing the full-screen picker page is as simple as setting the DatePicker.PickerPageUri or TimePicker.PickerPageUri property to point to a PhoneApplicationPage that implements the IDateTimePickerPage interface. The PickerPageUri property uses the standard assembly-relative syntax ("/assemblyShortName;component/resourceLocation"), so it should be familiar to most folks. The IDateTimePickerPage interface is a new interface, but I think you'll agree it's pretty basic:

namespace Microsoft.Phone.Controls.Primitives
{
    /// <summary>
    /// Represents an interface for DatePicker/TimePicker to use for communicating with a picker page.
    /// </summary>
    public interface IDateTimePickerPage
    {
        /// <summary>
        /// Gets or sets the DateTime to show in the picker page and to set when the user makes a selection.
        /// </summary>
        DateTime? Value { get; set; }
    }
}


When it's time to display the picker page, DatePicker and TimePicker navigate to the page specified by PickerPageUri via the NavigationService.Navigate("...") method, wait for the page to load, get a reference to its IDateTimePickerPage interface, and set its Value property to the starting DateTime. After that, the custom picker page is in complete control and can display any UI it wants. When the custom picker is done (either because the user picked a date/time or because the user cancelled the operation), the picker should set its Value property to the selected date/time (or null if cancelled) and then call NavigationService.GoBack to return to the previous page. DatePicker and TimePicker automatically detect this, update their own Value property (which automatically updates their UI), and fire their ValueChanged event.

In some ways, it's actually kind of elegant! :) And the fact that the picker is entirely implemented by its own PhoneApplicationPage makes it really easy to work with at design-time in Visual Studio and Blend.


To help illustrate the process, I created a sample application that uses custom pickers for DatePicker and TimePicker which let the user pick times relative to the current time:

CustomDateTimePickerPage sample application Custom DatePickerPage example Custom TimePickerPage example

The sample application shows the current date and time because what the emulator reports isn't always the same as what the host operating system reports! In my experience, it's often an hour or more off - so please keep in mind that the times used by the sample are relative to emulator time!


Here's the XAML for the main page that hosts the DatePicker and TimePicker controls:

<toolkit:DatePicker
    Value="10/10/2010"
    Header="Custom Date Picker Page"
    PickerPageUri="/CustomDateTimePickerPage;component/CustomDatePickerPage.xaml"/>

<toolkit:TimePicker
    Value="{x:Null}"
    Header="Custom Time Picker Page"
    PickerPageUri="/CustomDateTimePickerPage;component/CustomTimePickerPage.xaml"/>
Aside: Just for fun, I've explicitly set the Value properties here. Although the controls' default behavior of using the current date/time is likely to be what you want most of the time, applications are free to override the initial date/time (as DatePicker does above) or to provide a blank starting value (as TimePicker does with the x:Null markup extension).


The implementation of the custom PhoneApplicationPage implementation is so basic, I'm going to show the complete date picker here! (The custom time picker implementation is nearly identical.) I've highlighted the particularly interesting bits, but by now they should be familiar.

First the XAML, then the code:

<phone:PhoneApplicationPage
    x:Class="CustomDateTimePickerPage.CustomDatePickerPage"
    xmlns="http://schemas.microsoft.com/winfx/2006/xaml/presentation"
    xmlns:x="http://schemas.microsoft.com/winfx/2006/xaml"
    xmlns:phone="clr-namespace:Microsoft.Phone.Controls;assembly=Microsoft.Phone"
    xmlns:d="http://schemas.microsoft.com/expression/blend/2008"
    xmlns:mc="http://schemas.openxmlformats.org/markup-compatibility/2006"
    FontFamily="{StaticResource PhoneFontFamilyNormal}"
    FontSize="{StaticResource PhoneFontSizeNormal}"
    Foreground="{StaticResource PhoneForegroundBrush}"
    SupportedOrientations="PortraitOrLandscape" Orientation="Portrait"
    mc:Ignorable="d" d:DesignHeight="800" d:DesignWidth="480">

    <Grid>
        <Grid.RowDefinitions>
            <RowDefinition Height="Auto"/>
            <RowDefinition Height="*"/>
        </Grid.RowDefinitions>

        <TextBlock
            Text="CHOOSE CUSTOM DATE"
            Margin="12"
            FontWeight="Bold"/>

        <StackPanel
            Grid.Row="1"
            VerticalAlignment="Center">
            <Button Content="Tomorrow" Click="TomorrowButtonClick"/>
            <Button Content="Next Week" Click="NextWeekButtonClick"/>
            <Button Content="Next Month" Click="NextMonthButtonClick"/>
            <Button Content="[Cancel]" Click="CancelButtonClick"/>
        </StackPanel>
    </Grid>

</phone:PhoneApplicationPage>
public partial class CustomDatePickerPage : PhoneApplicationPage, IDateTimePickerPage
{
    /// <summary>
    /// Gets or sets the DateTime value for the IDateTimePickerPage interface.
    /// </summary>
    public DateTime? Value { get; set; }

    public CustomDatePickerPage()
    {
        InitializeComponent();
    }

    private void TomorrowButtonClick(object sender, RoutedEventArgs e)
    {
        ChooseDate(DateTime.Now.AddDays(1));
    }

    private void NextWeekButtonClick(object sender, RoutedEventArgs e)
    {
        ChooseDate(DateTime.Now.AddDays(7));
    }

    private void NextMonthButtonClick(object sender, RoutedEventArgs e)
    {
        ChooseDate(DateTime.Now.AddMonths(1));
    }

    private void ChooseDate(DateTime date)
    {
        // Commit date and close picker
        Value = date;
        NavigationService.GoBack();
    }

    private void CancelButtonClick(object sender, RoutedEventArgs e)
    {
        // Cancel selection and close picker
        Value = null;
        NavigationService.GoBack();
    }
}


As you can see, creating a custom picker page for DatePicker and TimePicker is really easy! As long as you play by a few basic rules, you have complete freedom to style the entire picker experience in a self-contained, interactive, designer-friendly way. It's kind of like re-Templating - but easier and more flexible - in a weird kind of way!


[Click here to download the complete source code for the CustomDateTimePickerPage sample application.]


Now get to it - I'm looking forward to seeing the kinds of custom picker experiences you all come up with! :)

See how we make the sausage [Episode 5 of the Inside Windows Phone show highlights the Windows Phone Toolkit!]

If you happen to have 11 minutes, 2 seconds lying around and don't know what to do with yourself, you might consider watching or listening to episode 5 of the Inside Windows Phone show on Channel 9. Of course, I'm a bit biased - this episode features Dave Relyea and I talking about the new controls in the Silverlight for Windows Phone Toolkit we just released. Dave and I were two of the four people who created the Phone Toolkit (the others being Scott Morrison and Will Faught) and were fortunate to be invited by Jaime Rodriguez to talk about it on Channel 9. (If you've never seen a Channel 9 video, it's informal and off-the-cuff. No script and no re-takes - at least for us!)


Without further ado, here's Inside Windows Phone #05:Windows Phone Silverlight Toolkit:

Dave, David, and Jaime


If you enjoyed that, you might also enjoy Inside Windows Phone #06: Panorama and Pivot are in the house! Woohoo!! which covers the new Windows Phone Panorama and Pivot controls. This was another project Dave Relyea, Scott Morrison, and I were involved in - along with Jeff Wilcox (who's featured in the video).

Thanks a lot to Jaime and the Channel 9 folks for creating these videos. I hope you find them useful - or at least entertaining! :)

Pining for Windows Phone 7 controls? We got ya covered! [Announcing the first release of the Silverlight for Windows Phone Toolkit!]

Phone Toolkit Sample Application

Today marks the official release of the Windows Phone Developer Tools. This free download enables anyone to create .NET applications for the Windows Phone 7 platform using the Silverlight framework (for traditional applications) or the XNA framework (for games). The Windows Phone 7 application development experience is fully integrated with Visual Studio 2010 and Blend 4 and also includes an emulator for running and testing applications without having a phone. It's really cool stuff, and I encourage everyone to learn more about Windows Phone 7 development!

Congratulations to the Windows Phone 7 team on their accomplishment!


To celebrate, there's a new download for the Silverlight Toolkit CodePlex project: the Silverlight for Windows Phone Toolkit September 2010 release! Yes, that's right - in addition to providing controls for Silverlight developers targeting the desktop, we're also providing controls for Silverlight developers targeting Windows Phone 7! As you might guess, the Windows Phone Toolkit is a lot like the Silverlight Toolkit: the goal is still to provide a set of controls that complement the platform's core offering and help developers/designers create more compelling, more platform-consistent user experiences simply and easily. Because we focus on writing solid, reusable controls that address common scenarios, you are free to focus on delivering an engaging, compelling application to your customers!

As with the Silverlight Toolkit, the Windows Phone Toolkit comes with full source code (under the permissive OSI-approved Ms-PL license) to help people learn the techniques behind developing rich, platform-consistent controls, to see how we solved a particular problem, or to make tweaks and improvements to the controls themselves! The idea is to publish the Windows Phone Toolkit every few months or so; each release will include new controls, improvements to existing controls, and fixes for any bugs people run into. If you have a suggestion for something we should add or change, please search for that issue in the CodePlex issue tracker and vote for it (or create a new issue if your idea is unique). We pay attention to the number of votes an issue has when prioritizing our efforts - it helps ensure we're delivering what the community wants!


Okay, after all that intro and background, you're probably wondering what's actually in the Phone Toolkit... :)


What's in the Phone Toolkit?

ContextMenu and ContextMenuService

ContextMenu sample

In desktop applications, ContextMenu is handy because it lets the second mouse button perform additional, contextually-relevant tasks; but on the phone, it's practically a requirement! Phone-sized UIs need to use every pixel to its fullest advantage, so being able to hide secondary commands behind a tap+hold gesture is a great way to keep the interface clean and easy to read.

The Windows Phone Toolkit's ContextMenu control is a direct port of the Silverlight 4 Toolkit's ContextMenu (read more about what it does and how it works here) with additional Windows Phone-specific functionality added on top. So the Phone ContextMenu uses the same, great 100% Silverlight- and WPF-compatible ItemsControl-based API you know and love - plus it looks good on the phone and behaves just like the system's ContextMenu does! Which means ContextMenu (along with its helper ContextMenuService) is simple to use and makes it easy for Windows Phone applications to maintain platform-consistent appearance and behavior. (And for advanced scenarios, ContextMenu supports the ICommand interface, data-binding (of and to) items, Separator, and more!)

Here's the XAML for the example above:

<Border
    Background="{StaticResource PhoneChromeBrush}"
    Padding="20">
    <toolkit:ContextMenuService.ContextMenu>
        <toolkit:ContextMenu>
            <toolkit:MenuItem
                Header="gray text"
                Click="MenuGrayTextClick"/>
            <toolkit:MenuItem
                Header="normal text"
                Click="MenuNormalTextClick"/>
        </toolkit:ContextMenu>
    </toolkit:ContextMenuService.ContextMenu>
    <TextBlock
        x:Name="MenuTextBlock"
        Text="Tap and hold for ContextMenu"
        HorizontalAlignment="Center"/>
</Border>


DatePicker and TimePicker

DatePicker and TimePicker sample buttons DatePicker and TimePicker sample picker

Windows Phone 7 includes a cool, distinctive UI for choosing dates and times: three vertical spinners create a fun "endless looping" experience that people really enjoy using. The Phone Toolkit's DatePicker and TimePicker controls implement the exact same experience as the core controls, so it's easy to add date and time selection to your own application!

What's more, these controls are both culture-aware and automatically configure themselves according to the settings on the user's phone (ex: d/m/y vs. m/d/y date formats and 12- vs. 24-hour time format). The API for DatePicker and TimePicker will be familiar to anyone who's used similar "picker" controls in the past. The Header convenience property simplifies the task of labeling either control - in a platform-consistent font and style!

Here's the XAML for the example above and to the right:

<toolkit:DatePicker
    Header="Date"
    Value="9/16/2010"
    ValueChanged="DatePickerValueChanged"/>
<toolkit:TimePicker
    Header="Time"
    Value="12:34 pm"
    ValueChanged="TimePickerValueChanged"/>


ToggleSwitch

ToggleSwitch sample

The Windows Phone UI for toggling settings on and off will be immediately familiar to anyone who's used a light switch (or an iDevice). Because there are subtleties to the core controls that are tricky to get right, the Toolkit includes the ToggleSwitch control! Continuing the theme of "make it easy to match the core behavior", ToggleSwitch looks, feels, and acts just like Windows Phone users will expect - including supporting flicks and swipes. In addition to subclassing ToggleButton for consistency and usability, ToggleSwitch supports the Header convenience property to make it easy to create properly-spaced settings pages. And if the need arises, you can also provide custom Content or pull the ToggleSwitchButton primitive control out and use it directly!

Here's the XAML for the example above:

<toolkit:ToggleSwitch
    Header="Some feature"
    IsChecked="true"
    Checked="ToggleSwitchChanged"
    Unchecked="ToggleSwitchChanged"/>


GestureListener and GestureService

GestureService and GestureListener sample

Touch interfaces are a lot more interactive and engaging than the conventional mouse+keyboard UI most people are used to. One of the neatest things about touch UIs are their ability to translate natural human gestures into meaningful commands. Taking good advantage of touch and gestures can significantly improve the user experience and really help an application stand out from the crowd.

To make gestures easy to work with, the Phone Toolkit includes the GestureService and GestureListener classes which provide events for the following gestures: tap, double-tap, hold, flick, drag (started/delta/completed), and pinch (started/delta/completed). All these gestures respect the relevant system parameters (ex: movement threshold, input timing, etc.), so applications that use GestureListener feel familiar and natural. All the developer needs to do is associate a GestureListener with the element(s) of interest and handle the corresponding gesture event(s) as they show up!

For more background on gestures, here's a nice, easy to visualize overview for Windows 7 (not identical, but close) and here's a detailed document specific to windows Phone 7.

Here's the XAML for the example above (note that typical applications will only hook up to the event(s) they care about):

<Border
    Background="{StaticResource PhoneChromeBrush}"
    Padding="40">
    <toolkit:GestureService.GestureListener>
        <toolkit:GestureListener
            Tap="GestureListenerTap"
            DoubleTap="GestureListenerDoubleTap"
            Hold="GestureListenerHold"
            Flick="GestureListenerFlick"
            DragStarted="GestureListenerDragStarted"
            DragDelta="GestureListenerDragDelta"
            DragCompleted="GestureListenerDragCompleted"
            PinchStarted="GestureListenerPinchStarted"
            PinchDelta="GestureListenerPinchDelta"
            PinchCompleted="GestureListenerPinchCompleted"/>
    </toolkit:GestureService.GestureListener>
    <TextBlock
        x:Name="GestureTextBlock"
        Text="Perform any gesture here"
        HorizontalAlignment="Center"/>
</Border>


WrapPanel

WrapPanel sample

It may not be the sexiest of the Panel classes, but WrapPanel is a tremendously useful layout container! Lots of Windows Phone developers have been using this control from the Silverlight 3 Toolkit (either by referencing that assembly or by copying the code into their projects), but that can be a little tricky - so we thought we'd make it super easy by including WrapPanel in the Phone Toolkit! WrapPanel's "put as much stuff on a line as fits, then wrap to the next line" approach works particularly well on the phone - especially for scenarios where the sizes of things can vary (ex: during the transition from portrait orientation to landscape).

Here's the XAML for the example above:

<toolkit:WrapPanel>
    <Button Content="Here"/>
    <Button Content="is"/>
    <Button Content="some"/>
    <Button Content="simple"/>
    <Button Content="content"/>
    <Button Content="that"/>
    <Button Content="wraps"/>
    <Button Content="to"/>
    <Button Content="fit"/>
    <Button Content="the"/>
    <Button Content="screen"/>
</toolkit:WrapPanel>


[Click here to download the sample application used to create all the examples shown here.]


Helpful Hints for Hopeful Heroes

Here are a few tips and tidbits to help fledgling Windows Phone 7 developers make the most of the Phone Toolkit:

  • The examples I show here are from my own (deliberately simple) sample application, but there's also a more comprehensive sample application that shows off more sophisticated scenarios. The complete source code for the entire Phone Toolkit (including the sample application) can be downloaded from the CodePlex release page or the CodePlex source code page or by using any of the supported version control system clients (ex: TFS, SVN, etc.).

  • Some (but not all) of the ContextMenus used by the core phone applications get a little fancy when they show the menu: they shrink the UI of the rest of the application in the background. Because we strive to help developers create consistent applications, the Toolkit's ContextMenu does this by default as well.

    But because it's not part of the application itself, our ContextMenu's behavior needs to be as self-contained as possible - which means it can not modify the existing visuals in order to create this effect. (Otherwise it might make an unexpected change that crashes the developer's application!) Therefore, the "shrink" effect is implemented by capturing a "background" screen shot of the entire application, layering it over an opaque PhoneBackgroundBrush layer to avoid transparent areas leaking through, creating a "active element" screen shot capture of just the element that was tap+held, layering this over a correspondingly-sized opaque PhoneBackgroundBrush layer (to avoid transparency issues again), creating a "menu" layer for the actual menu items, layering everything over the running application by putting it in a Popup, and finally animating the scale of the "background" layers. Whew - if that sounds like a lot of effort, it is... :)

    The good news is this works pretty well in practice and duplicates the core effect fairly authentically - the less good news is that certain page designs poke little holes in the sleight-of-hand ContextMenu is doing. In many cases, such issues can be resolved by modifying the target element (the one to which the ContextMenu is attached) to have a non-transparent background. (ContextMenu's PhoneBackgroundBrush guess is the best it can do, but the application developer can sometimes do better.)

    But if you still can't get the effect you're looking for - or if you just don't like the default "shrink and grow" behavior (the core applications don't use it everywhere, either!) - then you can set the (Phone-specific) ContextMenu.IsZoomEnabled property to false in order to disable the custom animation and get rid of all this goofy complexity. In every case I know of so far, developers who resorted to IsZoomEnabled were quite happy with the results! :)

  • Icon configuration When you first add DatePicker or TimePicker to your application, you'll find that the "done" and "cancel" ApplicationBar icons shown when the pickers are opened are wrong. That's because the icons aren't actually being loaded - and that's because of a platform restriction. Specifically, the ApplicationBarButton.IconUri property will only load images that are part of the project and marked with Build Action=Content in the property editor. This means there's no good way for an assembly like the Phone Toolkit assembly to bundle such icons within itself (like there would be if the IconUri property supported the assembly-relative syntax "/assemblyShortName;component/resourceLocation").

    As a result, it's necessary for application developers to add these two icons to a well-known path in their project where DatePicker and TimePicker will automatically use them. For your convenience, we've bundled these two icons along with the Toolkit installer and they're already on your machine! :) To find them, open the Start Menu, expand the "Microsoft Silverlight for Windows Phone Toolkit" folder, and click on the "Binaries" item. This will open a Windows Explorer view of the install location of the Phone Toolkit (something like C:\Program Files\Microsoft SDKs\Windows Phone\v7.0\Toolkit\Sep10\Bin). The icons can be found in the "Icons" sub-folder within.

    To use these two icons in an application, right click the application's project node in the Visual Studio Solution Explorer, choose "Add", choose "New Folder", and rename it "Toolkit.Content". Then right-click on the new folder, choose "Add", choose "Existing Item...", navigate to the Phone Toolkit's install directory, select both icons, and hit "OK". Right-click each icon and change its "Build Action" to "Content"; re-run the application, and they'll show up just like you expect! (And if any of that seemed confusing, just look at how the sample application is configured - match that and you'll be fine.)

  • If you already know Windows Phone 7 supports different themes ("Light" and "Dark", AKA "white background" and "black background"), you might wonder why it's not necessary to provide "Light" and "Dark" versions of each icon... Well, the platform's a little clever here - it will automatically "Light"-ify "Dark" icons when the "Light" theme is active. Therefore, all we need to do is provide is "Dark" versions of the icons - the system converts them for us!

    Note: The reverse is not true; "Light" icons will not be "Dark"-ified for you. (So it seems like maybe the "Dark" side is more powerful?)
  • We've already discussed the reasons why it's good for controls to use the Popup control (because it keeps things isolated from the rest of the application), so DatePicker and TimePicker obviously use Popup too, right? Wrong! :)

    To be fair, DatePicker and TimePicker originally used a Popup for exactly those reasons. And life was good. Except when you tried to scroll the time/date spinners in the picker view... It worked okay, but the frame-rate was pretty low - almost as if the animations weren't happening on the composition (render) thread like they were supposed to... And, indeed, they weren't! It turns out the phone platform doesn't apply hardware acceleration to content in a Popup. :(

    Enough people were unhappy with the performance that DatePicker and TimePicker were modified to use a PhoneApplicationPage-based model instead. What this means is that instead of opening a Popup to hold the picker's spinner UI, these controls instead call NavigationService.Navigate("...") and point it to a Page subclass that's hosted in the same control assembly. The platform doesn't care where it loads pages from, so it happily navigates to the new Page, which then loads the spinners, which benefit from hardware acceleration, and therefore scroll smoothly!

    If this sounds like a wonderful solution, that's because it is - mostly. The big drawback to the Page-based approach is that it subtly breaks one of the guidelines of control development we discussed above: don't make changes that affect the application. In this case, if the application is already listening to the NavigationService's Navigating or Navigated events, then it will also see the "hidden" navigations that DatePicker and TimePicker are performing.

    Whether this is a problem or not depends on what the application is doing and how it's doing it. The good news is that most applications don't track navigations and won't need to worry about this at all; for applications that do track navigations, the good news is that this scenario is easy to detect. Specifically, if the object exposed by NavigationEventArgs.Content during a navigation implements IDateTimePickerPage, then the current navigation is part of DatePicker or TimePicker's behavior and should be ignored by the application. Applications that follow that simple guideline should be safe; applications that ignore it and play tricks like cancelling DatePicker and TimePicker navigations will most likely break stuff. :(

  • Now that I've thoroughly scared everyone away from ever using Page-based navigations, let me back-pedal a bit and say that there are some cool things you can do with them! In particular, DatePicker and TimePicker allow you to customize their destination Page which lets you completely change the picker experience for both of them. But I've already gone on long enough here; that'll be the topic of a subsequent blog post... :)


We've had a lot of fun building the Silverlight for Windows Phone Toolkit - and we hope you have a lot of fun using it! Everything in the Phone Toolkit is there because there was strong customer demand. The Silverlight Toolkit team has heard you loud and clear, and we're doing our best to make your Windows Phone 7 development experience as pleasant and productive as possible!

Okay, enough chatter for now - go download the developer tools and get busy building great applications! :)

He has a right to criticize, who has a heart to help [Two fixes for DynamicOrientationChanges improve the experience of animating and fading Windows Phone orientation changes]

I've written about how my DynamicOrientationChanges classes improve the user experience for Windows Phone 7 applications by animating device orientation changes. For "in your face" transitions, there's AnimateOrientationChangesFrame which animates the rotation interactively (but might get bogged down by complex layouts). For more subtle transitions that perform smoothly regardless of how complex the page layout is, there's FadeOrientationChangesFrame which fades between the before/after layouts. Both classes have the same API and both are used in the same manner - it's just a matter of choosing the right one for your scenario.


FadeOrientationChanges sample


The purpose of this post is to let readers know I've just updated the source code and pre-compiled DynamicOrientationChanges.dll assembly with two fixes for AnimateOrientationChangesFrame:

  • On post-Beta builds of the Windows Phone 7 Tools (i.e., bits that aren't public yet, but will be soon), starting an application with AnimateOrientationChangesFrame in landscape orientation resulted in a black screen. This was due to a change in the order of startup events versus the Beta build and has been fixed so the scenario works on both the Beta and the latest (internal) phone builds. Other than upgrading to get the fix, users of AnimateOrientationChangesFrame don't need to change anything.
  • In scenarios where a TextBox was present and given focus, the corresponding "pop in" of the SIP (software input panel; AKA the keyboard) would not offset the window in order to keep the TextBox visible. What goes on behind the scenes is somewhat intricate, so I was fortunate to be able to reuse the existing logic by hijacking the relevant TranslateTransform that was already responsible for this effect. Accordingly, TextBox scenarios now behave the same with AnimateOrientationChangesFrame as without - and again there's nothing application developers need to do differently.

Neither of these issues affected FadeOrientationChangesFrame (its simpler implementation is its advantage), so that code hasn't changed since last time.

Aside: I'd like to thank kind readers Mike Calligaro (yes, the same Mike who found an issue last time!) and Tonci Tonci for reporting the landscape and SIP issues (respectively) and for trying out proposed fixes to verify their correctness. (Of course, any problems are entirely my fault.)


[Click here to download the DynamicOrientationChanges sample and pre-compiled assembly for the Windows Phone 7 platform.]


AnimateOrientationChanges sample


The steps for adding a rotation/fade animation to a new application remain the same as before:

  1. Enable support for orientation changes by making the following change to the XAML for the relevant PhoneApplicationPages (note that rotation is not enabled by default for new pages):
    SupportedOrientations="Portrait"
    SupportedOrientations="PortraitOrLandscape"
  2. Verify (by running in the emulator or on the device) the pages you expect to support rotation really do - if things aren't rotating at this point, trying to animate the rotations won't help. :)
  3. Add the AnimateOrientationChangesFrame.cs or FadeOrientationChangesFrame.cs source code file from the sample to your project/solution.

    -OR-

    Add a reference to the pre-compiled DynamicOrientationChanges.dll assembly from the sample download to your project/solution.

  4. Open App.xaml.cs and change the RootFrame initialization in the InitializePhoneApplication method (you may need to expand the Phone application initialization region at the bottom):
    RootFrame = new PhoneApplicationFrame();
    RootFrame = new Delay.AnimateOrientationChangesFrame();

    -OR-

    RootFrame = new Delay.FadeOrientationChangesFrame();
  5. Done; rotations will now be animated! To customize the animation, use the Duration, EasingFunction, and IsAnimationEnabled properties which are all present and continue to work as outlined in the original post.

Never do today what you can put off till tomorrow [DeferredLoadListBox (and StackPanel) help Windows Phone 7 lists scroll smoothly and consistently]

In my previous post about how LowProfileImageLoader helps the Windows Phone 7 UI thread stay responsive by loading images in the background, I began with the following introduction:

When writing applications for small, resource-constrained scenarios, it's not always easy to balance the demands of an attractive UI with the requirements of fast, functional design. Ideally, coding things the natural way will "just work" (the so-called pit of success) - and it usually does. But for those times when things need some extra "oomph", it's nice to have options. That's what my latest project, PhonePerformance is all about: giving developers performance-focused alternatives for common Windows Phone 7 scenarios.


In this second post, I'll be demonstrating the use of my DeferredLoadListBox class in conjunction with the Silverlight StackPanel in order to get good performance from a scenario that's pretty common for social media applications: a scrolling list of entries with a picture and a brief bit of text. (Ex: Twitter posts, Facebook updates, blog comments, and the like.) As usual, I've written a sample application to show what I'm talking about - it displays a simple list of about 200 image+name pairs from the web (the followers of my Twitter account [you know who you are! :) ]). You can see a screen shot of the "List Scrolling" sample below:

PhonePerformance List Scrolling sample
Note: Everything in this post pertains to the latest (internal) Windows Phone 7 builds, not the public Beta bits. Although I'd expect things to work the same on the Beta build, I haven't verified that because the final bits will be released to the public on September 16th.
Additional note: My discussion assumes all testing is done on actual phone hardware. Although running the emulator on a PC is a fantastic development experience, performance of applications in the emulator can vary significantly. The emulator is great for writing new code and fixing bugs, but performance work should be done on a real phone if at all possible.


Okay, go ahead and run the sample and wait a moment for it to load the user list from the web (and enable those two buttons). Then choose the "default" (left) or "performance" (right) scenario and watch the behavior of the little blue dots moving across the screen as the list content populates. (I discussed the motivation behind the blue dots in the previous post - for now just remember that when the dots are flowing smoothly, life is good - and when the dots get jumpy or stop animating completely, the application is unresponsive.)

Right now, we're interested in the different load times of the two scenarios. The "performance" side uses a StackPanel to get good scroll performance, but making that switch without doing anything else is likely to increase load times versus the default VirtualizingStackPanel used by the Windows Phone ListBox (because of the loss of virtualization; more on this later). That's why the sample also uses DeferredLoadListBox - to offset the performance loss by re-introducing enough pseudo-virtualization to bring performance back up to where it was. And as the sample application shows, the load times of the two lists are very similar. (Granted, neither is instantaneous - but it's also not the case that one is consistently faster than the other.)

Now that both lists are populated, the real experiment begins: go ahead and scroll the "default" (left) list up and down and watch the item content as you do so. When scrolling at slow or moderate speeds, the movement will be smooth and the experience will be great. But once you start scrolling quickly, things begin to break down - you may start to see brief glimpses of missing items, flickering, or even black-outs...

So with that baseline experience in mind, it's time to scroll the "performance" (right) list to see how it compares. The first thing you'll probably notice is that it's slower to load the images - that's due to the use of LowProfileImageLoader and was the topic of my previous post. The next thing you'll probably notice is that the scrolling is smooth for just about any speed - and especially for content that's already been on the screen at least once! I won't claim scrolling is perfect with StackPanel and DeferredLoadListBox, but it has been my experience (and that of others) that it can be notably better than the default behavior.


To understand why the DeferredLoadListBox+StackPanel combination is effective, it's necessary to understand a little about how VirtualizingStackPanel works - and why that ends up being a problem in this scenario...

Pretty much every Panel implementation for Silverlight and WPF works by measuring and arranging all its elements according to various layout guidelines (ex: stack, grid, etc.). This makes it straightforward to implement a custom Panel, but it also means that all the Children must be created and live in the visual tree from the beginning. Because in the vast majority of cases there are only a handful of children (and they're all on screen anyway), this isn't a problem. However, in the "really long list" scenario, there are often only 5-10 items on the screen at a time - and a few hundred other items that aren't. VirtualizingStackPanel works in conjunction with ItemsControl and ItemContainerGenerator to create only those elements that are actually on the screen. As the user scrolls the list, VirtualizingStackPanel automatically creates containers for any items about to come into view and recycles the containers for items that just scrolled out of view. (In reality, there's usually a screen's worth of buffer on either side.) Consequently, there are two big wins with VirtualizingStackPanel: load time (by virtue of creating only a fraction of the total elements) and memory consumption (by virtue of keeping only a fraction of the total elements around at any time).

But (as sometimes happens in life) VirtualizingStackPanel's strength is also its weakness. All that container recycling and item juggling takes time to execute - and that's precious time on the UI thread that can't be spent doing other things (like updating the UI). So what seems to happen when a list is scrolling quickly enough is that the VirtualizingStackPanel falls behind more and more - until some of those containers that are scrolling into view are blank because they haven't been created or populated yet! And that's when the user sees visual glitches and rendering issues...

Therefore, the fundamental approach I've taken to avoiding problems in scenarios like this is to replace the ListBox's VirtualizingStackPanel ItemsPanel with a StackPanel. This is quite easy to do - and the StackPanel's non-virtualizing nature means that scrolling long lists will be smooth as silk. However, there are two downsides to making this switch: load time is considerably longer and memory use will be significantly higher. The increased memory consumption probably won't be an issue with small- or medium-sized lists, but it could start to be a problem for large lists containing thousands of items. But while there are options for mitigating this, that's not my objective and I won't be going into them here. (Besides, I'm not sure how practical it is for people to scroll super-long lists, anyway!)

The way I avoid longer load times is by using the DeferredLoadListBox class I wrote for just this purpose - what it does is hold off on populating off-screen containers until they're about to show up on the screen. In this manner, it restores some of the benefits of VirtualizingStackPanel by making the relevant portion of the load time (roughly) independent of the total number of items in the list. But it's important to note that DeferredLoadListBox works in one direction only! Although there's no reason it couldn't "re-virtualize" items as they scroll out of view, it specifically doesn't do so because doing (and undoing) that would consume precious CPU cycles. DeferredLoadListBox is really only about softening the blow of switching from VirtualizingStackPanel to StackPanel - it's not about trying to re-implement VirtualizingStackPanel's fundamental behavior.

So with scrolling glitches avoided and load time back to where it started, there's just one other thing slowing things down and detracting from the user experience: the jumpiness that takes place during the first full scroll of the list. What's going on there is that the first full scroll causes all those "pseudo-virtualized" containers to be created - which causes the corresponding images to be downloaded from the web. We've established that downloading images on the UI thread is bad for performance, and this is exactly the scenario I created LowProfileImageLoader for! So by throwing LowProfileImageLoader into the mix, the first full scroll stays responsive, too.

And at this point, we've arrived at the smooth, pleasing, consistent scrolling experience you get from the "List Scrolling" sample's "performance" column! Yay us! :)


Of course, every application - and every scenario - is different, so there's no guarantee StackPanel, DeferredLoadListBox, or LowProfileImageLoader will help all the time (or even most of the time!). But what's nice is that it's extremely easy to try them out (alone or together), so there's nothing to lose by trying them out if your scenario seems likely to benefit!


[Click here to download the compiled PhonePerformance assembly, sample applications, and full source code for everything.]


To show what I mean, here's what the default scenario looks like:

<ListBox ItemsSource="{Binding Followers}">
    <ListBox.ItemTemplate>
        <DataTemplate>
            <Grid Height="50">
                <Grid.ColumnDefinitions>
                    <ColumnDefinition Width="50"/>
                    <ColumnDefinition Width="10"/>
                    <ColumnDefinition/>
                </Grid.ColumnDefinitions>
                <Rectangle
                    Grid.Column="0"
                    Fill="{StaticResource PhoneChromeBrush}"/
                <Image
                    Grid.Column="0"
                    Source="{Binding ProfileImageUrl}"
                    Width="48"
                    Height="48"/>
                <TextBlock
                    Grid.Column="2"
                    Text="{Binding ScreenName}"
                    VerticalAlignment="Center"/>
            </Grid>
        </DataTemplate>
    </ListBox.ItemTemplate>
    <ListBox.ItemContainerStyle>
        <Style TargetType="ListBoxItem">
            <Setter Property="Height" Value="50"/>
        </Style>
    </ListBox.ItemContainerStyle>
</ListBox>

And here's all it takes to convert it to use StackPanel, DeferredLoadListBox, and LowProfileImageLoader:

<delay:DeferredLoadListBox ItemsSource="{Binding Followers}">
    <delay:DeferredLoadListBox.ItemTemplate>
        <DataTemplate>
            <Grid Height="50">
                <Grid.ColumnDefinitions>
                    <ColumnDefinition Width="50"/>
                    <ColumnDefinition Width="10"/>
                    <ColumnDefinition/>
                </Grid.ColumnDefinitions>
                <Rectangle
                    Grid.Column="0"
                    Fill="{StaticResource PhoneChromeBrush}"/>
                <Image
                    Grid.Column="0"
                    delay:LowProfileImageLoader.UriSource="{Binding ProfileImageUrl}"
                    Width="48"
                    Height="48"/>
                <TextBlock
                    Grid.Column="2"
                    Text="{Binding ScreenName}"
                    VerticalAlignment="Center"/>
            </Grid>
        </DataTemplate>
    </delay:DeferredLoadListBox.ItemTemplate>
    <delay:DeferredLoadListBox.ItemContainerStyle>
        <Style TargetType="ListBoxItem">
            <Setter Property="Height" Value="50"/>
        </Style>
    </delay:DeferredLoadListBox.ItemContainerStyle>
    <delay:DeferredLoadListBox.ItemsPanel>
        <ItemsPanelTemplate>
            <StackPanel/>
        </ItemsPanelTemplate>
    </delay:DeferredLoadListBox.ItemsPanel>
</delay:DeferredLoadListBox>

(Don't forget to add the appropriate XMLNS to the top of the XAML file:)

xmlns:delay="clr-namespace:Delay;assembly=PhonePerformance"


The only thing I haven't talked about yet is the requirement that each ListBoxItem container needs to have a fixed height (via the ItemContainerStyle property; see above). This is currently necessary because it enables some optimizations in DeferredLoadListBox - however, it's important to note there's no need for all the containers to have the same fixed height - just that they all need to have a fixed height.


Aside: As it exists today, DeferredLoadListBox only works with vertical scrolling lists. Of course, the same concepts can be applied to horizontally scrolling lists, too, but because that's not consistent with the UI conventions of Windows Phone 7, I haven't tried to generalize the code to support both orientations. I optimized for the performance of the common scenario - but if you'd like to tweak things to support horizontal scrolling instead - or as well! - it should be fairly straightforward to do. :)