The blog of dlaa.me

Posts tagged "Utilities"

Say goodbye to dead links and inconsistent formatting [grunt-check-pages is a simple Grunt task to check various aspects of a web page for correctness]

As part of converting my blog to a custom Node.js app, I wrote a set of tests to validate its routes, structure, content, and behavior (using mocha/grunt-mocha-test). Most of these tests are specific to my blog, but some are broadly applicable and I wanted to make them available to anyone who was interested. So I created a Grunt plugin and published it to npm:

grunt-check-pages

An important aspect of creating web sites is to validate the structure and content of their pages. The checkPages task provides an easy way to integrate this testing into your normal Grunt workflow.

By providing a list of pages to scan, the task can:


Link validation is fairly uncontroversial: you want to ensure each hyperlink on a page points to valid content. grunt-check-pages supports the standard HTML link types (ex: <a href="..."/>, <img src="..."/>) and makes an HTTP HEAD request to each link to make sure it's valid. (Because some web servers misbehave, the task also tries a GET request before reporting a link broken.) There are options to limit checking to same-domain links, to disallow links that redirect, and to provide a set of known-broken links to ignore. (FYI: Links in draft elements (ex: picture) are not supported for now.)

XHTML compliance might be a little controversial. I'm not here to persuade you to love XHTML - but I do have some experience parsing HTML and can reasonably make a few claims:

  • HTML syntax errors are tricky for browsers to interpret and (historically) no two work the same way
  • Parsing ambiguity leads to rendering issues which create browser-specific quirks and surprises
  • HTML5 is more prescriptive about invalid syntax, but nothing beats a well-formed document
  • Being able to confidently parse web pages with simple tools is pleasant and quite handy
  • Putting a close '/' on your img and br tags is a small price to pay for peace of mind :)

Accordingly, grunt-check-pages will (optionally) parse each page as XML and report the issues it finds.


grunt.initConfig({
  checkPages: {
    development: {
      options: {
        pageUrls: [
          'http://localhost:8080/',
          'http://localhost:8080/blog',
          'http://localhost:8080/about.html'
        ],
        checkLinks: true,
        onlySameDomainLinks: true,
        disallowRedirect: false,
        linksToIgnore: [
          'http://localhost:8080/broken.html'
        ],
        checkXhtml: true
      }
    },
    production: {
      options: {
        pageUrls: [
          'http://example.com/',
          'http://example.com/blog',
          'http://example.com/about.html'
        ],
        checkLinks: true,
        checkXhtml: true
      }
    }
  }
});

Something I find useful (and outline above) is to define separate configurations for development and production. My development configuration limits itself to links within the blog and ignores some that don't work when I'm self-hosting. My production configuration tests everything across a broader set of pages. This lets me iterate quickly during development while validating the live deployment more thoroughly.

If you'd like to incorporate grunt-check-pages into your workflow, you can get it via grunt-check-pages on npm or grunt-check-pages on GitHub. And if you have any feedback, please let me know!


Footnote: grunt-check-pages is not a site crawler; it looks at exactly the set of pages you ask it to. If you're looking for a crawler, you may be interested in something like grunt-link-checker (though I haven't used it myself).
Just because I'm paranoid doesn't mean they're not out to get me [Open-sourcing PassWeb: A simple, secure, cloud-based password manager]

I've used a password manager for many years because I feel that's the best way to maintain different (strong!) passwords for every account. I chose Password Safe when it was one of the only options and stuck with it until a year or so ago. Its one limitation was becoming more and more of an issue: it only runs on Windows and only on a PC. I'm increasingly using Windows on other devices (ex: phone or tablet) or running other operating systems (ex: iOS or Linux), and was unable to access my passwords more and more frequently.

To address that problem, I decided to switch to a cloud-based password manager for access from any platform. Surveying the landscape, there appeared to be many good options (some free, some paid), but I had a fundamental concern about trusting important personal data to someone else. Recent, high-profile hacks of large corporations suggest that some companies don't try all that hard to protect their customers' data. Unfortunately, the incentives aren't there to begin with, and the consequences (to the company) of a breach are fairly small.

Instead, I thought it would be interesting to write my own cloud-based password manager - because at least that way I'd know the author had my best interests at heart. :) On the flip side, I introduce the risk of my own mistake or bug compromising the system. But all software has bugs - so "Better the evil you know (or can manage) than the evil you don't". Good news is that I've taken steps to try to make things more secure; bad news is that it only takes one bug to throw everything out the window...

Hence the disclaimer:

I've tried to ensure PassWeb is safe and secure for normal use in low-risk environments, but do not trust me. Before using PassWeb, you should evaluate it against your unique needs, priorities, threats, and comfort level. If you find a problem or a weakness, please let me know so I can address it - but ultimately you use PassWeb as-is and at your own risk.

With that in mind, I'm open-sourcing PassWeb's code for others to use, play around with, or find bugs in. In addition to being a good way of sharing knowledge and helping others, this will satisfy the requests for code that I've already gotten. :)

Some highlights:

  • PassWeb's client is built with HTML, CSS, and JavaScript and is an offline-enabled single-page application.
  • It runs on all recent browsers (I've tried) and is mobile-friendly so it works well on phones, too.
  • Entries have a title, the name/password for an account, a link to the login page, and a notes section for additional details (like answers to security questions).
  • PassWeb can generate strong, random passwords; use them as-is, tweak them, or ignore them and type your own.
  • The small server component runs on ASP.NET or Node.js (I provide both implementations and a set of unit tests).
  • Data is encrypted via AES/CBC and only ever decrypted on the client (the server never sees the user name or password).
  • The code is small, with few dependencies, and should be easy to audit.

For details, instructions, and the code, visit the GitHub repository: https://github.com/DavidAnson/PassWeb

If you find PassWeb interesting or useful, that's great! If you have any thoughts or suggestions, please tell me. If you find a bug, let me know and I'll try to fix it.

Another tool in the fight against spelling errors. [Added HtmlStringExtractor for pulling strings, attributes, and comments from HTML/XML files and URLs]

When I blogged simple string extraction utilities for C# and JavaScript code, I thought I'd covered the programming languages that matter most to me. Then I realized my focus was too narrow; I spend a lot of time working with markup languages and want content there to be correctly spelled as well.

So I dashed off another string extractor based on the implementation of JavaScriptStringExtractor:

HtmlStringExtractor Runs on Node.js. Dependencies via npm. htmlparser2 for parsing, glob for globbing, and request for web access. Wildcard matching includes subdirectories when ** is used. Pass a URL to extract strings from the web.

HtmlStringExtractor works just like its predecessors, outputting all strings/attributes/comments to the console for redirection or processing. But it has an additional power: the ability to access content directly from the internet via URL. Because so much of the web is HTML, it seemed natural to support live-extraction - which in turn makes it easier to spell-check a web site and be sure you're including "hidden" text (like title and alt attributes) that copy+paste don't cover.

Its HTML parser is very forgiving, so HtmlStringExtractor will happily work with HTML-like languages such as XML, ASPX, and PHP. Of course, the utility of doing so decreases as the language gets further removed from HTML, but for many scenarios the results are quite acceptable. In the specific case of XML, output should be entirely meaningful, filtering out all element and attribute metadata and leaving just the "real" data for review.

In keeping with the theme of "small and simple", I didn't add an option to exclude attributes by name - but you can imagine that filtering out things like id, src, and href would do a lot to reduce noise. Who knows, maybe I'll support that in a future update. :)

For now, things are simple. The StringExtractors GitHub repository has the complete code for all three extractors.

Enjoy!

Aside: As I wrote this post, I realized there's another "language" I use regularly: JSON. Because of its simple structure, I don't think there's a need for JsonStringExtractor - but if you feel otherwise, please let me know! (It'd be easy to create.)

Spelling is hard; let's go parsing. [Simple command-line utilities to extract strings and comments from C# and JavaScript code]

Maybe it's old fashioned, but I try to spell things correctly. I don't always succeed, so I rely on tools to help.

Integrated spell-checking for documents and email is ubiquitous, but there's not much support for source code. I've previously written about a code analysis rule I implemented for .NET/FxCop, but that doesn't help with JavaScript (which I've been using more and more).

Sometimes I'll copy+paste source code into Microsoft Word, but that's an act of true desperation because there are so many false positives for keywords, variables, syntax, and the like. So I wrote a simple tool to reduce the noise:

JavaScriptStringExtractor Runs on Node.js. Dependencies via npm. Esprima for parsing and glob for globbing. Wildcard matching includes subdirectories when ** is used.

It's a simple command-line utility to extract strings and comments from a JavaScript file and write the results to standard output. Redirect that output to a file and open it in Word for a much improved spell-checking experience!

Granted, it's still not ideal, but it is quick and painless and filters out most of the noise. I scan for red squiggles, update the code, and get on with life, feeling better about myself for the effort. :)

JavaScript was so easy, I wrote a version for C#, too:

CSharpStringExtractor Runs on .NET. Dependencies via NuGet. Roslyn for parsing. Wildcard matching includes subdirectories.

It's pretty much the same tool, just for a different language.

With JavaScript and C# taken care of, my needs are satisfied - but there are lots more languages out there and maybe other people want to try.

So I created a GitHub repository with the complete code for both tools: StringExtractors

Enjoy!

PS - Pull requests for other languages are welcome. :)

Plug it in, plug it in [Sample code for two TextAnalysisTool.NET plug-ins demonstrates support for custom file types]

A few days ago, @_yabloki tweeted asking how to write a TextAnalysisTool.NET plug-in. I've answered this question a few times in email, but never blogged it before now.

To understand the basis of the question, you need to know what TextAnalysisTool.NET is; for that, I refer you to the TextAnalysisTool.NET page for an overview.

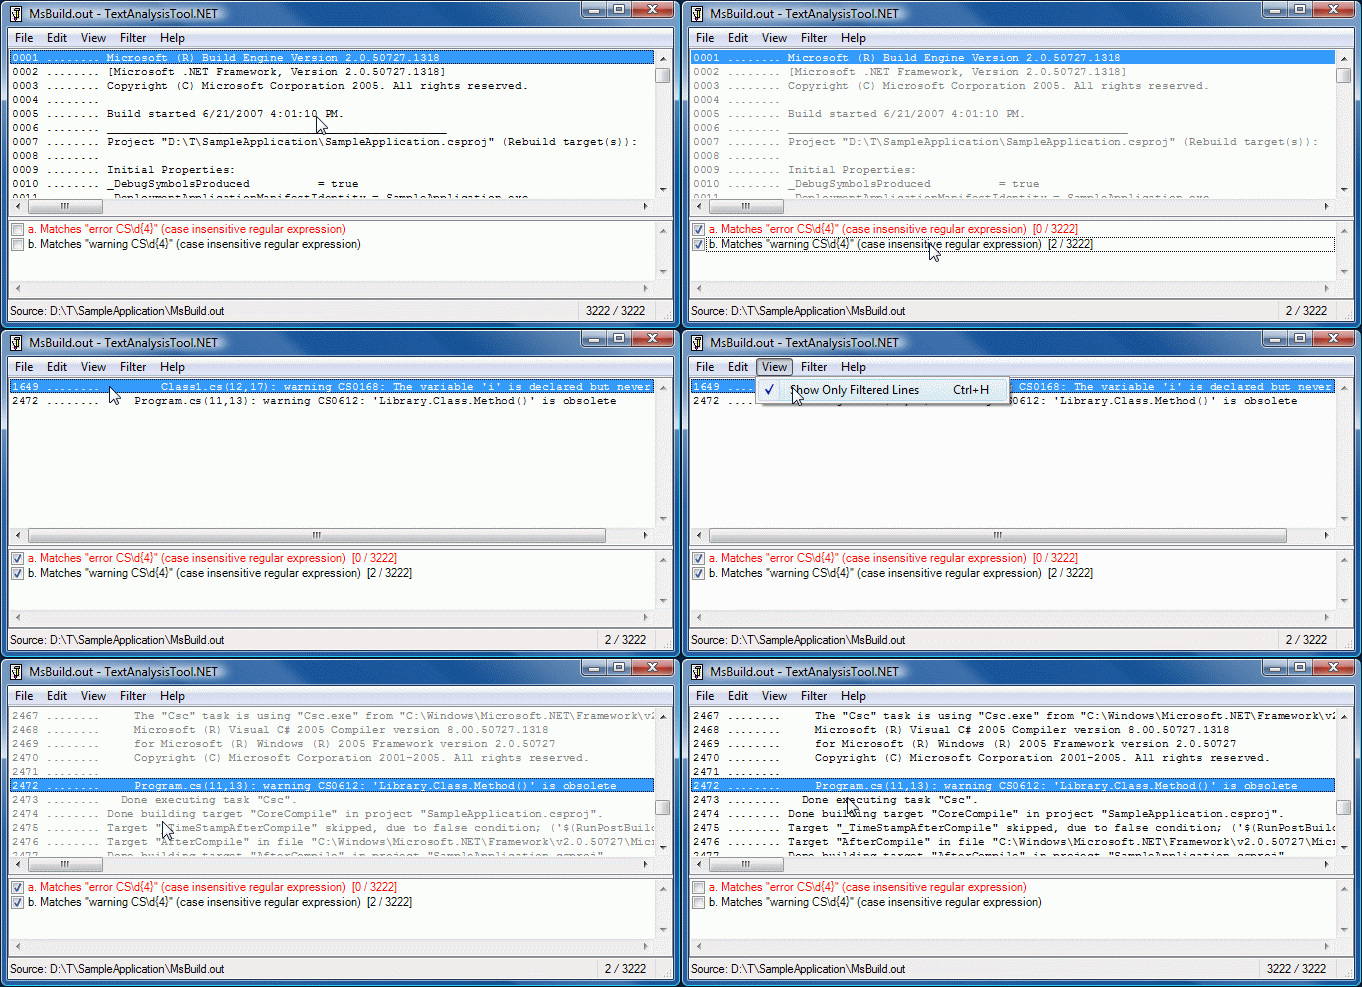
Animated GIF showing basic TextAnalysisTool.NET functionality

To understand the rest of the question, you need to know what a plug-in is; for that, there's the following paragraph from the documentation:

TextAnalysisTool.NET's support for plug-ins allows users to add in their own
code that understands specialized file types.  Every time a file is opened,
each plug-in is given a chance to take responsibility for parsing that file.
When a plug-in takes responsibility for parsing a file, it becomes that plug-
in's job to produce a textual representation of the file for display in the
usual line display.  If no plug-in supports a particular file, then it gets
opened using TextAnalysisTool.NET's default parser (which displays the file's
contents directly).  One example of what a plug-in could do is read a binary
file format and produce meaningful textual output from it (e.g., if the file is
compressed or encrypted).  Another plug-in might add support for the .zip
format and display a list of the files within the archive.  A particularly
ambitious plug-in might translate text files from one language to another.  The
possibilities are endless!


Armed with an understanding of TextAnalysisTool.NET and its support for plug-ins, we're ready to look at the interface plug-ins must implement:

namespace TextAnalysisTool.NET.Plugin
{
    /// <summary>
    /// Interface that all TextAnalysisTool.NET plug-ins must implement
    /// </summary>
    internal interface ITextAnalysisToolPlugin
    {
        /// <summary>
        /// Gets a meaningful string describing the type of file supported by the plug-in
        /// </summary>
        /// <remarks>
        /// Used to populate the "Files of type" combo box in the Open file dialog
        /// </remarks>
        /// <example>
        /// "XML Files"
        /// </example>
        /// <returns>descriptive string</returns>
        string GetFileTypeDescription();

        /// <summary>
        /// Gets the file type pattern describing the type(s) of file supported by the plug-in
        /// </summary>
        /// <remarks>
        /// Used to populate the "Files of type" combo box in the Open file dialog
        /// </remarks>
        /// <example>
        /// "*.xml"
        /// </example>
        /// <returns>file type pattern</returns>
        string GetFileTypePattern();

        /// <summary>
        /// Indicates whether the plug-in is able to parse the specified file
        /// </summary>
        /// <param name="fileName">full path to the file</param>
        /// <remarks>
        /// Called whenever a file is being opened to give the plug-in a chance to handle it;
        /// ideally the result can be returned based solely on the file name, but it is
        /// acceptable to open, read, and close the file if necessary
        /// </remarks>
        /// <returns>true iff the file is supported</returns>
        bool IsFileTypeSupported(string fileName);

        /// <summary>
        /// Returns a TextReader instance that will be used to read the specified file
        /// </summary>
        /// <param name="fileName">full path to the file</param>
        /// <remarks>
        /// The only methods that will be called (and therefore need to be implemented) are
        /// TextReader.ReadLine() and IDisposable.Dispose()
        /// </remarks>
        /// <returns>TextReader instance</returns>
        System.IO.TextReader GetReaderForFile(string fileName);
    }
}

Disclaimer: I wrote TextAnalysisTool.NET many years ago as a way to learn the (then) newly-released .NET 1.0 Framework. Extensibility frameworks like MEF weren't available yet, so please forgive the omission! :)


As you can see, the plug-in interface is simple, straightforward, automatically integrates into the standard File|Open UI, and leaves a great deal of freedom around implementation and function. Specifically, the TextReader instance returned by GetReaderForFile can do pretty much whatever you want. For example:

  • Simple tweaks to the input (ex: normalizing time stamps)
  • Filtering of the input (ex: to remove irrelevant lines)
  • Complex transformations of the input (ex: format conversions)
  • Completely unrelated data (ex: input from a network socket)

There's a lot of flexibility, and maybe the open-endedness is daunting? :) To make things concrete, I've packaged two of the samples I came up with during the original plug-in definition.


TATPlugin_SampleData

Loads files named like 3.lines and renders that many lines of sample text into the display.

Input (file name):

3.lines

Output:

1: The quick brown fox jumps over a lazy dog.
2: The quick brown fox jumps over a lazy dog.
3: The quick brown fox jumps over a lazy dog.


TATPlugin_XMLFormatter

Loads well-formed XML and pretty-prints it for easier reading.

Input:

<root><element><nested>value</nested></element><element><shallow><deep>value</deep></shallow></element></root>

Output:

<root>
  <element>
    <nested>value</nested>
  </element>
  <element>
    <shallow>
      <deep>value</deep>
    </shallow>
  </element>
</root>


[Click here to download the source code and supporting files for the sample TextAnalysisTool.NET plug-ins]

The download ZIP also includes Plugin.cs (the file defining the above interface), a few sample data files, and some trivial Build.cmd scripts to compile everything from a Visual Studio Developer Command Prompt (or similar environment where csc.exe and MSBuild.exe are available).

Note: When experimenting with the samples, remember that TextAnalysisTool.NET loads its plugins from the current directory at startup. So put a copy of TextAnalysisTool.NET (and its .config file) alongside the DLL outputs in the root of the samples directory and remember to re-start it if you change one of the samples. To check that plug-ins are loaded successfully, use the Help|Installed plug-ins menu item.

Aside: Plug-ins are generally UI-less, but they don't have to be - take a look at what Tomer did with the WPPFormatter plug-in for an example.

64 bits ought to be enough for everybody [TextAnalysisTool.NET update for .NET 2.0 and 64-bit enables the analysis of larger files!]

TextAnalysisTool.NET is a free program designed to excel at viewing, searching, and navigating large files quickly and efficiently.

I wrote the first version of TextAnalysisTool back in 2000 using C++ and Win32. In 2003, I rewrote it using the new .NET 1.0 Framework - and upgraded to .NET 1.1 later that year. There were a variety of improvements between then and 2006, the date of the last update to TextAnalysisTool.NET. Along the way, I've heard from a lot of people who use this tool to simplify their daily workflow! In the past year, I've started getting requests for 64-bit support from folks working with extremely large files that don't fit in the 4GB virtual address space limits of a normal 32-bit process on Windows. Although .NET 1.1 didn't support 64-bit processes, .NET 2.0 does, and I've decided it's finally time to take the plunge.:)

Animated GIF showing basic TextAnalysisTool.NET functionality


With this release, TextAnalysisTool.NET has been compiled using the .NET 2.0 toolset and the AnyCPU option which automatically matches a process to the architecture of its host operating system. On 32-bit OSes, TextAnalysisTool.NET will continue to run as a 32-bit process, but on 64-bit OSes, it will run as a 64-bit process and have access to a significantly larger address space. This makes it possible to work with larger log files without the risk of crashing into the 4GB memory limit (which can end up being as low as 1.7 GB in practice)!

Other than a few exceedingly minor string updates, I have made no changes to the way TextAnalysisTool.NET behaves - so the new version should feel just like the previous one. The framework update means .NET 1.1 is no longer a supported platform and .NET 2.0 is now natively supported. The included .config file allows the same executable to run under .NET 4.0 as-is (for example on Windows 8 without the optional ".NET Framework 3.5" feature installed).

If you've ever run out of memory using TextAnalysisTool.NET, please give this new version a try! And if not, go ahead and continue using the previous version without worrying that you're missing out on anything.:)


Click here to download the latest version of TextAnalysisTool.NET

Click here to visit the TextAnalysisTool.NET web page for more information


Many thanks to everyone for all the great feedback - I love getting messages from people around the world who are using TextAnalysisTool.NET to make their lives easier!


Aside: As a matter of technical interest, details on the one bug I found with 64-bit TextAnalysisTool.NET: the following code had worked fine for the last decade (message.WParam is an IntPtr via Form.WndProc for WM_MOUSEWHEEL):
int wheelDelta = ((int)message.WParam)>>16; // HIWORD(WPARAM)
However, when that assignment ran under .NET 2.0 on a 64-bit OS, it quickly threw OverflowException! I was surprised, but it turns out this is documented behavior. Because that line interoperates with the Windows API, I couldn't change the types involved - but I could tweak the code to avoid the exception by avoiding the problematic explicit conversion:
int wheelDelta = ((int)((long)message.WParam))>>16; // HIWORD(WPARAM)
Yep, the proverbial one-line fix saves the day!

"I never did mind about the little things..." [Free HideShowDesktopButtonOnTaskbar utility hides the "Show desktop" button on the Windows taskbar]

Over the holidays, a relative emailed me the following rant:

Most of my conversation with technical support was to find out how to turn off the "Show desktop" icon in the lower right corner of the screen. This icon can be engaged by clicking on it or hovering over it (if you select Peek). On a desktop or a laptop this is NO PROBLEM. But on a tablet, there is no difference between clicking and hovering so Peek is meaningless. VERY OFTEN when using and holding the slate/tablet the heel of my thumb ever so gently touches the "Show desktop" icon and I am taken to the desktop in the middle of what I am doing. As I work, I am in constant fear of touching this icon. I know that everything on my hard drive will not be erased if I do, but it is very annoying. I went on the internet and found a program that turns the icon off and it worked (so it can be done), but then my antivirus program said that it was a THREAT AND ADVISED ME TO PUT IT IN A VAULT WHERE IT COULD NOT HARM MY COMPUTER. I agreed and the program was deleted. I'm not the only one with this problem. The internet has many complaining about the "Show desktop" icon. MS allows me to turn the Clock and Volume icon off; why not the "Show Desktop" icon?????

If you want a somewhat more positive spin, "Aero Peek" and the "Show desktop" button are described in this article about new Windows 7 taskbar features. I don't use either myself, but a bit of internet searching confirmed some people really don't like these features.

"Show desktop" button


The best way to disable a feature is to use an officially supported mechanism - and the good news is that disabling Aero Peek is easy to do by following the directions "To turn off desktop previews" near the bottom of this article. However, I was not able to find similar support for disabling the "Show desktop" button, so I resorted to looking for the next best thing: a group policy setting or documented registry key. Unfortunately, I struck out there, too. But I did find this snippet from a Channel 9 video where Gov Maharaj confirms there's no built-in way to disable the button.

Aside: The relevant discussion is interesting, so maybe have a look even if you're not opposed to the feature itself!


Well, if there's no official way to remove the "Show desktop" button and enough people want to do it, then it's time to start considering other solutions. According to the original rant (and the video discussion), there already are third-party utilities for this purpose - although they're not supported by Microsoft. But it sounds like at least one of these tools might be malware, so I'm not super enthusiastic about trying them out...

Fortunately, I have a rudimentary understanding of both Windows and programming [ :) ], so I wondered if the simplest, most obvious trick would work here. I coded it up one night while waiting for something to compile and was pleased to find that it worked! So I've gone ahead and prettied the code up and am sharing a simple utility to get rid of the Windows 7 taskbar's "Show desktop" button:

HideShowDesktopButtonOnTaskbar icon

[Click here to download the HideShowDesktopButtonOnTaskbar utility and its complete source code.]


Of course, HideShowDesktopButtonOnTaskbar is just as unsupported and unofficial as the other utilities out there - so why choose it?

  • I've included the complete source code for HideShowDesktopButtonOnTaskbar, so you can review everything and re-compile it yourself if you're paranoid. Also, you can be pretty confident I'm not a 1337 h4x0r trying to root your box. :)

  • HideShowDesktopButtonOnTaskbar makes no persistent changes to the machine, so there are no lingering effects and a simple logoff is all it takes to restore everything to the way it was.

  • HideShowDesktopButtonOnTaskbar is simple, small, unobtrusive, and easy to use - just add it to your Startup group to have it run every time you log into Windows!


Okay, enough with the goofy sales pitch... how about some developer notes?

  • As I mentioned, HideShowDesktopButtonOnTaskbar works the simplest way you can imagine: it finds the window corresponding to the "Show desktop" button and hides it. Obviously, hidden windows aren't visible - but they also don't receive input (clicks or hover status), so although the taskbar is still listening for input messages, they don't get sent. Running HideShowDesktopButtonOnTaskbar a second time finds and unhides the "Show desktop" button, restoring things back to how they started. Logging off disposes of the entire taskbar and logging back on creates a new one from scratch, so HideShowDesktopButtonOnTaskbar's changes don't persist.

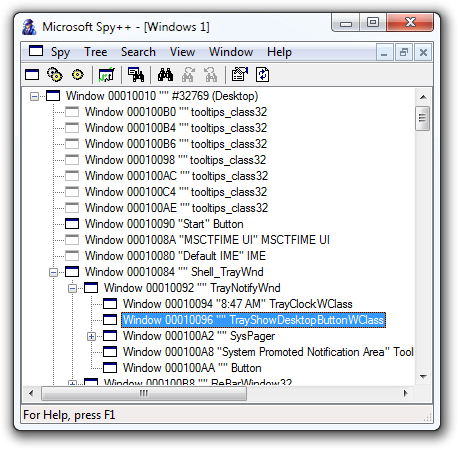
  • Spy++ of "Show desktop" button

    I figured out the right window class to target by using the handy-dandy Spy++ Windows development tool. Specifically, I ran Spy++, clicked the "Find Window" tool, dragged the crosshairs over the "Show desktop" button, and hit OK. That showed the window hierarchy to the right beginning with the desktop window at the top and going down to the "Show desktop" button. Translating that into three nested calls to FindWindowEx was trivial, as was adding a call to ShowWindow to hide the window. Using IsWindowVisible to unhide the button when it was already hidden was just icing on the cake. :)

    Aside: If the window hierarchy changes or if any of the hard-coded class names is different in a newer version of Windows, this will stop working... Yep, that's how it is with simple hacks like this - if it matters to anyone, I can always tweak things to accommodate.
  • Because HideShowDesktopButtonOnTaskbar ended up being easy to write, I was looking for a bit more challenge and set out to make it small. Specifically, the executable is just 11,776 bytes - and 7,015 bytes of that is due to the icon! While I could have squeezed a few more bytes out if I felt like it, the big win was by not linking to the standard C Run-Time library (the use of which results in a 41,472 byte file assuming static linking (i.e., /MT) is used to remove the dependency on MSVCR100.dll). Eschewing the CRT is an advanced scenario, but it was easy to do for HideShowDesktopButtonOnTaskbar because it's so small and simple.

    Aside: This is why the code's entry point is named WinMainCRTStartup instead of the usual WinMain. And by the way: if you're interested in reading more about what it means to get rid of the default CRT, Matt Pietrek's classic "Reduce EXE and DLL Size with LIBCTINY.LIB" is a good place to start.
  • Of course, everything has a price, and I needed to make two other changes as a result of omitting the default CRT. Both are found in Visual Studio's project Properties, Configuration Properties, C/C++, Code Generation settings: changing Basic Runtime Checks (known as <BasicRuntimeChecks> in the .vcxproj file) to Default (i.e., no /RTC? option) and changing Buffer Security Check (<BufferSecurityCheck>) to false (i.e., /GS-). Disabling these checks isn't something you should do in general (especially the latter), but HideShowDesktopButtonOnTaskbar takes no input, has no buffers, and is so simple that I'm (tentatively!) okay sacrificing these two security/resiliency measures.

  • The call to HeapSetInformation / HeapEnableTerminationOnCorruption is almost definitely overkill - but it's good practice and so easy to add that I did so anyway (FYI that the default CRT call this automatically). Plus, doing this made me feel a little better about losing /GS. :)


If you're bothered by Windows 7's "Show desktop" button and are looking for a solution, maybe HideShowDesktopButtonOnTaskbar is the answer. If you're curious how a hack like this works or are looking to dabble with replacing the CRT in your own programs, there might be something of interest here. Either way, HideShowDesktopButtonOnTaskbar was a fun side project - I hope you like it! :)


The code:

// Include system headers (at warning level 3 because they're not /Wall-friendly) #pragma warning(push, 3)
#include <windows.h> #pragma warning(pop)

// Disable harmless /Wall warning C4514 "unreferenced inline function has been removed" #pragma warning(disable: 4514)

// Default entry point function int __stdcall WinMainCRTStartup()
{
    // Enable "terminate-on-corruption"
    (void)HeapSetInformation(NULL, HeapEnableTerminationOnCorruption, NULL, 0);

    // Find the "Show desktop" button/window (starting from the Desktop window)    const HWND hwndTaskbar = FindWindowEx(NULL, NULL, TEXT("Shell_TrayWnd"), NULL);
    if (NULL != hwndTaskbar)
    {
        const HWND hwndNotify = FindWindowEx(hwndTaskbar, NULL, TEXT("TrayNotifyWnd"), NULL);
        if (NULL != hwndNotify)
        {
            const HWND hwndShowDesktopButton = FindWindowEx(hwndNotify, NULL, TEXT("TrayShowDesktopButtonWClass"), NULL);
            if (NULL != hwndShowDesktopButton)
            {
                // Toggle the visibility of the button                const int nCmdShow = IsWindowVisible(hwndShowDesktopButton) ? SW_HIDE : SW_SHOW;
                (void)ShowWindow(hwndShowDesktopButton, nCmdShow);
            }
        }
    }

    // Return 0 because a message loop wasn't entered    return 0;
}

"Make things as simple as possible, but not simpler." [ManagedMsiExec sample app shows how to use the Windows Installer API from managed code]

Windows Installer is the installation and configuration service used by Windows to add and remove applications. (For more information, Wikipedia has a great overview of Windows Installer, covering products, components, setup phases, permissions, etc..) In addition to exposing a rich, native API, Windows Installer comes with msiexec.exe, a command-line tool that offers fine-grained control over the install/uninstall process.

I wanted to familiarize myself with the use of the Windows Installer API from .NET, so I wrote a wrapper class to expose it to managed applications and then a simple program to exercise it. Unlike msiexec.exe which can do all kinds of things, my ManagedMsiExec supports only UI-less install and uninstall of a .MSI Windows Installer package (i.e., /quiet mode). By default, ManagedMsiExec provides simple status reporting on the command line and renders a text-based progress bar that shows how each phase is going. In its "verbose" mode, ManagedMsiExec outputs the complete set of status/progress/diagnostic messages generated by Windows Installer (i.e., /l*) so any problems can be investigated.

Aside: Although I haven't tested ManagedMsiExec exhaustively, it's fundamentally just a thin wrapper around Windows Installer, so I'd expect it to work for pretty much any MSI out there.


Here's how it looks when run:

C:\T>ManagedMsiExec
SYNTAX: ManagedMsiExec <--Install|-i|--Uninstall|-u> Package.msi [--Verbose|-v]
Windows Installer result: 87 (INVALID_PARAMETER)

Doing a simple install:

C:\T>ManagedMsiExec -i Package.msi
ManagedMsiExec: Installing C:\T\Package.msi
Windows Installer result: 0 (SUCCESS)

Doing a simple uninstall:

C:\T>ManagedMsiExec -u Package.msi
ManagedMsiExec: Uninstalling C:\T\Package.msi
Windows Installer result: 0 (SUCCESS)

Using verbose mode to diagnose a failure:

C:\T>ManagedMsiExec -u Package.msi -v
ManagedMsiExec: Uninstalling C:\T\Package.msi
ACTIONSTART: Action 18:31:21: INSTALL.
INFO: Action start 18:31:21: INSTALL.
COMMONDATA: 1: 0 2: 1033 3: 1252
PROGRESS:
PROGRESS: 1: 2 2: 189440
COMMONDATA: 1: 0 2: 1033 3: 1252
INFO: This action is only valid for products that are currently installed.
C:\T\Package.msi
COMMONDATA: 1: 2 2: 0
COMMONDATA: 1: 2 2: 1
INFO: DEBUG: Error 2755:  Server returned unexpected error 1605 attempting to
  install package C:\T\Package.msi.
ERROR: The installer has encountered an unexpected error installing this package.
  This may indicate a problem with this package. The error code is 2755.
INFO: Action ended 18:31:21: INSTALL. Return value 3.
TERMINATE:
Windows Installer result: 1603 (INSTALL_FAILURE)


Of note:

  • Msi.cs, the class containing a set of .NET platform invoke definitions for interoperating with the native MSI.dll that exposes Windows Installer APIs. The collection of functions and constants in this file is not comprehensive, but it covers enough functionality to get simple scenarios working. Most of the definitions are straightforward, and all of them have XML documentation comments (via MSDN) explaining their purpose. For convenience, many of the relevant Windows error codes from winerror.h are exposed by the ERROR enumeration.

  • ManagedMsiExec.cs, the sample application itself which works by calling the relevant Msi APIs in the right order. Conveniently, a complete install can be done in as few as three calls: MsiOpenPackage, MsiDoAction, and MsiCloseHandle (with MsiSetProperty an optional fourth for uninstall or customization). To provide a better command-line experience, the default UI for status reporting is customized via MsiSetInternalUI, MsiSetExternalUI, and MsiSetExternalUIRecord. Implementing the handler for a MsiSetExternalUI callback is easy because it is passed pre-formatted strings; parsing record structures in the handler for the MsiSetExternalUIRecord callback requires a few more API calls (and a closer reading of the documentation!).

Note: When providing delegates to the MsiSetExternalUI and MsiSetExternalUIRecord methods, it's important to ensure they won't be garbage collected while still in use (or else the application will crash!). Because the managed instances are handed off to native code and have a lifetime that extends beyond the function call itself, it's necessary to maintain a reference for the life of the application (or until the callback is unregistered). A common technique for maintaining such a reference is the GC.KeepAlive method (though ManagedMsiExec simply stores its delegate references in a static member for the same effect). Conveniently, the callbackOnCollectedDelegate managed debugging assistant can help identify lifetime problems during debugging


[Click here to download a pre-compiled executable along with the complete source code for the ManagedMsiExec sample.]


The introduction of Windows Installer helped unify the way applications install on Windows and encapsulates a great deal of complexity that installers previously needed to deal with. The openness and comprehensiveness of the Windows Installer native API makes it easy for applications to orchestrate installs directly, and the power of .NET's interoperability support makes it simple for managed applications to do the same.

The Msi class I'm sharing here should allow developers to get started with the Windows Installer API a bit more simply - as the ManagedMsiExec sample demonstrates. The wrapper class and the sample are both pretty straightforward - I hope they're useful, informative, or at least somewhat interesting! :)

TextAnalysisTool.NET to Windows 8: "Y U no run me under .NET 4?" [How to avoid the "please install .NET 3.5" dialog when running older .NET applications on the Windows 8 Developer Preview]

I wrote TextAnalysisTool.NET a number of years ago to streamline the task of analyzing large log files by creating an interactive experience that combines searching, filtering, and tagging and allow the user to quickly identify interesting portions of a large log file. Although .NET 2.0 was out at the time, I targeted .NET 1.1 because it was more widely available, coming pre-installed on Windows Server 2003 (the "latest and greatest" OS then). In the years since, I've heard from folks around the world running TextAnalysisTool.NET on subsequent Windows operating systems and .NET Framework versions. Because Windows and the .NET Framework do a great job maintaining backwards compatibility, the same TextAnalysisTool.NET binary has continued to work as-is for the near-decade since its initial release.

TextAnalysisTool.NET demonstration


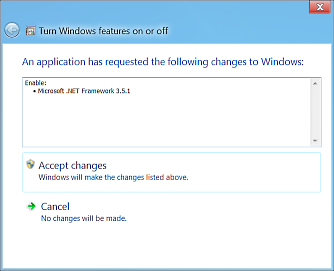
But the story changes with Windows 8! Although Windows 8 has the new .NET 4.5 pre-installed (including .NET 4.0 upon which it's based), it does not include .NET 3.5 (and therefore .NET 2.0). While I can imagine some very sensible reasons for the Windows team to take this approach, it's inconvenient for existing applications because .NET 4 in this scenario does not automatically run applications targeting an earlier framework version. What is cool is that the public Windows 8 Developer Preview detects when an older .NET application is run and automatically prompts the user to install .NET 3.5:

Windows 8 .NET 3.5 install prompt

That's pretty slick and is a really nice way to bridge the gap. However, it's still kind of annoying for users as it may not always be practical for them to perform a multi-megabyte download the first time they try to run an older .NET program. So it would be nice if there were an easy way for older .NET applications to opt into running under the .NET 4 framework that's already present on Windows 8...

And there is! :) One aspect of .NET's "side-by-side" support involves using .config files to specify which .NET versions an application is known to work with. (For more information, please refer to the MSDN article How to: Use an Application Configuration File to Target a .NET Framework Version.) Consequently, improving the Windows 8 experience for TextAnalisisTool.NET should be as easy as creating a suitable TextAnalysisTool.NET.exe.config file in the same folder as TextAnalysisTool.NET.exe.


Specifically, the following should do the trick:

<?xml version="1.0"?>
<configuration>
  <startup>
    <supportedRuntime version="v1.1.4322"/>
    <supportedRuntime version="v2.0.50727"/>
    <supportedRuntime version="v4.0"/>
  </startup>
</configuration>

And it does! :) With that TextAnalysisTool.NET.exe.config file in place, TextAnalysisTool.NET runs on a clean install of the Windows 8 Developer Preview as-is and without prompting the user to install .NET 3.5. I've updated the download ZIP to include this file so new users will automatically benefit; existing users should drop TextAnalysisTool.NET.exe.config in the right place, and they'll be set as well!

Aside: Although this trick will work in many cases, it isn't guaranteed to work. In particular, if there has been a breaking change in .NET 4, then attempting to run a pre-.NET 4 application in this manner might fail. Therefore, it's prudent to do some verification when trying a change like this!


[Click here to download a ZIP file containing TextAnalysisTool.NET, the relevant .config file, its documentation, and a ReadMe.]


TextAnalysisTool.NET has proven to be extremely popular with support engineers and it's always nice to hear from new users. I hope today's post extends the usefulness of TextAnalysisTool.NET by making the Windows 8 experience as seamless as people have come to expect!

What next, a DOS version?? [Free tool and source code to temporarily prevent a computer from entering sleep mode - 32-bit and 64-bit versions now support Windows XP!]

I used .NET 3.5 to write the first version of Insomnia about a year and a half ago. Its purpose in life is to make it easy for anyone to temporarily prevent their computer from going to sleep without having to futz with system-wide power options every time. Insomnia did its job well and people used it in ways I didn't expect: there were requests to allow the window to be minimized to the notification area, so I posted an update a few months later which allowed that. As a result, some people leave Insomnia running for extended periods of time (e.g., many days) and seemed likely to benefit from a version that didn't include the overhead of the .NET Framework, so I created new, native-code 32- and 64-bit versions of Insomnia late last year. These new versions did exactly what they were intended to and were also well received - but there's a catch...

Every couple of weeks or so, Insomnia gets featured by one of those "cool app of the day" sites (which is awesome, so thanks for that!). I never know when it's going to happen, but I can tell exactly when it does because I suddenly get a flurry of comments telling me the native-code versions don't run on Windows XP...

Aside: Many of you may be too young to remember; Windows XP is an operating system Microsoft released about ten years ago - practically an eternity in computing terms! And yet, a lot of people are still running XP... ;)


Although I didn't set out to not support Windows XP, I also didn't make a specific effort to support it - and as the saying goes, "if you don't test it, it won't work". Well it didn't work, so I investigated and summarized my findings in a reply on my blog:

I've looked into the Windows XP (SP3) issue just now - the "ordinal 380" error is due to the fact that the LoadIconMetric API isn't supported on OSes prior to Windows Vista. It's easy enough to use the more general LoadIcon API and then native Insomnia starts successfully on XP - but it doesn't show any text. The missing text is because the LM_GETIDEALSIZE message isn't supported prior to Vista, either - and in this case the simpler LM_GETIDEALHEIGHT message isn't a direct substitute. What's more, the current icon doesn't seem to be recognized by XP, either (it shows the generic application icon in Explorer and nothing in the tray). Neither of these issues (text measurement and icon) are overly difficult to fix, but they're also not trivial and I'm not sure how worthwhile it is to spend time and effort to support native Insomnia on Windows XP when the .NET version is reported to work just fine...

That said, I'm open to input here. If a lot of people think this is useful, I'll look into doing the work - but if everyone's happy to use the .NET version on XP, I'm happy to let them. :)

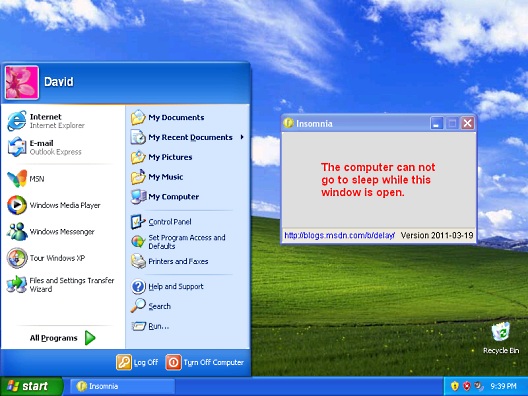
For what it's worth, I don't recall anybody coming back with a compelling reason why XP support is necessary - but after getting another round of XP feedback recently, I decided it was something I should do simply because it comes up so often. Therefore, I'm happy to announce that Insomnia's native 32-bit and 64-bit versions now support Windows XP!

Insomnia running on Windows XP


Note: With today's update (and in lieu of feedback to the contrary), the native versions of Insomnia are believed to run everywhere the .NET version does. Because there's no functional difference between the native- and managed-code implementations, I'll probably deprecate the .NET version soon. (Please don't get me wrong: I love the significant productivity benefits of using .NET! They're just moot here because I'm already doing the work to maintain the native implementations.)


Notes:

  • By far the biggest change with this release is the replacement of the SysLink control with one I wrote called IdealSizeStatic. Recall from the previous post that there were two things I liked about SysLink: its ability to return an "ideal size" and its ability to render hyperlinks. Both of these features worked like I wanted, but the lack of support for LM_GETIDEALSIZE on XP was a deal-breaker. When creating IdealSizeStatic, I kept things as simple as possible while also being consistent with how SysLink operates (ex: the use of WM_CTLCOLORSTATIC and WM_SETFONT) just in case I decide to switch back some day. IdealSizeStatic ends up being a pretty general-purpose control that offers WM_GETIDEALSIZE for querying the bounds (width and height) of its text - which is handy for the WPF-like layout pass I implemented in Insomnia.

    Despite my goal of keeping IdealSizeStatic as simple as possible, I didn't want to give up on the hyperlink functionality Insomnia already used, so I did the work to support that scenario. Specifically, if the first character of its window title is '_', IdealSizeStatic assumes it's showing a link, strips off the '_' prefix, and renders the control text in blue. Assuming WS_TABSTOP has also been set, it will show a focus rectangle when relevant and respond to mouse left-button clicks and space bar presses by calling ShellExecuteEx to open the link in the user's preferred web browser.

    IdealSizeStatic won't win any awards for "Win32 control of the year", but it seems to do just enough to be an adequate replacement for SysLink. :)

  • Having purged the SysLink control, Insomnia no longer has a dependency on the COMCTL32 common control DLL and the corresponding code to initialize it and incorporate the necessary manifest has been removed.

  • The other problem with running on XP was the use of the LoadIconMetric API to retrieve the application icon for the notification area. Fortunately, it's pretty simple to fall back to the LoadImage API instead - though it doesn't offer the same "auto-scaling" magic the original function does.

  • Speaking of icons, one curious problem with XP was that Windows Explorer showed the default application icon instead of the custom one embedded in the Insomnia executable. This ends up being because the custom ICO file generator I wrote/use outputs icon images in the 32-bit alpha-blended PNG format and that format isn't supported on Windows XP. This time around, I've also embedded 16x16 and 32x32 icons with the older 24-bit image+mask format. Because this type is recognized by XP, the icon shows up correctly.

    Aside: Unfortunately, XP still has a bit of trouble rendering the bottom-most pixels of the 32x32 icon in the application's property page. But that property page seems to have a variety of troubles with icons - there was a similar issue with the previous version even under Windows 7!
  • I've also fixed a couple of minor issues I noticed along the way - none of which should matter much in practice. The new version of the 32-bit and 64-bit builds of Insomnia is 2011-03-19. The version number of the .NET build has not changed and remains 2010-01-29.


[Click here to download the 32-bit, 64-bit, and .NET builds of Insomnia along with the complete source code for everything.]


I initially put off supporting XP because I figured very few people still used it. However, the steady stream of feedback from XP users finally convinced me there's enough interest to make the effort worthwhile. Windows 7 and Windows Vista users won't see functional differences with this release, but they will benefit from the slightly reduced footprint that comes from breaking the ties to COMCTL32.dll. My IdealSizeStatic control isn't a perfect replacement for the SysLink control, but it gets close enough - and does so without being overly complex.

Windows XP users: I hope you like the new support. Thanks for your patience! :)