The blog of dlaa.me

Posts tagged "Silverlight"

LB-SV-FAQ [Examples, Notes, Tips, and More for Silverlight 2 Beta 1's ListBox and ScrollViewer controls!]

Silverlight 2 Beta 1 is available today, yay!! I'm celebrating by publishing an FAQ of sorts for the controls I worked on. While not all of the topics below are "frequently asked questions" (it's a little too soon for that...), they're all intended to help developers get started by covering the basics of these controls.

If you're already familiar with WPF, then Silverlight should come pretty easily to you - but I'd still recommend skimming the topics below because some of the details are unique to Silverlight. If you're new to WPF and Silverlight, then I hope the topics below help jump-start the development process. In either case, I welcome your feedback, so please leave a comment below or contact me with any questions/problems/ideas you have!

Enjoy!!


General Questions

What does this FAQ cover? The Silverlight 2 Beta 1 controls I worked on: ListBox, ListBoxItem, ScrollViewer, and ScrollContentPresenter.

Why do all the hyperlinks point to WPF documentation? For one, that's all that was publically available when I started writing this post. For another, the WPF documentation is a superset of the Silverlight documentation and the additional detail there can help clarify issues. And finally, because one of the big goals for the Silverlight controls was complete (subset) compatibility with their WPF counterparts, the WPF documentation has been MY primary reference as well! But sometimes there's no substitute for the real thing; the Silverlight 2 Beta 1 documentation is a great reference, too. :)

What's the meaning of the WPF/WPFIMPLEMENTATION defines in the controls source code? The development of ListBox (+ListBoxItem) and ScrollViewer (+ScrollContentPresenter) was done in parallel with the development of their base types (e.g., ItemsControl, ContentControl) and also in parallel with the development of the Silverlight 2 platform itself. To minimize the risk/impact of developing on a changing foundation, I did much of my development and unit testing on WPF by deriving from the corresponding base classes, using only the subset of WPF that Silverlight exposes, and avoiding features specific to either platform as much as possible.

When compiling and running on WPF, I would add "WPF" to the list of conditional compilation symbols for the project. Therefore, code inside an #if WPF block applies only when running on WPF. In many cases, the pattern is #if WPF ... #else ... #endif and this corresponds to instances where some bit of code needed to be different between the two platforms (typically because it used features that weren't identical across both). In some cases, the relevant code only applies to one platform and the #else is missing or #if !WPF is used instead.

The meaning of "WPFIMPLEMENTATION" is similar and is used by the unit tests for code that applies only when testing the WPF implementations of ListBox or ScrollViewer. I used unit tests in three different scenarios to help ensure the code was as correct and compatible as possible: testing the Silverlight implementation on Silverlight, testing the Silverlight implementation on WPF (#if WPF), and testing the WPF implementation on WPF (#if WPF, #if WPFIMPLEMENTATION). Though it may seem silly at first, the point of testing the WPF implementation on WPF was to make sure the unit tests were validating the correct behavior.

What's a good strategy for investigating possible bugs? If you're trying to do something new and running into behavior that seems wrong, it's often helpful to identify exactly what/where the problem is. My first step is often to try the same scenario on WPF - if the behavior is the same there, then it's probably not a bug (and at least Silverlight is consistent!). But let's say the scenario works fine on WPF - my next step for ListBox problems is to try the same scenario using ItemsControl. This isn't always possible because ItemsControl offers only a subset of ListBox's functionality, but if I'm able to reproduce the problem using just ItemsControl, then ListBox is off the hook and that's a big chunk of code that's no longer in question. If ItemsControl isn't responsible, the next step I'll take is to switch to a debug version of System.Windows.Controls.dll so I can set breakpoints, tweak the control internals, etc.. For bugs in ListBox or ScrollViewer, this should be enough to identify most problems; for bugs in Silverlight, this helps to narrow things down.

And now that you've identified a bug, please let us know so we can fix it! :)


Common ListBox Scenarios

Here is the XAML code for a handful of the most common ListBox scenarios along with a picture of what it looks like on Silverlight.

ListBoxItems specified in XAML:

ListBoxItems specified in XAML
<ListBox>
    <ListBoxItem Content="ListBoxItem 0"/>
    <ListBoxItem Content="ListBoxItem 1"/>
    <ListBoxItem Content="ListBoxItem 2"/>
</ListBox>

FrameworkElements specified in XAML:

FrameworkElements specified in XAML
<ListBox>
    <Ellipse Width="20" Height="20"
             Fill="Red" Stroke="Black"/>
    <Rectangle Width="20" Height="20"
               Fill="Blue" Stroke="White"/>
    <Rectangle Width="20" Height="20"
               Fill="Yellow" Stroke="Black"
               RadiusX="5" RadiusY="5"/>
</ListBox>

Objects specified with ItemsSource and StaticResource Binding:

Objects specified with ItemsSource and StaticResource Binding
<ListBox
    ItemsSource="{StaticResource Products}"/>

Horizontal layout with ItemsPanel and ItemsPanelTemplate:

Horizontal layout with ItemsPanel and ItemsPanelTemplate
<ListBox>
    <ListBox.ItemsPanel>
        <ItemsPanelTemplate>
            <StackPanel Orientation="Horizontal"/>
        </ItemsPanelTemplate>
    </ListBox.ItemsPanel>
    <ListBoxItem Content="Item 0"/>
    <ListBoxItem Content="Item 1"/>
    <ListBoxItem Content="Item 2"/>
</ListBox>

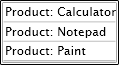
Simple data visualization with DisplayMemberPath:

Simple data visualization with DisplayMemberPath
<ListBox
    ItemsSource="{StaticResource Products}"
    DisplayMemberPath="Name"/>

Complex data visualization with ItemTemplate and DataTemplate:

Complex data visualization with ItemTemplate and DataTemplate
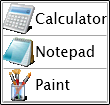
<ListBox ItemsSource="{StaticResource Products}">
    <ListBox.ItemTemplate>
        <DataTemplate>
            <StackPanel Orientation="Horizontal">
                <Image Source="{Binding Image}"/>
                <TextBlock Text="{Binding Name}"
                           VerticalAlignment="Center"/>
            </StackPanel>
        </DataTemplate>
    </ListBox.ItemTemplate>
</ListBox>

Customized ListBoxItem appearance with ItemContainerStyle and Style:

Customized ListBoxItem appearance with ItemContainerStyle and Style
<ListBox ItemsSource="{StaticResource Products}"
         DisplayMemberPath="Name">
    <ListBox.ItemContainerStyle>
        <Style TargetType="ListBoxItem">
            <Setter Property="Background" Value="Gray"/>
            <Setter Property="Foreground" Value="White"/>
        </Style>
    </ListBox.ItemContainerStyle>
</ListBox>

Minimally templated ListBox and ListBoxItem with Template and ControlTemplate:

Minimally templated ListBox and ListBoxItem with Template and ControlTemplate
<ListBox ItemsSource="{StaticResource Products}"
         DisplayMemberPath="Name">
    <ListBox.Template>
        <ControlTemplate TargetType="ListBox">
            <Border BorderBrush="Blue"
                    BorderThickness="2"
                    CornerRadius="5">
                <ItemsPresenter/>
            </Border>
        </ControlTemplate>
    </ListBox.Template>
    <ListBox.ItemContainerStyle>
        <Style TargetType="ListBoxItem">
            <Setter Property="Template">
                <Setter.Value>
                    <ControlTemplate TargetType="ListBoxItem">
                        <Border BorderBrush="HotPink"
                                BorderThickness="2"
                                CornerRadius="3">
                            <ContentPresenter
                                Content="{TemplateBinding Content}"
                                ContentTemplate="{TemplateBinding ContentTemplate}"
                                FontWeight="Bold"/>
                        </Border>
                    </ControlTemplate>
                </Setter.Value>
            </Setter>
        </Style>
    </ListBox.ItemContainerStyle>
</ListBox>

Note: For the samples that refer to {StaticResource Products}, the following code/XAML is assumed to be present:

namespace LB_SV_FAQ
{
    public class Products : List<Product>
    {
        public Products()
        {
            Add(new Product { Name = "Calculator" });
            Add(new Product { Name = "Notepad" });
            Add(new Product { Name = "Paint" });
        }
    }
    public class Product
    {
        public string Name { get; set; }
        public string Image { get { return Name + ".png"; } }
        public override string ToString() { return "Product: " + Name; }
    }
}
<UserControl x:Class="LB_SV_FAQ.Page"
    xmlns="http://schemas.microsoft.com/client/2007"
    xmlns:x="http://schemas.microsoft.com/winfx/2006/xaml"
    xmlns:local="clr-namespace:LB_SV_FAQ">
    <Grid>
        <Grid.Resources>
            <local:Products x:Key="Products"/>
        </Grid.Resources>
    ...
    </Grid>
</UserControl>


ListBox Implementation Notes

Why is SelectionMode.Single the only supported SelectionMode? The Silverlight controls are subsets of their WPF counterparts in order to keep complexity and download size as low as possible. In cases where it seemed that specific functionality was not widely used, we opted to exclude it for Beta 1 and use customer feedback to identify which missing features are the most important. SelectionMode.Multiple and SelectionMode.Extended both fall into the category of "very nice to have, but seemingly not critical for most scenarios" - if you need multiple selection support, please let us know!

Why doesn't ListBox derive from Selector? On WPF, ListBox derives from the Selector class which derives from ItemsControl; on Silverlight, ListBox derives directly from ItemsControl. To simplify matters and keep development/testing/download costs down, the Selector class was thought to be unnecessary for Silverlight 2 Beta 1. With ListBox being the only Selector-derived class in the Beta 1 controls offering, the Selector functionality was merged into ListBox for compactness. (If a Selector class is introduced to the Silverlight controls in the future, it should have little/no effect on existing ListBox code.)

Why does the ListBoxItem.ChangeVisualState method overlap playing the old/new Storyboards? The pattern of changing visual states by calling Begin for the new Storyboard and then calling Stop for the old one is a key part of the Silverlight state model. Starting the new Storyboard begins applying the values of whatever animations it represents (as you'd expect). Stopping the old one then automatically resets any animations it represents that aren't also being changed by the new Storyboard. Manipulating the two Storyboards in this particular manner is necessary for the correct visual behavior under Silverlight.


ListBox Curiosities

Why is the scrolling behavior slightly different than with WPF? If you have a ListBox with enough items that a vertical ScrollBar is displayed, using the Page Up/Down or arrow keys to scroll through the list behaves just a little bit differently on Silverlight than on WPF. In particular, WPF's default behavior is to keep the top-most item fully visible and flush against the top of the ListBox at all times. Therefore, scrolling doesn't affect the items' vertical placement until the very beginning/end of the list. Silverlight does not have the same behavior with respect to the top-most item, so the item placement tends to change slightly while scrolling through the list. This behavior difference is due to the fact that the WPF ListBox's default Style overrides the default ScrollViewer.CanContentScroll value of False and sets it to True, changing the ScrollViewer's scrolling mode from physical scrolling (pixel-based) to logical scrolling (item-based). Silverlight's ScrollViewer supports only physical scrolling, so this override is not present on Silverlight. To see the same Silverlight scrolling behavior on WPF, set ScrollViewer.CanContentScroll="False" on any ListBox with ScrollBars.

Why is selection behavior incorrect when I have the same object in a ListBox multiple times? For compatibility with WPF, of course! :) Due to the way ItemsControl is implemented, it is necessary for it to maintain a mapping from the objects it contains to the corresponding wrappers (i.e., ListBoxItems) that get created for them. This is handled by the ItemContainerGenerator.ContainerFromItem method on WPF and by ListBox.GetListBoxItemForObject on Silverlight - but the idea is the same. When the same object reference is added to the ListBox multiple times, this mapping breaks down because it isn't prepared for a single object to map to multiple containers. As it happens, the WPF and Silverlight behaviors differ slightly here. Both seem wrong, but I'll suggest that the Silverlight behavior is slightly less wrong. The following XAML/code demonstrates the problem on WPF and Silverlight (click on the third item, then the second item to see the behavior difference):

<ListBox x:Name="lb"/>
object obj = new object();
lb.Items.Add(obj);
lb.Items.Add(obj);
lb.Items.Add(obj);

Note: The problematic object-to-ListBoxItem mapping is unnecessary when the items added to the ListBox are of type ListBoxItem. Therefore, if you need to store the same object multiple times, consider wrapping your items in unique ListBoxItem instances (setting the Content property to the wrapped item) before adding them to the ListBox.


ListBox Bugs

Why doesn't setting ListBox's SelectedIndex in XAML or the Page constructor seem to work? The internal ListBox state is actually correct in the code scenario (and unit tests verify this), but the visual representation is wrong. The following XAML/code demonstrates the problem:

<ListBox x:Name="lb">
    <TextBlock Text="one"/>
    <TextBlock Text="two"/>
    <TextBlock Text="three"/>
</ListBox>
public Page()
{
    InitializeComponent();
    lb.SelectedIndex = 1;
}

The problem is that when the SelectedIndex property gets set in the Page constructor, ItemsControl has not yet called PrepareContainerForItemOverride and so ListBox has not yet set up its mapping from object to ListBoxItem (see the "ListBox Curiosities" section above for more about this mapping). So when ListBox tries to toggle IsSelected on the corresponding ListBoxItem, no such ListBoxItem exists and ListBox gives up instead of making a note to come back and finish this task after the mapping has been established. (Unfortunately, the situation is even worse if SelectedIndex is set in XAML (vs. code) because at that time it is typically the case that ItemsControl's Items collection is still empty.)

The workaround is to call something like the SelectedIndexWorkaround extension method (defined below) after setting SelectedIndex. SelectedIndexWorkaround defers setting SelectedIndex until it will have the desired effect - and thereby works around the bug. The change to the above code is:

lb.SelectedIndex = 1;
lb.SelectedIndexWorkaround();  // Added workaround

Why doesn't setting IsSelected True before adding a ListBoxItem to the ListBox look right? Again the internal ListBox state is correct, but the visual representation is wrong. In this case, the visuals fix themselves if you move the mouse over the selected item and then off it because the ListBoxItem transitions from its hover appearance to its selected appearance and the visuals update correctly. The problem here is that when IsSelected is toggled, ListBoxItem plays its state transition Storyboard immediately - but the ListBoxItem is not in the visual tree yet so Silverlight doesn't actually apply the associated state changes. (To behave correctly in this scenario, ListBoxItem should be calling its ChangeVisualState method at the end of OnApplyTemplate and also in a handler for the Loaded event.) The following code demonstrates the problem:

ListBoxItem lbi;
lbi = new ListBoxItem();
lbi.Content = "Unselected";
lb.Items.Add(lbi);
lbi = new ListBoxItem();
lbi.Content = "Selected";
lbi.IsSelected = true;
lb.Items.Add(lbi);

The workaround is to call something like the IsSelectedWorkaround extension method (defined below) after setting IsSelected. This method causes the appropriate Storyboard to play again once it will have the desired effect - and thereby works around the bug. The change to the above code:

lbi.IsSelected = true;
lbi.IsSelectedWorkaround();  // Added workaround

Why can't I arrow up/down past a ListBox item with Visibility Collapsed? Because ListBox doesn't expect there to be "invisible" ListBoxItems. If you try the obvious workaround of leaving the ListBoxItem Visible and marking its Content Collapsed, arrow navigation no longer gets "stuck" - but the scenario is still confusing to the user because the ListBox lets focus get set to the "invisible" item. Rather than playing with Visibility, consider the more direct approach of removing items from the collection if you don't want them to be visible. An elegant approach is to use an ObservableCollection for storing items and then assign that collection to the ItemsSource property of the ListBox. Because ObservableCollection implements INotifyCollectionChanged, changes to it (e.g., via Add/Remove) are automatically communicated to ListBox's ItemsControl base class which automatically updates the ListBox display. All you need to do is keep the collection up to date - everything else is handled for you.


ListBox Workaround Code

The following C# static class implementation can be added to a project to introduce extension methods to help work around the bugs described above. Simply call the corresponding extension method after setting one of the associated properties and the proper behavior should occur. Please note that calling these methods is not typically necessary and should be done only if a scenario is affected by one of the above bugs.

Sorry for the trouble!

/// <summary>
/// This class contains extensions to help work around two ListBox bugs in
/// the Silverlight 2 Beta 1 controls release. Simply add it to your project
/// and call the extension methods just after the properties they match.
/// </summary>
public static class ListBoxExtensions
{
    /// <summary>
    /// Augments ListBox.SelectedIndex to work around a bug where setting
    /// SelectedIndex before the ListBox is visible does not update the UI.
    /// </summary>
    /// <remarks>
    /// Instead of:
    ///     listBox.SelectedIndex = 1;
    /// Use:
    ///     listBox.SelectedIndex = 1;
    ///     listBox.SelectedIndexWorkaround();
    /// </remarks>
    /// <param name="listBox">Extension method class.</param>
    public static void SelectedIndexWorkaround(this ListBox listBox)
    {
        int selectedIndex = listBox.SelectedIndex;
        bool set = false;
        listBox.LayoutUpdated += delegate
        {
            if (!set)
            {
                // Toggle value to force the change
                listBox.SelectedIndex = -1;
                listBox.SelectedIndex = selectedIndex;
                set = true;
            }
        };
    }
    /// <summary>
    /// Augments ListBoxItem.IsSelected to work around a bug where setting
    /// IsSelected before the ListBoxItem is visible does not update the UI.
    /// </summary>
    /// <remarks>
    /// Instead of:
    ///     listBoxItem.IsSelected = true;
    /// Use:
    ///     listBoxItem.IsSelected = true;
    ///     listBoxItem.IsSelectedWorkaround();
    /// </remarks>
    /// <param name="listBoxItem">Extension method class.</param>
    public static void IsSelectedWorkaround(this ListBoxItem listBoxItem)
    {
        bool isSelected = listBoxItem.IsSelected;
        bool set = false;
        listBoxItem.LayoutUpdated += delegate
        {
            if (!set)
            {
                // Toggle value to force the change
                listBoxItem.IsSelected = !isSelected;
                listBoxItem.IsSelected = isSelected;
                set = true;
            }
        };
    }
}


Common ScrollViewer Scenarios

Using ScrollViewer to scroll content that is too large:

Using ScrollViewer to scroll content that is too large
<!-- Grid used to limit ScrollViewer size -->
<Grid Width="150" Height="70">
    <ScrollViewer HorizontalScrollBarVisibility="Auto"
                  VerticalScrollBarVisibility="Auto">
        <TextBlock Text="ScrollViewer"
                   FontFamily="Arial Black"
                   FontSize="50"/>
    </ScrollViewer>
</Grid>

Using ScrollViewer to add ScrollBars to an application when the browser is resized:

<UserControl x:Class="ResizableApplication.Page"
    xmlns="http://schemas.microsoft.com/client/2007"
    xmlns:x="http://schemas.microsoft.com/winfx/2006/xaml">
    <Grid>
        <ScrollViewer HorizontalScrollBarVisibility="Auto"
                      VerticalScrollBarVisibility="Auto">
            <Grid>
                <!-- Page content goes here instead of the outer Grid -->
            </Grid>
        </ScrollViewer>
    </Grid>
</UserControl>


ScrollViewer Implementation Notes

Why am I having a hard time specifying ScrollViewer's attached properties in XAML? Silverlight 2 Beta 1's XAML parser throws a XamlParseException (ex: "Unknown attribute ScrollViewer.VerticalScrollBarVisibility on element ListBox.") when trying to specify any control's attached properties on a different control in XAML. This problem should be fixed in a future release; for now there's an easy workaround: add an explicit xmlns definition for System.Windows.Controls and use that xmlns when setting the attached properties:

<UserControl x:Class="LB_SV_FAQ.Page"
    xmlns="http://schemas.microsoft.com/client/2007"
    xmlns:x="http://schemas.microsoft.com/winfx/2006/xaml"
    xmlns:controls="clr-namespace:System.Windows.Controls;assembly=System.Windows.Controls">
    <Grid>
        <ListBox controls:ScrollViewer.VerticalScrollBarVisibility="Hidden"/>
    </Grid>
</UserControl>

Why doesn't ScrollViewer support the ScrollViewer.CanContentScroll property? See the "ListBox Implementation Notes" section above for an explanation of how Silverlight controls try to be a minimal subset of core functionality and the "ListBox Curiosities" section for an explanation of how the lack of ScrollViewer.CanContentScroll affects ListBox.

Why is there no ScrollChanged event or IScrollInfo interface? As with ScrollViewer.CanContentScroll, these were deliberate omissions intended to keep things simple and compact.


ScrollViewer Curiosities

Why does the ScrollViewer default to HorizontalScrollBarVisibility Disabled and VerticalScrollBarVisibility Visible? For compatibility with the WPF defaults, of course. :) Regarding the obvious next question about why those values are the WPF defaults, I don't know. Auto/Auto would seem more generally useful to me and, in fact, the WPF ListBox (and Silverlight ListBox) overrides the ScrollViewer defaults to set Auto/Auto! But maintaining compatibility wins, so the Silverlight ScrollViewer defaults to the same values used by WPF.


A better web is coming [Silverlight 2 is on the way!]

On Friday, Scott Guthrie posted a "first look" at Silverlight 2. My boss, Shawn Burke, followed with a post about his team's involvement. I've already demonstrated my fondness for Silverlight, so now you know what I've been up to recently. :)

ListBox/ScrollViewer Intro My contribution to the Silverlight 2 effort was to write the ListBox control along with its ever-present sidekick, ListBoxItem. Because I needed to support bi-directional scrolling in ListBox, I figured it would be good to add ScrollViewer and its buddy ScrollContentPresenter for consistency with WPF. For people who don't live and breathe API definitions, MSDN offers a ListBox Overview and ScrollViewer Overview that summarize the key points of both controls. (Note: These links are all to the documentation for the WPF controls. Because the Silverlight implementations are subset-compatible, they give a great idea how the Silverlight controls will work, too.) For folks who want a taste of actual Silverlight 2 hotness, I've included an image of these controls being used in very simple scenarios to the right of this text. For images of the Silverlight 2 ListBox (and therefore ScrollViewer) being used in a real-world scenario, have a look at Scott's Silverlight tutorial - particularly part 5 where he introduces the ListBox and shows off some of its coolness.

I've had a lot of fun working on these controls and am planning to blog more about them once the Silverlight 2 beta is publically available. I'm thinking of starting with an FAQ-like document that touches on some of the more interesting implementation details and gives example code for some common scenarios. After that, I'm going to post a few simple applications to demonstrate more complex scenarios. And after that... we'll see how things play out!

Silverlight 2 looks like it will really improve the web experience for everyone - it'll be great to see what customers think once they get their hands on it!

PS - I'll be attending MIX08 next week and would be happy to chat about any of this in person. So if you're going to be in the Las Vegas area and want to get together, send me a note and we'll try to set something up!

Something fun for the little ones [SilverlightKidsDoodler develops mouse skills!]

When I'm working on the computer and my toddler is around, she usually wants to "type" - which consists mostly of hitting all the keys to see the letters appear on the screen. A maximized Notepad window works pretty well for this purpose, though the occasional modal dialog (ex: open file, change font) gets in the way and requires parental assistance. I've tried using Paint to let her "draw" and develop basic mouse skills, but the Paint user interface is not great for young children. Paint's input elements are small and hard for a beginning mouser to click and there are lots more of them than a beginner really needs.

So I decided to use Silverlight to write a very simple Paint-like program for kids. SilverlightKidsDoodler looks like this (the artwork is mine; yes, I'm keeping my day job):

SilverlightKidsDoodler Demonstration Page

You can click here (or on the image above) to try SilverlightKidsDoodler in your own browser. As usual, I've made the complete source code available, so click here to download the source code and play around with it yourself! (To build the project, you'll want to use Visual Studio 2008 Beta 2 and the latest Silverlight Tools.)

Notes:

  • The user interface elements (the color palette and action buttons at the left of the frame) are flush with the edges of the screen (when zoomed) to make them easy for young hands to target. (Bruce Tognazzini has more on Fitts's Law here.)
  • The "Zoom" button switches to Silverlight's full-screen mode. Unlike the other input elements which respond to a single-click, the zoom button requires a double-click to avoid accidental triggering by children. I figure the parent will start SilverlightKidsDoodler, zoom it, and then let the child play around without needing to worry about clicks on the close button, start menu, etc..
  • If you're serious about keeping children from inadvertently messing up your computer, you probably want to consider something like Windows SteadyState which makes it easy to lock-down your computer and avoid questions like, "Sweetie, where did all of daddy's documents go?". :)
  • As my daughter grows older and becomes more proficient, I'm thinking of moving her to something like Edubuntu which comes with a variety of educational applications already installed.

SilverlightKidsDoodler is an extremely simple drawing program that's intended to help young children learn basic mousing skills while having fun doing something they already enjoy. Silverlight made the implementation easy, and hosting the application on the web means "installation" is trivial!

Bringing more HTML to Silverlight [HtmlTextBlock improvements]

I blogged about my HtmlTextBlock implementation for Silverlight a few days ago. In that post I described HtmlTextBlock as a "plug-compatible" replacement for TextBlock that knows how to take simple HTML (technically XHTML) and display it in a manner that fairly closely approximates how a web browser does. The responses I've gotten suggest HtmlTextBlock is somewhat popular, so I've spent a bit of time improving upon the original implementation. The HtmlTextBlock demonstration and source code linked to by my earlier post have been updated, so feel free to play along as you read the notes:

HtmlTextBlock Demonstration Page

Notes:

  • I loved the simplicity of using an XmlReader to parse the input to HtmlTextBlock, but I worried that the prevalence of non-XHTML would limit the usefulness of HtmlTextBlock. For example, the following invalid XHTML would fail to parse correctly: foo<b>bar</i>baz. During an informal discussion, Ted Glaza suggested using the browser's Document Object Modelto do the parsing of invalid XHTML - great idea! :)
    • So now when its Text property is set, HtmlTextBlock first treats the input as valid XHTML and tries to parse it with XmlReader. This is the most efficient code path and should be successful for any valid XHTML input.
    • However, if the input can't be parsed in that manner, HtmlTextBlock uses the objects in Silverlight's System.Windows.Browser namespace to dynamically insert the provided text into the host browser's DOM, run some JavaScript code to transform the input into valid XHTML, then extract and parse the transformed text with XmlReader as before.
    • Two techniques are tried:
      • The first method works in browsers that return XHTML for an element's innerHTML property even if the contents of the element are not valid XHTML (ex: Firefox) and simply inserts and retrieves XHTML from the innerHTML property.
      • The second method works in browsers that return the contents of an element as-is (ex: Internet Explorer (though it works fine in Firefox, too)) by walking the node's .firstChild/.nextSibling/.nodeName tree and manually building up the corresponding XHTML as the nodes of the tree are visited. The results of this method appear ideal in most scenarios, though it's possible to come up with edge cases where its output is slightly different from that of the browser itself (Internet Explorer): foo<b><i>bar</b>baz.
    • Strangely, BOTH browsers prefer <br> to <br/>, going as far as transforming the latter into the former despite the fact that doing so creates invalid XHTML!
    • If all parsing attempts fail, the supplied text is used as-is with no formatting applied.
    Unfortunately, there's a catch... Depending on the content of the text, adding it to the DOM could insert untrusted HTML into the host browser's page. A malicious user with control of the text could use the following approach to run their own JavaScript code in the context of the user's browser (Firefox only): </div><script>alert('Script code running!');</script>. As such, the new DOM parsing behavior is disabled by default and can be enabled by setting the UseDomAsParser property of HtmlTextBlock for scenarios when the input text is known to be safe.
  • A kind reader informed me that an HtmlTextBlock created in code (vs. in XAML as my sample demonstrated) did not seem to do text wrapping properly. The problem was caused by the difference in when the Control.Loaded event fires in the two scenarios. The fix is a simple change to HandleLoaded that skips sizing the contained TextBlock if the HtmlTextBlock hasn't been sized itself. Additionally, the sample code now demonstrates how to create a HtmlTextBlock in code - just #define CREATE_IN_CODE to see how.
  • Because HtmlTextBlock used bool variables to track the bold/italic/underline states, nesting a style caused that style to be prematurely removed. Specifically, the following scenario would not display properly: normal <b>bold <b>also bold</b> still bold</b> normal. HtmlTextBlock now handles nesting properly by using int variables.
  • I mentioned last time that making HtmlTextBlock adhere to all the individual browser quirks would be a daunting task. For fun, here's a simple input to demonstrate the point: <p>hello world</p>. Firefox (and HtmlTextBlock) leaves some space above the text because of the <p> element; Internet Explorer does not. :)

In its introductory post, I said that HtmlTextBlock is obviously nothing like a complete HTML rendering engine - and that statement remains true today. However, by taking advantage of the host browser's DOM to transform invalid XHTML input, HtmlTextBlock is much more flexible than it used to be. That - and a few fixes - makes it an even more compelling option for rich text display in Silverlight!

Bringing a bit of HTML to Silverlight [HtmlTextBlock makes rich text display easy!]

Lately I've seen a few people wanting to display rich text in a Silverlight application, but having no way to do so easily. Most recently, I saw Tim Heuer bump into this when displaying RSS content in a neat demo of his. The basic problem is that Silverlight's primary text display object, TextBlock, does not natively have a way to display HTML - and that's the format most rich text is in these days. It seemed that if only there were a TextBlock that took HTML as input and built up a collection of Run and LineBreak objects corresponding to that HTML, things would be easier...

So I wrote HtmlTextBlock, a "plug-compatible" replacement for TextBlock that knows how to take simple HTML (technically XHTML, see the notes below) and display it in a manner that fairly closely approximates how a web browser does. A picture is worth a thousand words, so here's what HtmlTextBlock looks like in action:

HtmlTextBlock Demonstration Page

You can click here (or on the image above) to experiment with HtmlTextBlock in your own browser in an interactive demo page. As usual, I've made the complete source code available, so click here to download the source code and play around with it yourself! (To build the project, you'll want to use Visual Studio 2008 Beta 2 and the latest Silverlight Tools.)

Notes:

  • HtmlTextBlock supports the following HTML elements: <A>, <B>, <BR>, <EM>, <I>, <P>, <STRONG>, and <U>. Attributes are not supported with the exception of the <A> element's HREF attribute (see below).
  • I initially planned to have HtmlTextBlock derive from TextBlock and simply override its Text property. However, TextBlock is sealed, so that wasn't going to work. The next obvious approach was to have HtmlTextBlock be a Control with a TextBlock inside it, so that's what I've done here. My goal of "plug-compatibility" (i.e., the ability to easily replace TextBlock with HtmlTextBlock) meant that I needed to manually implement the various TextBlock properties on HtmlTextBlock and pass them through to the underlying TextBlock. So HtmlTextBlock doesn't actually derive from TextBlock, but it behaves as though it did.
  • Having HtmlTextBlock use TextBlock internally and represent the HTML markup with Run and LineBreak elements is nice because it means that just about everything people already know about TextBlock automatically applies to HtmlTextBlock And I get correct word wrapping behavior for free. :) However, the glitch is that the Run element does not support the MouseLeftButton* family of events, making the handling of <A> link elements difficult. Because HtmlTextBlock can't really tell when the user clicks on a link, it displays the URL of each link so the user can type it in themselves (and typing is necessary because TextBlock doesn't support select+copy either). I can think of a few reasons why Run might not support mouse events, but in this case it would be convenient if it did. :)
  • HtmlTextBlock uses an XmlReader to parse its input when creating the Run and LineBreak elements for display. This makes the parsing implementation simple and robust, but breaks down when the input is not XHTML (such as invalid HTML or valid HTML where empty elements don't have a trailing '/' (ex: "<br>" instead of "<br />")). In the event of a parsing error, HtmlTextBlock's default behavior is to display the input text as-is, just like TextBlock always does. Unfortunately, non-XHTML is pretty common, so certain scenarios may benefit from a custom HTML parser implementation that is more flexible in this regard.
  • HTML rendering is covered by a detailed specification, but some of the rules are not what one might expect. Specifically, the rules for handling spacing and whitespace (' ', '\n', '\t', etc.) can be tricky to get right. I've made some attempt to ensure that HtmlTextBlock follows the rules where possible and convenient, but it was not my goal to achieve 100% compliance in this area. Playing around in the demo application, HtmlTextBlock should pretty closely match the browser's HTML rendering of valid input, but if you know the rules, it's not too difficult to trigger whitespace rendering differences.
  • Silverlight's default font, "Portable User Interface"/"Lucida Sans Unicode"/"Lucida Grande" doesn't seem to render bold or italic text any differently than normal text. This always surprises people the first time they try to figure out why their text isn't bold/italic. I don't know why this is myself, but I'd guess it relates to keeping the download size of Silverlight to a minimum.
  • The demo page makes use of JavaScript -> C# function calls. Hooking this up in code is surprisingly easy, though I did run into a small glitch. If the sample text is deleted entirely (leaving a blank text box) in IE, the JS -> C# call originates from the JS side as it should, but never makes it through to the C# side. Looking at the call to SetText in the debugger, textAreaSampleText.value is "", so this should work in IE just like it does in Firefox - but it didn't for me. The simple workaround was to pass textAreaSampleText.value + "" instead and then things worked in IE, too.

HtmlTextBlock is obviously nothing like a complete HTML rendering engine [that's what web browsers are for! :) ]. However, if you want to add simple support for rich text to your Silverlight application without a lot of work, HtmlTextBlock may be just the thing for you!

Time for a little fun and games (Silverlight helps play Sudoku!)

I'm not much of a Sudoku player, but I was recently in the company of some and got an idea for a Silverlight application to help solve Sudoku puzzles. There are already plenty of fine Sudoku programs out there, so I didn't set out to write "the world's best Sudoku program". Rather, this was an opportunity to explore some aspects of Silverlight that I haven't shown off yet such as audio, keyboard input, control embedding, and some more animation.

Sudoku is a surprisingly complex game and its puzzles range from very easy to quite difficult. Naturally, there are a number of different techniques that can be used to solve a Sudoku puzzle. Most of the techniques rely on keeping track of what the valid candidates for each cell are. Keeping track of all the candidates is too much for most people to do in their heads, so the common approach is to maintain a collection of pencilmarks. Keeping the pencilmarks up to date is a simple, monotonous task that involves no creativity whatsoever - and is perfect for a computer!

The Silverlight Sudoku Helper displays a Sudoku puzzle, automatically tracks the valid candidates, and leaves the creative problem solving fun to the user. It also prevents illegal moves and plays some fun sounds. :) The application looks like this:

Silverlight Sudoku Helper

You can click here (or on the image above) to play a game of Sudoku in your browser. As usual, I've made the complete source code available, so click here to download the source code and play around with it yourself! (To build the project, you'll want to use Visual Studio 2008 Beta 2 and the latest Silverlight Tools.)

Notes:

  • Directions for how to use the application can be found at the bottom of the Silverlight Sudoku Helper web page.
  • The sample boards from Wikipedia and Sudopedia are included to make it easy to get started and are believed to be free of copyright restrictions.
  • I came up with the "nearly complete" sample board myself and hereby release it to the public without copyright restrictions. :)
  • There is no mechanism to automatically import boards from other sources because most of the sources I came across made a point of restricting the use of the boards they offered in one way or another. That's why it's easy to create a blank board and type in any board you want (hint: use the Shift key when typing to bold the given values).
  • The audio files were taken from the %windir%\Media directory, renamed slightly, and converted to the WMA file format for use by Silverlight. They are not included in the source code package to keep the download size small (if you download the sample code and get an error 1001/DownloadError when viewing the application, it's probably because the audio files are missing). Feel free to substitute your own favorite sounds!
  • The key handling is done on KeyUp instead of KeyDown because Silverlight does not generate KeyDown events for the arrow keys. If/when this is addressed, the key handling could be done on KeyDown instead as the more natural place (where it should automatically support holding down a key to repeat it).

I didn't know much about Sudoku when I started this project and it turned out to be a more involved game than I'd thought! I hope the Silverlight Sudoku Helper is fun and educational for others as well!

A new Silverlight version has been released! [Samples updated for the 1.1 Refresh]

With today's release of the Silverlight 1.0 RC and 1.1 Refresh, I've updated the Silverlight samples I own to run on the new bits. Specifically, I've uploaded the migrated source code and recompiled binaries for the team's Silverlight Airlines Demo, my Simple XPS Viewer Demo, and my Silverlight Surface Demo. Because the Silverlight 1.1 Refresh replaces the earlier 1.1 Alpha, the existing source and demo URLs remain the same and simply point to the new content.

The 1.1 Refresh's breaking changes from the 1.1 Alpha build we've all been using before today are documented in the SDK. The migration of the these samples was pretty simple and required very little code change. For the benefit of others migrating Silverlight apps, here are the specific incompatibilities I encountered along with the fix for each:

  • Silverlight.js content updated and namespace changed from Sys.Silverlight to Silverlight - use new version of Silverlight.js, change CreateSilverlight.js to use the new namespace, and specify version "1.1" in the call to createObject(Ex)
  • Downloader.Open API changed to remove third parameter ("async") because all downloads are now asynchronous - change call sites to pass only two parameters since they were already passing true for async
  • Assignment of DoubleAnimation to new Storyboard's Children property now throws an exception - use a Control class and InitializeFromXaml to load the Storyboard and Animation from a XAML resource
  • Visibility enum no longer contains .Hidden value - use .Collapsed instead
  • OnResize is now function pointer-based instead of string-based - pass function pointer instead

Additionally, a security-related change to the Downloader object now blocks access to file:// URLs. This means that the XPS Viewer and Surface demos will only be able to access their resources (images, files, etc.) when the host page is loaded from a web server. Specifically, loading Default.html from Explorer or by hitting F5 to run the project in Visual Studio will now result in an error message like the following:

Silverlight error message
ErrorCode: 1001
ErrorType: DownloadError
Message: AG_E_UNKNOWN_ERROR

To re-enable debugging for the XPS Viewer and Surface demos, I recommend the following steps which add a web site project to Visual Studio and access the demo page via the included Visual Studio Development Web Server (which uses http:// URLs and works fine). While there are other ways to work around the file:// restriction, I'm suggesting this approach because it automatically references the project files, doesn't require creating additional directories or copies of project files, and doesn't require getting involved with IIS. To enable debugging:

  1. From the File menu in Visual Studio 2008, click Open, Project/Solution...
  2. Select the .csproj file for the demo you want
  3. Click OK
  4. From the View menu, click Solution Explorer
  5. Right-click the Solution node at the top
  6. Click Add, Existing Web Site...
  7. Select the same directory the .csproj file is in
  8. Click OK
  9. Click No when asked to upgrade the web site
  10. Right-click the new Web Site Project node
  11. Click Property Pages
  12. Click Start Options in the left column
  13. Check Silverlight in the Debuggers section at the bottom right
  14. Click OK
  15. Right-click the new Web Site Project node
  16. Click Set as StartUp Project
  17. Press F5 to Run
  18. Click OK to enable debugging in web.config

Okay, enough with the boring details - go get the Silverlight 1.1 Refresh and have some fun with it! :)

Silverlight "Surface" Demonstration [Silverlight implementation of Surface's "photo table" UI]

Yesterday, Microsoft announced its Surface product to much buzz and excitement. The demo videos I saw featured a "photos on a table" user interface that displayed a handful of photos sitting on the Surface. The interface allowed people to easily move the virtual photos around by touching them in the center and sliding them to a different location on the screen. By touching the corners instead, photos could be sized and rotated with ease.

It struck me that this interface would be pretty easy to replicate with Silverlight and I decided to do so as a learning exercise. I spent some time on this last night and tonight and came up with an application that looks like this:

Silverlight "Surface" Demonstration

You can click here (or on the image above) to play with the application in your browser. The code's quite simple; click here to download the source code and play around with it yourself! (To build the project, you'll want to use Visual Studio Orcas Beta 1 and the Silverlight Tools.)

Notes:

  • When the application loads, it randomly lays out the sample photos. To interact with a photo, simply move the mouse pointer over the photo and click+drag on one of the yellow control elements that appears. The center element moves the photo around and the corner elements all rotate/resize it. Click on any part of a photo to bring it to the top of the pile.
  • Without the snazzy Surface hardware support, this application doesn't support the Human Finger 1.0 input device. :) However, if you run it on a Tablet PC or hooked up to something like the Wacom Cintiq, you can get pretty close.
  • As expected, Silverlight's XAML support makes this kind of interface pretty easy to build. I understand the Surface UI was written using WPF (Silverlight's big brother), so I suspect some of the techniques they used are fairly similar to what's being done here.
  • The sample images are a few of my favorite wallpapers that come with Windows Vista. I have not included them with the code download because they're large and it's easy enough to copy them from your own %windir%\Web\Wallpaper directory. Or just use your own favorite images!
  • I don't demonstrate it here (partly because I don't have a good nature video), but it would be easy to add video support so that each of the photos was a streaming video instead. Hum, maybe I'll do a follow-up post... :)

It's pretty obvious that XAML lets you do some pretty neat things with ease - I look forward to even more compelling new interfaces based on Silverlight and WPF!

Lighting up the XML Paper Specification [Proof-of-concept XPS reader for Silverlight!]

Since getting involved with Silverlight and finding out the XPS document type WPF enables has XAML at its core, I've been wondering how Silverlight would do as a lightweight XPS viewer.

First, a bit of background: WPF is the Windows Presentation Foundation and represents a new approach to UI for Windows. XPS refers to the XML Paper Specification, a device-independent file format for flexible document representation (think PDF) that's part of Office 2007 and .NET 3.0. WPF offers rich support for displaying XPS documents via its DocumentViewer and XpsDocument classes (among others). Because the 1.1 Alpha release doesn't currently include the relevant classes, Silverlight wouldn't appear to be well suited for XPS document display at first glance...

However, Silverlight does have the Downloader class which includes support for packages (for the purposes of this discussion, packages are basically just ZIP archives). Since an XPS document is really just a package, and the core document format XPS uses is XAML, and Silverlight speaks XAML (well, at least a subset of it!), maybe it's not such a stretch to do XPS with Silverlight after all.

I thought it would be a neat exercise to try to write an XPS viewer with the publically available Silverlight 1.1 Alpha bits so I gave it a try and ended up with an application I call SimpleSilverlightXpsViewer:

SimpleSilverlightXpsViewer Application

Go ahead and click here (or on the image above) to play around with the application in your browser. If you find yourself wondering how it works, just click here to download the complete source code/resources and play around with it yourself! (To build the SimpleSilverlightXpsViewer project, you'll want to use Orcas Beta 1 and the Silverlight Tools.)

Of course, this is just a proof-of-concept application built on an Alpha platform, so there are some rough edges. :) Some notes are in order:

  • I created my own XPS documents so I wouldn't have to worry about getting permission to use someone else's XPS documents. Office 2007 comes with a handy "Microsoft XPS Document Writer" printer driver that lets you create an XPS document from any application simply by printing to the XPS "printer" (which then saves the resulting output to a file you specify). I created the three sample documents this way: the "Intro" document came from a simple Word document, the "Blog" document came from my blog via IE7, and the "Site" document came from the Silverlight Forums via IE7 with a landscape page layout.
  • Because the only kind of XPS document I've worked with is the kind the XPS printer driver outputs, there's a very good chance SimpleSilverlightXpsViewer won't understand the internal format of other valid XPS files. Remember, though, that I didn't set out to write an XPS file parser - I just set out to write a simple XPS viewer for Silverlight. :)
  • The translation of "XPS XAML" to "Silverlight XAML" is done by the XpsToSilverlightXamlReader class, a minimal derivation from XmlReader that performs on-the-fly modification of the "XPS XAML" to translate it into "Silverlight XAML". Specifically, some elements are renamed, some attribute values are tweaked, and some attributes are removed entirely. The tweaking is done to address the Glyphs.FontUri/ImageBrush.ImageSource issue mentioned next and re-points the relevant content to an external location.
  • XPS documents are entirely self-contained, with any necessary fonts and images embedded in the file (package) itself. This is great for simplifying distribution and Silverlight's Downloader class makes it easy to get at individual files in a package. However, SimpleSilverlightXpsViewer works best when the images and the fonts are extracted from the XPS file:
    • Under the right conditions, embedded images can be fetched by Silverlight by using the ImageBrush.SetSource method. However, things tend to break if there are multiple references to the same image in a single page (an exception is thrown when the second call to SetSource is made), so SimpleSilverlightXpsViewer doesn't enable this by default. Interested parties can #define SETSOURCE (for both C# files) to experiment with this feature (things work fine for the first page of all of the sample documents, but break on the second pages of the Blog and Site documents).
    • The default behavior of Glyphs.FontUri does not seem to automatically pull the font out of the package - at least not as it's used by SimpleSilverlightXpsViewer (possibly because Silverlight doesn't seem to like the leading '/' on package-relative paths). TextBlock has a SetFontSource method that seems interesting, but XPS XAML uses the Glyphs class which doesn't seem to support SetFontSource.
  • For some reason, the XPS documents generated by the XPS printer driver aren't directly open-able by Silverlight's Downloader (a COM exception is thrown). However, I've found that a quick un-ZIP/re-ZIP with either of my favorite ZIP tools yields XPS documents that open right up. I suspect this is due to a simple issue with the Alpha Downloader implementation (endian-ness of the ZIP file, some special section embedded by the XPS printer driver, etc.) that could be fixed by the Silverlight team without much difficulty.
  • Silverlight doesn't support the TIFF file format (which is not surprising because full support can be quite complex and TIFF images are hardly ever used on the web). As it happens, XPS printer driver output may contain TIFF images (it seems they're used as a mask of some kind behind another PNG or JPG image) - SimpleSilverlightXpsViewer simply ignores the TIFF images and neatly side-steps the support issue. :)

While SimpleSilverlightXpsViewer is a cute proof-of-concept application I enjoyed writing, it is hardly the final word on Silverlight XPS support. (Hey, I'm not even on the Silverlight team!) I don't know what the official plans are for more formal XPS support in the Silverlight platform, but my experience with SimpleSilverlightXpsViewer suggests that most of the pieces are already in place for a pretty reasonable XPS experience with the Silverlight 1.1 Alpha. Throw in a couple of tweaks to Silverlight (and/or SimpleSilverlightXpsViewer!), and it should be possible to provide a pretty compelling XPS-like user experience for Silverlight!

The web just got even better... [Silverlight announced at MIX07!]

During his keynote at the MIX07 conference in Las Vegas, Scott Guthrie showed off some of the power of Microsoft's recently announced Silverlight platform. In particular, the ability to easily run managed code in the web browser - coupled with a powerful rendering engine - seems like it will to radically change the landscape of the web. My team had the privilege of writing the Silverlight Airlines demonstration he used to show off just how easy it is to develop with Silverlight. Demoed on stage, it looked something like the following image:

Silverlight Airlines Demonstration

Now that your appetite is whetted, go ahead and click here (or on the image above) to view the demo in your browser with the Silverlight 1.1 Alpha thanks to the seamless cross-browser, cross-platform support that Silverlight provides.

When our manager Shawn Burke asked us to put this demo together, my coworker Ted Glaza and I had practically no experience with Silverlight or WPF. So we spent about a week playing around with the technology to learn how it worked. By that time, the general concept of the demo was fairly well established and we spent time the next week developing the foundations of the application. Before long, we had a working demo that we showed off to Scott. The third week was spent incorporating visual feedback from a designer and adding some finishing touches. For those of you keeping track at home, that's one cool app written by two developers in just three weeks - beginning with nothing and building on top of a platform that was still being developed - pretty compelling, I think!

In the spirit of openness and learning, you can click here to download the complete source code for this demo application and play around with it yourself!

A few notes on the application:

  • It's implemented as three self-contained controls (the map, calendar, and itinerary picker) that are hooked together via a couple of simple event handlers and property accessors.
  • The goal of code/design separation was achieved here to an extent I haven't experienced before. In particular, the fact that we were able to incorporate an external party's XAML design into our existing code with such ease was a rare treat.
  • I experimented with a vaguely CSS-y approach to XAML design with the calendar and itinerary picker controls I wrote, overlapping a number of different styles and using opacity to display the right style at the right time. I liked the way it worked out here because it enabled me to (for example) completely define the look of the calendar's day cells in a single XAML file - even though that style is actually somewhat complex (there are different styles for alternating months, weekends, hovering, selection, etc.).
  • The "plane flying" animation was Ted's doing and adds a really nice effect. All it took to implement was a plane graphic, a few transforms, a couple of animations, and a bit of high school math. :)
  • The XAML content is automatically resized to fit the browser window (while maintaining its original aspect ratio) with some JavaScript code that hooks the Silverlight control's onLoad and onResize events and manipulates two simple transforms it creates for that purpose. Silverlight lets you program against it with C# and JavaScript - at the same time!
  • In order to compile and build the source code, you need Visual Studio "Orcas" Beta 1 and the Silverlight Tools installed on you machine. Complete details and download links for these tools (and others) can be found on the Silverlight web site.
  • The inspiration for the demo application came from Bret Victor's Magic Ink essay which is a great read and recommended for anyone who's interested in user interface design.

The Silverlight Airlines demo was a fun project to work on - I look forward to be seeing (and doing!) a lot more with Silverlight in the coming days!

PS - Since the keynote presentation, there has been some interest in reusing the calendar control. Beyond making the source code available here, I may write a follow-up blog post going into more detail about the calendar itself. As a quick teaser: it's capable of more sophisticated display than what's in the demo application. :)

PPS - If you watched the Scott Guthrie keynote, you probably saw that there was a time Scott tried to switch the display screen over to the Mac to demonstrate something and it took a while for the conference's A/V folks to actually make the switch. A couple of people have asked if this delay was due to a problem with the Mac or Silverlight. I happen to have been sitting backstage mere inches away from the Mac in question (conferences use KVM switches to keep all the demo machines backstage) and I can assure you that there was no technical issue with the Mac or Silverlight. Aside from the conference tech taking a little while to switch the display over, there were no technical glitches during the demo. :)