This one time, at band camp... [A banded StackPanel implementation for Silverlight and WPF!]
Recently, I came across this article in the Expression Newsletter showing how to create a three-column ListBox. In it, Victor Gaudioso shows a Blend-only technique for creating a Silverlight/WPF ListBox with three columns. [And I award him extra credit for using the Silverlight Toolkit to do so! :) ] The technique described in that article is a great way to custom the interface layout without writing any code.
But it can get a little harder when the elements in the ListBox aren't all the same size: a row with larger elements may only be able to fit two items across before wrapping, while a row with smaller elements may fit four items or more! Such things can typically be avoided by specifying the exact size of all the items and the container itself (otherwise the user might resize the window and ruin the layout). But while hard-coding an application's UI size can be convenient at times, it's not always an option.
For those times when it's possible to write some code, specialized layout requirements can usually be implemented more reliably and more accurately with a custom Panel subclass. Victor started by looking for a property he could use to set the number of columns for the ListBox, and there's nothing like that by default. So I've written some a custom layout container to provide it - and because I've created a new Panel, this banded layout can be applied anywhere in an application - not just inside a ListBox!
The class I created is called BandedStackPanel and it behaves like a normal StackPanel, except that it includes a Bands property to specify how many vertical/horizontal bands to create. When Bands is set to its default value of 1, BandedStackPanel looks the same as StackPanel - when the value is greater than 1, additional bands show up automatically! And because BandedStackPanel is an integral part of the layout process, it's able to ensure that there are always exactly as many bands as there should be - regardless of how big or small the elements are and regardless of how the container is resized.

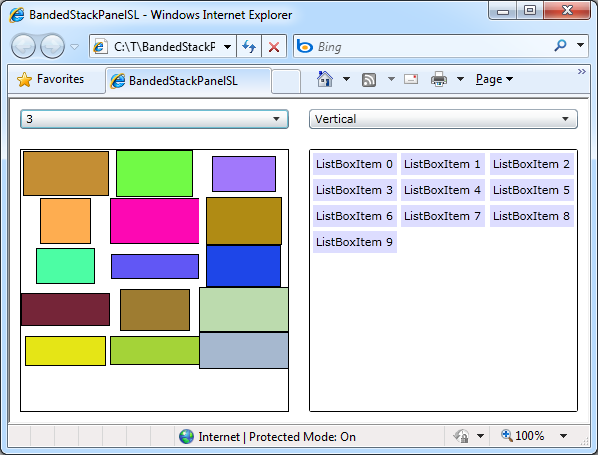
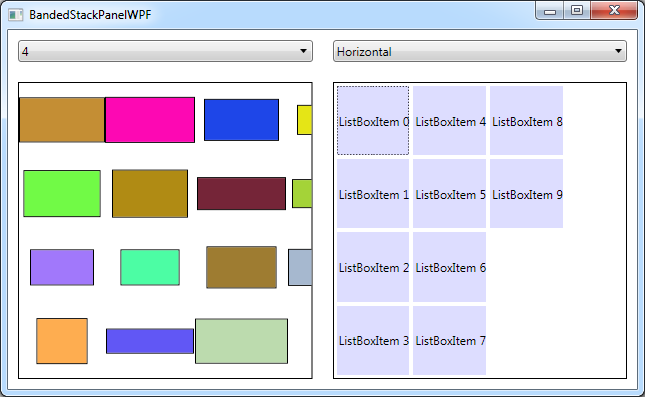
The sample application shown here has a test panel on the left to play around with and a ListBox at the right to demonstrate how BandedStackPanel can be used to satisfy the original requirements of the article. The ComboBoxes at the top of the window allow you to customize the behavior of both BandedStackPanel instances. And, of course, BandedStackPanel works great on WPF as well as on Silverlight.

The way to use BandedStackPanel with a ListBox is the same as any other ItemsControl layout customization: via the ItemsControl.ItemsPanel property:
<ListBox>
    <ListBox.ItemsPanel>
        <ItemsPanelTemplate>
            <delay:BandedStackPanel Bands="3"/>
        </ItemsPanelTemplate>
    </ListBox.ItemsPanel>
    <ListBoxItem Content="ListBoxItem 0"/>
    <ListBoxItem Content="ListBoxItem 1"/>
    <ListBoxItem Content="ListBoxItem 2"/>
    ...
</ListBox>
That's pretty much all there is to it! The Silverlight/WPF layout system is very powerful and can be made to do all kinds of weird and wonderful things without writing a single line of code. But for those times when your needs are very specific, nothing beats a custom Panel for really nailing the scenario!
PS - The implementation of BandedStackPanel is fairly straightforward. The only real complexity is abstracting out the handling of both the horizontal and vertical orientations so the same code can be used for both. I followed much the same approach the Silverlight Toolkit's WrapPanel uses and introduced a dedicated OrientedLength class that allows the code to deal in terms of primary/secondary growth directions instead of specifically manipulating width and height. Once the abstraction of OrientedLength is in place, the implementations of MeasureOverride and ArrangeOverride are pretty much what you'd expect. Here they are for those who might be interested:
/// <summary>
/// Implements custom measure logic.
/// </summary>
/// <param name="constraint">Constraint to measure within.</param>
/// <returns>Desired size.</returns>
protected override Size MeasureOverride(Size constraint)
{
    var bands = Bands;
    var orientation = Orientation;
    // Calculate the Size to Measure children with
    var constrainedLength = new OrientedLength(orientation, constraint);
    constrainedLength.PrimaryLength = double.PositiveInfinity;
    constrainedLength.SecondaryLength /= bands;
    var availableLength = constrainedLength.Size;
    // Measure each child
    var band = 0;
    var levelLength = new OrientedLength(orientation);
    var usedLength = new OrientedLength(orientation);
    foreach (UIElement child in Children)
    {
        child.Measure(availableLength);
        // Update for the band/level of this child
        var desiredLength = new OrientedLength(orientation, child.DesiredSize);
        levelLength.PrimaryLength = Math.Max(levelLength.PrimaryLength, desiredLength.PrimaryLength);
        levelLength.SecondaryLength += desiredLength.SecondaryLength;
        // Move to the next band
        band = (band + 1) % bands;
        if (0 == band)
        {
            // Update for the complete level; reset for the next one
            usedLength.PrimaryLength += levelLength.PrimaryLength;
            usedLength.SecondaryLength = Math.Max(usedLength.SecondaryLength, levelLength.SecondaryLength);
            levelLength.PrimaryLength = 0;
            levelLength.SecondaryLength = 0;
        }
    }
    // Update for the partial level at the end
    usedLength.PrimaryLength += levelLength.PrimaryLength;
    usedLength.SecondaryLength = Math.Max(usedLength.SecondaryLength, levelLength.SecondaryLength);
    // Return the used size
    return usedLength.Size;
}

/// <summary>
/// Implements custom arrange logic.
/// </summary>
/// <param name="arrangeSize">Size to arrange to.</param>
/// <returns>Used size.</returns>
protected override Size ArrangeOverride(Size arrangeSize)
{
    var bands = Bands;
    var orientation = Orientation;
    var count = Children.Count;
    // Prepare the Rect to arrange children with
    var arrangeLength = new OrientedLength(orientation, arrangeSize);
    arrangeLength.SecondaryLength /= bands;
    // Arrange each child
    for (var i = 0; i < count; i += bands)
    {
        // Determine the length of the current level
        arrangeLength.PrimaryLength = 0;
        arrangeLength.SecondaryOffset = 0;
        for (var band = 0; (band < bands) && (i + band < count); band++)
        {
            var desiredLength = new OrientedLength(orientation, Children[i + band].DesiredSize);
            arrangeLength.PrimaryLength = Math.Max(arrangeLength.PrimaryLength, desiredLength.PrimaryLength);
        }
        // Arrange each band within the level
        for (var band = 0; (band < bands) && (i + band < count); band++)
        {
            Children[i + band].Arrange(arrangeLength.Rect);
            arrangeLength.SecondaryOffset += arrangeLength.SecondaryLength;
        }
        // Update for the next level
        arrangeLength.PrimaryOffset += arrangeLength.PrimaryLength;
    }
    // Return the arranged size
    return arrangeSize;
}