The blog of dlaa.me

"Hang loose" is for surfers, not developers [Why I pin dependency versions in Node.js packages]

A few days ago, I posted a response to a question I get asked about open-source project management. Here we go again - this time the topic is dependency versioning.

What is a package dependency?

In the Node.js ecosystem, packages (a.k.a. projects) can make use of other packages by declaring them as a dependency in package.json and specifying the range of supported versions. When a package gets installed, the package manager (typically npm) makes sure appropriate versions of all dependencies are included.

How are dependency versions specified?

The Node community uses semantic versioning of the form major.minor.patch. There are many ways to specify a version range, but the most common is to identify a specific version (typically the most recent) and prefix it with a tilde or caret to signify that later versions which differ only by patch or minor.patch are also acceptable. For example: ~1.2.3 and ^1.2.3. This is what is meant by "loose" versioning.

Why does the community use "loose" versioning?

The intent of loose versioning is to automatically benefit from bug fixes and non-breaking changes to dependent packages. Any time an install is run or an update is performed, the latest (allowable) version of such dependencies will be included and the user will seamlessly benefit from any bug fixes that were made since the named version was published.

What is a "pinned" dependency version?

A pinned dependency version specifies a particular major.minor.patch version and does not include any modifiers. The only version that satisfies this range is the exact version listed. For example: 1.2.3. Bug fixes to such package dependencies will not be used until a new version of the package that references them is published (with updated references).

Why is pinning a better versioning strategy?

Pinning ensures that users only run a package with the set of dependencies it has been tested with. While this doesn't rule out the possibility of bugs, it's far safer and more predictable than loose versioning, which allows users to run with an unpredictable set of dependencies. In the loose versioning worst case, every install of a package could have a different set of dependencies. This is a nightmare for quality and reliability. With pinning, behavior changes only show up when the user decides to update versions. If anything breaks, the upgrade can be skipped while the issue is investigated. Loose versioning doesn't allow "undo"; when something breaks, you're stuck until a fix gets published.

What's so bad about running untested configurations?

As much as developers may try to ensure consistent behavior across minor- and patch-level version updates, any change - no matter how small - has the possibility of altering behavior and causing failures. Worse, such behavior changes show up unexpectedly and unpredictably and can be difficult to track down, especially for users who may not even realize the broken package was being used. I've had to investigate such issues on multiple occasions and think it is a waste of time for users and package maintainers alike.

Are popular projects safer to version loosely?

Well-run projects with thorough testing are probably less likely to cause problems then single-person hobby projects. But the underlying issue is the same: any change to dependency code can change runtime behavior and cause problems.

What about missing out on security bug fixes due to pinning?

While the urgency to include a security bug fix may be higher than a normal bug fix, the same challenges apply. There's no general-purpose way to identify a security fix from a normal fix from a breaking change.

Could pinning lead to larger install sizes?

Yes, because the package manager doesn't have as much freedom to choose among package versions that are shared by multiple dependencies. However, this is a speculative optimization with limited benefit in practice as disk space is comparatively inexpensive. Correctness and predictability are far more important.

Isn't pinning pointless if dependent packages version loosely?

No, though it's less effective because those transitive dependencies can change/break at any time. My opinion is that every package should use pinning, but I can only enforce that policy for my own packages. (But maybe by setting a good example, I can be the change I want to see in the world...)

Is there a way to force a dependency update for a pinned package?

Yes, by updating a project's package.json to use overrides (npm) or resolutions (yarn). This means users who are worried about a specific dependency version can make sure that version is used in their scenario - and any resulting problems are their responsibility to deal with.

Does pinning versions create more work for a maintainer?

No, maintainers should already be updating package dependencies as part of each release. This can be done manually or automatically through the use of a tool like Dependabot.
Further reading

"DRINK ME" [Why I do not include npm-shrinkwrap.json in Node.js tool packages]

I maintain a few open source projects and get asked some of the same questions from time to time. I wrote the explanation below in August of 2023 and posted it as a GitHub Gist; I am capturing it here for easier reference.

Background:


For historical purposes and possible future reference, here are my notes on why I backed out a change to use npm-shrinkwrap.json in markdownlint-cli2.

The basic problem is that npm will include platform-specific packages in npm-shrinkwrap.json. Specifically, if one generates npm-shrinkwrap.json on Mac, it may include components (like fsevents) that are only supported on Mac. Attempts to use a published package with such a npm-shrinkwrap.json on a different platform like Linux or Windows fails with EBADPLATFORM. This seems (to me, currently) like a fundamental and fatal flaw with the way npm implements npm-shrinkwrap.json. And while there are ways npm might address this problem, the current state of things seems unusably broken.

To make this concrete, the result of running rm npm-shrinkwrap.json && npm install && npm shrinkwrap for this project on macOS can be found here: https://github.com/DavidAnson/markdownlint-cli2/blob/v0.9.0/npm-shrinkwrap.json. Note that fsevents is an optional Mac-only dependency: https://github.com/DavidAnson/markdownlint-cli2/blob/66b36d1681566451da8d56dcef4bb7a193cdf302/npm-shrinkwrap.json#L1955-L1958. Including it is not wrong per se, but sets the stage for failure as reproduced via GitHub Codespaces:

@DavidAnson > /workspaces/temp (main) $ ls
@DavidAnson > /workspaces/temp (main) $ node --version
v20.5.1
@DavidAnson > /workspaces/temp (main) $ npm --version
9.8.0
@DavidAnson > /workspaces/temp (main) $ npm install markdownlint-cli2@v0.9.0
npm WARN deprecated date-format@0.0.2: 0.x is no longer supported. Please upgrade to 4.x or higher.

added 442 packages in 4s

9 packages are looking for funding
  run `npm fund` for details
@DavidAnson > /workspaces/temp (main) $ npm clean-install
npm ERR! code EBADPLATFORM
npm ERR! notsup Unsupported platform for fsevents@2.3.3: wanted {"os":"darwin"} (current: {"os":"linux"})
npm ERR! notsup Valid os:  darwin
npm ERR! notsup Actual os: linux

npm ERR! A complete log of this run can be found in: /home/codespace/.npm/_logs/2023-08-27T18_24_58_585Z-debug-0.log
@DavidAnson > /workspaces/temp (main) $

Note that the initial package install succeeded, but the subsequent attempt to use clean-install failed due to the platform mismatch. This is a basic scenario and the user is completely blocked at this point.

Because this is a second-level failure, it is not caught by most reasonable continuous integration configurations which work from the current project directory instead of installing and testing via the packed .tgz file. However, attempts to reproduce this failure in CI via .tgz were unsuccessful: https://github.com/DavidAnson/markdownlint-cli2/commit/f9bcd599b3e6dbc8d2ebc631b13e922c5d0df8c0. From what I can tell, npm install of a local .tgz file is handled differently than when that same (identical) file is installed via the package repository.

While there are some efforts to test the .tgz scenario better (for example: https://github.com/boneskull/midnight-smoker), better testing does not solve the fundamental problem that npm-shrinkwrap.json is a platform-specific file that gets used by npm in a cross-platform manner.


Unrelated, but notable: npm installs ALL package dependencies when npm-shrinkwrap.json is present - even in a context where it would normally NOT install devDependencies. Contrast the 442 packages installed above vs. the 40 when --omit=dev is used explicitly:

@DavidAnson > /workspaces/temp (main) $ npm install markdownlint-cli2@v0.9.0 --omit=dev

added 40 packages in 1s

9 packages are looking for funding
  run `npm fund` for details
@DavidAnson > /workspaces/temp (main) $

But the default behavior of a dependency install in this manner is not to include devDependencies as seen when installing a version of this package without npm-shrinkwrap.json:

@DavidAnson > /workspaces/temp (main) $ npm install markdownlint-cli2@v0.9.2

added 35 packages in 2s

7 packages are looking for funding
  run `npm fund` for details
@DavidAnson > /workspaces/temp (main) $

References:

"The unexamined life is not worth living" [Thoughts on writing an effective performance review at Microsoft (or elsewhere)]

It's "Connect season" again at Microsoft and I thought it might be useful to address something managers see pretty regularly: reluctance by their direct reports to fill out the required "paperwork".

To start, it's important to understand what a Connect is. A Connect is a structured document that Microsoft employees are required to fill out every few months, submit to their manager for comment, then use as a basis for a career/performance discussion. The Connect was introduced as a way to provide employees with regular feedback on a flexible basis to accommodate each organization's timelines. Before Connects, people went through a similar process every six months on a rigid schedule; in practice, Connects happen twice a year on the same schedule as before. (Shrug.)

There are four sections in a Connect document, all open-ended text boxes. Each part has an area for the direct report which is filled out first and an area for the manager which is filled out second, often referencing the direct report's comments.

  1. The first section is for writing about what the person accomplished since last time. Depending on the level of detail, this section can get long. (Very long.) It's usually the biggest part because people have a chance to talk about all the great things they did. Ironically, if the individual is extremely thorough, their manager may not have much to add beyond "Yup, they did all that".
  2. The second section is about things that could have gone better since last time. Most people don't like to focus on negatives and this is often a short section. Managers usually have more to say and may go into depth depending on what happened and the opportunities they see (and how many hours they've already spent writing feedback that day).
  3. The third section is about what the person will do in the upcoming months. This is ostensibly an opportunity to set goals and provide clarity about future tasks. Unfortunately, planning hasn't usually been done at this point and, besides, good luck trying to define a schedule six months in advance for a dynamic environment. In my experience, managers don't hold people to commitments made here.
  4. The fourth section is about what the person will do to learn and grow in the coming months. This can be things like training, coursework, reading books, etc., and is driven by the direct report. The manager may have suggestions, but this section is about how the person is looking to improve themselves.

Some people seem to really struggle with the process of filling out a Connect. To be sure, it can be hard to write about yourself and some people aren't used to extolling their virtues. (While other people are comfortable doing so at length!) In my opinion, the greatest value in this process is for the individual, not the manager. Managers might be reminded of a few things that got done and it's a pleasure to share positive feedback, but managers probably are not learning a lot from the writing process nor getting much actionable feedback from the document. (The ensuing discussion is a more balanced exchange of ideas, but people don't seem to dread it as much.)

Some key benefits for the individual (who I'll refer to as "you" below):

  • This process contributes directly to a discussion between you and your manager. Regular one-on-one's are great for keeping up with daily and weekly progress, but they often don't get into deeper career-oriented topics without one of you making a specific effort to do so. Connects provide that opportunity and are a good forcing function.
  • Another benefit of Connects is documenting your accomplishments for future reference. There shouldn't be a lot your manager wasn't already aware of (or else you're not communicating effectively in email and 1:1's), but Connects are something future managers will look at as part of the hiring process. Being comprehensive about listing accomplishments is a good way to capture the things you've done in a place that's easy to review and gives a complete picture of your impact. It's also a great reference when updating your resume. (You do update your resume periodically, right?)
  • Connects are a great opportunity for self-reflection and feedback and this is where you skimping on the process is counter-productive. It may feel good to leave the "what could have gone better" section blank, but that's probably not honest and it puts the onus on your manager to do all the heavy lifting. Yes, it's their job to help you improve, but that's much more productive when you take an active role and provide a good starting point for the discussion. A common phrase at Microsoft is "growth mindset" and that requires acknowledging and identifying areas for growth. Your manager probably has some ideas about ways you could do things differently and it's much easier when they see that you acknowledge this also. That means they don't need spend time pointing out issues and can think more about coaching you through them.

In my opinion, Connects are very much a "the more you put into it, the more you get out of it" situation. But this is not to say you should write long multi-page essays! (Please don't.) Writing a Connect is about communicating concepts clearly and concisely. My preference is to use bulleted lists and sentence fragments, but short paragraphs can also work well if that's your style. Make your point, provide supporting evidence, then move on. Your manager may have a dozen Connects to read and respond to and will appreciate being able to focus on the content.

In summary, the Connect process is a valuable opportunity for you to think back on your accomplishments as well as ways to improve how you do things. Your manager will try their best to provide constructive, actionable feedback regardless of how deeply you invest, but the experience will be more rewarding if you take the time to reflect, are candid about where things could have gone better, and are open to feedback about what to do differently next time.

You may never love the act of self-analysis, but writing a performance review shouldn't be a source of fear or anxiety. I hope this post makes your next Connect a more positive experience!

"If you want to see the sunshine, you have to weather the storm." [A simple AppleScript script to backup Notes in iCloud]

As someone who likes to make backups of all my data, storing things "in the cloud" is a little concerning because I have no idea how well that data is backed up. So I try to periodically save copies of cloud data locally just to be safe. This can be easy or hard depending on how that data is represented and how amenable the provider is to supporting this workflow. In the case of Apple Notes, it's easy to find questionable or for-pay solutions, but there's a lot out there I don't really trust. You might think Apple's own suggestion would be the best, but you might be wrong because it's rather impractical for someone with more than a handful of notes.

As a new macOS user, there's a lot I'm still discovering about the platform, but something that seems well suited for this problem is AppleScript and the AppleScript Editor, both of which are part of the OS and enable the creation of scripts that interact with applications and data. This Gist by James Thigpen proves the concept of using AppleScript to backup Notes, but of course I wanted to do some things a little differently and so I made my own script.

Notes:

  • This script enumerates all notes and appends them to a single HTML document that it puts on the clipboard for you to paste into the editor of your choice and save somewhere safe, email to yourself, or whatever.
  • The script does very little formatting other than separating notes from each other with a horizontal rule and adding a heading for each folder name. The output should be legible in text form and look reasonable in a web browser, but it won't win any design awards.
  • The contents of each note are apparently stored by Notes as HTML; this script adds the fewest number of additional tags necessary for everything to render properly in the browser.
  • If your OS language is set to something other than English, you may need to customize the hardcoded folder name, "Recently Deleted". (Or remove that conditional and you can backup deleted notes, too!)
  • This was my first experience with AppleScript and I'm keeping an open mind, but I will say that I did not immediately fall in love with it.
set result to "<html><head><meta charset='utf-8'/></head><body>" & linefeed & linefeed
tell application "Notes"
  tell account "iCloud"
    repeat with myFolder in folders
      if name of myFolder is not in ("Recently Deleted") then
        set result to result & "<h1>" & name of myFolder & "</h1>"
        set result to result & "<hr/>" & linefeed & linefeed
        repeat with myNote in notes in myFolder
          set result to result & body of myNote
          set result to result & linefeed & "<hr/>" & linefeed & linefeed
        end repeat
      end if
    end repeat
  end tell
end tell
set result to result & "</body></html>"
set the clipboard to result

Can you use it in a sentence? [An example of solving the New York Times Spelling Bee puzzle with JavaScript]

The New York Times Crossword app includes a daily puzzle called "Spelling Bee". The challenge is to make as many four-or-more letter words from a set of seven letters as you can. Each word must contain only those letters (using a letter multiple times is okay) and all of the words must include a specific letter (highlighted as part of the puzzle). It's pretty straightforward and the goal is to find a bunch of valid words with extra credit being given for long words and extra-extra credit for a word that uses all of the day's letters (known as a "pangram"). It's fun and you can spend as little or as much time as you want.

The app lets you see a list of all the previous day's words, but maybe you're stuck and want some ideas today. Or maybe you're bored and wonder what it would look like to solve this in code. Or both. I won't judge.

As usual, there are various ways to solve this problem. This one is mine. On iOS, my go-to application for writing JavaScript is Scriptable. It offers a modern JavaScript environment with handy helper functions and is pleasant to use on both iPhone and iPad. In this case, the Request.loadJSON method provides a concise way to load a list of popular English words from the Internet. The source I chose is dictionary.json from this GitHub repository. In addition to being a fairly comprehensive list of English words, this file is in JSON format which is automatically parsed by the API above.

The algorithm I use is fairly straightforward: download the list of words and loop through them looking for valid ones. Once found, check if the word is a pangram and write it to the console (red if so, white otherwise). I use a RegExp for the validity check and augment it with a function call to ensure the required letter is present. (I don't think there's an elegant way to do everything with a single regular expression, but I'd be happy to learn one! And I'm not interested in clunky ways because I already know a few of those.) The pangram check is basically also a loop, though it uses Array's reduce for conciseness. There are a couple of less-common practices to keep things interesting, but otherwise the code speaks for itself.

I didn't want to "spoil" a previously published puzzle, so the code below uses the seven unique letters of my full name with "d" as the required letter. Running the sample code with this set of letters doesn't output a pangram for any dictionary I tried, so it's unlikely to ever be a real Spelling Bee puzzle! (Fun fact: the longest valid word for this input seems to be "nondivision".)

// Puzzle letters; the first is required
const letters = "davinso";

// Source of word list JSON dictionary
const req = new Request("https://github.com/adambom/dictionary/blob/master/dictionary.json?raw=true");

// Output valid words to console log/error
const valid = new RegExp("^[" + letters + "]{4,}$");
const required = letters[0];
const optionals = letters.slice(1).split("");
req.loadJSON().then((dictionary) => {
  const sorted = Object.keys(dictionary).map((word) => word.toLowerCase());
  sorted.sort();
  for (const word of sorted) {
    if (valid.test(word) && word.includes(required)) {
      const pangram = optionals.reduce(
        (prev, curr) => prev && word.includes(curr),
        true
      );
      console[pangram ? "error" : "log"](word);
    }
  }
}).catch(console.error);

"We must never become too busy sawing to take time to sharpen the saw." [Two solutions to a programming challenge]

I stumbled across a programming challenge while looking for info on UglifyJS. It's called A little JavaScript problem, though I you can do it in any language. I will summarize the problem here, but please visit that page for the details:

The problem: define functions range, map, reverse and foreach, obeying the restrictions below, such that the following program works properly. It prints the squares of numbers from 1 to 10, in reverse order.

var numbers = range(1, 10);
numbers = map(numbers, function (n) { return n * n });
numbers = reverse(numbers);
foreach(numbers, console.log);

This wouldn't be too hard, except the restrictions say you are not allowed to use Array or Object (i.e., no storing state in a lookup). So, yeah, it's a good challenge!

If you're interested, please try to do it before reading further - spoilers follow...

The first solution

My first thought was to use something like IEnumerable in .NET where range would generate the sequence of numbers and the other functions would consume that sequence and output a modified sequence in turn until foreach wrote each item to the console. I thought of this as a "generator" model (yes, I know JavaScript has generator functions, that's next...) and it's easy to define range as returning a function that returns one number each time it's called and a falsy value to signal the end.

function range (a, b) {
  return () => (a <= b) ? a++ : null;
}

That done, it's pretty straightforward to define foreach as a function that takes one of these "generators" and keeps calling it and processing results until they run out. (Yes, this has a bug if the range includes the value 0, but we could use a unique sentinel value to fix that.)

function foreach (g, func) {
  while (v = g()) {
    func(v);
  }
}

It's also easy to define map as taking one of these generator functions and returning another that returns the result of calling the provided function for each of the generated values in turn.

function map (g, func) {
  return () => func(g());
}

But reverse is more challenging! The only way to return the last item first is to traverse the entire list, but once that's done it can't be done again, so all the preceding elements need to be saved somewhere to be able to return them in backwards order. But recall that the code is not allowed to use arrays or objects, so typical data structures like Stack are not available. The approach I came up with was to create breadcrumbs out of closures. There might be a more elegant way to express this, but I did so with a local variable and helper methods push and pop. For each element in the list, a new closure is created that captures the previous closure and the value of the element. Returning values in reverse is then just a matter of looking into the current closure, replacing it with the previous closure, and returning the current closure's value. It's probably not immediately obvious what's going on with this code and it took a little while to come up with the right approach even after I had the design in my head.

function reverse (g) {
  let pop = () => null;
  const push = (v, pre) =>
    pop = () => (pop = pre) && v;
  while (v = g()) {
    push(v, pop);
  }
  return () => pop();
}

"She may not look like much, but she's got it where it counts, kid." But we can do better! I hadn't previously worked with JavaScript generators, and this seemed like a great opportunity to sharpen the saw...

The second solution

You're almost always better off using the right tool for the job; in this case generators/iterators fit nicely. As before, range is easy to get started with - just return the numbers in order and stop after the last one. In this case, the generator automatically indicates completion, so there is no confusion or ambiguity around returning a falsy value to signal the end.

function* range (a, b) {
  while (a <= b) {
    yield a++;
  }
}

The implementation of foreach is almost identical to before.

function foreach (g, func) {
  for (let v of g) {
    func(v);
  }
}

The code for map is very slightly longer than before, but it's completely obvious what it's doing and it's easy to write. (It looks a lot like foreach which is a win from an consistency point of view.)

function* map (g, func) {
  for (let v of g) {
    yield func(v);
  }
}

That brings us to reverse and that is where the real payoff happens! The generator-based version of this code also builds up state in the call chain (known as a "call stack" for a reason), but the way it does so is clear and closely relates to how one would describe this function in words: "until you're done, get the first value, reverse the rest of the list, and return the value (i.e., after the other values)".

function* reverse (g) {
  const { done, value } = g.next();
  if (!done) {
    yield* reverse(g);
    yield value;
  }
}

I'm much happier with this second solution because the intent is so much clearer. Also, it took me less time to write! :)

And there you have it: two solutions to the same problem. The first: functional but hard to follow; the second: clear and easy to understand (also more versatile). Sometimes, the right algorithm or approach can make a world of difference when it comes to programming.

"If you can't measure it, you can't manage it." [A brief analysis of markdownlint rule popularity]

From time to time, discussions of a markdownlint rule come up where the popularity of one of the rules is questioned. There are about 45 rules right now, so there's a lot of room for debate about whether a particular one goes too far or isn't generally applicable. By convention, all rules are enabled for linting by default, though it is easy to disable any rules that you disagree with or that don't fit with a project's approach. But until recently, I had no good way of knowing what the popularity of these rules was in practice.

If only there were an easy way to collect the configuration files for the most popular repositories in GitHub, I could do some basic analysis to get an idea what rules were used or ignored in practice. Well, that's where Google's BigQuery comes in - specifically its database of public GitHub repositories that is available for anyone to query. I developed a basic understanding of the database and came up with the following query to list the most popular repositories with a markdownlint configuration file:

SELECT files.repo_name
FROM `bigquery-public-data.github_repos.files` as files
INNER JOIN `bigquery-public-data.github_repos.sample_repos` as repos
  ON files.repo_name = repos.repo_name
WHERE files.path = ".markdownlint.json" OR files.path = ".markdownlint.yaml"
ORDER BY repos.watch_count DESC
LIMIT 100

Aside: While this resource was almost exactly what I needed, it turns out the data that's available is off by an order of magnitude, so this analysis is not perfect. However, it's an approximation anyway, so this should not be a problem. (For context, follow this Twitter thread with @JustinBeckwith.)

The query above returns about 60 repository names. The next step was to download and process the relevant configuration files and output a simple CSV file recording which repositories used which rules (based on configuration defaults, customizations, and deprecations). This was fairly easily accomplished with a bit of code I've published in the markdownlint-analyze-config repository. You can run it if you'd like, but I captured the output as of early October, 2020 in the file analyze-config.csv for convenience.

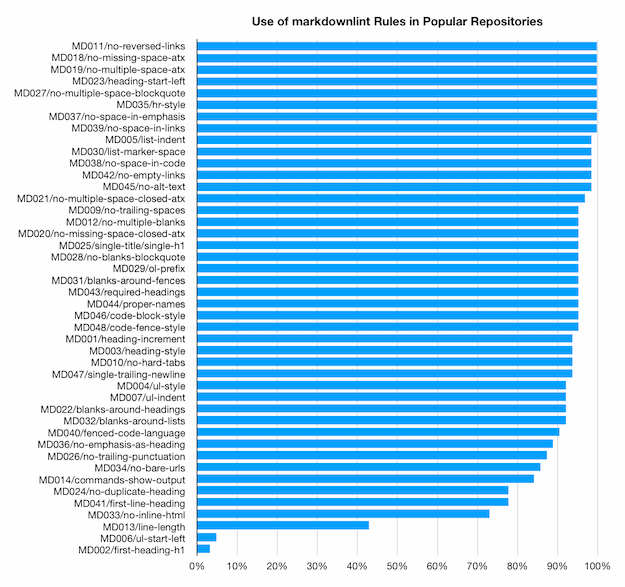
Importing that data into the Numbers app and doing some simple aggregation produced the following representation of how common each rule is across the data set:

Bar chart showing how common each  rule is

Some observations:

  • There are 8 rules that are used by every project whose data is represented here. These should be uncontroversial. Good job, rules!
  • The two rules at the bottom with less than 5% use are both deprecated because they have been replaced by more capable rules. It's interesting some projects have explicitly enabled them, but they can be safely ignored.
  • More than half of the rules are used in at least 95% of the scenarios. These seem pretty solid as well, and are probably not going to see much protest.
  • All but 4 (of the non-deprecated) rules are used in at least 80% of the scenarios. Again, pretty strong, though there is some room for discussion in the lower ranges of this category.
  • Of those 4 least-popular rules that are active, 3 are used between 70% and 80% of the time. That's not shabby, but it's clear these rules are checking for things that are less universally applicable and/or somewhat controversial.
  • The least popular (non-deprecated) rule is MD013/line-length at about 45% popularity. This is not surprising, as there are definitely good arguments for and against manually wrapping lines at an arbitrary column. This rule is already disabled by default for the VS Code markdownlint extension because it is noisy in projects that use long lines (where nearly every line could trigger a violation).

Overall, this was a very informative exercise. The data source isn't perfect, but it's a good start and I can always rerun the numbers if I get a better list of repositories. Rules seem to be disabled less often in practice than I would have guessed. This is nice to see - and a good reminder to be careful about introducing controversial rules that many people end up wanting to turn off. The next time a discussion about rule popularity comes up, I'll be sure to reference this post!

If one is good, two must be better [markdownlint-cli2 is a new kind of command-line interface for markdownlint]

About 5 years ago, Igor Shubovych and I discussed the idea of writing a CLI for markdownlint. I wasn't ready at the time, so Igor created markdownlint-cli and it has been a tremendous help for the popularity of the library. I didn't do much with it at first, but for the past 3+ years I have been the primary contributor to the project. This CLI is the primary way that many users interact with the markdownlint library, so I think it is important to maintain it.

However, I've always felt a little bit like a guest in someone else's home and while I have added new features, there were always some things I wasn't comfortable changing. A few months ago, I decided to address this by creating my own CLI - and approaching the problem from a slightly different/unusual perspective so as not to duplicate the fine work that had already been done. My implementation is named markdownlint-cli2 and you can find it here:

markdownlint-cli2 on GitHub
markdownlint-cli2 on npm

markdownlint-cli2 has a few principles that motivate its interface and behavior:

  • Faster is better. There are three phases of execution: globbing/configuration parsing, linting of each configuration set, and summarizing results. Each of these phases takes full advantage of asynchronous function calls to execute operations concurrently and make the best use of Node.js's single-threaded architecture. Because it's inefficient to enumerate files and directories that end up being ignored by a filter, all glob patterns for input (inclusive and exclusive) are expected to be passed on the command-line so they can be used by the glob library to optimize file system access.

    How much faster does it run? Well, it depends. :) In many cases, probably only a little bit faster - all the same Markdown files need to be processed by the same library code. That said, linting is done concurrently, so slow disk scenarios offer one opportunity for speed-ups. In testing, an artificial 5 millisecond delay for every file access was completely overcome by this concurrency. In situations that play to the strengths of the new implementation - such as with many ignored files and few Markdown files (common for Node.js packages with deep node_modules) - the difference can be significant. One early user reported times exceeding 100 seconds dropped to less than 1 second.

  • Configuration should be flexible. Command line arguments are never as expressive as data or code, so all configuration for markdownlint-cli2 is specified via appropriately-named JSON, YAML, or JavaScript files. These options files can live anywhere and automatically apply to their part of the directory tree. Settings cascade and inherit, so it's easy to customize a particular scenario without repeating yourself. Other than two necessary exceptions, all options (including custom rules and parser plugins) can be set or changed in any directory being linted.

    It's unconventional for a command-line tool not to allow configuration via command-line arguments, but this model keeps the input (glob patterns) separate from the configuration (files) and allows easier sharing of settings across tools (like the markdownlint extension for VS Code). It's also good for scenarios where the user may not have the ability to alter the command line (such as GitHub's Super-Linter action).

    In addition to support for custom rules, it's possible to provide custom markdown-it plugins - for each directory if desired. This can be necessary for scenarios that involve custom rendering and make use of non-standard CommonMark syntax. By using an appropriate plugin, the custom syntax gets parsed correctly and the linting rules can work with the intended structure of the document. A common scenario is when embedding TeX math equations with the $ math $ or $$ math $$ syntax and a plugin such as markdown-it-texmath.

    Although the default output format to stderr is identical to that of markdownlint-cli (making it easy to switch between CLI's), there are lots of ways to display results and so any number of output formatters can be configured to run after linting. I've provided stock implementations for default, JSON, JUnit, and summarized results, but anyone can provide their own formatter if they want something else.

  • Dependencies should be few. As with the markdownlint library itself, package dependencies are kept to a minimum. Fewer dependencies mean less code to install, parse, audit, and maintain - which makes everything easier.

So, which CLI should you use? Well, whichever you want! If you're happy with markdownlint-cli, there's no need to change. If you're looking for a bit more flexibility or want to see if markdownlint-cli2 is faster in your scenario, give it a try. At this point, markdownlint-cli2 supports pretty much everything markdownlint-cli does, so you're free to experiment and shouldn't need to give up any features if you switch.

What does this mean for the future of the original markdownlint-cli? Nothing! It's a great tool and it's used by many projects. I will continue to update it as I release new versions of the markdownlint library. However, I expect that my own time working on new features will be focused on markdownlint-cli2 for now.

Whether you use markdownlint-cli2 or markdownlint-cli, I hope you find it useful!

Don't just complain - offer solutions! [Enabling markdownlint rules to fix the violations they report]

In October of 2017, an issue was opened in the markdownlint repository on GitHub asking for the ability to automatically fix rule violations. (Background: markdownlint is a Node.js style checker and lint tool for Markdown/CommonMark files.) I liked the idea, but had some concerns about how to implement it effectively. I had recently added the ability to fix simple violations to the vscode-markdownlint extension for VS Code based entirely on regular expressions and it was primitive, but mostly sufficient.

Such was the state of things for about two years, with 15 of the 44 linting rules having regular expression-based fixes in VS Code that usually worked. Then, in August of 2019, I overcame my reservations about the feature and added fix information as one of the things a rule can report with a linting violation. In doing so, the road was paved for an additional 9 rules to become auto-fixable. What's more, it became possible for custom rules written by others to offer fixes as well.

Implementation notes

The way a rule reports fix information for a violation is via an object that looks like this in TypeScript:

/**
 * Fix information for RuleOnErrorInfo.
 */
type RuleOnErrorFixInfo = {
    /**
     * Line number (1-based).
     */
    lineNumber?: number;
    /**
     * Column of the fix (1-based).
     */
    editColumn?: number;
    /**
     * Count of characters to delete.
     */
    deleteCount?: number;
    /**
     * Text to insert (after deleting).
     */
    insertText?: string;
};

Aside: markdownlint now includes a TypeScript declaration file for all public APIs and objects!

The "fix information" object identifies a single edit that fixes the corresponding violation. All the properties shown above are optional, but in practice there will always be 2 or 3. lineNumber defaults to the line of the corresponding violation and almost never needs to be set. editColumn points to the location in the line to edit. deleteCount says how many characters to delete (the value -1 means to delete the entire line); insertText provides the characters to add. If delete and insert are both specified, the delete is applied before the insert. This simple format is easy for callers of the markdownlint API to apply, so the structure is proxied to them pretty much as-is when returning violations.

Aside: With the current design, a violation can only include a single fixInfo object. This could be limiting, but has proven adequate for all scenarios so far.

Practical matters

Considered in isolation, a single fix is easy to reason about and apply. However, when dealing with an entire document, there can be multiple violations for a line and therefore multiple fixes with potential to overlap and conflict. The first strategy to deal with this is to make fixes simple; the change represented by a fix should alter as little as possible. The second strategy is to apply fixes in the order least likely to create conflicts - that's right-to-left on a line with detection of overlaps that may cause the application of the second fix to be skipped. Finally, overlapping edits of different kinds that don't conflict are merged into one. This process isn't especially tricky, but there are some subtleties and so there are helper methods in the markdownlint-rule-helpers package for applying a single fix (applyFix) or multiple fixes (applyFixes).

Aside: markdownlint-rule-helpers is an undocumented, unsupported collection of functions and variables that helps author rules and utilities for markdownlint. The API for this package is ad-hoc, but everything in it is used by the core library and part of the 100% test coverage that project has.

Availability

Automatic fix behavior is available in markdownlint-cli, markdownlint-cli2, and the vscode-markdownlint extension for VS Code. Both CLIs can fix multiple files at once; the VS Code extension limits fixes to the current file (and includes undo support). Fixability is also available to consumers of the library via the markdownlint-rule-helpers package mentioned earlier. Not all rules are automatically fixable - in some cases the resolution is ambiguous and needs human intervention. However, rules that offer fixes can dramatically improve the quality of a document without the user having to do any work!

Further reading

For more about markdownlint and related topics, search for "markdownlint" on this blog.

Absolute coordinates corrupt absolutely [MouseButtonClicker gets support for absolute coordinates and virtual machine/remote desktop scenarios]

I wrote and shared MouseButtonClicker almost 12 years ago. It's a simple Windows utility to automatically click the mouse button for you. You can read about why that's interesting and how the program works in my blog post, "MouseButtonClicker clicks the mouse so you don't have to!" [Releasing binaries and source for a nifty mouse utility].

I've used MouseButtonClicker at work and at home pretty much every day since I wrote it. It works perfectly well for normal scenarios, but also virtual machine guest scenarios because mouse input is handled by the host operating system and clicks are generated as user input to the remote desktop app. That means it's possible to wave the mouse into and out of a virtual machine window and get the desired automatic-clicking behavior everywhere.

However, for a number of months now, I haven't been able to use MouseButtonClicker in one specific computing environment. The details aren't important, but you can imagine a scenario like this one where the host operating system is locked down and doesn't permit the user (me) to execute third-party code. Clearly, it's not possible to run MouseButtonClicker on the host OS in this case, but shouldn't it work fine within a virtual machine guest OS?

Actually, no. It turns out that raw mouse input messages for the VM guest are provided to that OS in absolute coordinates rather than relative coordinates. I had previously disallowed this scenario because absolute coordinates are also how tablet input devices like those made by Wacom present their input and you do not want automatic mouse button clicking when using a pen or digitizer.

But desperate times call for desperate measures and I decided to reverse my decision and add support for absolute mouse input based on this new understanding. The approach I took was to remember the previous absolute position and subtract the coordinates of the current absolute position to create a relative change - then reuse all the rest of the existing code. I used my Wacom tablet to generate absolute coordinates for development purposes, though it sadly violates the specification and reports values in the range [0, screen width/height]. This mostly doesn't matter, except the anti-jitter bounding box I describe in the original blog post is tied to the units of mouse movement.

Aside: The Wacom tablet also seems to generate a lot of spurious [0, 0] input messages (which are ignored), but I didn't spend time tracking this down because it's not a real use case.

In the relative coordinate world, ±2 pixels is very reasonable for jitter detection. However, in the absolute coordinate world (assuming an implementation that complies with the specification) 2 units out of 65,536 is insignificant. For reference, on a 4K display, each screen pixel is about 16 of these units. One could choose to scale the absolute input values according to the current width and height of the screen, but that runs into challenges when multiple screens (at different resolutions!) are present. Instead, I decided to scale all absolute input values down to a 4K maximum, thereby simulating a 4K (by 4K) screen for absolute coordinate scenarios. It's not perfect, but it's quick and it has proven accurate enough for the purposes of avoiding extra clicks due to mouse jitter.

I also took the opportunity to publish the source code on GitHub and convert from a Visual Studio solution over to a command-line build based on the Windows SDK and build tools (free for anyone to download, see the project README for more). Visual Studio changes its solution/project formats so frequently, I don't recall that I've ever come back to a project and been able to load it in the current version of VS without having to migrate it and deal with weird issues. Instead, having done this conversion, everything is simpler, more explicit, and free for all. I also took the opportunity to opt into new security flags in the compiler and linker so any 1337 haxxors trying to root my machine via phony mouse events/hardware are going to have a slightly harder time of it.

Aside: I set the compiler/linker flags to optimize for size (including an undocumented linker flag to actually exclude debug info), but the new executables are roughly double the size from before. Maybe it's the new anti-hacking protections? Maybe it's Maybelline?

With the addition of absolute coordinate support, MouseButtonClicker now works seamlessly in both environments: on the host operating system or within a virtual machine guest window. That said, there are some details to be aware of. For example, dragging the mouse out of a remote desktop window looks to the relevant OS as though the mouse was dragged to the edge of the screen and then stopped moving. That means a click should be generated, and you might be surprised to see windows getting activated when their non-client area is clicked on. If you're really unlucky, you'll drag the mouse out of the upper-right corner and a window will disappear as its close button is clicked (darn you, Fitts!). It should be possible to add heuristics to prevent this sort of behavior, but it's also pretty easy to avoid once you know about it. (Kind of like how you quickly learn to recognize inert parts of the screen where the mouse pointer can safely rest.)

The latest version of the code (with diffs to the previously published version) is available on the MouseButtonClicker GitHub project page. 32- and 64-bit binaries are available for download on the Releases page. Pointers to a few similar tools for other operating systems/environments can be found at the bottom of the README.

If you've never experienced automatic mouse button clicking, I encourage you to try it out! There's a bit of an adjustment period to work through (and it's probably not going to appeal to everyone), but auto-clicking (a.k.a. dwell-clicking, a.k.a. hover-clicking) can be quite nice once you get the hang of it.