The blog of dlaa.me

"We must never become too busy sawing to take time to sharpen the saw." [Two solutions to a programming challenge]

I stumbled across a programming challenge while looking for info on UglifyJS. It's called A little JavaScript problem, though I you can do it in any language. I will summarize the problem here, but please visit that page for the details:

The problem: define functions range, map, reverse and foreach, obeying the restrictions below, such that the following program works properly. It prints the squares of numbers from 1 to 10, in reverse order.

var numbers = range(1, 10);
numbers = map(numbers, function (n) { return n * n });
numbers = reverse(numbers);
foreach(numbers, console.log);

This wouldn't be too hard, except the restrictions say you are not allowed to use Array or Object (i.e., no storing state in a lookup). So, yeah, it's a good challenge!

If you're interested, please try to do it before reading further - spoilers follow...

The first solution

My first thought was to use something like IEnumerable in .NET where range would generate the sequence of numbers and the other functions would consume that sequence and output a modified sequence in turn until foreach wrote each item to the console. I thought of this as a "generator" model (yes, I know JavaScript has generator functions, that's next...) and it's easy to define range as returning a function that returns one number each time it's called and a falsy value to signal the end.

function range (a, b) {
  return () => (a <= b) ? a++ : null;
}

That done, it's pretty straightforward to define foreach as a function that takes one of these "generators" and keeps calling it and processing results until they run out. (Yes, this has a bug if the range includes the value 0, but we could use a unique sentinel value to fix that.)

function foreach (g, func) {
  while (v = g()) {
    func(v);
  }
}

It's also easy to define map as taking one of these generator functions and returning another that returns the result of calling the provided function for each of the generated values in turn.

function map (g, func) {
  return () => func(g());
}

But reverse is more challenging! The only way to return the last item first is to traverse the entire list, but once that's done it can't be done again, so all the preceding elements need to be saved somewhere to be able to return them in backwards order. But recall that the code is not allowed to use arrays or objects, so typical data structures like Stack are not available. The approach I came up with was to create breadcrumbs out of closures. There might be a more elegant way to express this, but I did so with a local variable and helper methods push and pop. For each element in the list, a new closure is created that captures the previous closure and the value of the element. Returning values in reverse is then just a matter of looking into the current closure, replacing it with the previous closure, and returning the current closure's value. It's probably not immediately obvious what's going on with this code and it took a little while to come up with the right approach even after I had the design in my head.

function reverse (g) {
  let pop = () => null;
  const push = (v, pre) =>
    pop = () => (pop = pre) && v;
  while (v = g()) {
    push(v, pop);
  }
  return () => pop();
}

"She may not look like much, but she's got it where it counts, kid." But we can do better! I hadn't previously worked with JavaScript generators, and this seemed like a great opportunity to sharpen the saw...

The second solution

You're almost always better off using the right tool for the job; in this case generators/iterators fit nicely. As before, range is easy to get started with - just return the numbers in order and stop after the last one. In this case, the generator automatically indicates completion, so there is no confusion or ambiguity around returning a falsy value to signal the end.

function* range (a, b) {
  while (a <= b) {
    yield a++;
  }
}

The implementation of foreach is almost identical to before.

function foreach (g, func) {
  for (let v of g) {
    func(v);
  }
}

The code for map is very slightly longer than before, but it's completely obvious what it's doing and it's easy to write. (It looks a lot like foreach which is a win from an consistency point of view.)

function* map (g, func) {
  for (let v of g) {
    yield func(v);
  }
}

That brings us to reverse and that is where the real payoff happens! The generator-based version of this code also builds up state in the call chain (known as a "call stack" for a reason), but the way it does so is clear and closely relates to how one would describe this function in words: "until you're done, get the first value, reverse the rest of the list, and return the value (i.e., after the other values)".

function* reverse (g) {
  const { done, value } = g.next();
  if (!done) {
    yield* reverse(g);
    yield value;
  }
}

I'm much happier with this second solution because the intent is so much clearer. Also, it took me less time to write! :)

And there you have it: two solutions to the same problem. The first: functional but hard to follow; the second: clear and easy to understand (also more versatile). Sometimes, the right algorithm or approach can make a world of difference when it comes to programming.
"If you can't measure it, you can't manage it." [A brief analysis of markdownlint rule popularity]

From time to time, discussions of a markdownlint rule come up where the popularity of one of the rules is questioned. There are about 45 rules right now, so there's a lot of room for debate about whether a particular one goes too far or isn't generally applicable. By convention, all rules are enabled for linting by default, though it is easy to disable any rules that you disagree with or that don't fit with a project's approach. But until recently, I had no good way of knowing what the popularity of these rules was in practice.

If only there were an easy way to collect the configuration files for the most popular repositories in GitHub, I could do some basic analysis to get an idea what rules were used or ignored in practice. Well, that's where Google's BigQuery comes in - specifically its database of public GitHub repositories that is available for anyone to query. I developed a basic understanding of the database and came up with the following query to list the most popular repositories with a markdownlint configuration file:

SELECT files.repo_name
FROM `bigquery-public-data.github_repos.files` as files
INNER JOIN `bigquery-public-data.github_repos.sample_repos` as repos
  ON files.repo_name = repos.repo_name
WHERE files.path = ".markdownlint.json" OR files.path = ".markdownlint.yaml"
ORDER BY repos.watch_count DESC
LIMIT 100

Aside: While this resource was almost exactly what I needed, it turns out the data that's available is off by an order of magnitude, so this analysis is not perfect. However, it's an approximation anyway, so this should not be a problem. (For context, follow this Twitter thread with @JustinBeckwith.)

The query above returns about 60 repository names. The next step was to download and process the relevant configuration files and output a simple CSV file recording which repositories used which rules (based on configuration defaults, customizations, and deprecations). This was fairly easily accomplished with a bit of code I've published in the markdownlint-analyze-config repository. You can run it if you'd like, but I captured the output as of early October, 2020 in the file analyze-config.csv for convenience.

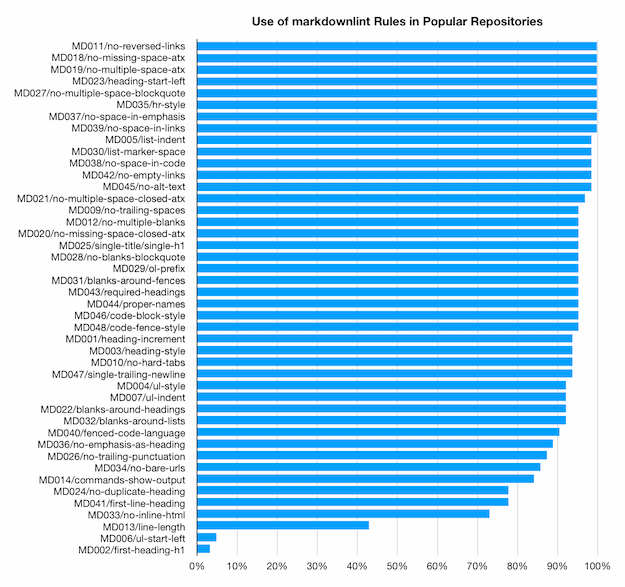
Importing that data into the Numbers app and doing some simple aggregation produced the following representation of how common each rule is across the data set:

Bar chart showing how common each  rule is

Some observations:

  • There are 8 rules that are used by every project whose data is represented here. These should be uncontroversial. Good job, rules!
  • The two rules at the bottom with less than 5% use are both deprecated because they have been replaced by more capable rules. It's interesting some projects have explicitly enabled them, but they can be safely ignored.
  • More than half of the rules are used in at least 95% of the scenarios. These seem pretty solid as well, and are probably not going to see much protest.
  • All but 4 (of the non-deprecated) rules are used in at least 80% of the scenarios. Again, pretty strong, though there is some room for discussion in the lower ranges of this category.
  • Of those 4 least-popular rules that are active, 3 are used between 70% and 80% of the time. That's not shabby, but it's clear these rules are checking for things that are less universally applicable and/or somewhat controversial.
  • The least popular (non-deprecated) rule is MD013/line-length at about 45% popularity. This is not surprising, as there are definitely good arguments for and against manually wrapping lines at an arbitrary column. This rule is already disabled by default for the VS Code markdownlint extension because it is noisy in projects that use long lines (where nearly every line could trigger a violation).

Overall, this was a very informative exercise. The data source isn't perfect, but it's a good start and I can always rerun the numbers if I get a better list of repositories. Rules seem to be disabled less often in practice than I would have guessed. This is nice to see - and a good reminder to be careful about introducing controversial rules that many people end up wanting to turn off. The next time a discussion about rule popularity comes up, I'll be sure to reference this post!

If one is good, two must be better [markdownlint-cli2 is a new kind of command-line interface for markdownlint]

About 5 years ago, Igor Shubovych and I discussed the idea of writing a CLI for markdownlint. I wasn't ready at the time, so Igor created markdownlint-cli and it has been a tremendous help for the popularity of the library. I didn't do much with it at first, but for the past 3+ years I have been the primary contributor to the project. This CLI is the primary way that many users interact with the markdownlint library, so I think it is important to maintain it.

However, I've always felt a little bit like a guest in someone else's home and while I have added new features, there were always some things I wasn't comfortable changing. A few months ago, I decided to address this by creating my own CLI - and approaching the problem from a slightly different/unusual perspective so as not to duplicate the fine work that had already been done. My implementation is named markdownlint-cli2 and you can find it here:

markdownlint-cli2 on GitHub
markdownlint-cli2 on npm

markdownlint-cli2 has a few principles that motivate its interface and behavior:

  • Faster is better. There are three phases of execution: globbing/configuration parsing, linting of each configuration set, and summarizing results. Each of these phases takes full advantage of asynchronous function calls to execute operations concurrently and make the best use of Node.js's single-threaded architecture. Because it's inefficient to enumerate files and directories that end up being ignored by a filter, all glob patterns for input (inclusive and exclusive) are expected to be passed on the command-line so they can be used by the glob library to optimize file system access.

    How much faster does it run? Well, it depends. :) In many cases, probably only a little bit faster - all the same Markdown files need to be processed by the same library code. That said, linting is done concurrently, so slow disk scenarios offer one opportunity for speed-ups. In testing, an artificial 5 millisecond delay for every file access was completely overcome by this concurrency. In situations that play to the strengths of the new implementation - such as with many ignored files and few Markdown files (common for Node.js packages with deep node_modules) - the difference can be significant. One early user reported times exceeding 100 seconds dropped to less than 1 second.

  • Configuration should be flexible. Command line arguments are never as expressive as data or code, so all configuration for markdownlint-cli2 is specified via appropriately-named JSON, YAML, or JavaScript files. These options files can live anywhere and automatically apply to their part of the directory tree. Settings cascade and inherit, so it's easy to customize a particular scenario without repeating yourself. Other than two necessary exceptions, all options (including custom rules and parser plugins) can be set or changed in any directory being linted.

    It's unconventional for a command-line tool not to allow configuration via command-line arguments, but this model keeps the input (glob patterns) separate from the configuration (files) and allows easier sharing of settings across tools (like the markdownlint extension for VS Code). It's also good for scenarios where the user may not have the ability to alter the command line (such as GitHub's Super-Linter action).

    In addition to support for custom rules, it's possible to provide custom markdown-it plugins - for each directory if desired. This can be necessary for scenarios that involve custom rendering and make use of non-standard CommonMark syntax. By using an appropriate plugin, the custom syntax gets parsed correctly and the linting rules can work with the intended structure of the document. A common scenario is when embedding TeX math equations with the $ math $ or $$ math $$ syntax and a plugin such as markdown-it-texmath.

    Although the default output format to stderr is identical to that of markdownlint-cli (making it easy to switch between CLI's), there are lots of ways to display results and so any number of output formatters can be configured to run after linting. I've provided stock implementations for default, JSON, JUnit, and summarized results, but anyone can provide their own formatter if they want something else.

  • Dependencies should be few. As with the markdownlint library itself, package dependencies are kept to a minimum. Fewer dependencies mean less code to install, parse, audit, and maintain - which makes everything easier.

So, which CLI should you use? Well, whichever you want! If you're happy with markdownlint-cli, there's no need to change. If you're looking for a bit more flexibility or want to see if markdownlint-cli2 is faster in your scenario, give it a try. At this point, markdownlint-cli2 supports pretty much everything markdownlint-cli does, so you're free to experiment and shouldn't need to give up any features if you switch.

What does this mean for the future of the original markdownlint-cli? Nothing! It's a great tool and it's used by many projects. I will continue to update it as I release new versions of the markdownlint library. However, I expect that my own time working on new features will be focused on markdownlint-cli2 for now.

Whether you use markdownlint-cli2 or markdownlint-cli, I hope you find it useful!

Don't just complain - offer solutions! [Enabling markdownlint rules to fix the violations they report]

In October of 2017, an issue was opened in the markdownlint repository on GitHub asking for the ability to automatically fix rule violations. (Background: markdownlint is a Node.js style checker and lint tool for Markdown/CommonMark files.) I liked the idea, but had some concerns about how to implement it effectively. I had recently added the ability to fix simple violations to the vscode-markdownlint extension for VS Code based entirely on regular expressions and it was primitive, but mostly sufficient.

Such was the state of things for about two years, with 15 of the 44 linting rules having regular expression-based fixes in VS Code that usually worked. Then, in August of 2019, I overcame my reservations about the feature and added fix information as one of the things a rule can report with a linting violation. In doing so, the road was paved for an additional 9 rules to become auto-fixable. What's more, it became possible for custom rules written by others to offer fixes as well.

Implementation notes

The way a rule reports fix information for a violation is via an object that looks like this in TypeScript:

/**
 * Fix information for RuleOnErrorInfo.
 */
type RuleOnErrorFixInfo = {
    /**
     * Line number (1-based).
     */
    lineNumber?: number;
    /**
     * Column of the fix (1-based).
     */
    editColumn?: number;
    /**
     * Count of characters to delete.
     */
    deleteCount?: number;
    /**
     * Text to insert (after deleting).
     */
    insertText?: string;
};

Aside: markdownlint now includes a TypeScript declaration file for all public APIs and objects!

The "fix information" object identifies a single edit that fixes the corresponding violation. All the properties shown above are optional, but in practice there will always be 2 or 3. lineNumber defaults to the line of the corresponding violation and almost never needs to be set. editColumn points to the location in the line to edit. deleteCount says how many characters to delete (the value -1 means to delete the entire line); insertText provides the characters to add. If delete and insert are both specified, the delete is applied before the insert. This simple format is easy for callers of the markdownlint API to apply, so the structure is proxied to them pretty much as-is when returning violations.

Aside: With the current design, a violation can only include a single fixInfo object. This could be limiting, but has proven adequate for all scenarios so far.

Practical matters

Considered in isolation, a single fix is easy to reason about and apply. However, when dealing with an entire document, there can be multiple violations for a line and therefore multiple fixes with potential to overlap and conflict. The first strategy to deal with this is to make fixes simple; the change represented by a fix should alter as little as possible. The second strategy is to apply fixes in the order least likely to create conflicts - that's right-to-left on a line with detection of overlaps that may cause the application of the second fix to be skipped. Finally, overlapping edits of different kinds that don't conflict are merged into one. This process isn't especially tricky, but there are some subtleties and so there are helper methods in the markdownlint-rule-helpers package for applying a single fix (applyFix) or multiple fixes (applyFixes).

Aside: markdownlint-rule-helpers is an undocumented, unsupported collection of functions and variables that helps author rules and utilities for markdownlint. The API for this package is ad-hoc, but everything in it is used by the core library and part of the 100% test coverage that project has.

Availability

Automatic fix behavior is available in markdownlint-cli, markdownlint-cli2, and the vscode-markdownlint extension for VS Code. Both CLIs can fix multiple files at once; the VS Code extension limits fixes to the current file (and includes undo support). Fixability is also available to consumers of the library via the markdownlint-rule-helpers package mentioned earlier. Not all rules are automatically fixable - in some cases the resolution is ambiguous and needs human intervention. However, rules that offer fixes can dramatically improve the quality of a document without the user having to do any work!

Further reading

For more about markdownlint and related topics, search for "markdownlint" on this blog.

Absolute coordinates corrupt absolutely [MouseButtonClicker gets support for absolute coordinates and virtual machine/remote desktop scenarios]

I wrote and shared MouseButtonClicker almost 12 years ago. It's a simple Windows utility to automatically click the mouse button for you. You can read about why that's interesting and how the program works in my blog post, "MouseButtonClicker clicks the mouse so you don't have to!" [Releasing binaries and source for a nifty mouse utility].

I've used MouseButtonClicker at work and at home pretty much every day since I wrote it. It works perfectly well for normal scenarios, but also virtual machine guest scenarios because mouse input is handled by the host operating system and clicks are generated as user input to the remote desktop app. That means it's possible to wave the mouse into and out of a virtual machine window and get the desired automatic-clicking behavior everywhere.

However, for a number of months now, I haven't been able to use MouseButtonClicker in one specific computing environment. The details aren't important, but you can imagine a scenario like this one where the host operating system is locked down and doesn't permit the user (me) to execute third-party code. Clearly, it's not possible to run MouseButtonClicker on the host OS in this case, but shouldn't it work fine within a virtual machine guest OS?

Actually, no. It turns out that raw mouse input messages for the VM guest are provided to that OS in absolute coordinates rather than relative coordinates. I had previously disallowed this scenario because absolute coordinates are also how tablet input devices like those made by Wacom present their input and you do not want automatic mouse button clicking when using a pen or digitizer.

But desperate times call for desperate measures and I decided to reverse my decision and add support for absolute mouse input based on this new understanding. The approach I took was to remember the previous absolute position and subtract the coordinates of the current absolute position to create a relative change - then reuse all the rest of the existing code. I used my Wacom tablet to generate absolute coordinates for development purposes, though it sadly violates the specification and reports values in the range [0, screen width/height]. This mostly doesn't matter, except the anti-jitter bounding box I describe in the original blog post is tied to the units of mouse movement.

Aside: The Wacom tablet also seems to generate a lot of spurious [0, 0] input messages (which are ignored), but I didn't spend time tracking this down because it's not a real use case.

In the relative coordinate world, ±2 pixels is very reasonable for jitter detection. However, in the absolute coordinate world (assuming an implementation that complies with the specification) 2 units out of 65,536 is insignificant. For reference, on a 4K display, each screen pixel is about 16 of these units. One could choose to scale the absolute input values according to the current width and height of the screen, but that runs into challenges when multiple screens (at different resolutions!) are present. Instead, I decided to scale all absolute input values down to a 4K maximum, thereby simulating a 4K (by 4K) screen for absolute coordinate scenarios. It's not perfect, but it's quick and it has proven accurate enough for the purposes of avoiding extra clicks due to mouse jitter.

I also took the opportunity to publish the source code on GitHub and convert from a Visual Studio solution over to a command-line build based on the Windows SDK and build tools (free for anyone to download, see the project README for more). Visual Studio changes its solution/project formats so frequently, I don't recall that I've ever come back to a project and been able to load it in the current version of VS without having to migrate it and deal with weird issues. Instead, having done this conversion, everything is simpler, more explicit, and free for all. I also took the opportunity to opt into new security flags in the compiler and linker so any 1337 haxxors trying to root my machine via phony mouse events/hardware are going to have a slightly harder time of it.

Aside: I set the compiler/linker flags to optimize for size (including an undocumented linker flag to actually exclude debug info), but the new executables are roughly double the size from before. Maybe it's the new anti-hacking protections? Maybe it's Maybelline?

With the addition of absolute coordinate support, MouseButtonClicker now works seamlessly in both environments: on the host operating system or within a virtual machine guest window. That said, there are some details to be aware of. For example, dragging the mouse out of a remote desktop window looks to the relevant OS as though the mouse was dragged to the edge of the screen and then stopped moving. That means a click should be generated, and you might be surprised to see windows getting activated when their non-client area is clicked on. If you're really unlucky, you'll drag the mouse out of the upper-right corner and a window will disappear as its close button is clicked (darn you, Fitts!). It should be possible to add heuristics to prevent this sort of behavior, but it's also pretty easy to avoid once you know about it. (Kind of like how you quickly learn to recognize inert parts of the screen where the mouse pointer can safely rest.)

The latest version of the code (with diffs to the previously published version) is available on the MouseButtonClicker GitHub project page. 32- and 64-bit binaries are available for download on the Releases page. Pointers to a few similar tools for other operating systems/environments can be found at the bottom of the README.

If you've never experienced automatic mouse button clicking, I encourage you to try it out! There's a bit of an adjustment period to work through (and it's probably not going to appeal to everyone), but auto-clicking (a.k.a. dwell-clicking, a.k.a. hover-clicking) can be quite nice once you get the hang of it.

Make the Pi Higher [Configuring a Raspberry Pi for Node.js and web development]

Since the beginning of the year, I've been doing all my OSS project development on a Raspberry Pi 4 running Raspberry Pi OS (née Raspbian). It's not as powerful a machine as my Intel-based desktop PC running Windows, but it's much smaller, it uses much less power, it's completely silent, and it cost about 5% of the price. To be clear, I still do photo editing on Windows and the extra speed of the PC is nice for running unit tests - but most of the time I'm perfectly happy using the Pi.

There are some great resources for Setting up your Raspberry Pi. If you want to configure it for development work like I did, here are steps that worked for me. (They assume some familiarity with Linux, but not much.)

  1. Install Raspberry Pi OS (32-bit) with desktop
  2. sudo apt update
  3. sudo apt upgrade
  4. If you want to use the Xfce desktop environment:
    1. sudo apt install xfce4 xfce4-terminal
    2. sudo update-alternatives --config x-session-manager
    3. Choose startxfce4
  5. Install the Git UI tools and configure Git
    1. sudo apt install git-gui gitk
    2. Set your username in Git
    3. Set your commit email address in Git
    4. Connect to GitHub with SSH
  6. Install a current version of Node.js
  7. Install a community build of Visual Studio Code
    1. Trust the corresponding GPG key: wget -qO - https://packagecloud.io/headmelted/codebuilds/gpgkey | sudo apt-key add -
  8. Install the ARM build of Visual Studio Code
  9. Install Visual Studio Code via apt install code

Note: The community build of VS Code is the only part of this process that uses an unofficial release. I'd love for VS Code to support the Pi officially, but this issue from 2016 has not been addressed. Everything is official now that VS Code supports Raspberry Pi!

That's pretty much it! I really enjoy this minimalist configuration and find there are very few compromises with the Pi relative to a "real" computer. Plus, it's easy to swap drives (SD cards) and keep a set of different OS'es / configurations handy for experimenting and trying new things.

If you thought the Pi was just a toy, maybe it's time for another look!

Updated 2020-11-22 to link to official builds of Visual Studio Code for ARM.

Without geometry, life is pointless [Another interesting programming puzzle worked through]

I happened across another coding puzzle recently that caught my interest. (If you're curious, here is a link to the puzzle I discussed a few weeks ago about implementing a weird kind of addition.) The problem this time is as follows:

You are given an array of coordinates, coordinates[i] = [x,y], where [x,y] represents the coordinate of a point. Check if these points make a straight line in the XY plane.

I saw an approach to solving this that didn't thrill me, so I wanted to solve it for myself.

If you're going to do the same, stop reading now because there are spoilers ahead!

As an aside, one thing I don't love about this problem is that it requires a certain amount of geometry knowledge to solve and furthermore the solution I use benefits from experience with trigonometric functions. However, one can be a perfectly good programmer without knowing either of these topics and they're not likely to come up in most roles. I try to avoid questions like this when I'm interviewing because they're likely to favor some backgrounds over others. That said, I didn't come up with this scenario and it's still interesting to think about, so let's go.

The first thing is to figure out how to approach the problem. If you remember much about linear equations, you might think to use the equation for a line to solve this: y = mx + b. If the slope, m, and the y-intercept, b, are the same for all pairs of points, then they all lie on the same line. This is helpful, but the equation starts to fall apart for points that lie on the same vertical line (for example, along the y-axis) because the slope there is infinite. Now, maybe you are comfortable dealing with infinity or risking division by zero, but I am not. That makes the vertical line scenario a special case and "special case" is often another phrase for "bug farm".

We don't want to use the slope equation, but we're in luck because there's something similar that's easier to work with: angle. Specifically:

The Math.atan2() function returns the angle in the plane (in radians) between the positive x-axis and the ray from (0,0) to the point (x,y), for Math.atan2(y,x).

That's not a solution as-is, but if we choose two points from the input and subtract the corresponding x and y coordinates, we get coordinates that define a ray in the manner described above. Now, two sets of points on line segments sharing the same angle (as calculated above) will be parallel, but not necessarily collinear. However, if we use the same point to calculate the angle to every other point of the input, that should be sufficient to determine collinearity of the set. In words:

If the angle of the line segment made up by pairing the first point of the input array with every other point of the array is the same, then we know all those rays point in the same direction and all originate at the same point (the first point) and therefore all the points are on the same line!

We're nearly there, but there's one more observation: two rays that go in exactly opposite directions from the same point are also on the same line. For example, the line segment defined by two points on a ray with an angle of 10° to the x-axis are parallel to the segment corresponding to two points on a ray with an angle of 190° to the x-axis. So instead of worrying about all 360°, we can focus on just the first 180°. The modulo operator provides an easy way to map angles between 180° and 360° into the range of 0° to 180°. (Except that the atan2 function returns values in radians instead of degrees because "Why not?" so we're going to be dealing with π.)

With all that behind us, the following algorithm should make sense. There are a few subtleties so it correctly handles empty lists as well as lists with just one point and also lists where the same point appears multiple times. In addition, it bails out as soon as it finds a non-collinear point for efficiency. Here's the code - as is the custom with JavaScript, there's no parameter validation, but this is intended to work for all valid inputs:

function arePointsCollinear(points) {
  let angle = null;
  const first = points[0];
  for (let i = 1; i < points.length; i++) {
    const current = points[i];
    const deltaX = current[0] - first[0];
    const deltaY = current[1] - first[1];
    if (deltaX || deltaY) {
      const theta = (Math.atan2(deltaY, deltaX) + Math.PI) % Math.PI;
      if (angle === null) {
        angle = theta;
      } else if (angle !== theta) {
        return false;
      }
    }
  }
  return true;
}

Interviewing for Fun and Profit [An unreasonably detailed consideration of a practical programming puzzle]

A few days ago, Brent Simmons published a thoughtful blog post about one aspect of programming interviews. As someone who conducts interviews regularly for work, the topic is of interest to me. Rather than summarizing the post, I encourage you to go read Practicing the Coding Challenges now. (You might also enjoy some of the replies to Brent's tweet linking to it.)

After reading the post, I tweeted a response:

I agree with the spirit of this post - that clarity beats premature optimization - but feel the conclusion skips an important point. The "efficient" solution is correct for arbitrarily large numbers while the "clear" one fails after MAX_INT (or similar).

Brent replied:

I thought about discussing that, but felt like I'd be muddying up the post too much.

And I responded:

Understood, thanks! I don't know how it was posed on LeetCode, so that difference may not even be relevant. But if I were discussing this with a candidate during an interview, it's something I'd want them to raise for discussion as an indication they're thinking about edge cases.

And I kept thinking about this problem in the context of a programming interview. When I saw Olof Hellman's well-reasoned follow-up post Practicing the Coding Challenges, I realized I wasn't the only one.

I was curious what the "clear" and "efficient" solutions might look like in practice, so I decided to write them and see. I used JavaScript because it's my "go to" language. Things will look a little different in other languages, but I had to pick one and I chose something popular. I'm not including comments in the code below because they'll distract from it and I'm not validating parameters (for null-ness or range) per typical JavaScript practice.

As a reminder, here's the problem definition:

You need to add two numbers and get a sum. But, importantly, the digits of those numbers are stored in arrays, and they're backwards.

The return value also needs to be in a backwards array.

If inputs are [4,2,6] and [3,8,0,8], the function should return [7,0,7,8] - because 624 + 8083 == 8707.

Let's start with the "clear" approach. The point here is to be obvious and straightforward - like you normally want your code to be. Recall Brent's pseudocode proposal:

let num1 = number(from: array1)
let num2 = number(from: array2)
let sum = num1 + num2
return array(from: sum)

Now, in order to run that, we need to implement those two conversion functions. As John Siracusa pointed out, we can do anything we want inside there and because we want to handle arbitrarily large inputs, we'll use JavaScript's BigInt built-in.

As an aside, BigInt does not have widespread support across browsers. In fact, none of the three JavaScript tools I use on iOS support it and I had to switch to a "real" computer to finish this post.

Okay, here's what I came up with:

function clear(array1, array2) {
  const num1 = toBigInt(array1);
  const num2 = toBigInt(array2);
  const sum = num1 + num2;
  return toArray(sum);
}
function toBigInt(arr) {
  const copy = [...arr];
  copy.reverse();
  const numberAsString = copy.join("");
  return BigInt(numberAsString);
}
function toArray(num) {
  const numString = num.toString();
  const charArray = numString.split("");
  const digitArray = charArray.map(Number);
  digitArray.reverse();
  return digitArray;
}

Because this is the "clear" implementation, each line does a single thing and I've mostly avoided idiomatic JavaScript. You could argue map(Number) is a bit subtle, but it should be familiar to most JavaScript programmers. The BigInt constructor takes a Number or a String, so we need to bounce the input through a String on the way into/out of BigInt. We copy the input array to avoid mutating data we don't own.

Okay, so what does the "efficient" code look like? Here's what I came up with:

function efficient(array1, array2) {
  const length = Math.max(array1.length, array2.length);
  const res = new Array(length);
  let carry = 0;
  for (let i = 0; (i < length) || carry; i++) {
    const sum = (array1[i] || 0) + (array2[i] || 0) + carry;
    carry = (sum >= 10) ? 1 : 0;
    res[i] = sum % 10;
  }
  return res;
}

Because this isn't the "clear" solution, I took some liberties with this implementation in the interest of compactness and efficiency. The output array is pre-allocated (though it may need to grow by one) and there is a single loop over the input with no redundancy and fairly little overhead I see. I'll acknowledge some folks might be uncomfortable with the (deliberate) ignorance of array bounds and that the use of carry in the loop condition may be too clever by half. (It can be removed at the cost of a single additional line of code, but I like how this approach reuses the core logic for the final overflow.) Otherwise, I tried not to be unnecessarily obscure.

Conclusions?

The "clear" code is definitely clearer, but it's not as simple as it originally seemed to be. The need to implement helper functions basically tripled the amount of code that needed to be written. The "efficient" code is smaller and ought to be quite a bit cheaper to run considering the algorithmic efficiency and the fact that it doesn't require JIT-ing BigInt or the need for String parsing. In fact, by eschewing those dependencies, it's able to run in many environments (like iOS) where BigInt doesn't exist - so it's also the more "flexible" implementation!

Of course, there's no "right" answer here - just inspiration and food for thought. My thanks go out to everyone who contributed to the discussion and especially Brent, whose NetNewsWire app is my favorite RSS reader!

Existence is random [JavaScript code to efficiently generate a random (version 4) UUID]

A few months ago, I dashed out a JavaScript function to efficiently generate a random (version 4) UUID per RFC 4122. This was inspired by code I saw for the same purpose that was not especially efficient - or random. (For more on randomness in JavaScript, see my post about polyfilling Math.random().) My UUID generator uses crypto.getRandomValues() for the best randomness and tries to do as little extra work as possible for efficiency.

The generateRandomUUID page on GitHub has the code and a link to the generateRandomUUID sample page that runs in your browser and generates a new UUID every time it's loaded.

Because it's so small, I've included the code here for reference:

// generateRandomUUID.js
// https://github.com/DavidAnson/generateRandomUUID
// 2019-10-27

"use strict";

// JavaScript code to efficiently generate a random UUID per RFC 4122
function generateRandomUUID() {
  // UUIDs have 16 byte values
  const bytes = new Uint8Array(16);
  // Seed bytes with cryptographically random values
  crypto.getRandomValues(bytes);
  // Set required fields for an RFC 4122 random UUID
  bytes[6] = (bytes[6] & 0x0f) | 0x40;
  bytes[8] = (bytes[8] & 0x3f) | 0x80;
  // Convert bytes to hex and format appropriately
  const uuid = Array.prototype.map.call(bytes, (b, i) => {
    // Left-pad single-character values with 0,
    // Convert to hexadecimal,
    // Add dashes
    return ((b < 16) ? "0" : "") +
      b.toString(16) +
      (((i % 2) && (i < 10) && (i > 2)) ? "-" : "");
  }).join("");
  // Return the string
  return uuid;
}

Let's go to the video tape! [tape-player is a simple, terse, in-process reporter for the tape test harness for Node.js]

I've been a happy user of the nodeunit test harness for a long time, but it was deprecated a few years ago. Recently, I went looking for a similar Node.js test harness to replace it. I prefer small, simple packages and settled on the tape test harness. I enjoy nearly everything about it, but didn't like having to pipe output to a formatter (more on this below). So I wrote a quick bit of code to create an in-process reporter. Then I realized what I'd done could have broader applicability (in my own projects, if nowhere else!) and published a reusable package after adding scenario tests to ensure formatted output for all of the the tape primitives is reasonable.

If this seems interesting, the README goes into more detail:

The Test Anything Protocol (TAP) used by many test harnesses is versatile, but it's not much to look at - or rather, it's too much to look at. There are many custom formatters that work with the tape test harness, but most work by piping process output. This is a useful technique, but interferes with the exit status of the test harness which is a problem in scripts that are meant to fail when tests fail (like npm test). (Though there are workarounds for this, they are shell- and platform-specific.)

Fortunately, tape offers an alternative logging mechanism via its createStream API. This technique is easy to use and runs in-process so it doesn't interfere with the exit status of the test harness. tape-player takes advantage of this to produce a concise test log that's easy to enable.

You can find directions to install and enable tape-player on the GitHub project for tape-player.