The blog of dlaa.me

Posts from August 2010

Your phone can turn into a robot [LayoutTransformer works great on the Windows Phone platform]

The WPF platform offers RenderTransform and LayoutTransform. Silverlight - being considerably smaller and a bit simpler - has only RenderTransform. Which is usually enough - except when it's not! :)

So I wrote LayoutTransformControl a while back in order to bring LayoutTransform to the Silverlight platform. It was so useful/popular that we included it in the Silverlight Toolkit with the name LayoutTransformer [insert robot sounds here]. That post includes links to a bunch of my posts about LayoutTransformControl/LayoutTransformer, but the most important one for newcomers is probably the original "motivational" post.


Here's the relevant portion:

People who want to rotate visual elements in Silverlight are likely to use RotateTransform within RenderTransform - but they may not always get the results they expect! For example, using RenderTransform to achieve the following effect:

Sweet

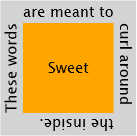
Actually renders like this:

Whoops

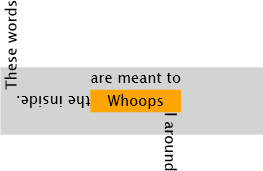
But the problem isn't with RenderTransform - it's with using the wrong tool for the job! By design, RenderTransform applies its transformations (a rotation in this case) after the layout system has performed its measure/arrange pass. So when the elements in the example are being measured and arranged, the text is still horizontal. It's only after everything has been positioned that the text is finally rotated - and ends up in the "wrong" place. While it's possible to correct for this discrepancy by hard-coding all the relevant offsets in the XAML (very brittle and error-prone) or by adjusting all the offsets in code (only slightly more flexible - and a lot more work), these aren't great alternatives.

The right tool for the job is LayoutTransform which applies its transformations before the layout pass. With LayoutTransform, the text in the example is already rotated by the time the elements are measured and arranged, and the desired effect can be achieved quite simply.

But there's a catch: LayoutTransform doesn't exist in Silverlight [and therefore Windows Phone]...

However, there's no reason to let that stop us. Rotation is rotation whenever it happens, so maybe there's a way to get the already-optimized RenderTransform implementation to do the real work earlier in the layout pass...


Lately, I've been contacted by a number of customers asking if LayoutTransform worked in Windows Phone applications or having trouble referencing it from the relevant Silverlight 3 Toolkit assembly. So I figured it would be good to verify this for myself and make it even easier for people to use!

There are lots of compelling scenarios for LayoutTransform, but the most common is definitely rotating text and images. So here's my simple "bookshelf" sample which highlights a few of my favorite programming books:

LayoutTransformer on Windows Phone

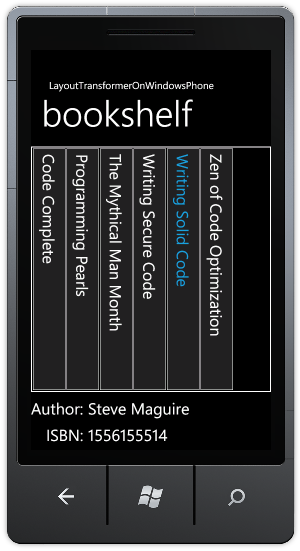
The tricky part of creating a layout like this without LayoutTransformer would have been getting those vertical book titles aligned properly on the spines of those books without hardcoding a bunch of positioning data (which would have broken as soon as anyone touched the XAML). But LayoutTransformer makes this a piece of cake - just wrap the content, rotate it, and everything automatically works just how you'd expect it to! You can change font sizes, margins, alignment - whatever - and never have to worry about your layout going funky.


[Click here to download the complete LayoutTransformerOnWindowsPhone sample and pre-compiled assembly]


When you're ready to add LayoutTransformer to your own application, just add a project reference to the LayoutTransformer.dll assembly (found in the root of the ZIP download) and add the appropriate XMLNS to the top of your XAML:

xmlns:toolkit="clr-namespace:System.Windows.Controls;assembly=LayoutTransformer"

After that, wrap anything you want in a LayoutTransformer and apply the relevant transforms. Here's what the sample uses:

<toolkit:LayoutTransformer>
    <toolkit:LayoutTransformer.LayoutTransform>
        <RotateTransform Angle="90"/>
    </toolkit:LayoutTransformer.LayoutTransform>
    <Border
        BorderBrush="{StaticResource PhoneForegroundBrush}"
        BorderThickness="1">
        <TextBlock
            Text="{Binding Title}"
            Margin="10"/>
    </Border>
</toolkit:LayoutTransformer>


Yep, it's really that easy!


PS - There's a bug in the default templates of the Windows Phone Developer Tools Beta that makes the books show up with different heights. That problem has been fixed in more recent Tools releases (as demonstrated by the screen capture above), so don't worry when you see that on the Beta - it has nothing to do with LayoutTransformer. :)

Fade Into You [Code to easily animate orientation changes for Windows Phone applications now supports fade, too!]

I've already written about my efforts to improve the orientation behavior of Windows Phone applications; while the default behavior of snapping to the new orientation is fast and easy, it lacks a certain amount of panache. So I wrote the AnimateOrientationChangesFrame class to animate changes between portrait and landscape layouts. It works well, and I know of a few upcoming Windows Phone applications that are using it.


Of course, the drawback to animating rotations is that the overhead for complex layouts could be enough to overwhelm the phone's resources. At which point, the animation would become choppy and the beauty of the transition would be lost...

I wanted to provide another option that would still make orientation changes interesting, but would do so more cheaply. And so I've created the FadeOrientationChangesFrame class which (surprise!) fades smoothly between the "before" and "after" orientations. Because of its simpler approach, FadeOrientationChangesFrame doesn't require any additional layout computation from the host application. What's more, its animation of the UIElement.Opacity property makes the animation eligible to run on the compositor thread (AKA the "render thread") where is the place to be when you want smooth, seamless animations!


Here's what the sample application looks like part of the way through a fade from portrait to landscape:

FadeOrientationChanges sample


If the sample application for FadeOrientationChangesFrame looks a lot like the one for AnimateOrientationChangesFrame, that's because they're practically the same. In fact, the two *OrientationChangesFrame classes have identical APIs and are wired up in exactly the same manner. If you're using one, you can switch to the other quite trivially; if you're not using either, it's easy to start! :)


[Click here to download the DynamicOrientationChanges sample for Windows Phone 7.]


Notes:

  • Not only do both classes work well with the Windows Phone Developer Tools Beta, they also run happily on the latest internal Tools builds and on real phone hardware.
  • Because I'm now offering two classes for dynamic orientation changes, I've created a dedicated DynamicOrientationChanges assembly for them both to live in. People who wish to use either class can opt to add the relevant .cs file to their project (as before), or they can reference the DynamicOrientationChanges.dll assembly directly. For everyone's convenience, I've put a pre-compiled copy of this assembly in the root of the sample ZIP.
  • Here are the complete directions for adding rotation/fade animation to a new application:
    1. Enable support for orientation changes by making the following change to the XAML for the relevant PhoneApplicationPages (note that rotation is not enabled by default for new pages):
      SupportedOrientations="Portrait"
      SupportedOrientations="PortraitOrLandscape"
    2. Verify (by running in the emulator) the pages you expect to support rotation really do - if things aren't rotating at this point, trying to animate the rotations won't help. :)
    3. Add the AnimateOrientationChangesFrame.cs or FadeOrientationChangesFrame.cs source code file from the sample to your project/solution.

      -OR-

      Add a reference to the pre-compiled DynamicOrientationChanges.dll assembly from the sample download to your project/solution.

    4. Open App.xaml.cs and change the RootFrame initialization in the InitializePhoneApplication method (you may need to expand the Phone application initialization region at the bottom):
      RootFrame = new PhoneApplicationFrame();
      RootFrame = new Delay.AnimateOrientationChangesFrame();

      -OR-

      RootFrame = new Delay.FadeOrientationChangesFrame();
    5. Done; rotations will now be animated! To customize the animation, use the Duration, EasingFunction, and IsAnimationEnabled properties which are all present and continue to work as outlined in the original post.
  • Though the *OrientationChangesFrame classes share a decent amount of code, I have deliberately kept them separate for now so each .cs file is completely self-contained. This makes it easy for anyone to incorporate either class into their project without worrying about pulling in a bunch of dependent files.
  • Fellow Microsoft employee (and former teammate from long, long ago) Mike Calligaro ran across a bug in AnimateOrientationChangesFrame where elements started getting clipped incorrectly after a couple of orientation changes. Looking into this, I discovered that my attempt to save a few cycles by calling InvalidateArrange instead of InvalidateMeasure was somewhat misguided. I changed the implementation to call InvalidateMeasure and that simple tweak fixed the bug. Aside from this, AnimateOrientationChangesFrame is exactly the same as last time.
  • The Beta phone emulator has a bug where it frequently fails to notify applications about an orientation change. This problem has nothing to do with my code (you can reproduce it by enabling rotation for any application), but shows up regularly when playing around with the sample app in the emulator. When the orientation gets "stuck" like this, just rotate a few more times and things sort themselves out. (Fortunately, this problem does not exist on actual phone hardware or on more recent builds of the emulator!)


In today's dynamic world, there's no need to settle for boring transitions - go ahead and spice up your Windows Phone application by making use of FadeOrientationChangesFrame or AnimateOrientationChangesFrame today!

My new home page, rejuvenated [Updated collection of great Silverlight/WPF/Windows Phone Data Visualization resources!]

It's been a few months since I posted my previous collection of Silverlight/WPF Charting links. In the meantime, the April 2010 release of the Silverlight Toolkit was published with support for stacked series and significant performance improvements! And Windows Phone 7 has been steadily building momentum - it's handy that the Data Visualization assembly also works on Windows Phone!

So there's lots of good stuff - here are all the links (FYI: previously published links are gray):

Overviews (100 level)

Scenarios (200 level)

Internals (300 level)

Team Member posts (Partner level)

My posts (Ego level)

Many thanks go out to everyone who has spent time helping people learn how to use Silverlight/WPF/Windows Phone Data Visualization!

PS - If I've missed something useful, please send me a link - I'm always happy to find more great content! :)

PPS - The most recent version of this collection will always be pointed to by http://cesso.org/r/DVLinks. If you're going to create a favorite or link to this post, please use that URL so your link will always be current.

Why didn't I think of that in the first place? [Windows Phone 7 Charting example updated to include reusable, platform-consistent Style and Templates]

I've previously blogged about how to get the Data Visualization assembly from the Silverlight Toolkit/WPF Toolkit working on Windows Phone. It's quite simple with my Data Visualization Development Release 4 and the Windows Phone Developer Tools Beta because it's now as easy as adding a reference to two assemblies and then creating some charts! However, those charts start out with visuals meant for use with Silverlight running in the web browser (white background, etc.), not Silverlight running on Windows Phone (black background, etc.). One of the things I did in a previous post was to customize the appearance of the sample charts so they fit in better with the phone conventions. Because Charting has come up quite a bit with customers lately, I wanted to do a quick follow-up to help make things even easier to use!


Sample in landscape orientation


Accordingly, I've made the following improvements to the DataVisualizationOnWindowsPhone sample:

  • Created the PhoneDataVisualizationResources.xaml file. It contains a ResourceDictionary with PhoneChartStyle, PhoneChartPortraitTemplate, and PhoneChartLandscapeTemplate. These are the same basic custom customized Style and ControlTemplates from before, but now they're named according to the platform convention for resources and bundled in a single, self-contained XAML file. This makes it easy for customers to incorporate the Windows Phone look into their charting applications.
  • Modified the sample to merge the contents of PhoneDataVisualizationResources.xaml into the application-level ResourceDictionary via MergedDictionaries in App.xaml:
    <Application.Resources>
        <!-- Merge resources from PhoneDataVisualizationResources.xaml (Build Action=Page) -->
        <ResourceDictionary>
            <ResourceDictionary.MergedDictionaries>
                <ResourceDictionarySource="/DataVisualizationOnWindowsPhone;component/PhoneDataVisualizationResources.xaml"/>
            </ResourceDictionary.MergedDictionaries>
        </ResourceDictionary>
    </Application.Resources>
    With the customizations now located off in their own dedicated file, the Chart in MainPage.xaml is simple and uncluttered:
    <charting:Chart
        x:Name="myChart"
        Title="my activity"
        LegendTitle="legend"
        Style="{StaticResource PhoneChartStyle}">
        <!-- ... -->
    </charting:Chart>
  • Changed the fills for DataPoints to use a solid color instead of a gradient. The default Brush used to paint the inside of data points has a gradient effect which looks quite nice on the desktop, but that gradient exhibits noticeable color banding on the actual phone because the displays used for mobile devices are often incapable of displaying the full range of colors humans perceive. While it's possible to minimize the impact of this by dithering (here's a nice article that shows how), you don't get that for free. Because gradients aren't consistent with the "Metro" user interface guidelines anyway, I've made all the default colors solid (as seen in the image at the start of the post).
  • Switched to using standard phone resources (ex: PhoneForegroundBrush) where applicable so Charts automatically respect the current phone appearance. Specifically, this enables seamless support for the "Dark" and "Light" phone themes without any effort on the part of the developer/designer.
  • Customized the Legend Template to include a horizontal scroll bar when rendered (horizontally) in Portrait orientation. The default Legend for Landscape orientation already had a vertical scroll bar, so this change makes it possible to scroll long lists in both layouts.
  • Switched to the official Silverlight 3 System.Windows.Controls.dll assembly now that the platform supports using strongly-named assemblies.


[Click here to download the updated Windows Phone 7 Data Visualization sample application.]


Important: After downloading the ZIP file above, you should "unblock" it before extracting its contents to avoid warnings from Visual Studio: Security Warning, You should only open projects from a trustworthy source. and The "ValidateXaml" task failed unexpectedly. System.IO.FileLoadException: Could not load file or assembly .... Unblocking is a simple matter of right-clicking on the ZIP file, choosing Properties from the context menu, then clicking the "Unblock" button in the lower, right-hand corner of the resulting dialog and hitting "OK" or "Apply":

Unblock button in Properties dialog