The blog of dlaa.me

Posts from February 2009

DesignerProperties.GetIsInDesignMode_ForRealz [How to: Reliably detect Silverlight design mode in Blend and Visual Studio]

Catching up on Dave Campbell's fantastic WynApse feed earlier today, I came across this post by Bryant Likes about detecting design mode in Silverlight. One of the things mentioned in that post was the challenge of finding a design mode check that works correctly in both Expression Blend and Visual Studio's XAML designer. Unfortunately, the official mechanism for this, DesignerProperties.GetIsInDesignMode, doesn't always return the correct value under Visual Studio. :(

Well, I needed something reliable for the Charting assembly in the Silverlight Toolkit, so I checked with the experts (i.e., members of both teams) and came up with the following code that returns the correct value under both Blend and Visual studio (from DesignerProperties.cs in the Silverlight Toolkit source).

I present it here in the hope that others might also benefit:

/// <summary>
/// Provides a custom implementation of DesignerProperties.GetIsInDesignMode
/// to work around an issue.
/// </summary>
internal static class DesignerProperties
{
    /// <summary>
    /// Returns whether the control is in design mode (running under Blend
    /// or Visual Studio).
    /// </summary>
    /// <param name="element">The element from which the property value is
    /// read.</param>
    /// <returns>True if in design mode.</returns>
    [SuppressMessage("Microsoft.Usage", "CA1801:ReviewUnusedParameters", MessageId = "element", Justification =
        "Matching declaration of System.ComponentModel.DesignerProperties.GetIsInDesignMode (which has a bug and is not reliable).")]
    public static bool GetIsInDesignMode(DependencyObject element)
    {
        if (!_isInDesignMode.HasValue)
        {
            _isInDesignMode =
                (null == Application.Current) ||
                Application.Current.GetType() == typeof(Application);
        }
        return _isInDesignMode.Value;
    }

    /// <summary>
    /// Stores the computed InDesignMode value.
    /// </summary>
    private static bool? _isInDesignMode;
}

Ambiguous contract is ambiguous [Minor bug fix for CRC32 and MD5Managed HashAlgorithm implementations]

Kind reader Gregor Zurowski contacted me over the weekend to let me know that he was using my free CRC-32 HashAlgorithm implementation in his project and he'd found that omitting the call to the Initialize method lead to incorrect hash values being returned. My first thought was, "Well, sure, calling the Initialize method before using the class is a necessary part of the HashAlgorithm contract - if you don't satisfy the contract then problems like this are entirely possible.". But Gregor went on to say that he got perfectly good results from the .NET Framework's MD5/SHA1 implementations without needing to call the Initialize method. I wondered if maybe the Framework classes had anticipated this scenario and allowed callers to skip the initialize call, but I was beginning to suspect that my understanding of the contract was wrong and that my implementation had a bug...

Sure enough, when I consulted the documentation for the Initialize method there was no mention of a contractual need to call it prior to doing anything else: "Initializes an implementation of the HashAlgorithm class.". I poked around a bit more trying to find some kind of justification for my beliefs, but I couldn't and was soon forced to conclude that I'd simply been mistaken by assuming that the .NET Framework followed the same pattern as COM or Win32. What's worse, I'd made the mistake twice: once for my CRC32 class and again with my MD5Managed class. :(

Well, as long as I was taking some time to validate my assumptions, I decided to check up on my assumption that a final call to TransformFinalBlock was required prior to fetching the hash value. Fortunately, I was right about this one and the TransformFinalBlock documentation notes that "You must call the TransformFinalBlock method after calling the TransformBlock method but before you retrieve the final hash value.". So while I'd clearly started out on the wrong foot, at least I didn't botch the landing, too. :)

The good news here is that this mistake is trivial to detect during application development (failing to call the Initialize method always yields the wrong hash value) and it's also trivial to work around: simply call the Initialize method after constructing a new instance of one of these HashAlgorithm subclasses. In fact, if your application already does this (as my ComputeFileHashes suite does), then you are completely unaffected by this issue.

Of course, I didn't want to perpetuate this error any further than I already had, so I corrected the code for the CRC32 and MD5Managed classes by performing the initialization as part of the object construction process. I then updated the following resources:

As I note above, there was no need to update the ComputeFileHashes application binaries because they were written under the assumption that a call to Initialize was required - and therefore are correct whether or not a call to Initialize actually is required.

Again, my thanks go out to Gregor for bringing this issue to my attention - I sincerely hope that no one else was affected by this mistake. While I do try to strive for perfection, I obviously need all the help I can get along the way! :)

Sometimes all it takes is a little encouragement [How to: Automatically update the widths of ListView columns]

I was working on a WPF project the other day and wanted an easy way to display data in a simple tabular format: a few columns (with headers) that would automatically size to fit their contents. The obvious choice was the ListView control and its GridView View which do exactly this. As you might expect, using this control was straightforward and it worked just like I wanted. Well, almost... There was one small catch: my ListView was hooked up to a data source that changed dynamically (via a Binding on its ItemsSource property) and I noticed that when the data source was updated, the widths of the columns were not automatically adjusted to fit the new content.

Here's a sample application I wrote for this post - notice how the text in the first ListView's "Value" column is truncated because the columns widths have not been updated:

ListViewColumnWidthAutoUpdate sample

This behavior was kind of annoying - and a brief web search showed that I'm hardly the first person to want to change it. There are a few different ways to tell the ListView to update its columns - the one I prefer looks something like this:

// Technique for updating column widths of a ListView's GridView manually
public static void UpdateColumnWidths(GridView gridView)
{
    // For each column...
    foreach (var column in gridView.Columns)
    {
        // If this is an "auto width" column...
        if (double.IsNaN(column.Width))
        {
            // Set its Width back to NaN to auto-size again
            column.Width = 0;
            column.Width = double.NaN;
        }
    }
}

Calling this method after a ListView's ItemsSource property changes is simple and does exactly what we want. So if your scenario is such that you always know exactly when your data changes, you can add a call to this method after that happens and stop reading now because your problem is already solved. :)

Okay, so if you're still reading, then your scenario is probably like mine: changes to the data source can occur without the application explicitly knowing about it. That last bit may not make a lot of sense until you realize that it's possible to implement a great deal of an application's functionality entirely in XAML. Specifically, it's quite easy to connect a ListView to the SelectedItem property of a ListBox so that changes to the selected item of the ListBox automatically re-populate the data in the ListView. Because this can be done entirely in XAML, these updates aren't automatically visible to the application.

The solution for the slightly more complicated scenario begins by realizing that it's necessary to know when the ItemsSource Binding updates. Fortunately, this is quite easy in WPF! :) By setting the NotifyOnTargetUpdated property of the ItemsSource Binding to true and handling the Binding.TargetUpdated attached event on the ListView, we have a fairly simple way of generating an event that can run a bit of code that calls the above method to update the column widths. What's more, this technique is fairly designer-friendly because it gives the designer complete freedom to set up such cross-control Bindings in their XAML without having to be intimately involved with the developer responsible for the application's code. Granted, the developer needs to implement the handler for the generated event, but that code is completely general and can be reused across multiple different ListViews.

The second ListView of the sample application uses this approach; notice how the column widths are correct in the image above. The XAML looks like this:

<ListView
    ItemsSource="{Binding Details, NotifyOnTargetUpdated=True}"
    Binding.TargetUpdated="ListViewTargetUpdated"
    ...

And the code for the event handler looks like this:

// Handler for the ListView's TargetUpdated event
private void ListViewTargetUpdated(object sender, DataTransferEventArgs e)
{
    // Get a reference to the ListView's GridView...
    var listView = sender as ListView;
    if (null != listView)
    {
        var gridView = listView.View as GridView;
        if (null != gridView)
        {
            // ... and update its column widths
            ListViewBehaviors.UpdateColumnWidths(gridView);
        }
    }
}

I'd arrived at the above solution and was going to consider the problem solved - and that's when Dr. WPF suggested I could use an attached behavior to encapsulate what I'd done into something that would be even simpler to use from XAML and wouldn't require the developer's involvement at all (aside from referencing the code that implements the attached behavior, of course). Attached behaviors are a powerful technique that allow the introduction of changes to the functionality of a control simply by setting an attached property on it. (If you're not familiar with attached behaviors, you can read more about them in this post by John Gossman or this article by Josh Smith.)

In the case of the attached behavior solution to this problem, we make use of the DependencyPropertyDescriptor class to attach a change handler to the ItemsSource property of the ListView - and then call the method above to actually update the widths of the columns. There end up being a few more lines of code with this solution because of what it takes to create an attached DependencyProperty and attach/remove a handler for it, but that code is completely self-contained and can live entirely in its own dedicated class (whereas the method used by the previous solution needs to be part of one of the application's classes). More importantly, the number of XAML edits drops to just one and it's no longer even necessary that a Binding changes the data source - even direct assignments to the ItemsSource property will do!

The third ListView of the simple application uses this approach; the XAML looks like this:

<ListView
    ItemsSource="{Binding Details}"
    local:ListViewBehaviors.IsAutoUpdatingColumnWidths="true"
    ...

And here's the complete implementation of the attached DependencyProperty:

// Class implementing handy behaviors for the ListView control
public static class ListViewBehaviors
{
    // Technique for updating column widths of a ListView's GridView manually
    public static void UpdateColumnWidths(GridView gridView)
    {
        // For each column...
        foreach (var column in gridView.Columns)
        {
            // If this is an "auto width" column...
            if (double.IsNaN(column.Width))
            {
                // Set its Width back to NaN to auto-size again
                column.Width = 0;
                column.Width = double.NaN;
            }
        }
    }

    // Definition of the IsAutoUpdatingColumnWidthsProperty attached DependencyProperty
    public static readonly DependencyProperty IsAutoUpdatingColumnWidthsProperty =
        DependencyProperty.RegisterAttached(
            "IsAutoUpdatingColumnWidths",
            typeof(bool),
            typeof(ListViewBehaviors),
            new UIPropertyMetadata(false, OnIsAutoUpdatingColumnWidthsChanged));

    // Get/set methods for the attached DependencyProperty
    [SuppressMessage("Microsoft.Design", "CA1011:ConsiderPassingBaseTypesAsParameters",
        Justification = "Only applies to ListView instances.")]
    public static bool GetIsAutoUpdatingColumnWidths(ListView listView)
    {
        return (bool)listView.GetValue(IsAutoUpdatingColumnWidthsProperty);
    }
    [SuppressMessage("Microsoft.Design", "CA1011:ConsiderPassingBaseTypesAsParameters",
        Justification = "Only applies to ListView instances.")]
    public static void SetIsAutoUpdatingColumnWidths(ListView listView, bool value)
    {
        listView.SetValue(IsAutoUpdatingColumnWidthsProperty, value);
    }

    // Change handler for the attached DependencyProperty
    private static void OnIsAutoUpdatingColumnWidthsChanged(DependencyObject o, DependencyPropertyChangedEventArgs e)
    {
        // Get the ListView instance and new bool value
        var listView = o as ListView;
        if ((null != listView) && (e.NewValue is bool))
        {
            // Get a descriptor for the ListView's ItemsSource property
            var descriptor = DependencyPropertyDescriptor.FromProperty(ListView.ItemsSourceProperty, typeof(ListView));
            if ((bool)e.NewValue)
            {
                // Enabling the feature, so add the change handler
                descriptor.AddValueChanged(listView, OnListViewItemsSourceValueChanged);
            }
            else
            {
                // Disabling the feature, so remove the change handler
                descriptor.RemoveValueChanged(listView, OnListViewItemsSourceValueChanged);
            }
        }
    }

    // Handler for changes to the ListView's ItemsSource updates the column widths
    private static void OnListViewItemsSourceValueChanged(object sender, EventArgs e)
    {
        // Get a reference to the ListView's GridView...
        var listView = sender as ListView;
        if (null != listView)
        {
            var gridView = listView.View as GridView;
            if (null != gridView)
            {
                // And update its column widths
                UpdateColumnWidths(gridView);
            }
        }
    }
}


[Click here to download the sample application demonstrating everything described here.]


What's neat is how something that started out as a minor annoyance turned into a great learning opportunity! I haven't needed to use DependencyPropertyDescriptor before now, but it's definitely something I'll keep in mind next time something like this comes up. And while I've made use of attached behaviors in the past, I didn't initially think to use one here - my thanks go out to Marlon Grech and Dr. WPF for encouraging me to do so. As it turns out, I like the attached behavior solution best of all for its simplicity, clarity, and separation of concerns. I've incorporated this change into my project and now my ListViews are behaving exactly how I want them to!

Tags: WPF

My new home page, expanded [Updated collection of great Silverlight Charting resources!]

It's been a couple of months since I shared my semi-comprehensive page of Charting resources on the web. During that time, the Silverlight Toolkit's December release came out with some great new Charting features (Woot!) and there have been a number of fantastic Charting posts that I'd like people to be aware of. So I've updated my previous list of links (FYI: old links are grayed-out) with all the new content that caught my eye:

Overviews (100 level)

Scenarios (200 level)

Internals (300 level)

My own Charting posts (Ego level)

Many, many thanks to everyone who has spent time helping others learn how to use Silverlight Charting!

PS - If I've missed any good resources, please leave a comment with a link - I'm always happy to find more quality Charting content! :)

Columns of a different color [Customizing the appearance of Silverlight charts with re-templating and MVVM]

When we created Silverlight Charting (background reading here and here), we tried to make things as designer-friendly as possible. So friendly, in fact, that it would be possible for someone to take the default look-and-feel of what we'd released and significantly enhance it without changing the Charting framework at all. :) That said, it's worth noting that Charting controls are a little different than typical WPF/Silverlight controls: while it might make sense to completely change how a ListBox looks, there are certain aspects of a chart that can't be changed without rendering the visualization meaningless. And so there are certain assumptions behind our Charting implementation around things we didn't expect users to want to change. But that's the great thing about users: they want to change these things anyway! :)

One of the fundamentals of column/bar charts is that the columns/bars of a single series are all drawn the same; that's what ties them together and makes it clear they represent a single series. If you create a column chart in Excel, the default color for the columns is blue. It's easy to change that color to orange or green or plaid, but by default all of the columns of the series change together because they're all part of the same series. (Incidentally, it is possible to change the colors of an individual column in Excel, but it's not entirely obvious how to do so and it's clearly not a mainline scenario.) With that in mind, it's no surprise that our charts behave similarly: you can provide whatever look you want for the columns and bars (via the ColumnSeries.DataPointStyle property, perhaps), but the columns and bars of a particular series always look the same.

But what if your scenario is such that you want to do things a little differently and you want more control over the colors of individual columns and bars? Well, you take advantage of re-templating and Model-View-ViewModel (MVVM), that's what! :) You're reading this blog, so I'll assume you already know what re-templating is - if not, here's a good place to start. Model-View-ViewModel (MVVM) is probably less well known to date - it's an approach to application development commonly used with WPF and Silverlight where simple wrapper classes are used to expose aspects of the underlying data types in a manner that's easy for the UI layer to deal with. You can read lots more about MVVM on John Gossman's blog or this recent MSDN article by Josh Smith. But I'm not here to teach you what re-templating or MVVM are - I'm here to show you how to use them with Charting to implement the multi-colored column scenario!


[Click here to download the complete Silverlight 2 source code for the sample application shown/discussed below.]


Imagine that you're a teacher and you want to chart the grades of your students. You've already got a basic Student class that exposes some basic properties and you can create instances from a database or a file or something. The Student class probably looks like this:

// Standard data object representing a Student
public class Student : INotifyPropertyChanged
{
    // Student's name
    public string Name { get; private set; }

    // Student's favorite color
    public Brush FavoriteColor { get; private set; }

    // Student's grade
    public double Grade
    {
        get { return _grade; }
        set
        {
            _grade = value;
            Helpers.InvokePropertyChanged(PropertyChanged, this, "Grade");
        }
    }
    private double _grade;

    // Student constructor
    public Student(string name, Brush favoriteColor)
    {
        Name = name;
        FavoriteColor = favoriteColor;
    }

    // INotifyPropertyChanged event
    public event PropertyChangedEventHandler PropertyChanged;
}

The class above exposes a name and a favorite color (which I've implemented here as a Brush for convenience). There's also a grade, but we'll come back to that shortly... The goal is for each column representing a student to be drawn using that student's favorite color. To accomplish this, all we need to do is re-template. Using a designer tool like Blend or something simple like my SilverlightDefaultStyleBrowser, we can copy the default Style for ColumnDataPoint and paste it into our project's resources. By removing stuff that's not relevant to the demonstration and making a single change (highlighted below), we arrive at something like the following:

<Style
    x:Key="ColorByPreferenceColumn"
    TargetType="charting:ColumnDataPoint">
    <Setter Property="Background" Value="DarkGray"/>
    <Setter Property="Template">
        <Setter.Value>
            <ControlTemplate
                TargetType="charting:ColumnDataPoint">
                <Border
                    BorderBrush="{TemplateBinding BorderBrush}"
                    BorderThickness="{TemplateBinding BorderThickness}">
                    <Grid Background="{Binding FavoriteColor}">
                        <Rectangle>
                            <Rectangle.Fill>
                                <LinearGradientBrush>
                                    <GradientStop Color="#77ffffff" Offset="0"/>
                                    <GradientStop Color="#00ffffff" Offset="1"/>
                                </LinearGradientBrush>
                            </Rectangle.Fill>
                        </Rectangle>
                        <Border BorderBrush="#ccffffff" BorderThickness="1">
                            <Border BorderBrush="#77ffffff" BorderThickness="1"/>
                        </Border>
                    </Grid>
                </Border>
            </ControlTemplate>
        </Setter.Value>
    </Setter>
</Style>

This is just a tweak of the default template so that each column pulls its Background Brush from the FavoriteColor property of the underlying data object. Hook that up to a Chart/ColumnSeries in XAML, and that's all there is to it:

Color from Student

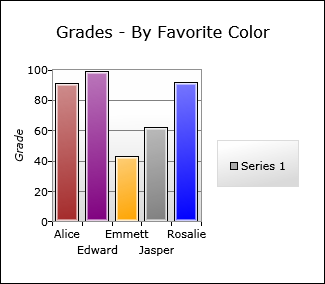
By the way, here's the XAML for that Chart:

<charting:Chart
    x:Name="FavoriteColorColumnChart"
    Title="Grades - By Favorite Color"
    Grid.Column="0">
    <charting:ColumnSeries
        DependentValueBinding="{Binding Grade}"
        IndependentValueBinding="{Binding Name}"
        DataPointStyle="{StaticResource ColorByPreferenceColumn}">
        <charting:ColumnSeries.DependentRangeAxis>
            <charting:LinearAxis
                Minimum="0"
                Maximum="100"
                Title="Grade"
                ShowGridLines="True"/>
        </charting:ColumnSeries.DependentRangeAxis>
    </charting:ColumnSeries>
</charting:Chart>
Aside: This process is even easier on WPF! (Assuming I had access to something like daily builds of Charting for WPF, I might have even mocked this up quickly to prove it to myself...) Unfortunately, the necessary "Binding in a Setter" capability is not supported by Silverlight 2 in XAML or code:
<Style
    x:Key="ColorByPreferenceColumn"
    TargetType="charting:ColumnDataPoint">
    <Setter Property="Background" Value="{Binding FavoriteColor}"/>
</Style>

So that's how easy it is to get custom column and bar colors if your data objects already expose the information you need!

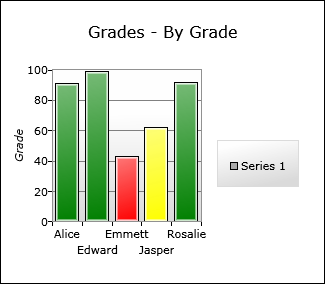
But what if you want to base the custom colors on something that's not directly available on the data objects and you also don't have the freedom to change the data objects themselves? In other words - continuing the example above - let's say we decided to change things so the columns are colored according to each student's current grade: great grades get green columns, satisfactory grades get yellow columns, and unsatisfactory grades get red columns.

The first thing to consider when faced with a problem like this is whether an IValueConverter will work. I've written about the usefulness of IValueConverter before, so I won't spend more time on that here. IValueConverter is great if you want to take a single property and mutate it as part of a Binding. But what if you want to do something more complicated than that? Well, on WPF there's IMultiValueConverter which might do the trick, but that's not available on Silverlight and it's not always the answer anyway. So let's take advantage of MVVM to wrap our existing Student data objects with an object that's more view-friendly: StudentViewModel. Here's a trivial StudentViewModel class that exposes a Student and a Brush that's colored according to the Student's Grade property. Because Student implements INotifyPropertyChanged (like a well behaved class should), StudentViewModel can listen for changes to the Grade property and update its Brush automatically. StudentViewModel also implements INotifyPropertyChanged - so that anything referencing it will be notified about changes to the GradeColor property it exposes. Here's how it looks in code:

// Custom data object to wrap a Student object for the view model
public class StudentViewModel : INotifyPropertyChanged
{
    // Student object
    public Student Student { get; private set; }

    // Color representing Student's Grade
    public Brush GradeColor { get; private set; }

    // StudentViewModel constructor
    public StudentViewModel(Student student)
    {
        Student = student;
        student.PropertyChanged += new PropertyChangedEventHandler(HandleStudentPropertyChanged);
    }

    // Detect changes to the Student's grade and update GradeColor
    void HandleStudentPropertyChanged(object sender, PropertyChangedEventArgs e)
    {
        if ("Grade" == e.PropertyName)
        {
            if (Student.Grade < 50)
            {
                GradeColor = new SolidColorBrush { Color = Colors.Red };
            }
            else if (Student.Grade < 80)
            {
                GradeColor = new SolidColorBrush { Color = Colors.Yellow };
            }
            else
            {
                GradeColor = new SolidColorBrush { Color = Colors.Green };
            }
            Helpers.InvokePropertyChanged(PropertyChanged, this, "GradeColor");
        }
    }

    // INotifyPropertyChanged event
    public event PropertyChangedEventHandler PropertyChanged;
}
Aside: I've typically seen view model classes implemented by re-exposing each of the interesting data object properties - so for each property Foo on the data object, there will be a property Foo' on the view model object (which is either identical to the original property or some derivative of it). While I can see the value of this approach in some cases, the duplication of properties always bothers me and so I've instead exposed the entire Student object from the StudentViewModel object as a property (along with the new GradeColor property). This saves me from duplicating any existing properties, exposes the entire Student object to users of the StudentViewModel object, and is completely future-proof because any updates to the Student implementation will automatically show up for users of StudentViewModel.

Now that we've got a view model class that exposes a view-friendly property that is exactly what we need, our job is easy: change the chart to use StudentViewModels and change the custom template to reference the GradeColor property. Here's the new template (with the same kind of change as before):

<Style
    x:Key="ColorByGradeColumn"
    TargetType="charting:ColumnDataPoint">
    <Setter Property="Background" Value="DarkGray"/>
    <Setter Property="Template">
        <Setter.Value>
            <ControlTemplate
                TargetType="charting:ColumnDataPoint">
                <Border
                    BorderBrush="{TemplateBinding BorderBrush}"
                    BorderThickness="{TemplateBinding BorderThickness}">
                    <Grid Background="{Binding GradeColor}">
                        <Rectangle>
                            <Rectangle.Fill>
                                <LinearGradientBrush>
                                    <GradientStop Color="#77ffffff" Offset="0"/>
                                    <GradientStop Color="#00ffffff" Offset="1"/>
                                </LinearGradientBrush>
                            </Rectangle.Fill>
                        </Rectangle>
                        <Border BorderBrush="#ccffffff" BorderThickness="1">
                            <Border BorderBrush="#77ffffff" BorderThickness="1"/>
                        </Border>
                    </Grid>
                </Border>
            </ControlTemplate>
        </Setter.Value>
    </Setter>
</Style>

The XAML for this chart is nearly identical and the end result looks just how we wanted it to:

Color from Grade

Having shown off how re-templating and MVVM enable more advanced Charting customization scenarios, I've accomplished what I set out to do and could have stopped here... But there was still one customer scenario I wanted to address: synchronizing the colors of pie slices in a pie chart with the colors of columns in a column chart. Given what we've just discussed, the solution is easy: just repeat the re-templating process for a second chart with a PieSeries and PieDataPoints. Because the column/slice colors come from the data objects and because both charts are sharing the same data objects, the color for every data object (student) will naturally be the same across both charts. The re-templated XAML is the same as before and the final result is exactly what we want:

Color from Student as Pie

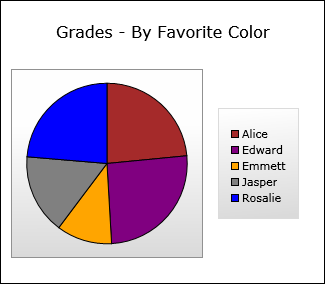
Well, actually, that's not entirely true; Getting the pie slices right was trivial - but there was a bit of additional effort required to synchronize the colors of the pie chart's legend items with the pie slices...

The way things work is that the Series creates whatever LegendItems it needs. As part of that creation, it also creates a "fake" DataPoint that's styled just like the "real" ones displayed in the chart. This fake data point exists so that the LegendItem's default Template can create Bindings for things like the Background and BorderBrush properties. (Recall that users can completely change the look of a DataPoint, so the only way we have to know how something will look is to create it and see.) This approach works out pretty well, but there was an oversight that caused problems for me when I tried to provide my own PieSeries.LegendItemStyle: the DataContext of the fake PieDataPoint wasn't set to the corresponding slice's data object. Normally, that's no big deal because it's unused - however in this case it's a problem because the custom Template we created above gets its color from the data object. Without a bound data object to provide context, the legend items weren't using the right colors. :(

I thought about a few ways to work around this, but eventually decided the fix (the setting of the DataContext property for the fake PieDataPoint) belonged in the Charting code itself. Fortunately, Charting is open source, so it's easy for anybody to make such changes if/when the need arises! I've included a copy of the relevant source file with the one-line change I made (Changes\PieSeries.cs, line 317) and changed the sample project to use a custom build of Charting's Microsoft.Windows.Controls.DataVisualization.dll assembly that includes this change.

And because I'm a nice guy, I also made the same change to the actual charting source code that's under development, got it reviewed, and submitted it (along with an associated unit test) for inclusion in the next official release of the Silverlight Toolkit! After all, if I needed this to work for my sample, chances are good that someone else might need it to work for their application as well. :)

With that fix in place, here is the Style that applies the proper color to the LegendItems:

<Style
    x:Key="ColorByPreferenceLegendItem"
    TargetType="charting:LegendItem">
    <Setter Property="Template">
        <Setter.Value>
            <ControlTemplate TargetType="charting:LegendItem">
                <StackPanel Orientation="Horizontal">
                    <Rectangle
                        Width="8" Height="8"
                        Fill="{Binding DataContext.FavoriteColor}"
                        Stroke="{Binding BorderBrush}"
                        StrokeThickness="1" Margin="0,0,3,0"/>
                    <datavis:Title Content="{TemplateBinding Content}"/>
                </StackPanel>
            </ControlTemplate>
        </Setter.Value>
    </Setter>
</Style>


And there you have it: a few simple ways to take Charting and extend it to do exactly what you want! The examples here are fairly simple, but re-templating and MVVM are very powerful concepts which enable a high degree of customization for Silverlight and WPF applications that's pretty hard to come by in other platforms. If you're trying to do something unique and you're not having any luck the "normal" way, please take a few moments to consider the techniques discussed here - you may find that your problem has an easy solution after all!

The proverbial "one line fix" [ComputeFileHashes works around a troublesome Silverlight-on-Mac issue]

When I achieved cross-platform parity by adding MD5 support to the Silverlight version of ComputeFileHashes, I thought I was done for a while. But then I got an email from a coworker reporting that the Silverlight version of ComputeFileHashes running on a Mac under Safari presented an "Add Files" dialog that did not actually let the user select any files. Ouch, that's no good...

I started investigating with a quick web search; the top hit for "OpenFileDialog Mac" showed that others had experienced similar problems and the Silverlight team confirmed a bug. So at least my application wasn't totally broken. :) I wanted to understand the scenario better, but I don't own a Mac (which is why this problem escaped my notice in the first place). Fortunately, I found one at work that I could borrow some cycles on and I wrote a simple test application to invoke the OpenFileDialog with a few different values for the Filter property. ComputeFileHashes was initially passing the value "All Files (*)|*" - effectively just "*" - which was intended to match all files. And, indeed, it does so in WPF and Silverlight/PC. However, on Silverlight/Mac that value seems to match no files. Someone suggested "*.*", but to me that matches all files with a '.' in their name and I didn't want to exclude files that don't happen to have an extension. So I tried "" instead, and that did exactly what I wanted on Silverlight/Mac and Silverlight/PC. I thought I'd found the solution - until I tried the new value on WPF and it caused an exception...

At this point I was tired of cross-platform trial-and-error, and I decided I was inviting trouble by passing any filter string at all! The default behavior of OpenFileDialog is to allow the selection of all files, so I wasn't really adding much value by passing a custom filter that did the same thing. Well, I was providing more explicit filter text in the drop-down of the dialog, but it wasn't worth the compatibility problems I was dealing with. So I removed the line of code that set the Filter property, recompiled, republished, and called it done. :)

The latest version of ComputeFileHashes is now 2009-01-30. I've updated all the binaries in order to avoid version number confusion, but the only real change here is the filter string and the improvement is only visible on Silverlight/Mac. (Note: I did not update the screenshots below, so the versions shown there are out of date.)

  • If you're using Silverlight to run ComputeFileHashes, you'll automatically get the new version next time you run ComputeFileHashes.
  • If you're using ClickOnce to run ComputeFileHashes, the application will automatically update itself after you run it a couple of times.
  • If you're using the WPF or command-line versions, you'll need to download the new binaries and update manually.

Please refer to the original release announcement for more information about supported platforms, source code, implementation, etc..


ClickOnce ComputeFileHashes

Click here or on the image below to run the Silverlight version of ComputeFileHashes in your browser.

Silverlight ComputeFileHashes

Click here or on the image below to download the command-line and WPF versions of ComputeFileHashes - along with the ClickOnce and Silverlight versions AND the complete source code for everything!

Command-line ComputeFileHashes


Seamless cross-platform support is a tricky matter that's usually best left to others who have the time and resources to do it right. I didn't realize I was introducing a platform dependency by specifying a filter string, but I was... and I got burned by it. That's why it's important to test an application on all the supported configurations: you never know what problem might show up where you least expect it! That said, I'm probably not going to run out and buy myself a Mac just because of this incident - so please accept my apologies in advance should I fall victim to a similar problem in the future. :)