Dynamic content made easy [How to: Use the new dynamic population support for Toolkit controls]
One of the more frequent requests we've gotten for the "Atlas" Control Toolkit is some way to easily alter the content of a popup before displaying it to the user. Typically, page authors want to have a single popup element on their page that is used from multiple locations (often the rows of a data-bound server control) and they want the popup to display information specific to each location that displays it. For example, a page displaying multiple products might want a popup associated with each product to display additional details for that particular product.
There was previously no easy way to accomplish this task, but with the 60914 release of the Toolkit, we've made it simple! The HoverMenu, ModalPopup, and PopupControl now all derive from new DynamicPopulate*Base classes (see the "Other neat stuff" page for details) and automatically expose four new properties: DynamicControlID, DynamicContextKey, DynamicServicePath, and DynamicServiceMethod. These properties behave just like they do for the DynamicPopulate control (please follow that link for more details) and the existing controls have been modified to call the "populate" function as part of their popup actions.
What this means for page authors is that it's simple to add dynamic population to new/existing pages - what it means for control authors is that it's simple to add dynamic population to new/existing controls!
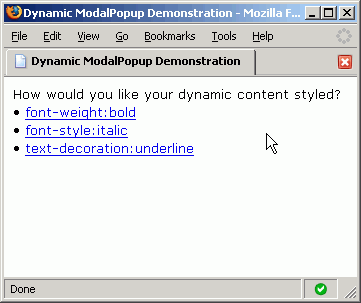
Here's what dynamic population looks like in action (I've arbitrarily chosen ModalPopup for the demonstration):
The complete code for the sample follows; noteworthy sections have been bolded to make them stand out. The important things to note are:
- The page content is generated by data binding an XmlDataSource to a DataList. The data are simple CSS style declarations that are used to decorate the dynamic content when it renders. The user can select which decoration to apply by choosing any of the links on the page.
- Each row of the DataList includes a ModalPopupExtender declaration that pops a modal panel when the CSS style declaration is clicked. All ModalPopupsExtenders share the same popup element in order to avoid unnecessary duplication. The text of the row and the DynamicContextKey of the ModalPopupProperties are both set by a (data bound) call to Eval.
- The popup (Panel1) contains both static content and dynamic content (Panel2). The static content includes the "OK" button that dismisses the popup. The dynamic content consists of the current server time which is styled according to the selected row's CSS style declaration and displayed in a random color.
- The dynamic content is generated by a page method which uses its context key parameter to identify the specific row that is being dynamically populated. (Here, the context key is the CSS style declaration, but typically it might be a database index or row number.)
That's all there is to it!
Just save the following code to an .ASPX file in the SampleWebSite directory of a Toolkit installation if you want to try it out for yourself:
<%@ Register Assembly="AtlasControlToolkit" Namespace="AtlasControlToolkit"
TagPrefix="atlasToolkit" %>
<!DOCTYPE html PUBLIC "-//W3C//DTD XHTML 1.0 Transitional//EN"
"http://www.w3.org/TR/xhtml1/DTD/xhtml1-transitional.dtd">
<script runat="server">
[System.Web.Services.WebMethod]
public string GetContent(string contextKey)
{
// Create a random color
string color = (new Random()).Next(0xffffff).ToString("x6");
// Use the style specified by the page author
string style = contextKey;
// Display the current time
string time = DateTime.Now.ToLongTimeString();
// Compose the content to return
return "<span style='color:#" + color + "; " + style + "'>" + time + "</span> ";
}</script>
<html xmlns="http://www.w3.org/1999/xhtml">
<head runat="server">
<title>Dynamic ModalPopup Demonstration</title>
<%-- Style the page so it looks pretty --%>
<style type="text/css">
body { font-family:Verdana; font-size:10pt; }
.background { background-color:Gray; }
.popup { width:200px; padding:10px; background-color:White;
border-style:solid; border-color:Black; border-width:2px;
vertical-align: middle; text-align:center; }
</style>
</head>
<body>
<form id="form1" runat="server">
<%-- Atlas pages need a ScriptManager --%>
<atlas:ScriptManager ID="ScriptManager1" runat="server" />
<%-- A very simple data source to drive the demonstration --%>
<asp:XmlDataSource ID="XmlDataSource1" runat="server">
<Data>
<items>
<item style="font-weight:bold" />
<item style="font-style:italic" />
<item style="text-decoration:underline" />
</items>
</Data>
</asp:XmlDataSource>
<%-- A simple list of all the data items available --%>
<asp:DataList ID="DataList1" runat="server" DataSourceID="XmlDataSource1">
<HeaderTemplate>
How would you like your dynamic content styled?
</HeaderTemplate>
<ItemTemplate>
• <asp:LinkButton ID="LinkButton" runat="server" Text='<%# Eval("style") %>' />
<%-- The ModalPopupExtender, popping up Panel1 and dynamically populating Panel2 --%>
<atlasToolkit:ModalPopupExtender ID="ModalPopupExtender" runat="server">
<atlasToolkit:ModalPopupProperties
TargetControlID="LinkButton" PopupControlID="Panel1" OkControlID="Button1"
BackgroundCssClass="background" DynamicControlID="Panel2"
DynamicContextKey='<%# Eval("style") %>' DynamicServiceMethod="GetContent" />
</atlasToolkit:ModalPopupExtender>
</ItemTemplate>
</asp:DataList>
<%-- All ModalPopups share the same popup --%>
<asp:Panel ID="Panel1" runat="server" CssClass="popup" style="display:none;">
<p>This popup popped at <asp:Label ID="Panel2" runat="server" /> and all was well.</p>
<p><asp:Button ID="Button1" runat="server" Text="OK" /></p>
</asp:Panel>
</form>
</body>
</html>
If you found this "How to" helpful or if you have any suggestions for ways in which future "How to"'s could be improved, please let me know. Thank you!!