Developer test case, customer win! [Using ContextMenu to implement SplitButton and MenuButton for Silverlight (or WPF)]
A great way to test a new control is to make use of it in a real-world scenario. So one of the things I did just before we published the April '10 release of the Silverlight Toolkit (click here for my full write-up) was to take the ContextMenu code I'd written out for a little test drive. One of my "stretch goals" for ContextMenu had been to use it to implement a "split button" ever since teammate Ted Glaza brought up the idea during an API review. To make a short story even shorter: it worked!
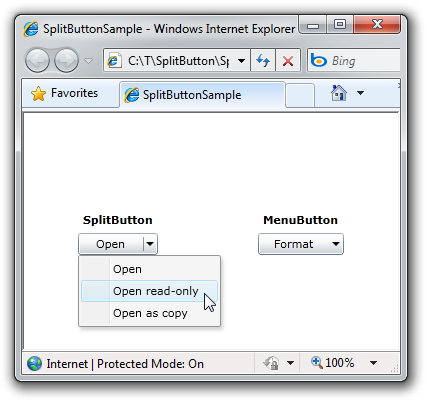
<splitButton:SplitButton Content="Open" Click="Open_Click">
    <splitButton:SplitButton.ButtonMenuItemsSource>
        <toolkit:MenuItem Header="Open" Click="Open_Click"/>
        <toolkit:MenuItem Header="Open read-only" Click="OpenReadOnly_Click"/>
        <toolkit:MenuItem Header="Open as copy" Click="OpenCopy_Click"/>
    </splitButton:SplitButton.ButtonMenuItemsSource>
</splitButton:SplitButton>
To get us all on the same page, here's a discussion of split button and menu button in the Windows User Experience Interaction Guidelines. These controls are normal-looking buttons that show a popup menu of other items in certain cases. Because I wanted SplitButton to be a Button, I derived and added a single collection-typed property called ButtonMenuItemsSource which follows the same ItemsControl pattern everyone is already familiar with (and that ContextMenu uses for its items). That done, all that's necessary is to wire up a bit of additional code to support popping the menu when the little arrow (which I call the "split element") is clicked. The default Style/Template of SplitButton is a direct copy of the default for Button - the only change is that the original ContentPresenter has been replaced with a Grid that positions the split element and divider graphics just to the right of the replacement ContentPresenter. To enable complete customization of SplitButton, the ContextMenu is part of the default Template.
Here's how things look after the replacement:
<Grid>
    <Grid.ColumnDefinitions>
        <ColumnDefinition/>
        <ColumnDefinition Width="Auto"/>
        <ColumnDefinition Width="Auto"/>
    </Grid.ColumnDefinitions>
    <ContentPresenter x:Name="contentPresenter" Content="{TemplateBinding Content}" ContentTemplate="{TemplateBinding ContentTemplate}" VerticalAlignment="{TemplateBinding VerticalContentAlignment}" HorizontalAlignment="{TemplateBinding HorizontalContentAlignment}" Margin="{TemplateBinding Padding}"/>
    <Rectangle Grid.Column="1" Width="1" Fill="{TemplateBinding Foreground}" Opacity="0.4" Margin="0 4 0 4"/>
    <Grid x:Name="SplitElement" Grid.Column="2" Background="Transparent">
        <toolkit:ContextMenuService.ContextMenu>
            <toolkit:ContextMenu ItemsSource="{Binding ButtonMenuItemsSource, RelativeSource={RelativeSource TemplatedParent}}" Foreground="{TemplateBinding Foreground}" FlowDirection="{TemplateBinding FlowDirection}"/>
        </toolkit:ContextMenuService.ContextMenu>
        <Path Data="M 0,0 L 8,0 L 4,4 Z" Fill="{TemplateBinding Foreground}" Margin="2 0 4 0" VerticalAlignment="Center"/>
    </Grid>
</Grid>
What's great is that simply tweaking this template to make the split element be the background of the entire button gets most of the way to MenuButton! After that, all it takes is a subclass and two lines of code!
That's really all there is to it! To be clear, I didn't set out to build the world's best SplitButton ever - my primary goal was to get some good ContextMenu testing done. (Speaking of which, I found (and fixed) a bug in the process, so it was definitely worthwhile!) Just now, I spent a bit more time cleaning up my SplitButton implementation and adding some polish like XML comments, keyboard support, RTL support, etc., and at this point I think SplitButton and MenuButton could be used in many applications as-is. If you do that, I'd love to hear about it!
Note: The sample project is for Silverlight 4, but everything I do here can be applied to WPF as well. That said, if I were going to port this code to WPF, one of the things I'd look into doing differently (in addition to updating the Style/Template!) is the positioning logic. WPF's ContextMenu supports additional positioning logic via the Placement/PlacementTarget properties that could be used to simplify this implementation even further!