There are lots of ways to ask for a date [Creating custom DatePicker/TimePicker experiences is easy with the Windows Phone Toolkit]
In my previous post announcing the release of the Windows Phone Toolkit, I explained the motivation for the PhoneApplicationPage-based design of the DatePicker and TimePicker controls. Though justified, the current implementation is fairly unusual and has the potential to trip people up if they're not ready for it. So I highly recommend reading the details at the end of that post if you're using DatePicker or TimePicker.
[Waits patiently...]
Okay, if you read the notes, then you understand what we've done and why. And while I'm happy to discuss the pros and cons of the current implementation, that's what we've got for now and I'm going to spend a little time highlighting its extensibility!
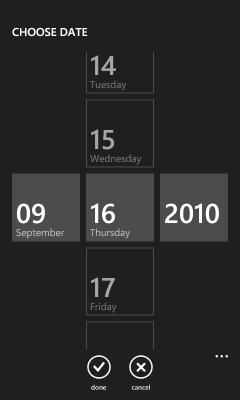
As with the rest of the Phone Toolkit, our primary goal was to make it easy for developers to match the core Windows Phone 7 experience in their own applications. Toward that end, adding an instance of DatePicker or TimePicker to a page gives the same "small button expands to full-page date/time picker with infinite scrolly thingies" experience that's found in the core Settings, Calendar, and Alarms applications. But sometimes you want to do things a little differently, and maybe you've got a date/time picking interface in mind that's more relevant to your scenario...
Aside: If what you want to do is change the format used to display the date/time on the face of the initial "button", then all you need to do is set the
ValueStringFormatproperty to the standard date and time format string or custom date and time format string of your choice!But because format strings include "{" and "}", they're a little tricky to code in XAML; you need to escape the special characters. here's an example of what this looks like in its simplest form: ValueStringFormat="{}{0:d}"
And here are a few practical examples (using the culture settings for USA):
Description XAML Sample Short date format ( DatePickerdefault)"{}{0:d}" 9/20/2010 Short time format ( TimePickerdefault)"{}{0:t}" 4:00 PM Long date format "{}{0:D}" Monday, September 20, 2010 Long time format "{}{0:T}" 4:00:00 PM Explicit month/day/year format "{}{0:MM-dd-yyyy}" 09-20-2010 Explicit 24-hour time format with text "{}The 24-hour time is {0:HH:mm}." The 24-hour time is 16:00.
Customizing the full-screen picker page is as simple as setting the DatePicker.PickerPageUri or TimePicker.PickerPageUri property to point to a PhoneApplicationPage that implements the IDateTimePickerPage interface. The PickerPageUri property uses the standard assembly-relative syntax ("/assemblyShortName;component/resourceLocation"), so it should be familiar to most folks. The IDateTimePickerPage interface is a new interface, but I think you'll agree it's pretty basic:
namespace Microsoft.Phone.Controls.Primitives
{
    /// <summary>
    /// Represents an interface for DatePicker/TimePicker to use for communicating with a picker page.
    /// </summary>
    public interface IDateTimePickerPage
    {
        /// <summary>
        /// Gets or sets the DateTime to show in the picker page and to set when the user makes a selection.
        /// </summary>
        DateTime? Value { get; set; }
    }
}
When it's time to display the picker page, DatePicker and TimePicker navigate to the page specified by PickerPageUri via the NavigationService.Navigate("...") method, wait for the page to load, get a reference to its IDateTimePickerPage interface, and set its Value property to the starting DateTime. After that, the custom picker page is in complete control and can display any UI it wants. When the custom picker is done (either because the user picked a date/time or because the user cancelled the operation), the picker should set its Value property to the selected date/time (or null if cancelled) and then call NavigationService.GoBack to return to the previous page. DatePicker and TimePicker automatically detect this, update their own Value property (which automatically updates their UI), and fire their ValueChanged event.
In some ways, it's actually kind of elegant! PhoneApplicationPage makes it really easy to work with at design-time in Visual Studio and Blend.
To help illustrate the process, I created a sample application that uses custom pickers for DatePicker and TimePicker which let the user pick times relative to the current time:
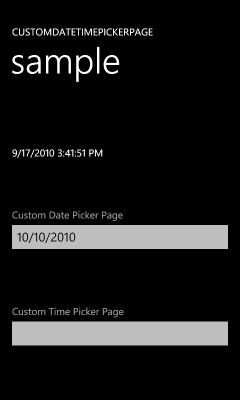


The sample application shows the current date and time because what the emulator reports isn't always the same as what the host operating system reports! In my experience, it's often an hour or more off - so please keep in mind that the times used by the sample are relative to emulator time!
Here's the XAML for the main page that hosts the DatePicker and TimePicker controls:
<toolkit:DatePicker
    Value="10/10/2010"
    Header="Custom Date Picker Page"
    PickerPageUri="/CustomDateTimePickerPage;component/CustomDatePickerPage.xaml"/>

<toolkit:TimePicker
    Value="{x:Null}"
    Header="Custom Time Picker Page"
    PickerPageUri="/CustomDateTimePickerPage;component/CustomTimePickerPage.xaml"/>
Aside: Just for fun, I've explicitly set theValueproperties here. Although the controls' default behavior of using the current date/time is likely to be what you want most of the time, applications are free to override the initial date/time (asDatePickerdoes above) or to provide a blank starting value (asTimePickerdoes with the x:Null markup extension).
The implementation of the custom PhoneApplicationPage implementation is so basic, I'm going to show the complete date picker here! (The custom time picker implementation is nearly identical.) I've highlighted the particularly interesting bits, but by now they should be familiar.
First the XAML, then the code:
<phone:PhoneApplicationPage
    x:Class="CustomDateTimePickerPage.CustomDatePickerPage"
    xmlns="http://schemas.microsoft.com/winfx/2006/xaml/presentation"
    xmlns:x="http://schemas.microsoft.com/winfx/2006/xaml"
    xmlns:phone="clr-namespace:Microsoft.Phone.Controls;assembly=Microsoft.Phone"
    xmlns:d="http://schemas.microsoft.com/expression/blend/2008"
    xmlns:mc="http://schemas.openxmlformats.org/markup-compatibility/2006"
    FontFamily="{StaticResource PhoneFontFamilyNormal}"
    FontSize="{StaticResource PhoneFontSizeNormal}"
    Foreground="{StaticResource PhoneForegroundBrush}"
    SupportedOrientations="PortraitOrLandscape" Orientation="Portrait"
    mc:Ignorable="d" d:DesignHeight="800" d:DesignWidth="480">

    <Grid>
        <Grid.RowDefinitions>
            <RowDefinition Height="Auto"/>
            <RowDefinition Height="*"/>
        </Grid.RowDefinitions>

        <TextBlock
            Text="CHOOSE CUSTOM DATE"
            Margin="12"
            FontWeight="Bold"/>

        <StackPanel
            Grid.Row="1"
            VerticalAlignment="Center">
            <Button Content="Tomorrow" Click="TomorrowButtonClick"/>
            <Button Content="Next Week" Click="NextWeekButtonClick"/>
            <Button Content="Next Month" Click="NextMonthButtonClick"/>
            <Button Content="[Cancel]" Click="CancelButtonClick"/>
        </StackPanel>
    </Grid>

</phone:PhoneApplicationPage>
public partial class CustomDatePickerPage : PhoneApplicationPage, IDateTimePickerPage
{
    /// <summary>
    /// Gets or sets the DateTime value for the IDateTimePickerPage interface.
    /// </summary>
    public DateTime? Value { get; set; }

    public CustomDatePickerPage()
    {
        InitializeComponent();
    }

    private void TomorrowButtonClick(object sender, RoutedEventArgs e)
    {
        ChooseDate(DateTime.Now.AddDays(1));
    }

    private void NextWeekButtonClick(object sender, RoutedEventArgs e)
    {
        ChooseDate(DateTime.Now.AddDays(7));
    }

    private void NextMonthButtonClick(object sender, RoutedEventArgs e)
    {
        ChooseDate(DateTime.Now.AddMonths(1));
    }

    private void ChooseDate(DateTime date)
    {
        // Commit date and close picker
        Value = date;
        NavigationService.GoBack();
    }

    private void CancelButtonClick(object sender, RoutedEventArgs e)
    {
        // Cancel selection and close picker
        Value = null;
        NavigationService.GoBack();
    }
}
As you can see, creating a custom picker page for DatePicker and TimePicker is really easy! As long as you play by a few basic rules, you have complete freedom to style the entire picker experience in a self-contained, interactive, designer-friendly way. It's kind of like re-Templating - but easier and more flexible - in a weird kind of way!
Now get to it - I'm looking forward to seeing the kinds of custom picker experiences you all come up with!